Create a Lark Sheets data source
Connect to Lark Sheets as a data source to seamlessly import your business data into Quick BI. This eliminates the tedious process of manual exports and uploads, enabling more efficient visual analysis and business intelligence.
Prerequisites
You have created a Lark app and obtained the required authorization information. For more information, see Obtain application authorization information.
You have obtained the shareable link for the Lark Sheets that you want to connect to Quick BI. For more information, see Obtain the spreadsheet link.
Limitations
Only Quick BI Professional Edition supports creating Lark Sheets data sources.
Lark Sheets data sources have the following functional limitations:
For a dataset created from a Lark Sheets data source:
Custom SQL, data extraction acceleration, relational modeling, and placeholders are not supported.
You cannot create trend analysis tables or multi-dimensional analysis tables based on this dataset.
Monitoring, alerting, and self-service data retrieval are not supported.
Due to limitations from Lark, starting October 31, 2024, the basic free edition of Lark will have a cumulative API call limit of 10,000 calls per month. If this limit is insufficient, upgrade to a different Lark edition for a higher call quota. For more information, see the Lark documentation on Adjustments to Custom App API Call Limits.
Procedure
To connect Lark Sheets to Quick BI, follow these three main steps: obtaining Lark app authorization information, obtaining the Lark Sheets shareable link, and creating the Quick BI data source.
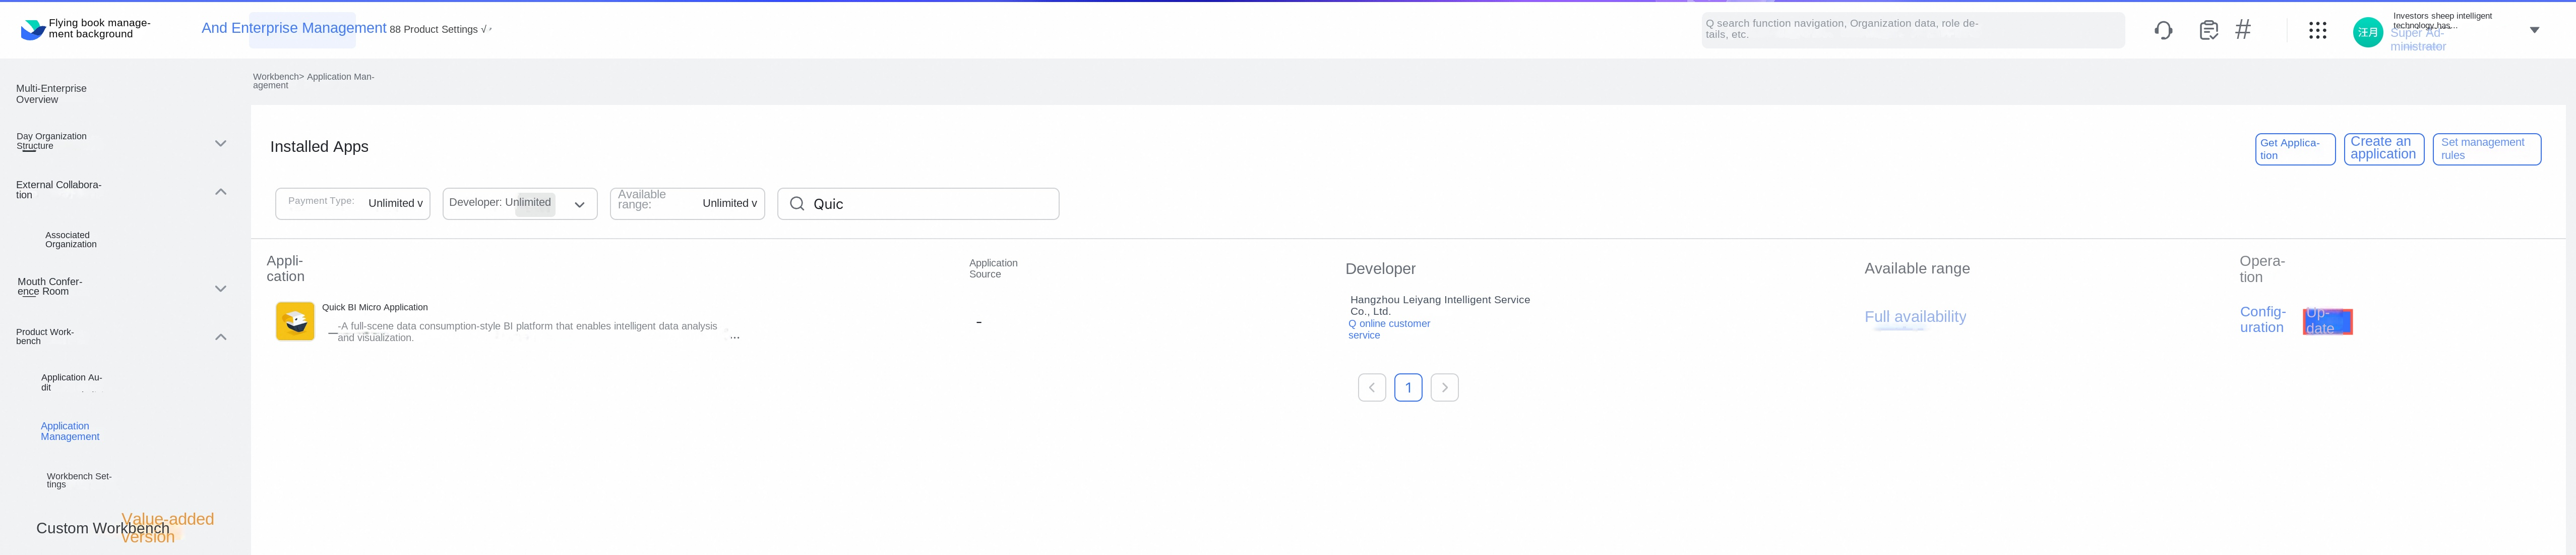
If your organization has already configured Lark API authorization under Organization Management > Office Software Integration, the system automatically reads the application information when you create a Lark Sheets data source. Ensure that the app installed in your Lark organization is the latest version. You can skip to Step 2: Obtain the spreadsheet link.
If your organization has not configured Lark API authorization under Organization Management > Office Software Integration, you can either contact your organization administrator to configure it or add a custom app to connect your Lark Sheets data. To do this, start with Step 1: Obtain application authorization information.
Step 1: Obtain app authorization
Create a custom enterprise app in the Lark Open Platform and obtain its authorization information to authenticate the data source in Quick BI.
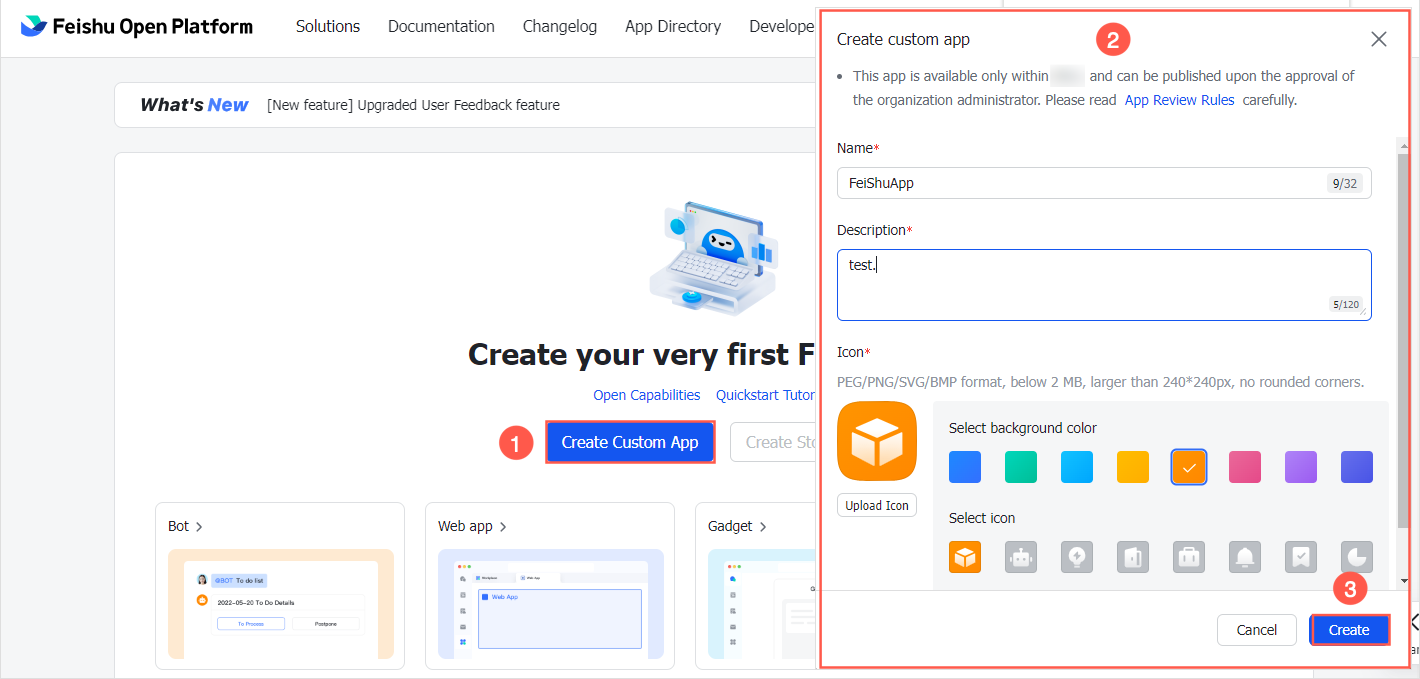
Log on to the Lark Open Platform and click Create Custom App. In the dialog box that appears, enter the application information and click Create.
Quick BI reads data from Lark Sheets by using APIs. Therefore, you must request API permissions for your app. In the app's developer console, choose Permission Management from the left-side navigation pane. On the API Permissions tab, configure the required permissions for the app.
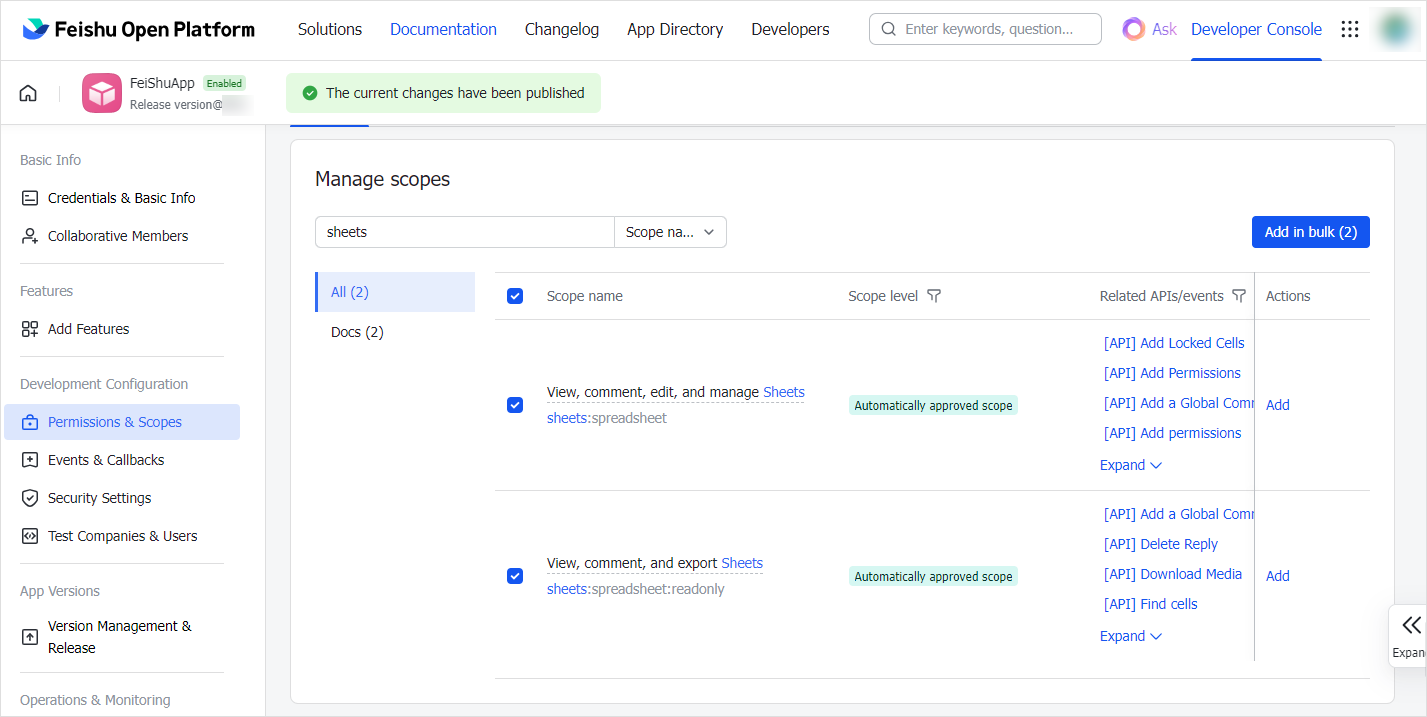
Select the following API permissions and click Enable in Batches.
View, comment on, edit, and manage all files in Lark Drive
View, comment on, edit, and manage spreadsheets
View, comment on, and export spreadsheets
Obtain application information
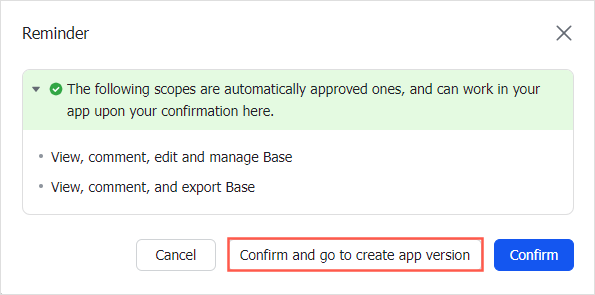
In the confirmation dialog box, click Confirm and Go to Create App Version.
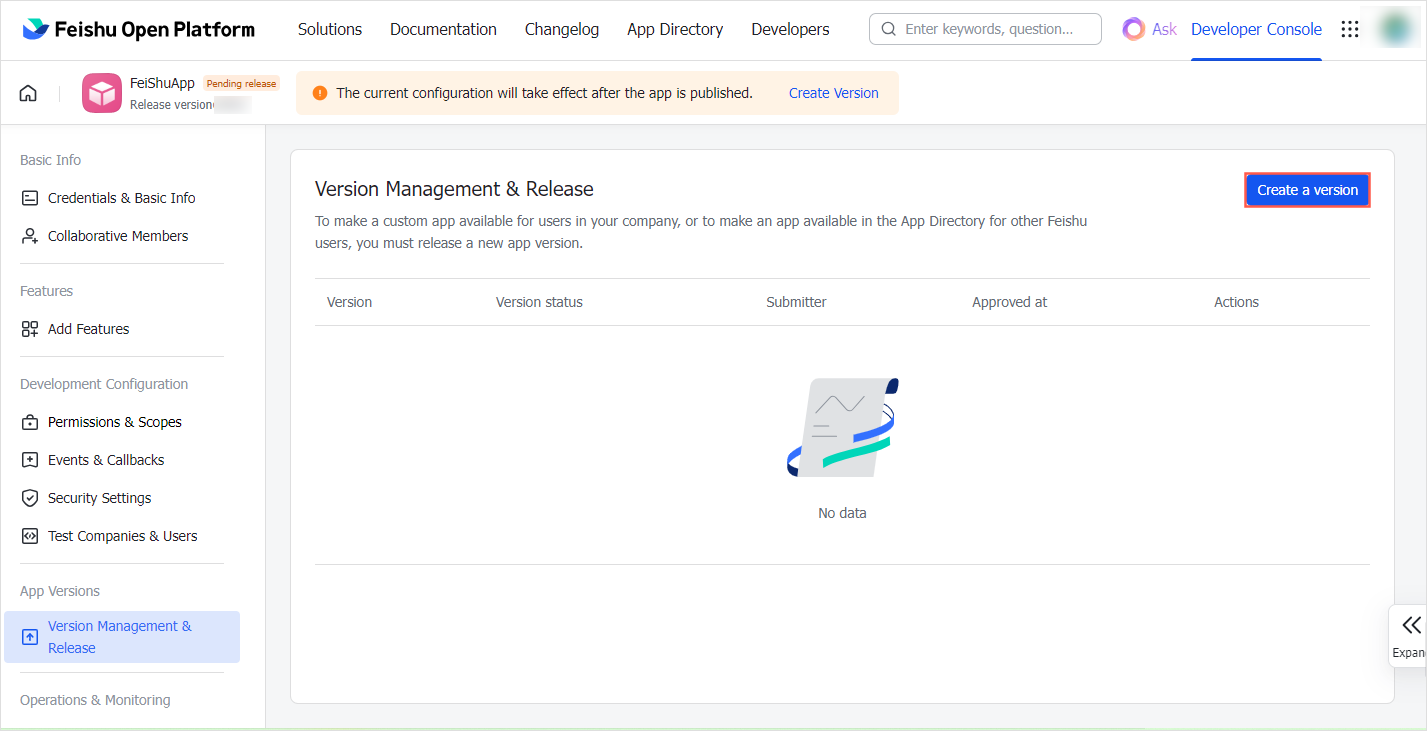
On the Version Management & Publishing page, click Create Version.
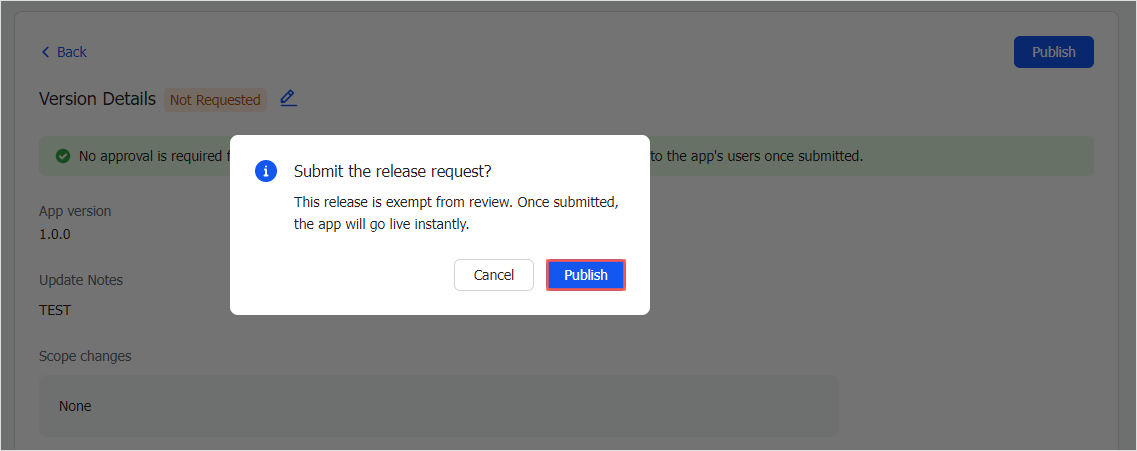
Enter the version details. Then, click Save > Apply for Online Release to publish the application.
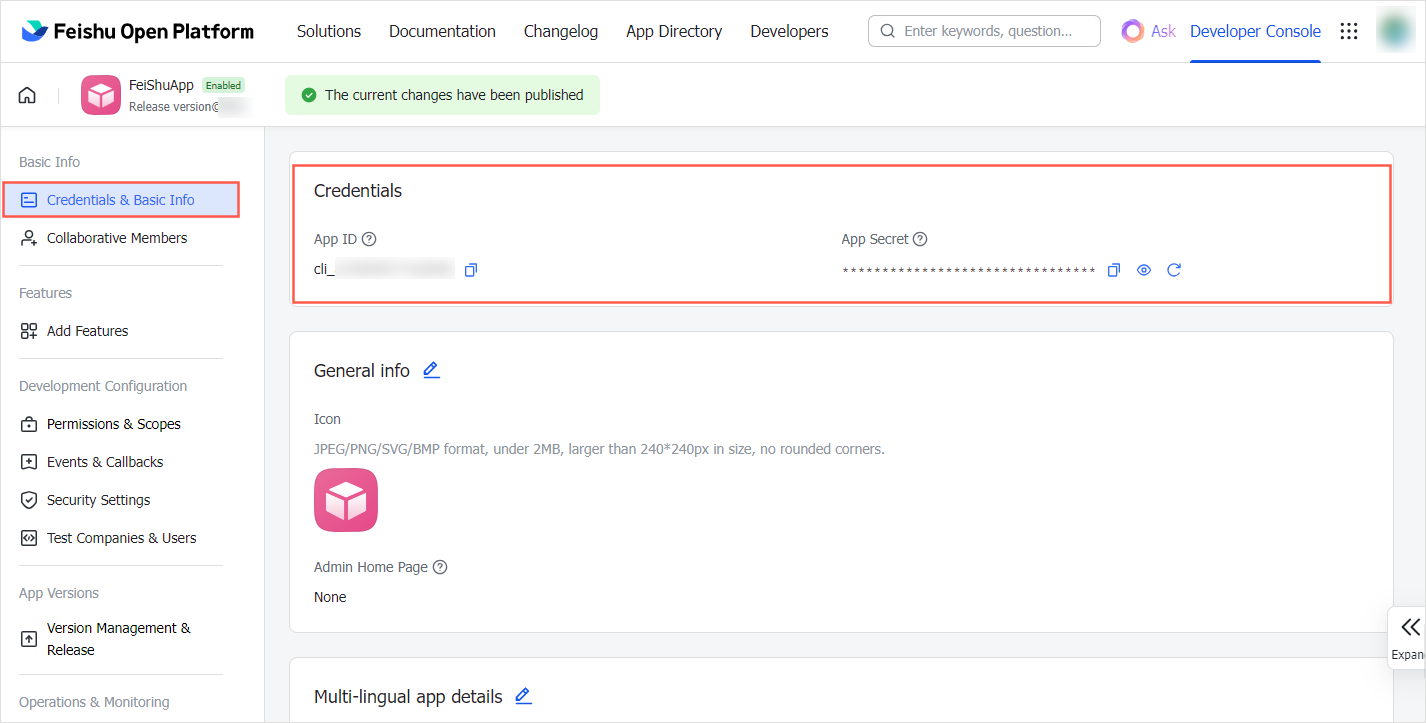
In the app's Developer Console, go to the Credentials & Basic Information page. Copy and save the App ID and App Secret.

Step 2: Obtain the spreadsheet link
Log on to Lark Docs, find the spreadsheet you want to connect to Quick BI, and then copy and save its shareable link.
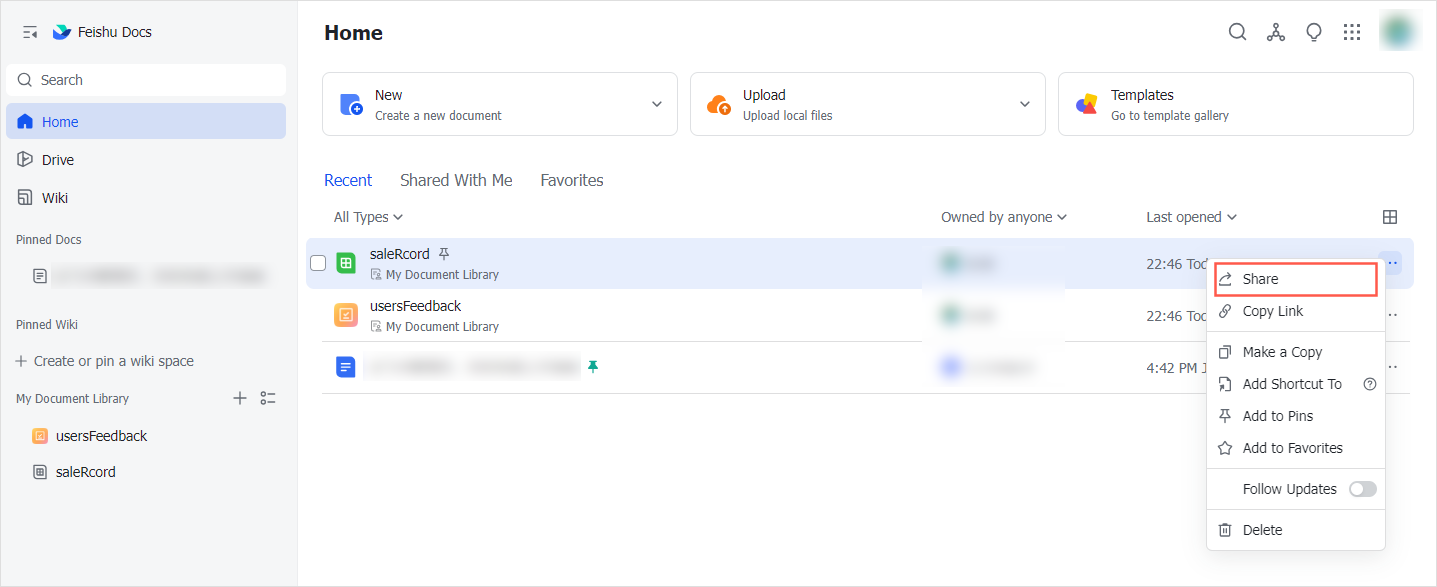
In your list of documents in Lark Docs, find the target spreadsheet and click Share in its action menu.
NoteBefore you connect your Lark Sheets to Quick BI, ensure it meets the following requirements:
Only standard Lark Sheets are supported.
A single sheet cannot exceed 100 columns or 10,000 rows.
The data in Lark Sheets must be structured. Avoid mixing different data types within a single column.
Ensure that the sheet does not contain the following: an empty first column, empty columns between data columns, duplicate column names, or merged cells. These can cause data parsing and synchronization errors.
Formulas are not supported. Only the calculated values are imported.
The file must contain five or fewer sheets.
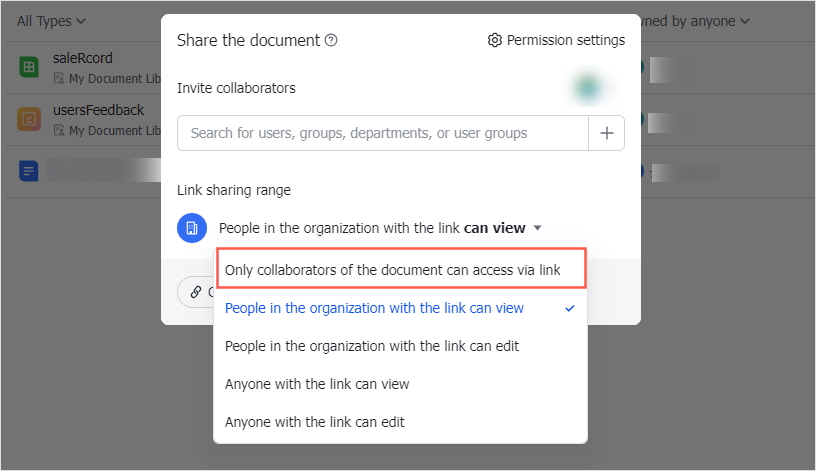
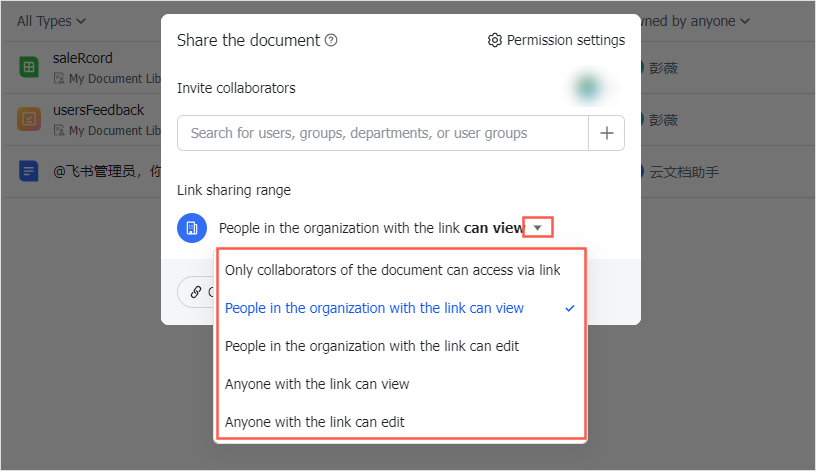
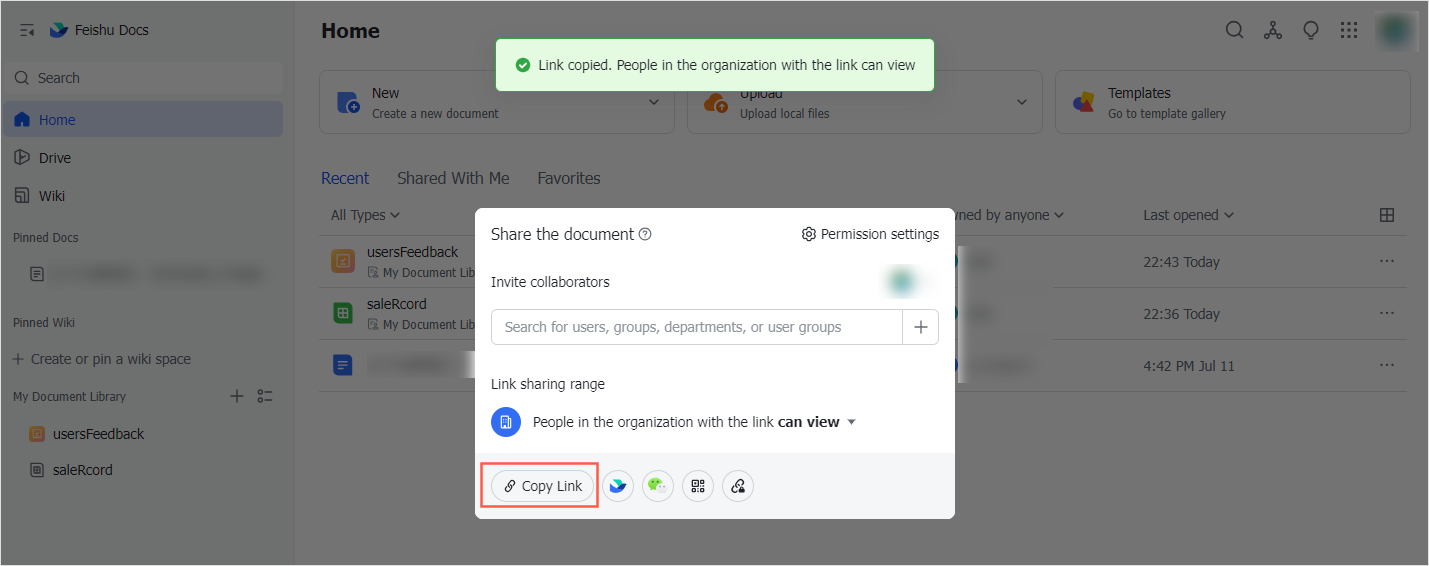
In the Share Document dialog box, configure the link's sharing scope.
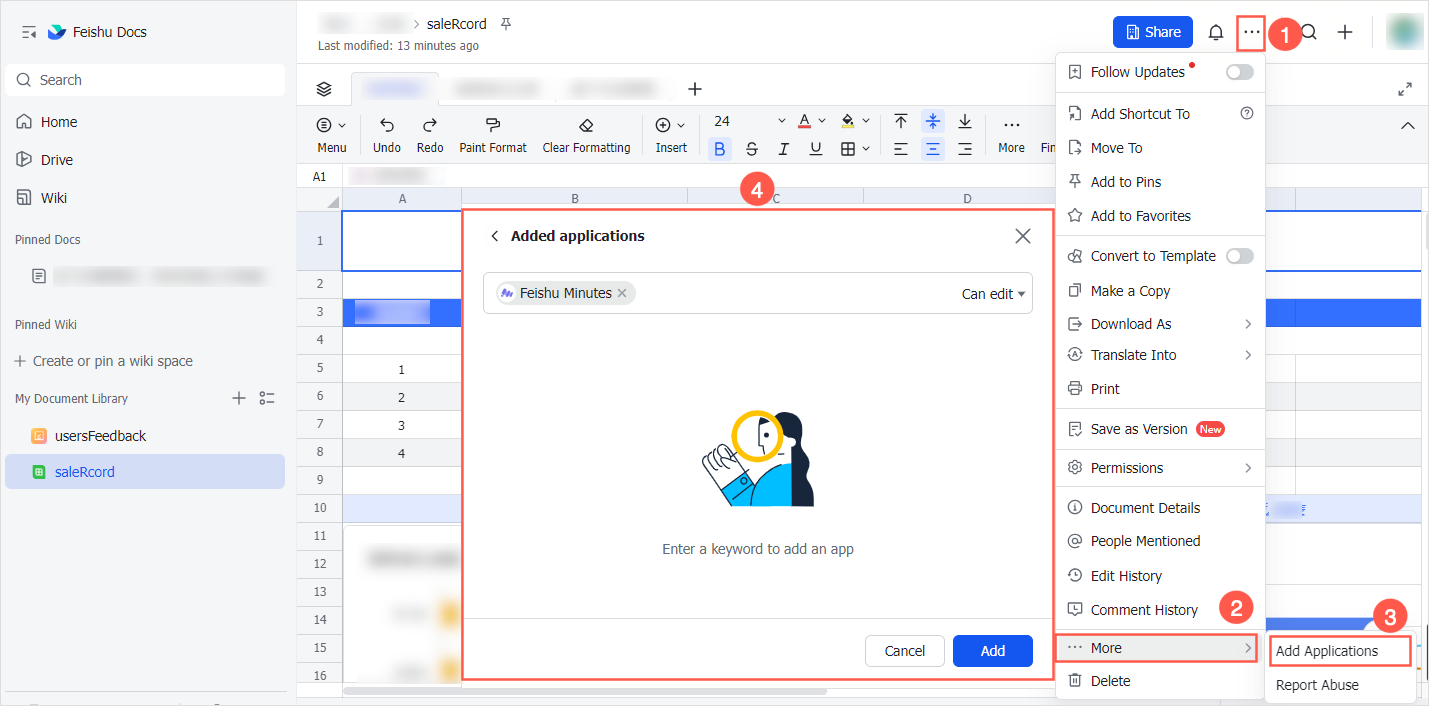
NoteIf the link's sharing scope is set to Only document collaborators can access via link, you must add your custom app to the spreadsheet's list of Document Applications.
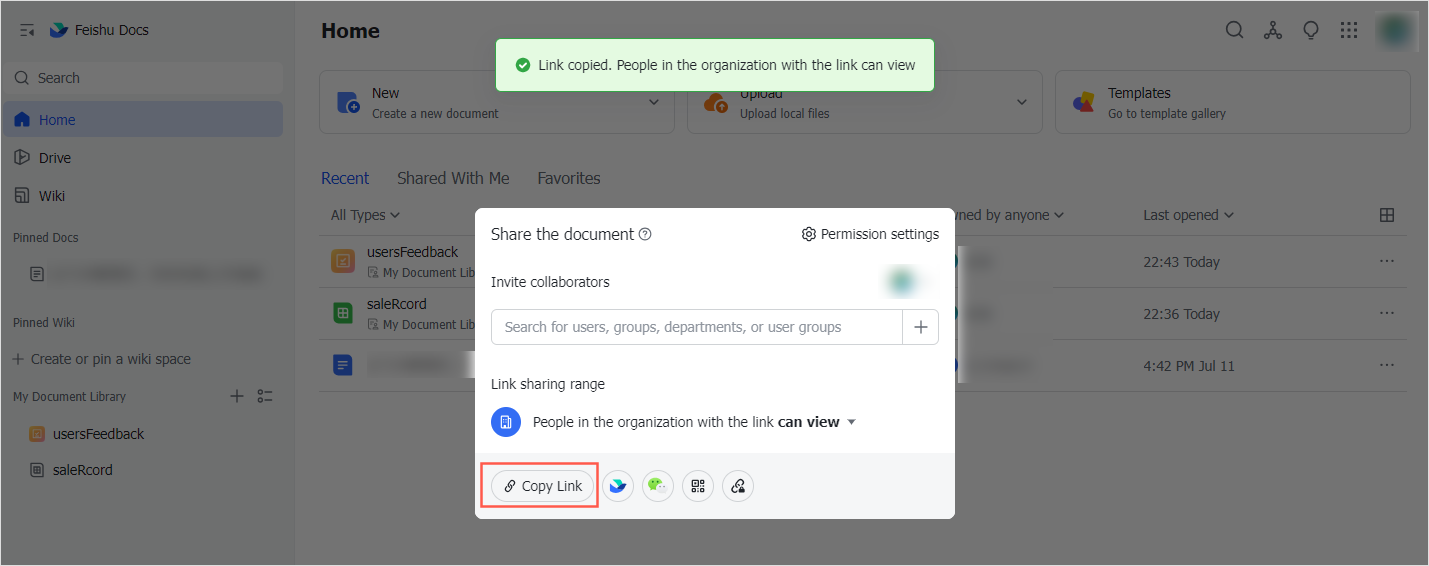
Click Copy Link to copy and save the shareable link for the spreadsheet.
Step 3: Create the data source
After you obtain the Lark authorization information and the spreadsheet shareable link, add them to Quick BI to create the Lark Sheets data source.
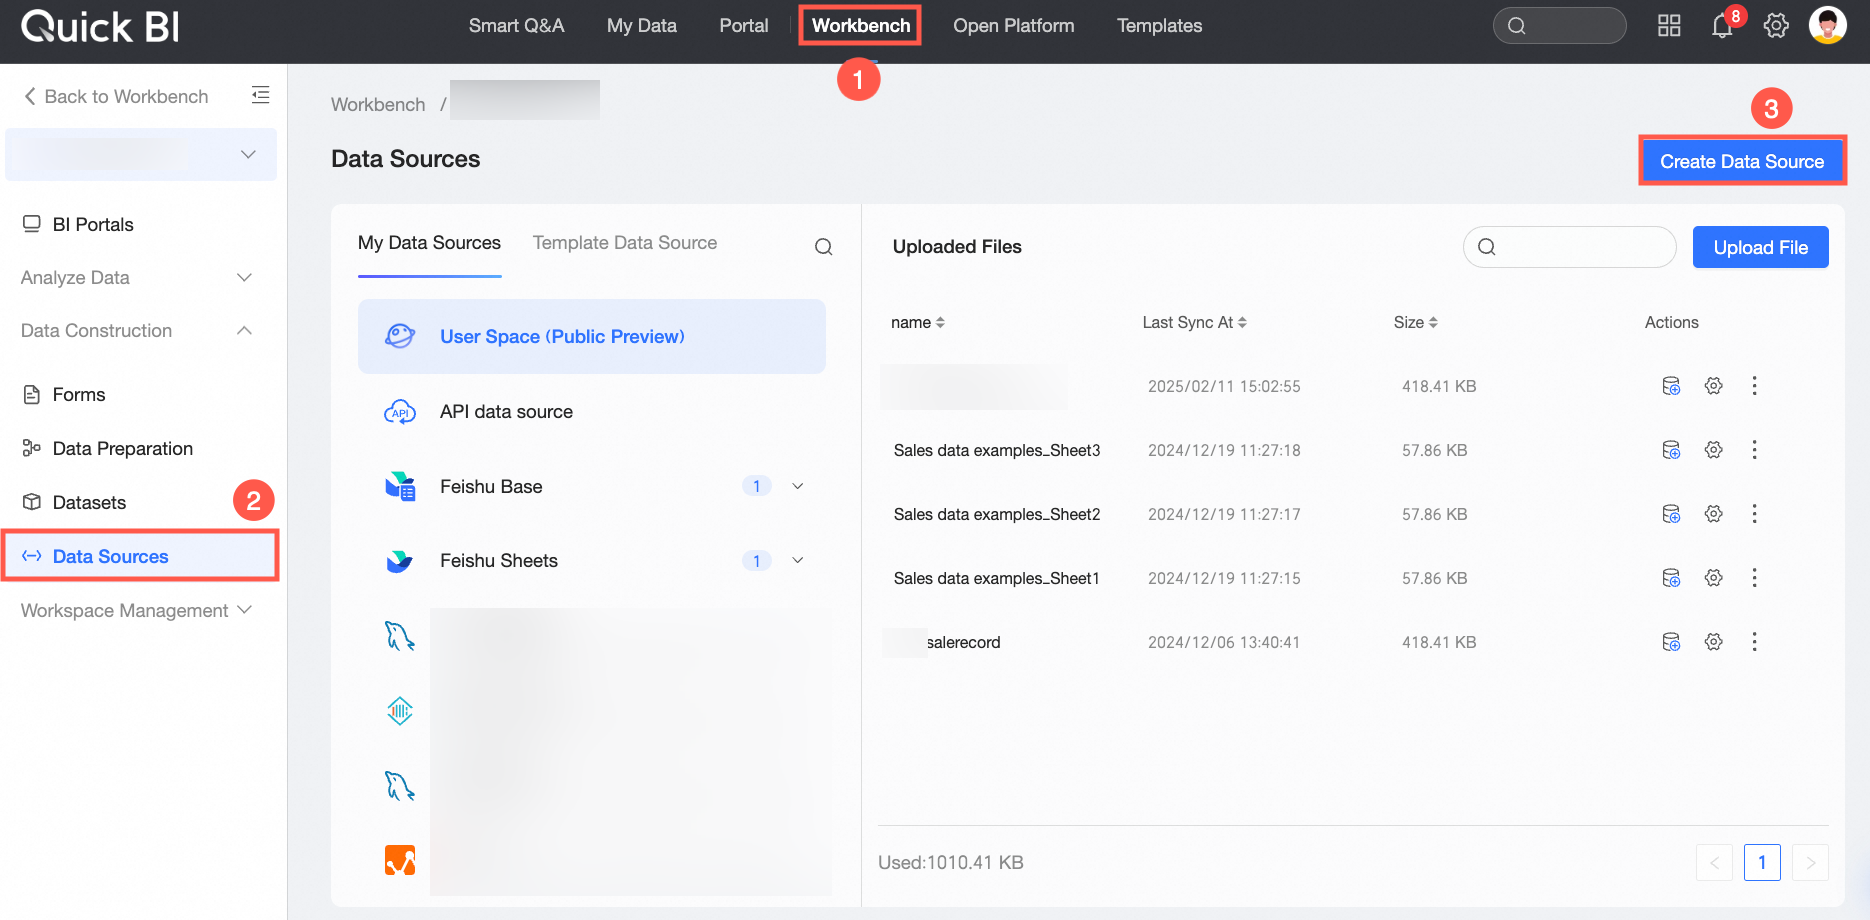
Log on to the Quick BI Workbench and go to Data Sources. In the upper-right corner of the Data Sources page, click New Data Source.
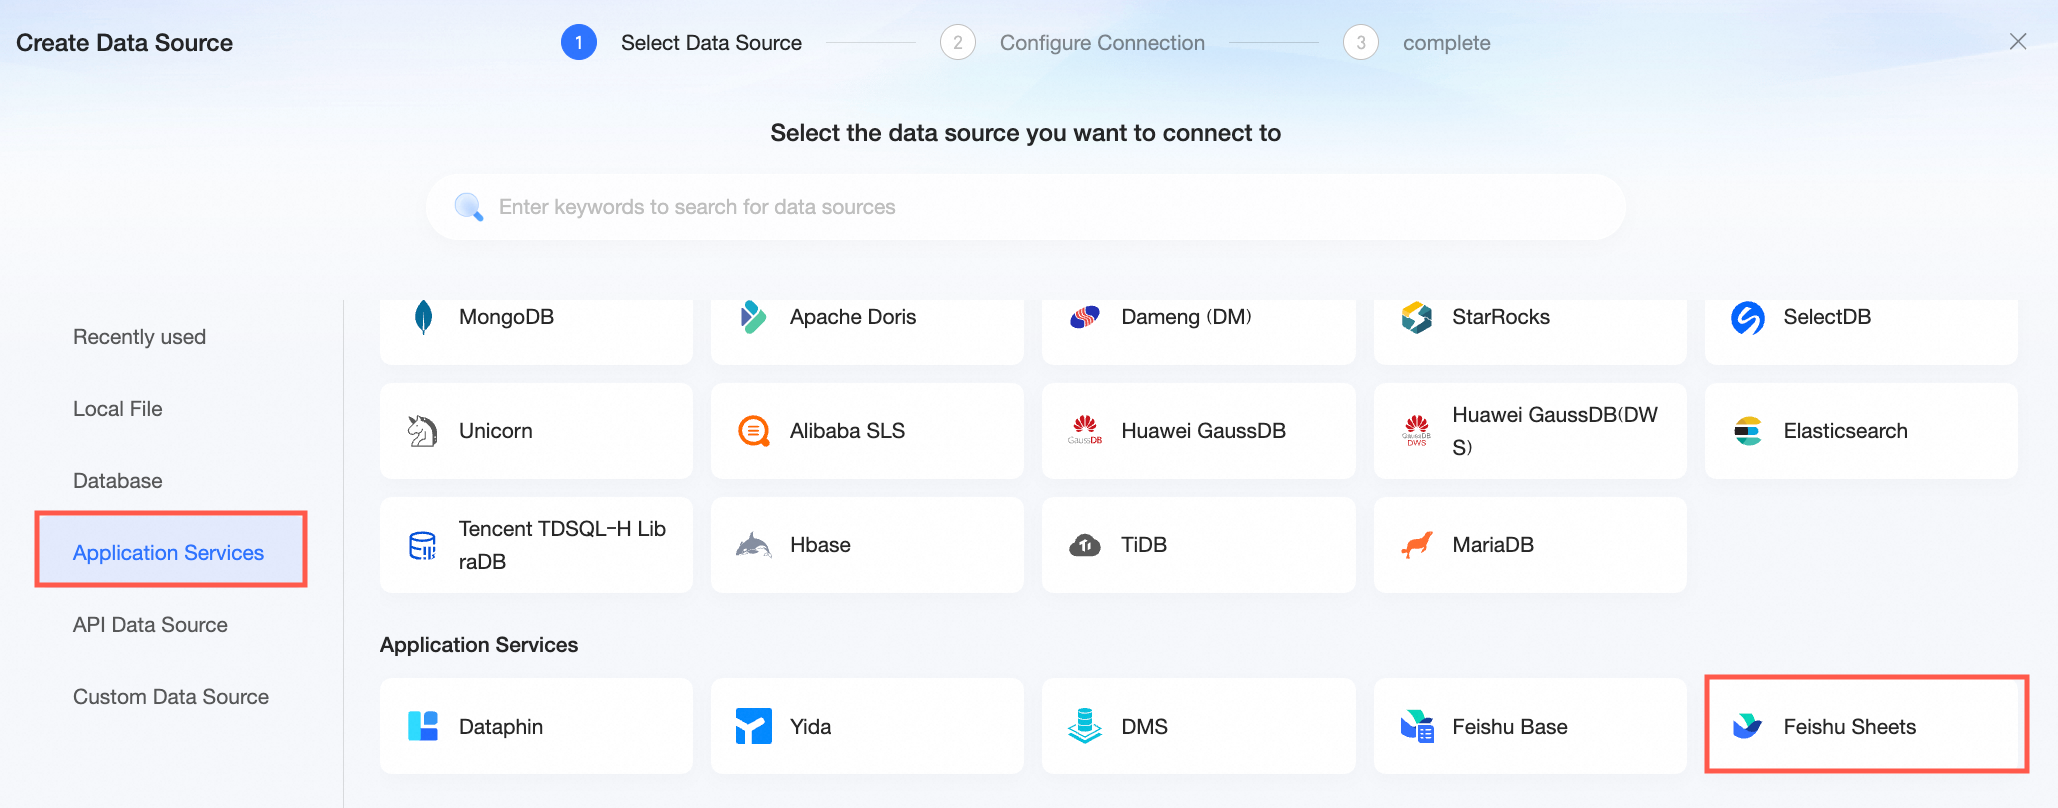
On the New Data Source page, select Application Services > Lark Sheets.
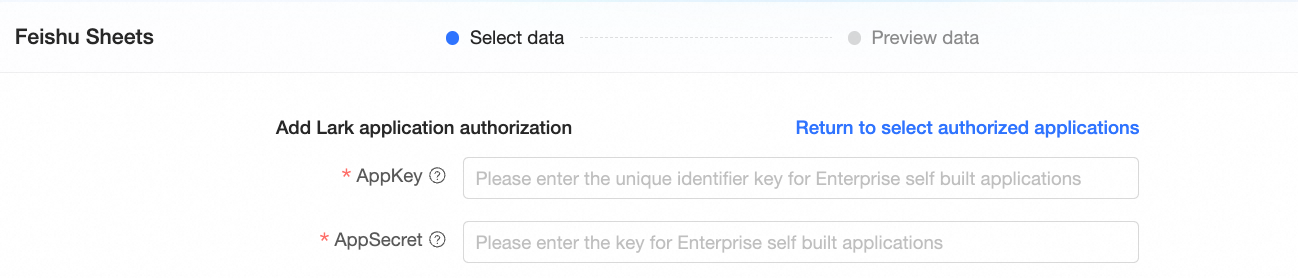
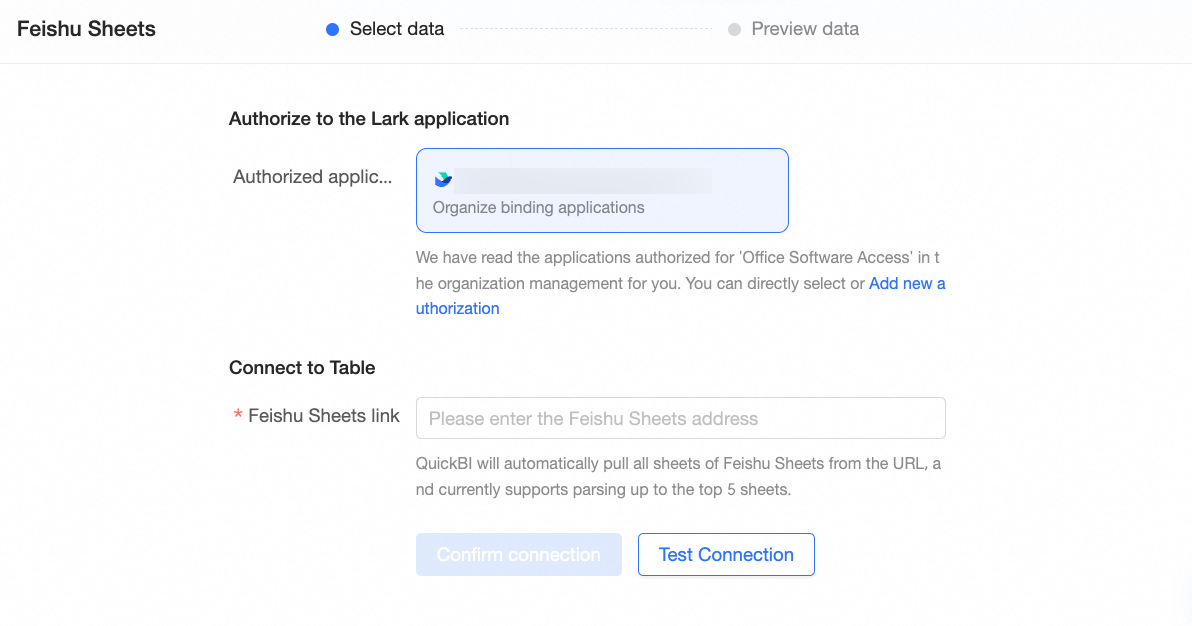
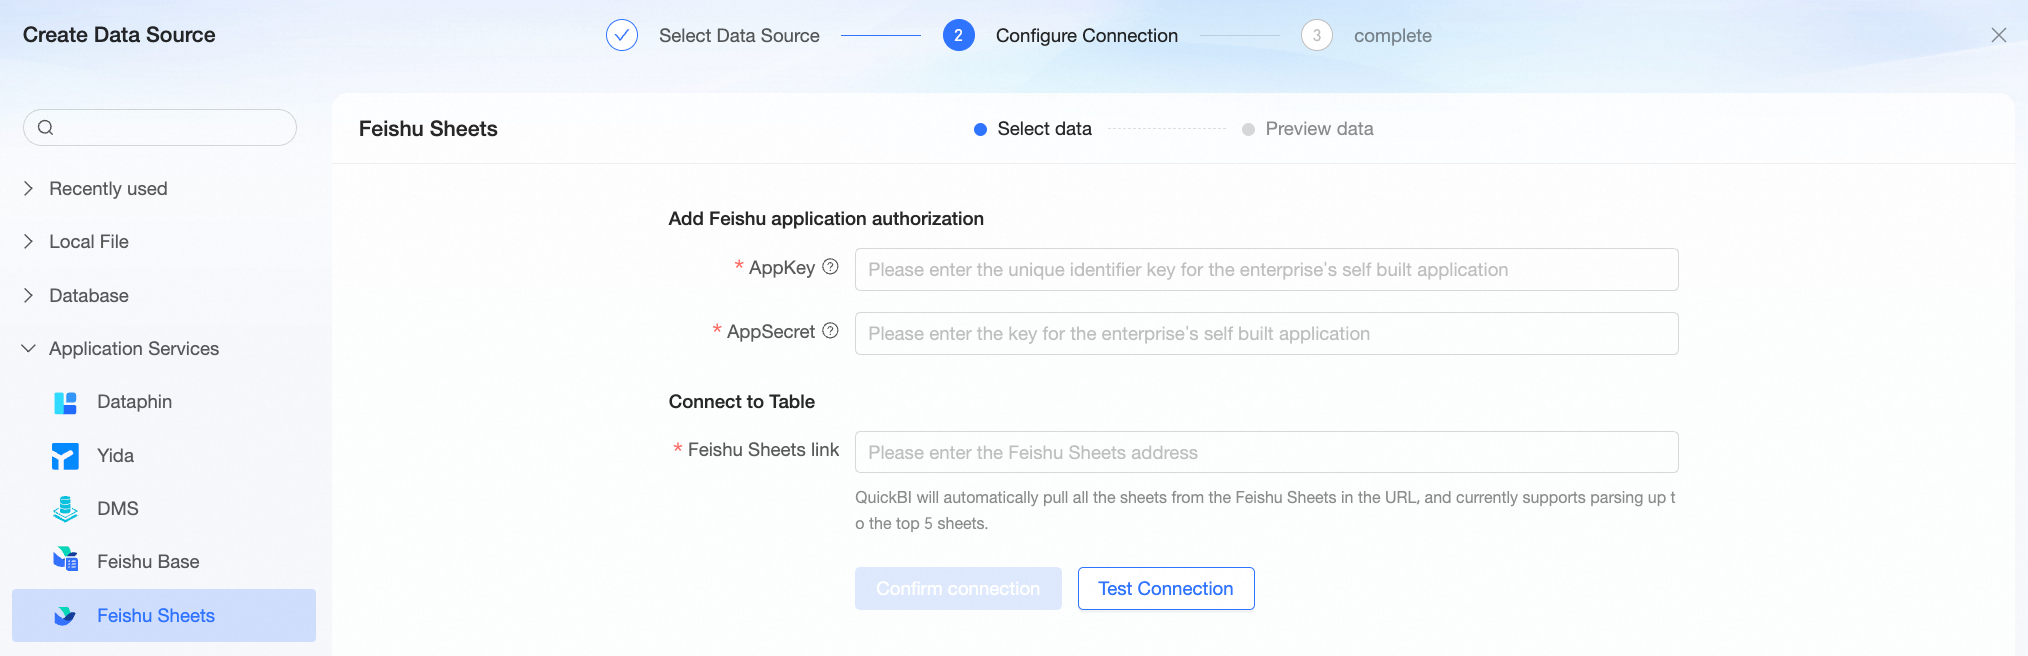
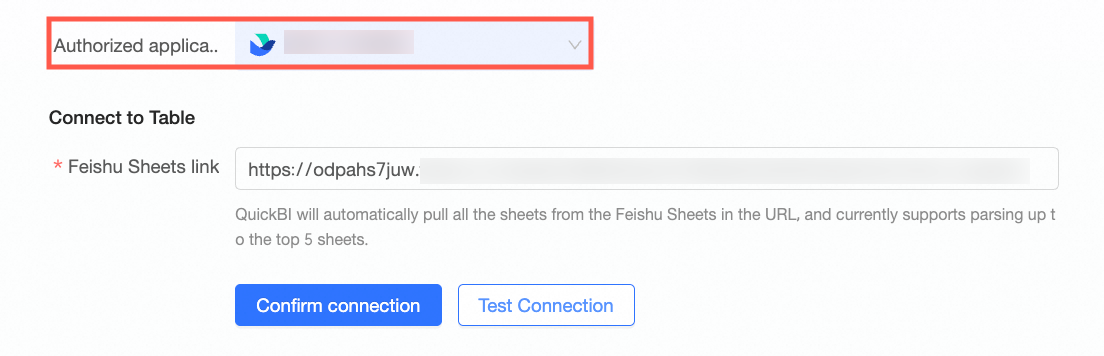
On the configuration page, enter the authorization information that you obtained in Step 1 and Step 2.
If your organization has already configured Lark API authorization under Organization Management > Office Software Integration, the system automatically reads the authorized application. Ensure that this app has the necessary permissions to call the Lark spreadsheet-related APIs.
If your organization has not configured Lark API authorization under Organization Management> Office Software Integration, you must enter the authorization information for the custom enterprise app that you created in Step 1.
Parameter
Description
AppKey
The unique identifier of the Lark app. This corresponds to the App ID on the Credentials & Basic Information page in the Lark Developer Console.
AppSecret
The secret key of the Lark app. The Lark platform automatically generates this key when you create the app. This corresponds to the App Secret on the Credentials & Basic Information page in the Lark Developer Console.
Lark Sheets Link
The shareable link of the Lark Sheets file. This is the link you copied from the document sharing page in Lark.
Click Test Connection. If the test is successful, information about the authorized application appears on the page.
Click Confirm Connection. The system automatically parses and reads all sheets at the specified URL.
NoteA maximum of five sheets can be parsed.
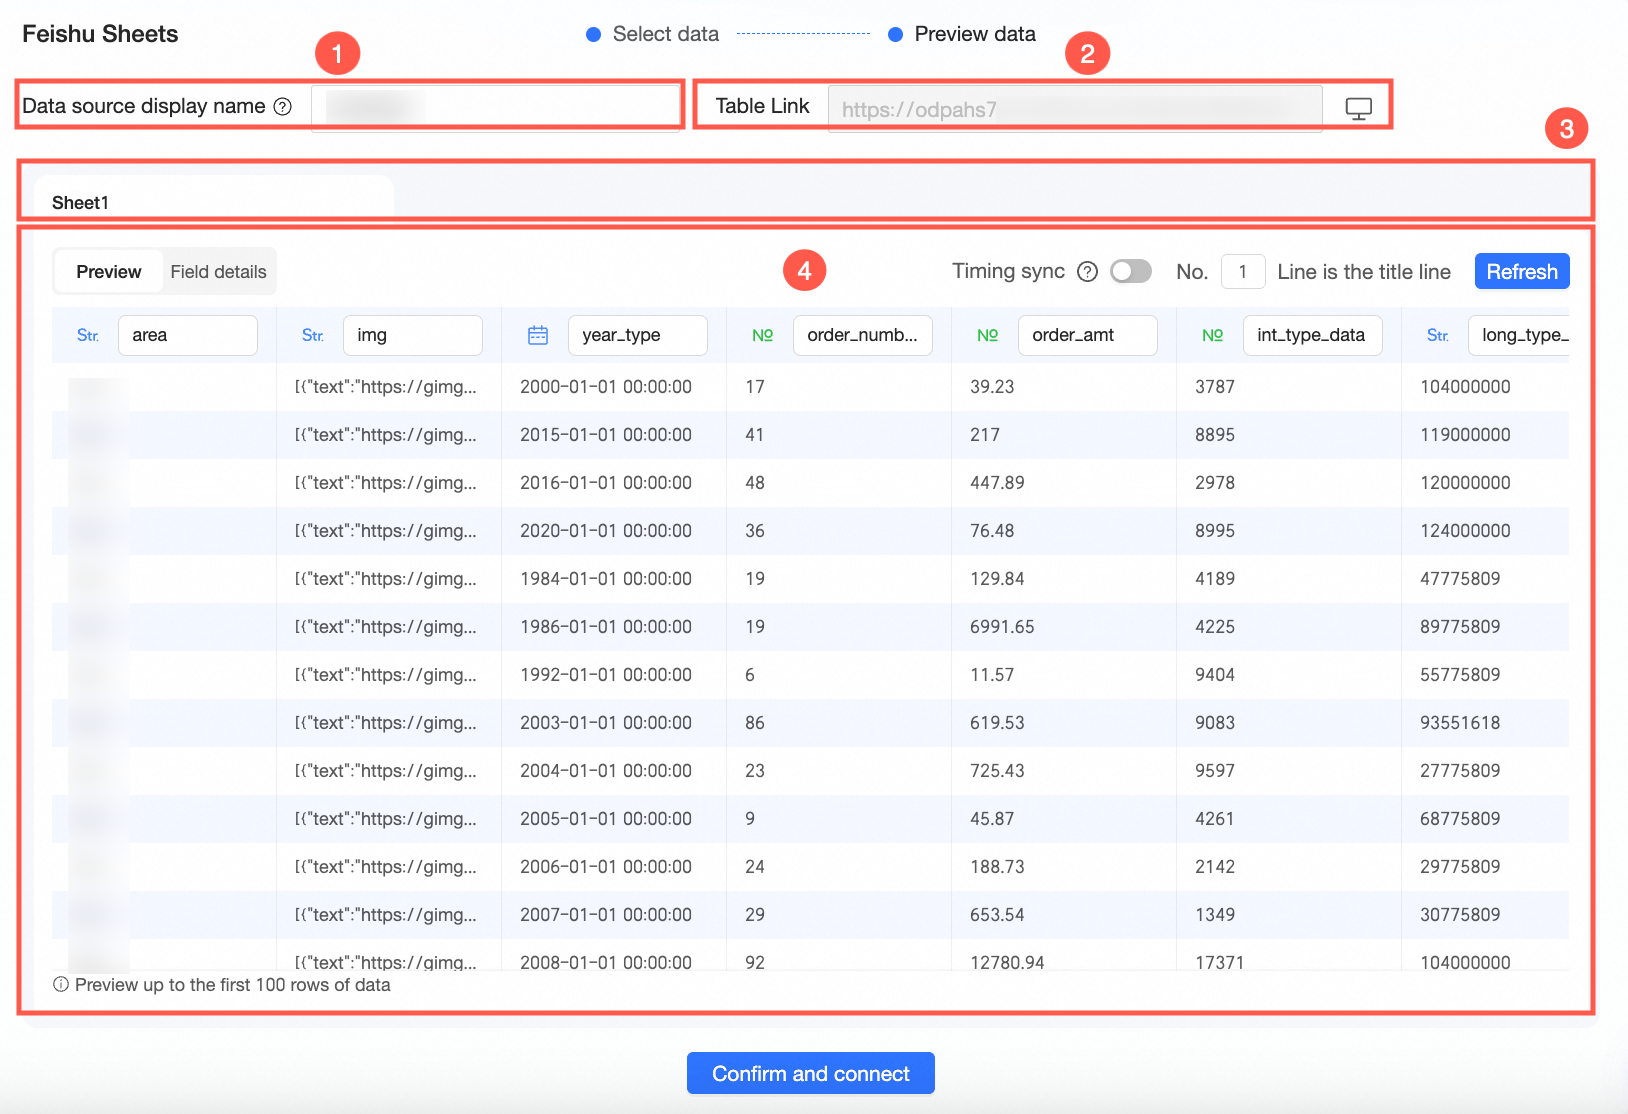
If parsing is Successful for all sheets, you are redirected to the Data Preview page. Here, you can preview information and perform the following operations.
Displayed content
Configuration
Actions
Area ①
Display name of the spreadsheet in Quick BI
Rename the display name
By default, Quick BI uses the original spreadsheet name as the display name. You can customize it as needed.
NoteThe display name cannot contain special characters or leading or trailing spaces.
Area ②
Shareable link of the spreadsheet
View the source document
Click the
icon next to the spreadsheet link to open the original document in Lark in a new window.Area ③
Number and titles of sheets in the spreadsheet
Switch sheets
Click a sheet tab to preview its data. The data content in Area ④ updates accordingly.
Rename a sheet
Double-click a sheet name to rename it as needed. By default, the original sheet names from Lark are used.
NoteSheet names cannot contain special characters or leading or trailing spaces.
Area ④
Data content of the spreadsheet
Data preview
On the Data Preview tab, you can preview the data and perform the following operations:
Modify field name: Click the field name text box to modify the field name.
Modify field type: Click the field type icon and select a suitable type from the drop-down list. Supported types include Text, Number, and Date.
NoteFormulas from the source Lark document are not supported. Only the calculated values are imported.
Field details
Quick BI stores the spreadsheet data in a database table. The database field name and field type refer to the fields in this table, while the field name is the original name from the Lark sheet.
You can rename fields and modify field types as needed. To remove a field, click the
icon.NoteFormulas from the source Lark document are not supported. Only the calculated values are imported.
Set up scheduled sync
To sync the latest business data daily, you can enable Scheduled Sync. In the Scheduled Data Sync dialog box, set the time of day for the data sync.
After setup, you can also click the
icon to modify the existing scheduled sync settings.NoteEach sync performs a full overwrite of the existing data. A single sheet sync is limited to 10,000 rows and 100 columns.
This setting applies only to the current sheet. If you have multiple sheets to sync, you must configure it individually for each sheet.
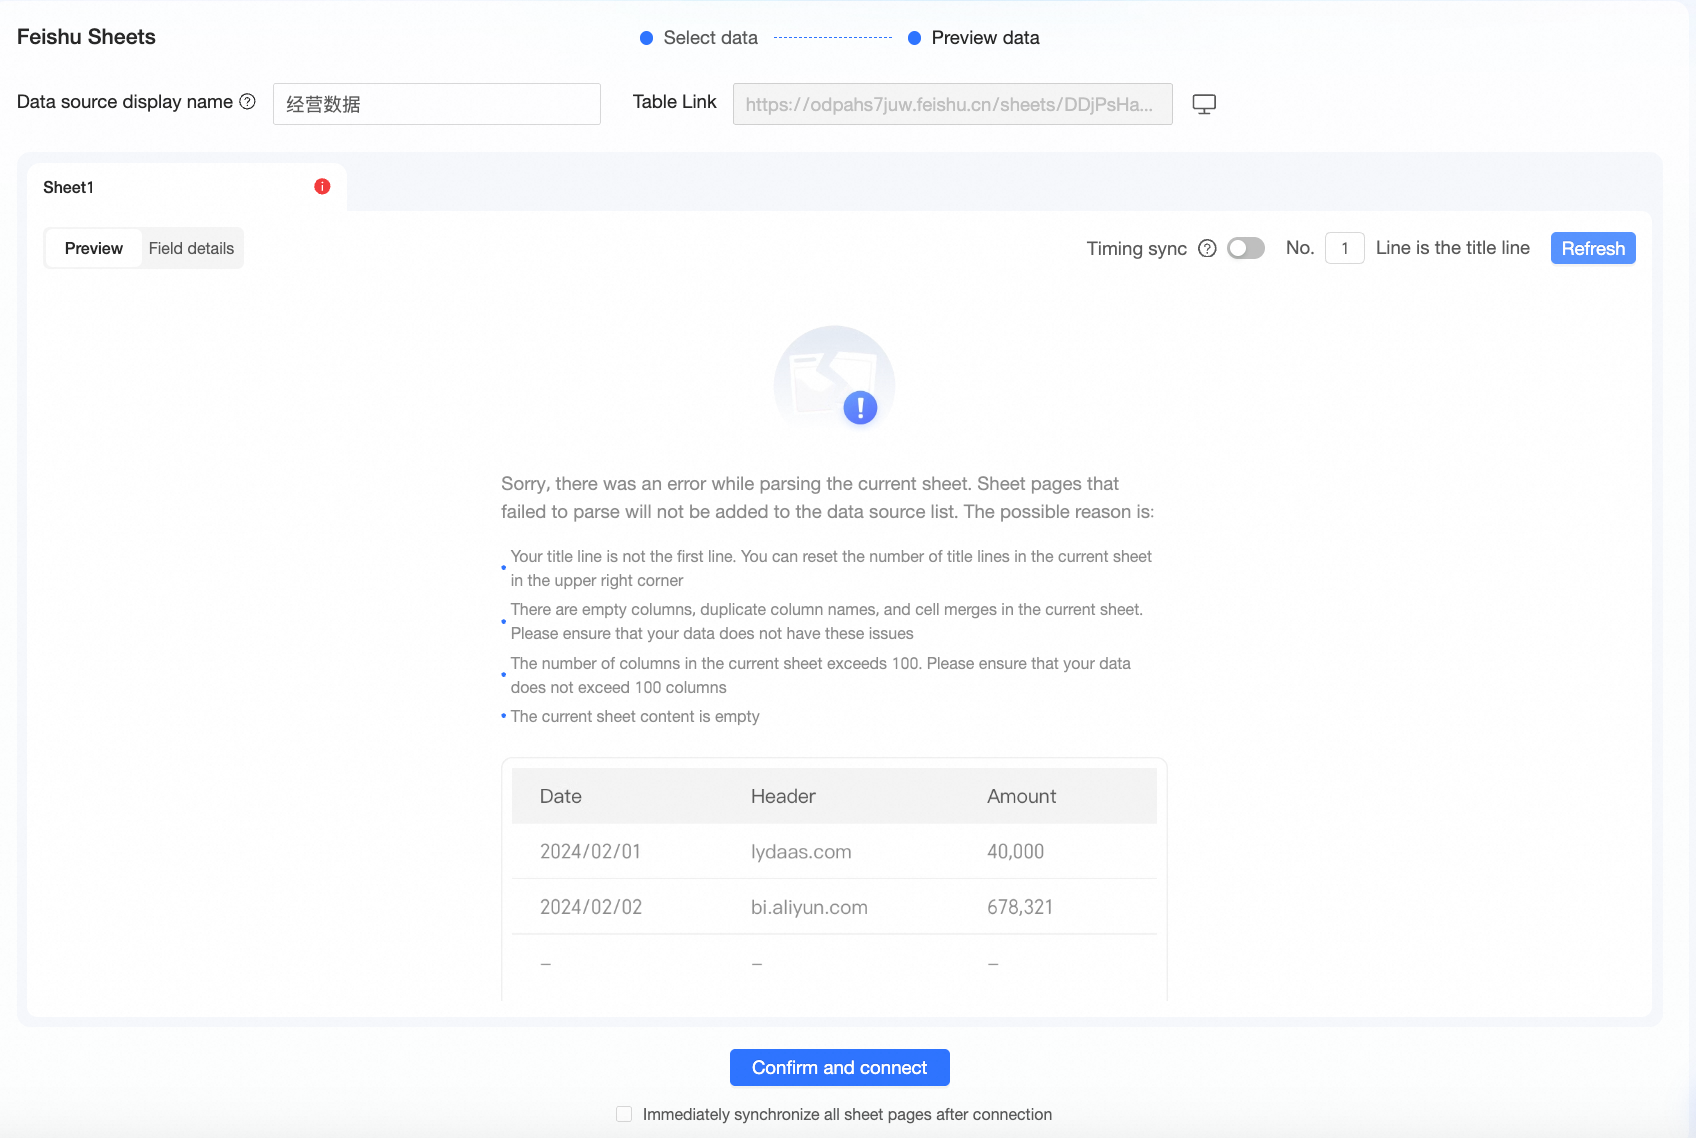
Set the header row
By default, the system identifies the first row of the spreadsheet as the header row and begins syncing data from the second row. You can change the header row for the current sheet as needed. Click the Refresh button for the changes to take effect.
NoteThe input must be an integer greater than 0.
Ensure that the header row does not contain empty fields to avoid errors.
If a sheet fails to parse with a status of Failed, you can view the cause of the failure on the Data Preview page. After you correct the issue, click the Refresh button in the upper-right corner. If the sheet is not needed, you can ignore the error. The sheet is automatically excluded when the data source is connected.
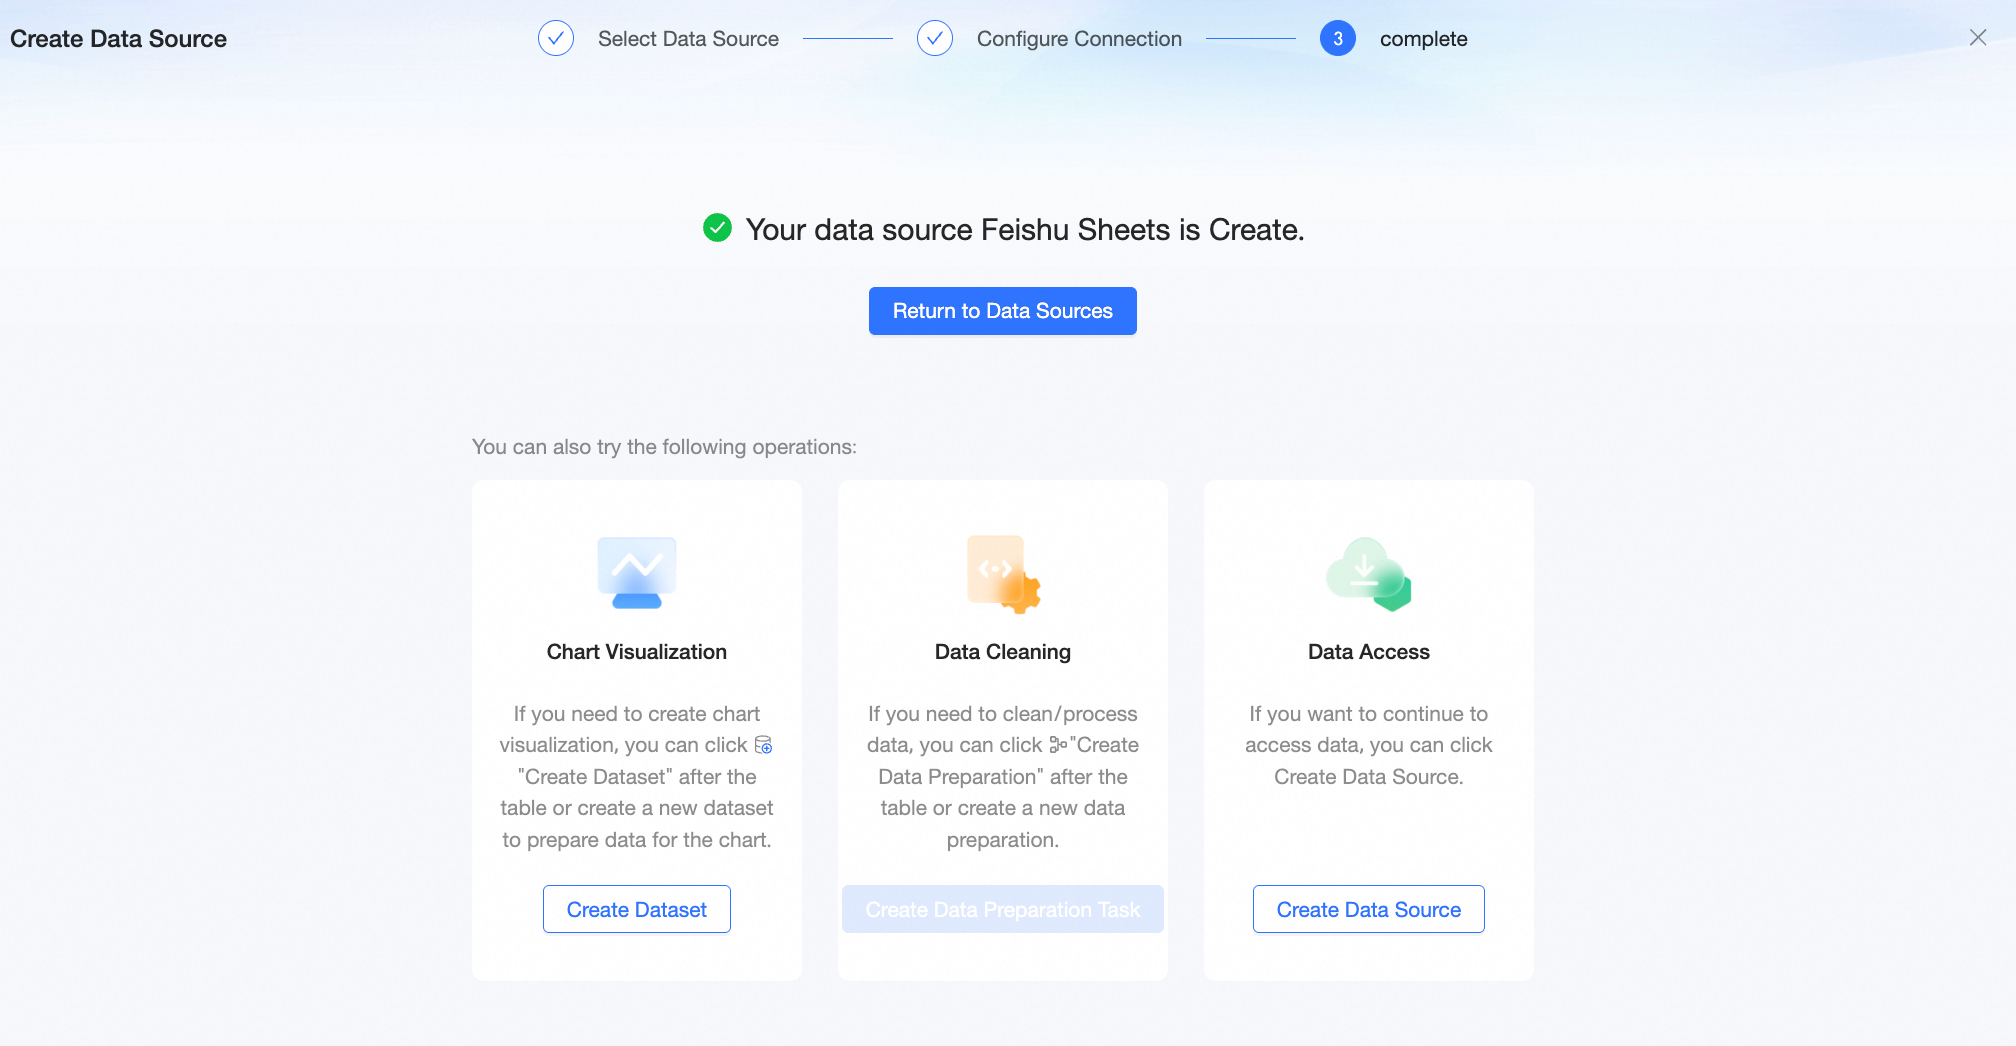
After you complete the configuration, click Confirm and Connect to create the Lark Sheets data source.
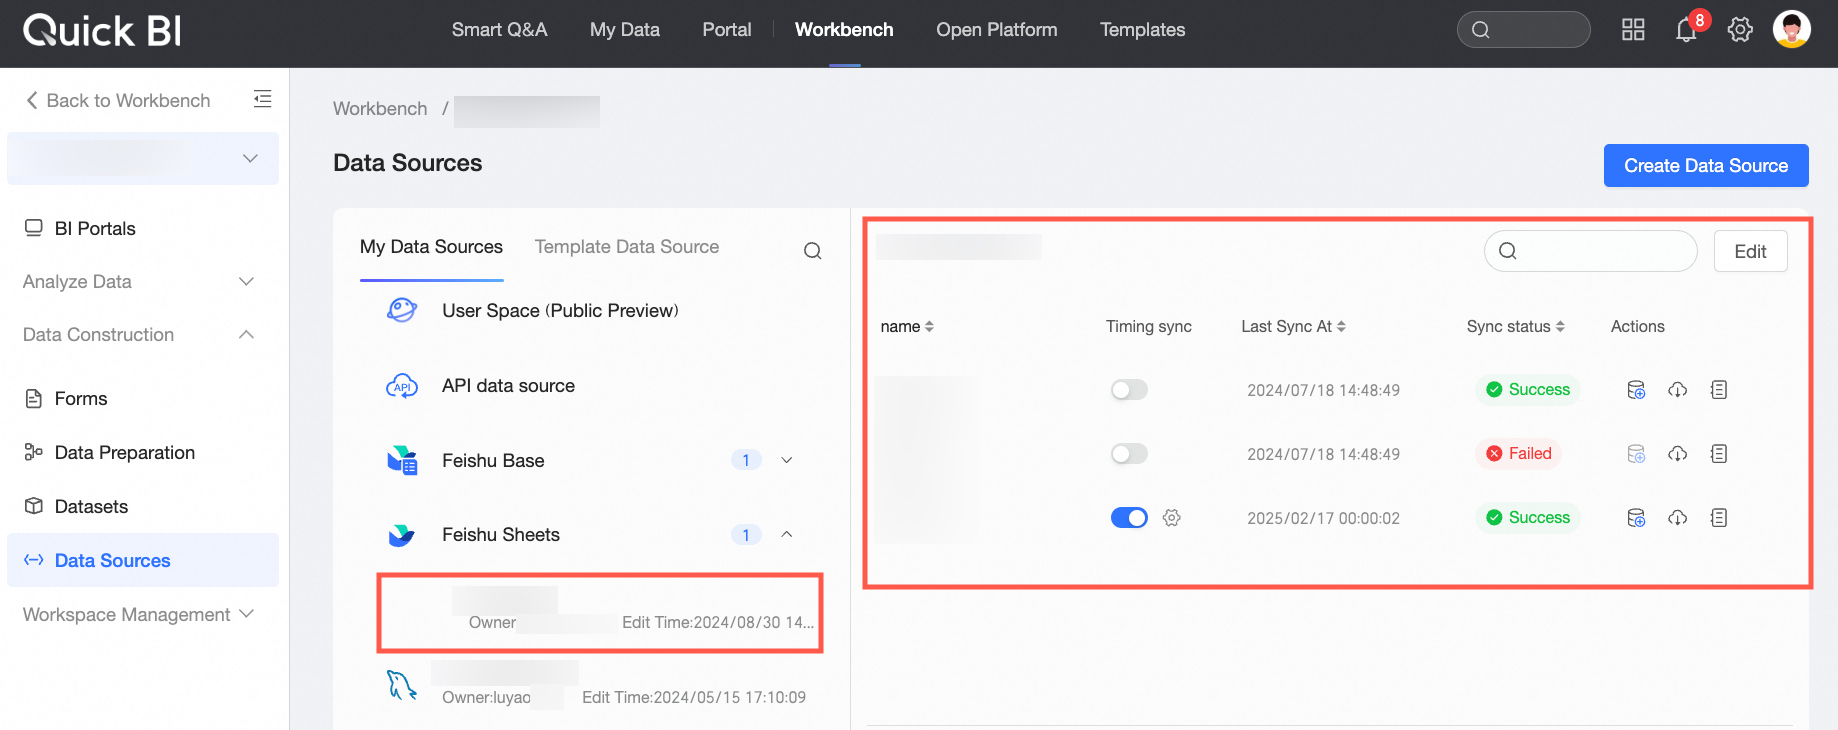
Return to the Data Sources page. In the data source list, find the Lark Sheets data source that you just added. In the actions column for the desired sheet, click the
icon to sync its data.(Optional) On the Data Sources page, you can view and manage the created Lark Sheets data source and its sheets. The following operations are supported.
Preview a sheet: In the Name column, find the sheet that you want to preview and click its name. The content of the sheet appears on the Preview Data page.
Set up scheduled sync: Click the scheduled sync toggle
to enable or disable the scheduled sync feature. If scheduled sync is enabled, you can click the icon to change the sync time.Create a dataset: Click the
icon to create a dataset based on the current sheet. For more information about how to create a dataset, see Create a dataset.NoteEnsure that the sheet has synced successfully. Otherwise, you cannot create a dataset based on this sheet.
Sync data: Click the
icon to manually trigger a sync task.View sync records: Click the
icon. In the View Logs dialog box, you can view the update history of the current sheet, including the update time, status, duration, and log information. You can also query logs within a specific time range.


 icon next to the spreadsheet link to open the original document in Lark in a new window.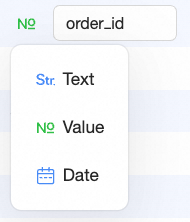
 icon.
icon.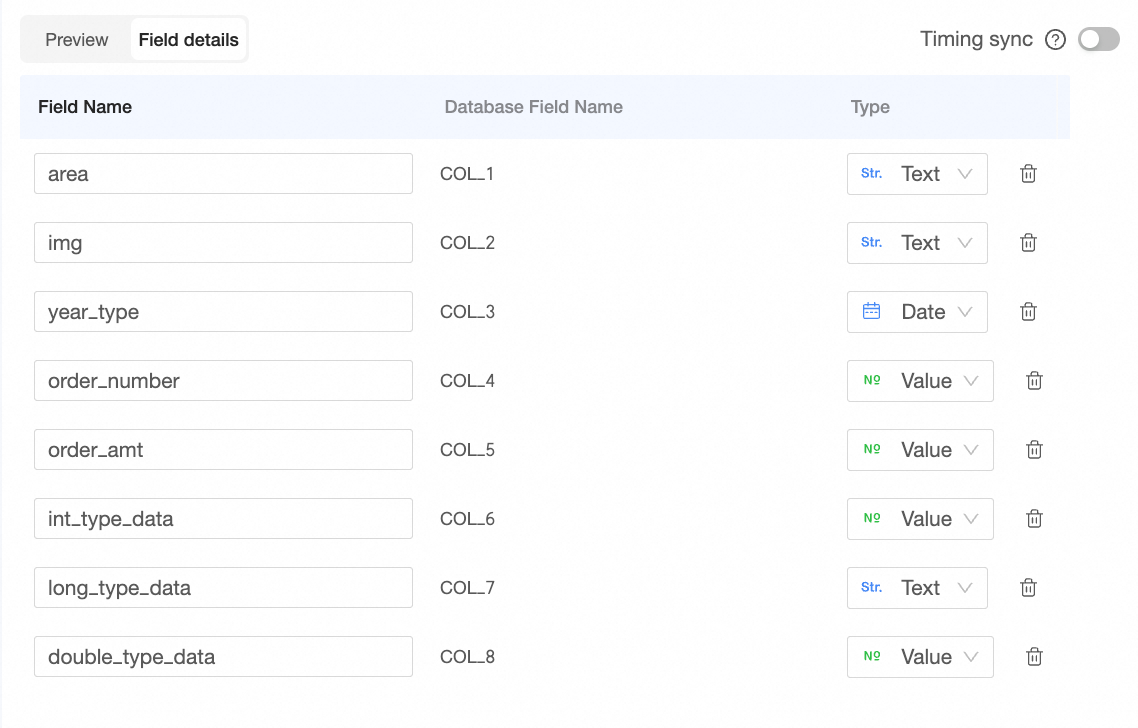
 icon to modify the existing scheduled sync settings.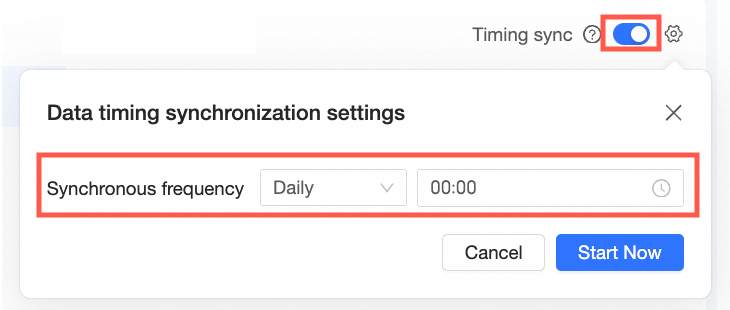

 icon to sync its data.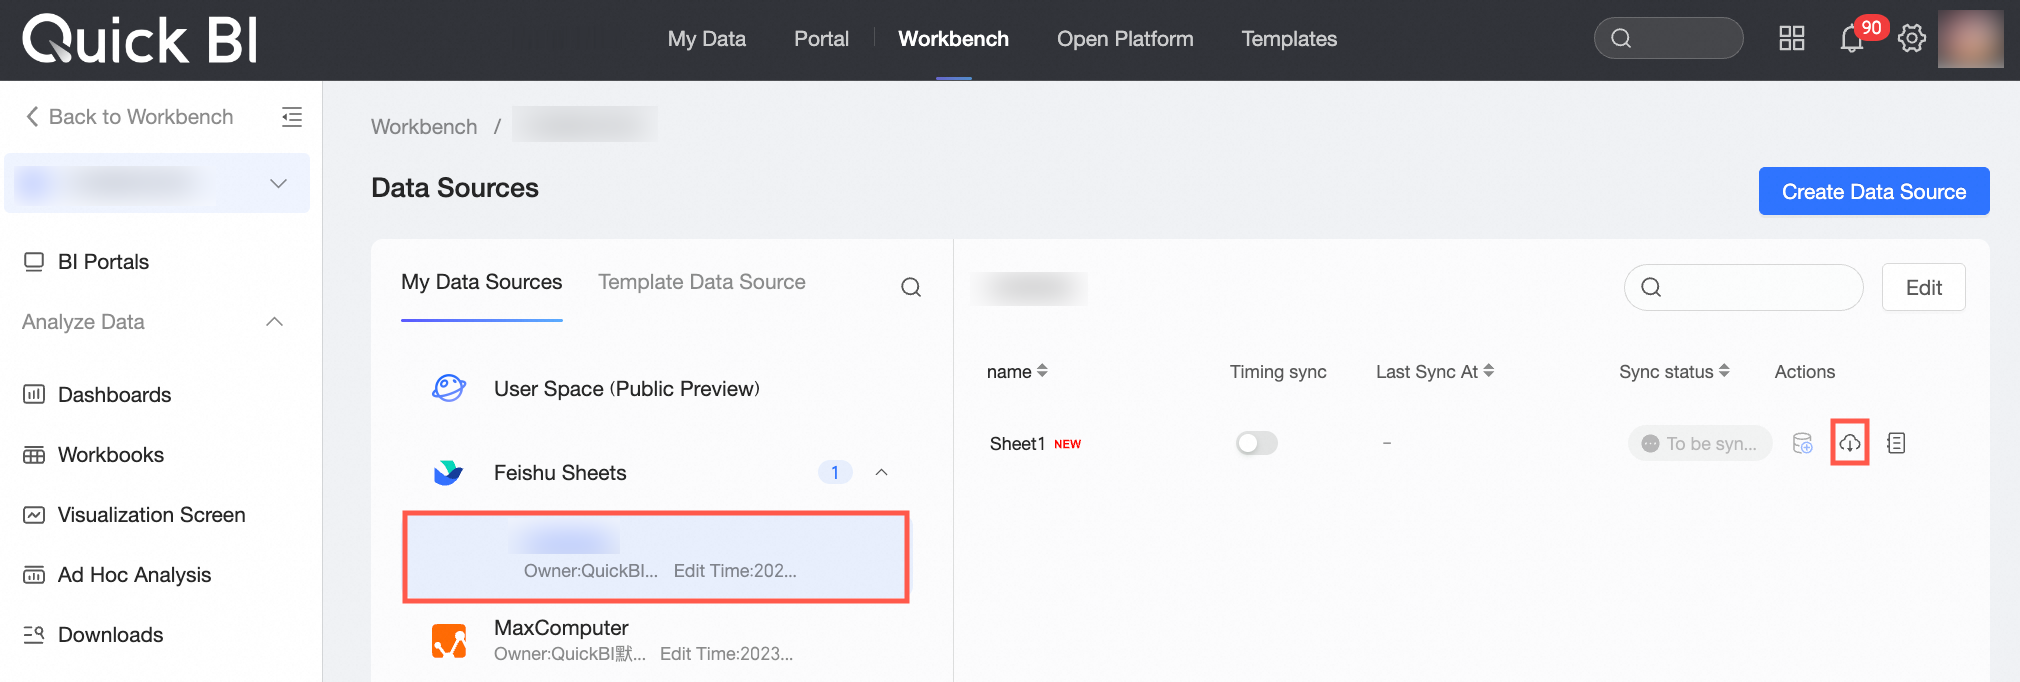
 to enable or disable the scheduled sync feature. If scheduled sync is enabled, you can click the
  icon to change the sync time.
 icon to create a dataset based on the current sheet. For more information about how to create a dataset, see
  icon. In the View Logs dialog box, you can view the update history of the current sheet, including the update time, status, duration, and log information. You can also query logs within a specific time range.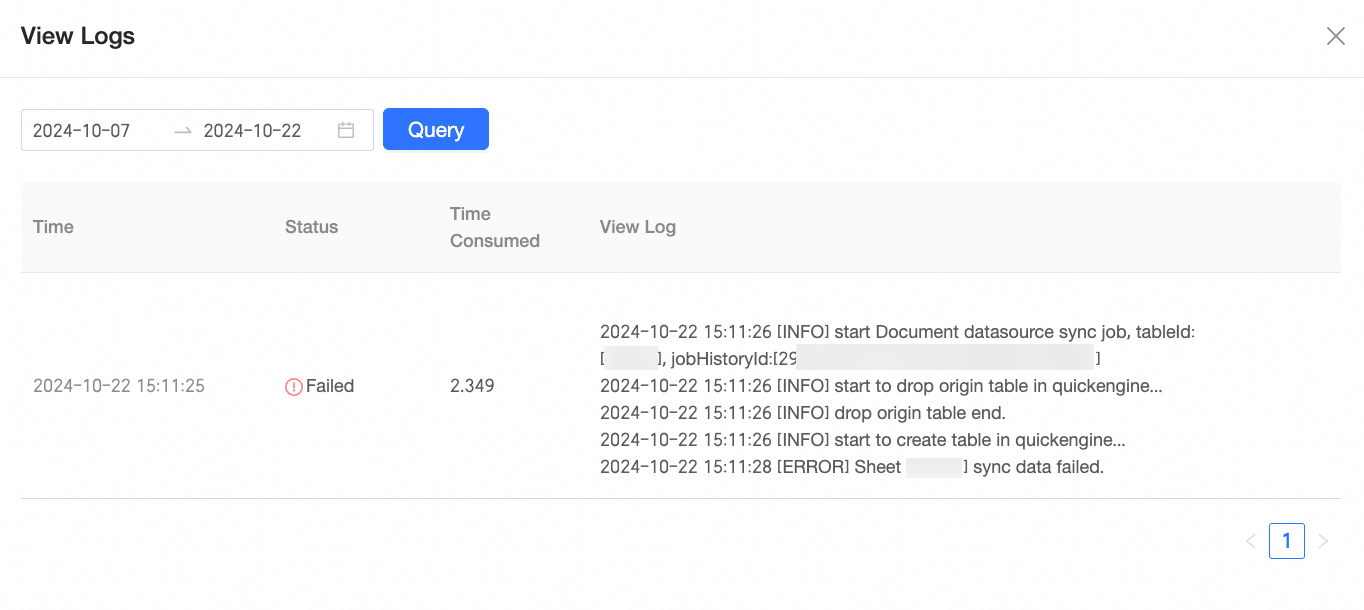
Step 4: Edit the data source
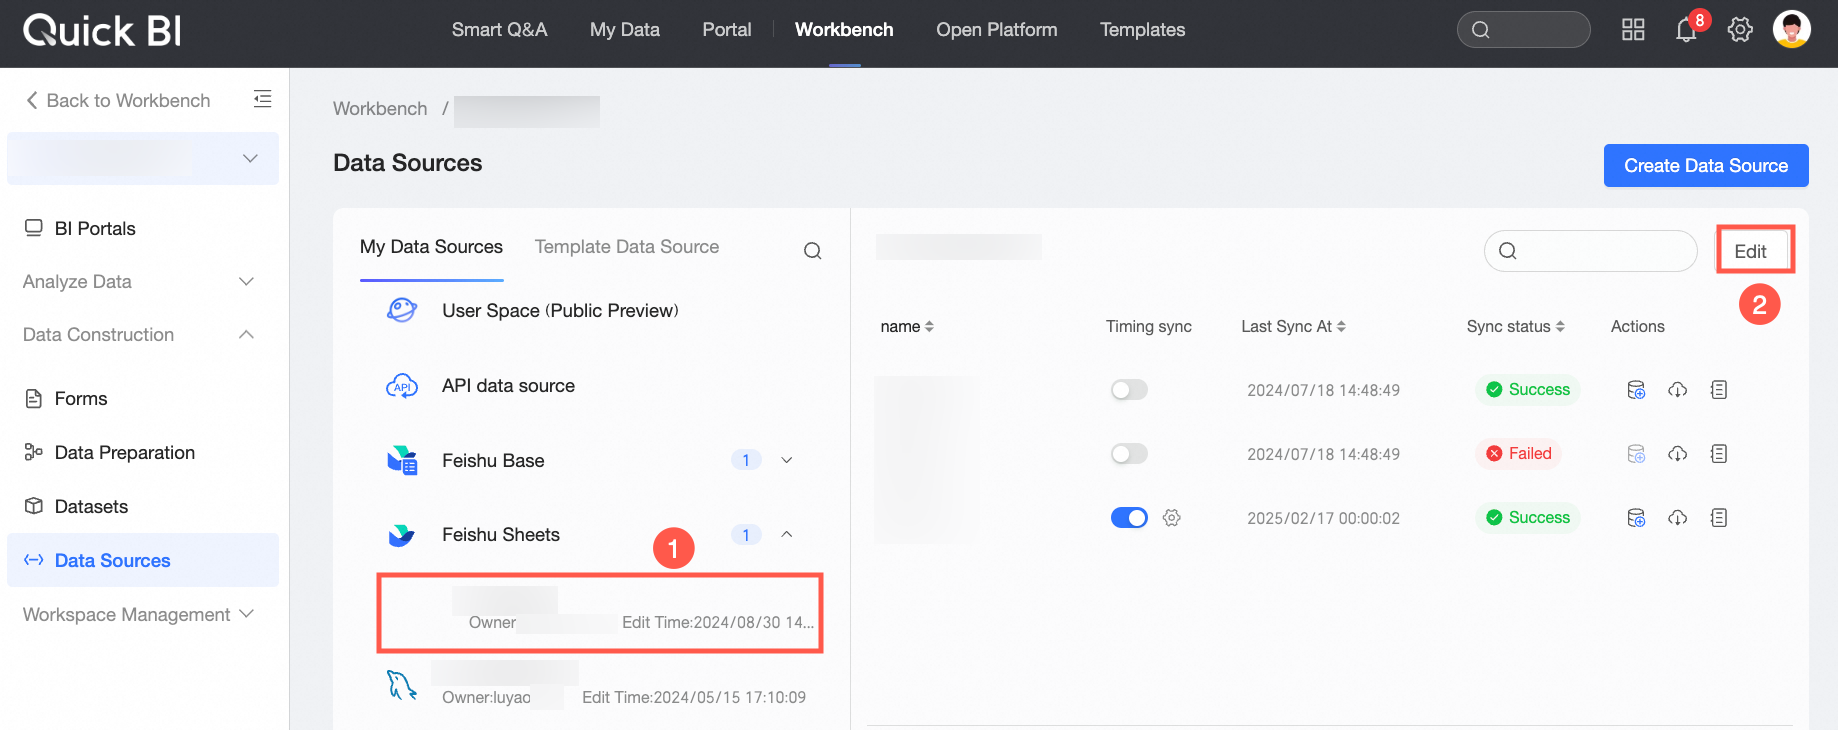
In the Lark Sheets list, find the target data source and click Edit.
On the Select Data page for the Lark Sheets data source, modify the Lark application's authorization information.
Parameter
Description
Authorized application
Click the
icon in the Authorized Application drop-down list. The AppKey and AppSecret text boxes appear. Enter the new AppKey and AppSecret.Lark Sheets Link
Enter the shareable link for the new spreadsheet.
Click Test Connection. After a successful test, click Confirm Connection to go to the Data Preview page. On this page, you can edit the spreadsheet's display name, scheduled sync settings, field names, and data types as needed. For more information, refer to Step 5 in the Create the data source section.
After you finish editing, click Confirm and Connect.
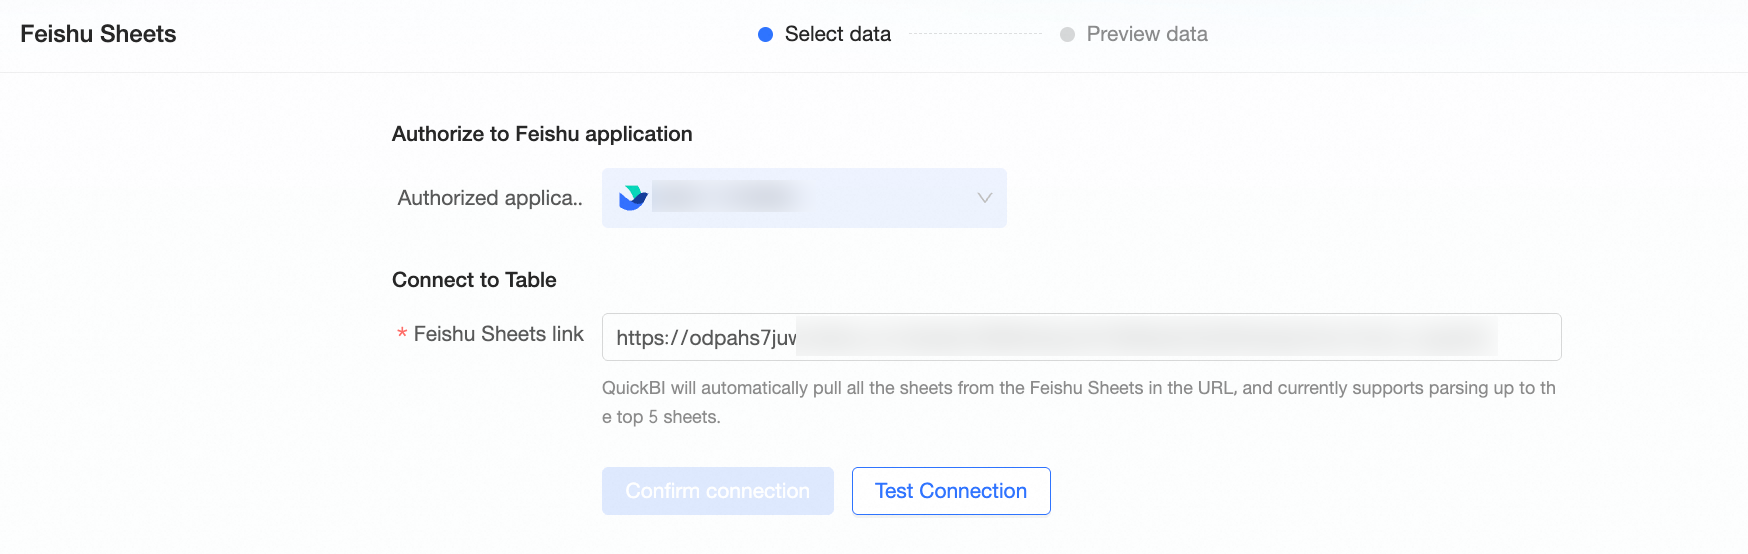
 icon in the Authorized Application drop-down list. The AppKey and AppSecret text boxes appear. Enter the new AppKey and AppSecret.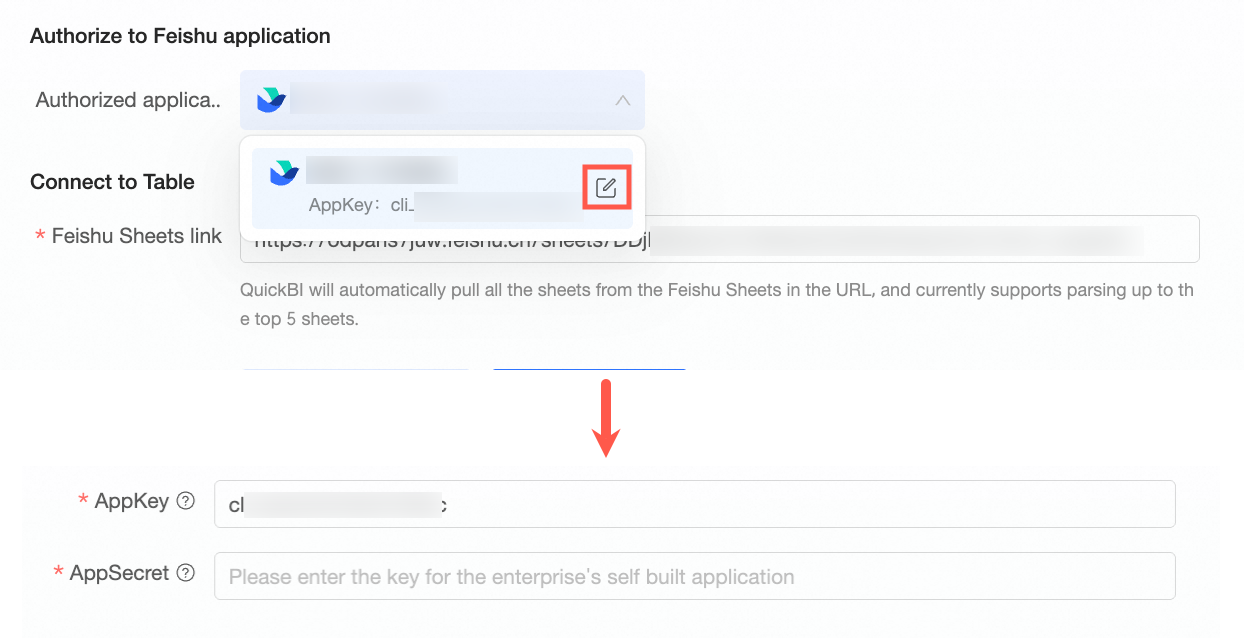
Next steps
After you create the data source, you can create a dataset and analyze your data.
Create a dataset based on the connected Lark Sheets data source. For more information, see Create a dataset.
Add visualizations and analyze data. For more information, see Create a dashboard and Overview of visualizations.
Drill down for in-depth data analysis. For more information, see Step 3: Set up and display drill-down.
FAQ
1. Common causes for connection failure
If the connection to a Lark Sheets data source fails, check for the following issues:
Cause | Solution |
The AppKey or AppSecret is incorrect. | Log on to the Lark Developer Console and obtain the correct AppKey and AppSecret for the application. |
The required API permissions were not enabled for the custom Lark app on the Permission Management page in the Lark Developer Console. | You must enable the following API permissions:
|
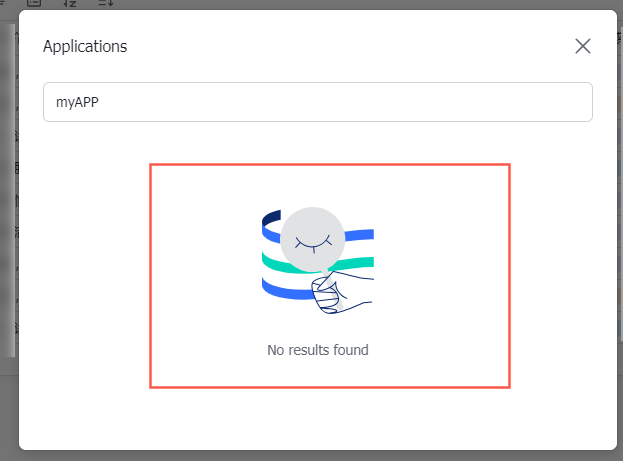
If the link sharing scope for the Lark Sheets is set to Only document collaborators can access via link, the corresponding custom enterprise app was not added as a document application. | On the document editing page in Lark Sheets, add the corresponding custom enterprise app as a document application. The following figure shows the procedure. |
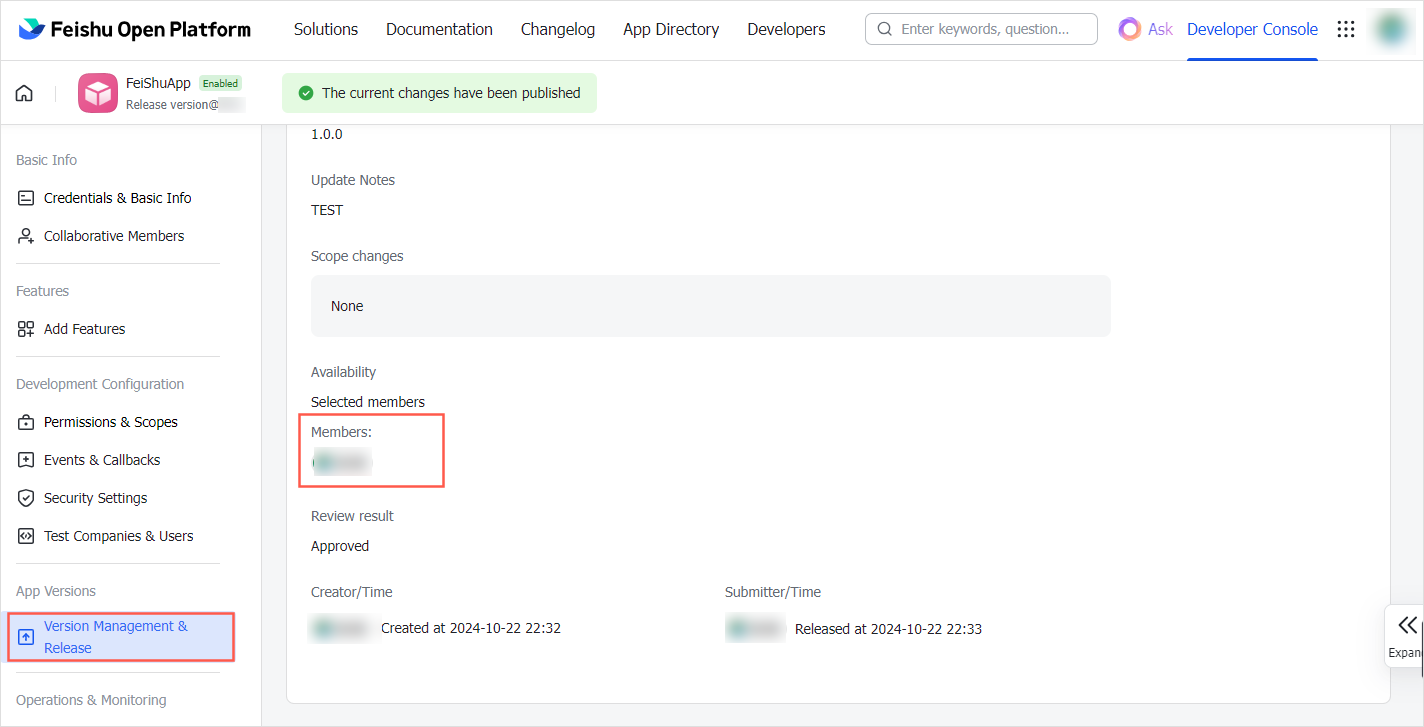
If the link sharing scope for the Lark Sheets is set to Only document collaborators can access via link, the corresponding custom app cannot be selected as a document application on the document editing page, which causes the addition to fail. | To be able to add a custom enterprise app to a document, the current account must be added to the Availability settings in the version details when the app version is created. |
If you use the system's default application information, the third-party app might not be the latest version. | Go to the Lark Admin Console to update the app version. |