Quick BI supports integration with Microsoft Teams. Before you connect Teams in Quick BI, you must configure a Teams app.
Limitations
You must have development permissions in the Teams Developer Portal.
Procedure
Configure a Teams app and obtain its tenant ID, application ID, and client credentials by completing the following steps:
Step 1: Configure in Entra ID
-
Open the Azure portal in a web browser.
-
Select the **App registrations** icon.


-
Register a new app.

The Register an application page appears.

Field
Description
Instructions
Display name
The name of your app.
Required.
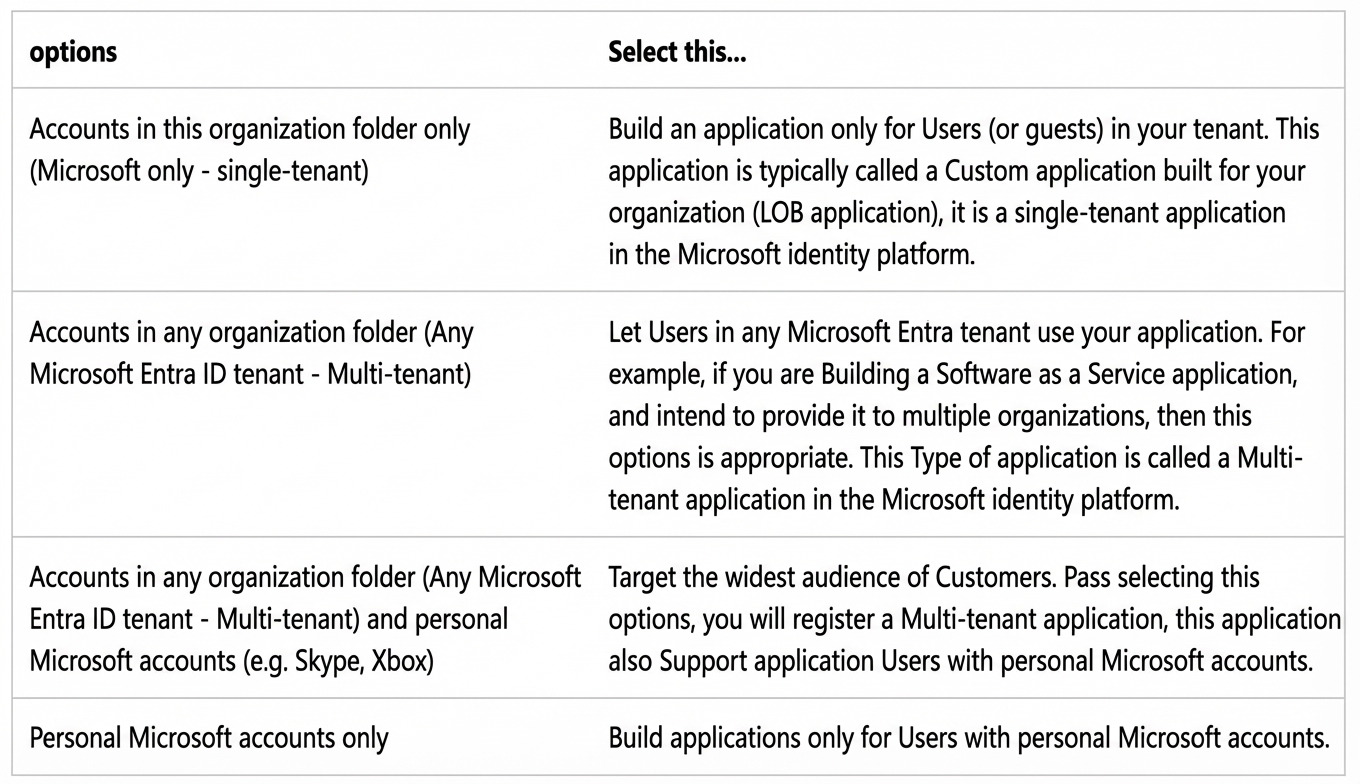
Supported account types
The types of accounts that can use the app.
Required.
Keep the default selection (the first option), which allows access only for accounts in the current organization.
Redirect URI
The URI where the user is redirected after successful authentication.
Required.
-
Format:
https://{host}/login/teams/callback. -
Note:
-
Only the HTTPS protocol is supported.
-
Replace
{host}with your actual Quick BI domain name.
-
 Note
NoteYou do not need to enter a redirect URI to enable single sign-on (SSO) for a tab app.
-
-
Click Register. The app overview page opens, showing the application ID and other configuration details.

-
Generate a client secret.
Record the following information for later use:-
Directory (tenant) ID
-
Application (client) ID
-
Client secret
-
-
On the Expose an API page, configure the access token scope.
-
In the left pane, select **Manage** > **Expose an API**.
Configure the following items:
-
Application ID URI
-
Scopes defined by this API
-
Authorized client applications
-
-
Configure the Application ID URI.
-
Click **Set** next to the Application ID URI field.
-
The Application ID URI is pre-filled with the Application ID (GUID) in the format
api://{AppID}. -
The Application ID URI must be in the following format:
api://{QuickBI service domain name, which is the domain name of the tab app}/{AppID: The application ID generated when you register the application}. For example: api://quickbi-demo-2.aliyun.com/beef226-****-****-****baed49e5 -
Select **Save**. A confirmation message appears, and the page displays the updated Application ID URI.
-
Record the Application ID URI. You will need it to update the app manifest in the Teams Developer Portal.
-
-
Configure API scopes.
-
Enter a scope name. This field is required.
-
Select who can consent to this scope. The default option is Admins only.
-
Enter an Admin consent display name. This field is required.
-
Enter an Admin consent description. This field is required.
-
Enter a User consent display name.
-
Enter a user consent description.
-
Set the **State** to Enabled.
-
Select Add a scope.
A message confirms that the scope has been added.
The new scope appears on the page. -
-
Configure authorized client applications.
On the Expose an API page, go to the Authorized client applications section and select + Add a client application.
The Add a client application page appears.Enter the appropriate Microsoft 365 client ID for the application you want to authorize.
Reference: Enable SSO for a tab app
For the Client ID, enter the following value:
Teams desktop and mobile:
1fec8e78-bce4-4aaf-ab1b-5451cc387264Under Authorized scopes, select the checkbox for the scope you created.Select Add application.
After a confirmation message, the client ID appears in the list of authorized applications.
-
-
Configure the access token version in the **Manifest**.
NoteIf you selected Personal Microsoft accounts only or Accounts in any organizational directory (Any Microsoft Entra directory - Multitenant) and personal Microsoft accounts (such as Skype and Xbox) during application registration, update the value of the
accessTokenAcceptedVersionproperty to 2. -
Configure **API permissions**.
Select the required delegated API permissions and grant admin consent.
(Optional) If the parsed access token is missing expected field values, add them in the token configuration. The required API permissions are as follows:API/Permission name
Required
Purpose
email
Yes
Sign-in verification
openid
Yes
profile
Yes
User.Read
Yes
Organization.Read.All
Yes
Synchronize contacts and retrieve team and member information.
User.Read.All
Yes
Team.ReadBasic.All
Yes
TeamMember.Read.All
Yes


 Record the following information for later use:


 The new scope appears on the page.
 The Add a client application page appears.
 Under Authorized scopes, select the checkbox for the scope you created.


 (Optional) If the parsed access token is missing expected field values, add them in the token configuration.
 The required API permissions are as follows:
Step 2: Configure in Teams Developer Portal
-
In the Azure portal, copy the **Application (client) ID** from your app's overview page.
-
Use this ID to link your app registration to your Teams app.


Step 3: Publish app in the Teams admin center
-
Create a new app.
-
Log on to the Teams Developer Portal at https://dev.teams.microsoft.com/home.
-
Under **Basic information**, enter the required details for your app.
Category
Field
Required
Description
Image
App names
Short name - 30 characters or less
Yes
The name of the app.
Full name - up to 100 characters (optional)
Yes
App ID
No
Not currently used.
Descriptions
-
Short description
-
Long description
Yes
Descriptions of the app.
Developer information
-
Developer or company name
Required
The name of the developer or company.
-
Website (must be a valid HTTPS URL)
Required
The URL of the developer's website.
App URLs
-
Privacy policy
Required
The URL for the app's privacy policy statement.
-
Terms of use
Required
The URL for the app's terms of use statement.
Application (client) ID*
-
ApplicationID
Required
-
The Application (client) ID of the app you registered in Azure Active Directory.
-
-
Under **Branding**, configure the app's icons.
-
Under **App features**, set up the **Personal app** and **Group and channel app**.
-
Set up a personal tab.
Set the Content URL and Website URL to
https://{your-host}/home. Replace{your-host}with your specific domain name.-
Scope: Select personal.
-
Context: Select personalTab.
-
Configure single sign-on (SSO) settings in Teams.
In the Application ID URI, set the sign-in address in the format: api://{your-host}/{application ID}
-
-
-
Configure **App Content**.
Select the Full-screen mode checkbox to allow the app to run in full-screen mode in Teams.
-
Under App validation, validate your app. After it passes, you can publish it.
-
Click Publish to org to publish the app to your organization. After approval, the app becomes visible in your organization's Teams Store.
-
-
Approve the app.
Log on to the Microsoft Teams admin center.
In the Manage apps section, search for your published Teams app. The app status is Blocked.
Select the app to open its details, then click Publish to make it available to your organization.Note-
Users and groups: Configure the app's visibility scope.
-
Permissions: Review the app's permission information.
-
-
Add the app in the Teams client.
In Teams, click Apps and select Built for your org. The published app appears here.
Note-
Publication delay: The app may take up to a few hours to appear in the Teams client after publication.
-
Client cache: If the app is not visible, try signing out and signing back in to the Teams client to refresh its cache.
-


 Select the app to open its details, then click Publish to make it available to your organization.


Step 4: Configure Quick BI integration
In the Azure portal, find the tenant ID, application ID, and client credentials for your app. You need this information to Enable the Teams Micro-app.
-
Log on to the Azure portal.
-
Select your new app to view its details.
-
Obtain the following information:
-
Directory (tenant) ID
-
Application (client) ID
-
Client credentials (client secret)
-


