Theme customization
To build a brand, companies establish an identity with key elements like a logo, brand characters, and slogans. Consequently, they need the Intelligent Q user interface to reflect their brand and deliver a consistent experience.
To meet this demand, Quick BI provides the theme customization feature for Intelligent Q. This feature lets companies configure the user interface to match their brand guidelines, ensuring Intelligent Q aligns with the corporate brand and reinforces its identity. This topic explains how to customize the theme for Intelligent Q.
Limitations
Only an organization administrator can configure themes for Intelligent Q.
Feature access
Navigate to the organization management page. In the navigation pane on the left, choose Intelligent Q > general settings > theme customization. You can configure the settings on the theme customization tab on the right side of the page.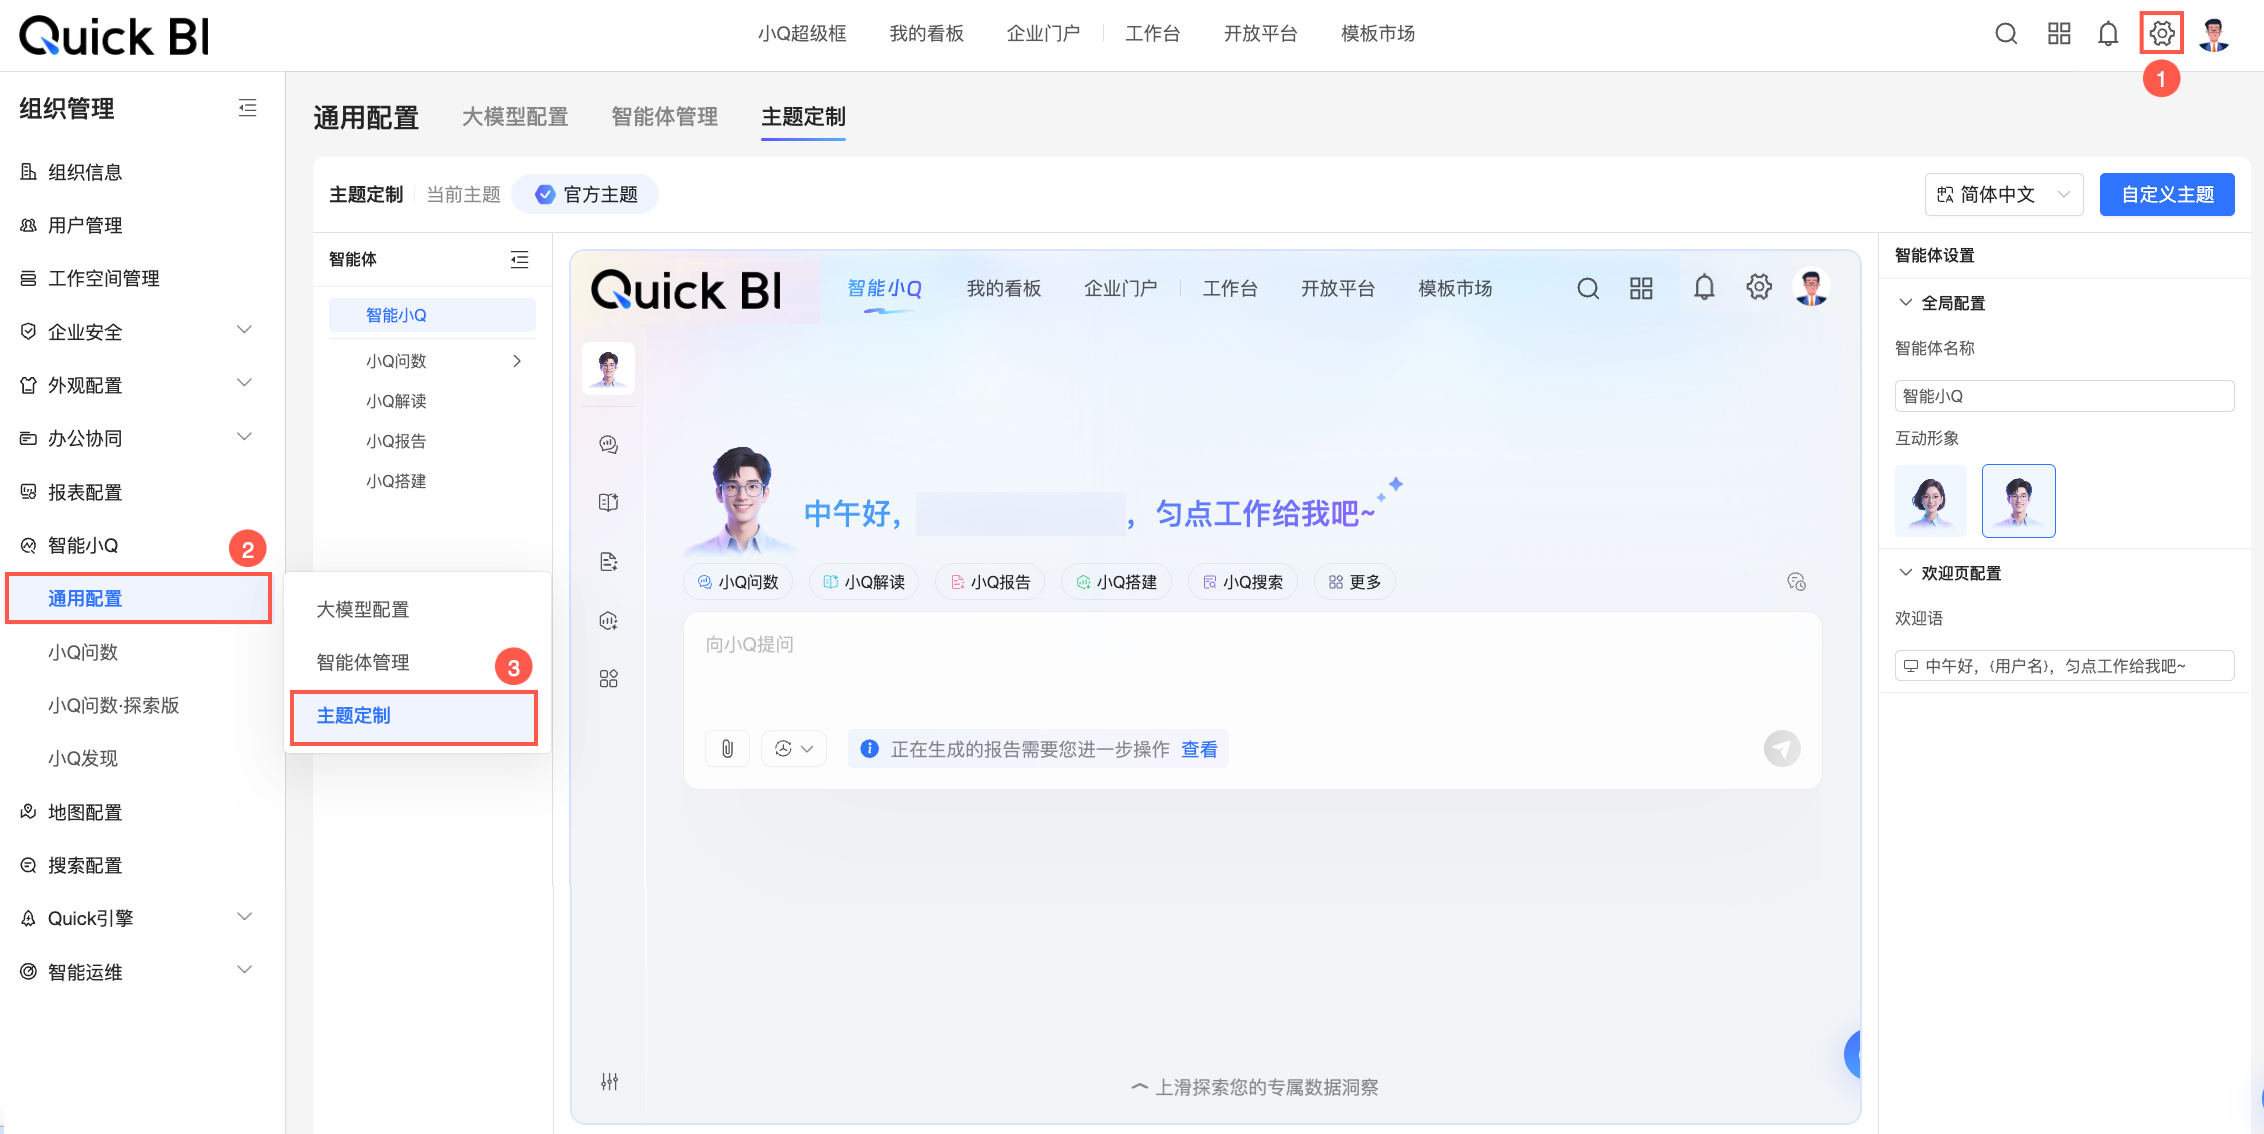
Procedure
On the theme customization page, you can see a real-time preview of the theme settings and the available parameters. You can use the default official theme provided by the system or switch to a custom theme that you configure. The following sections provide details.
Official theme
If your organization has never configured a custom theme, the system uses the official theme by default. When using the official theme, all parameters are locked. You can only perform the following actions: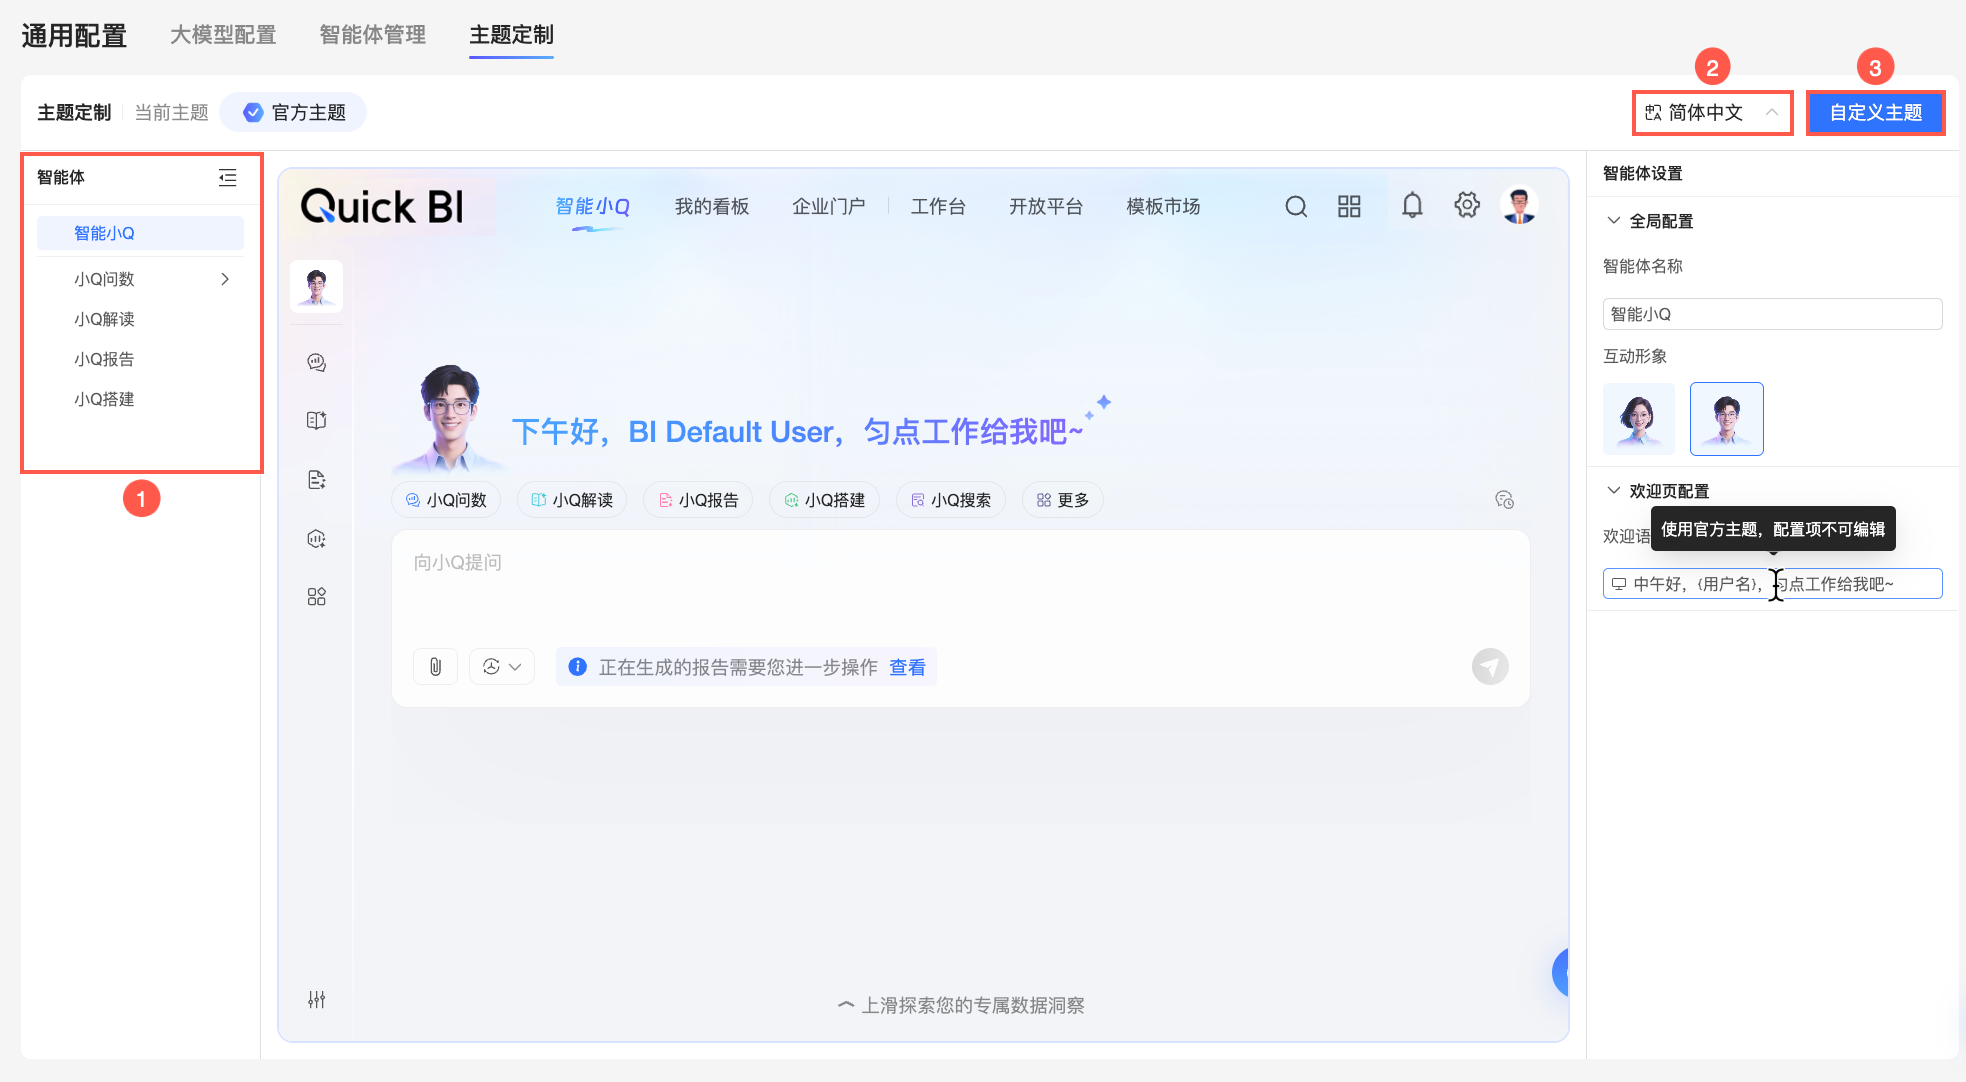
Actions | Description |
① View agent settings | Use the agent navigation bar to switch between different agents. You can view the system configurations for each agent in the agent settings panel. Use this information as a reference when you set up a custom theme. |
② Set language | Set the display language of Intelligent Q to Simplified Chinese or English. |
③ Switch to a custom theme | When you need to personalize UI elements, click the custom theme button in the upper-right corner to switch to custom theme mode. This unlocks all parameters for customization. |
Custom theme
Custom theme mode lets you customize UI elements like the agent name and interactive avatar to match your corporate brand. Follow these steps:
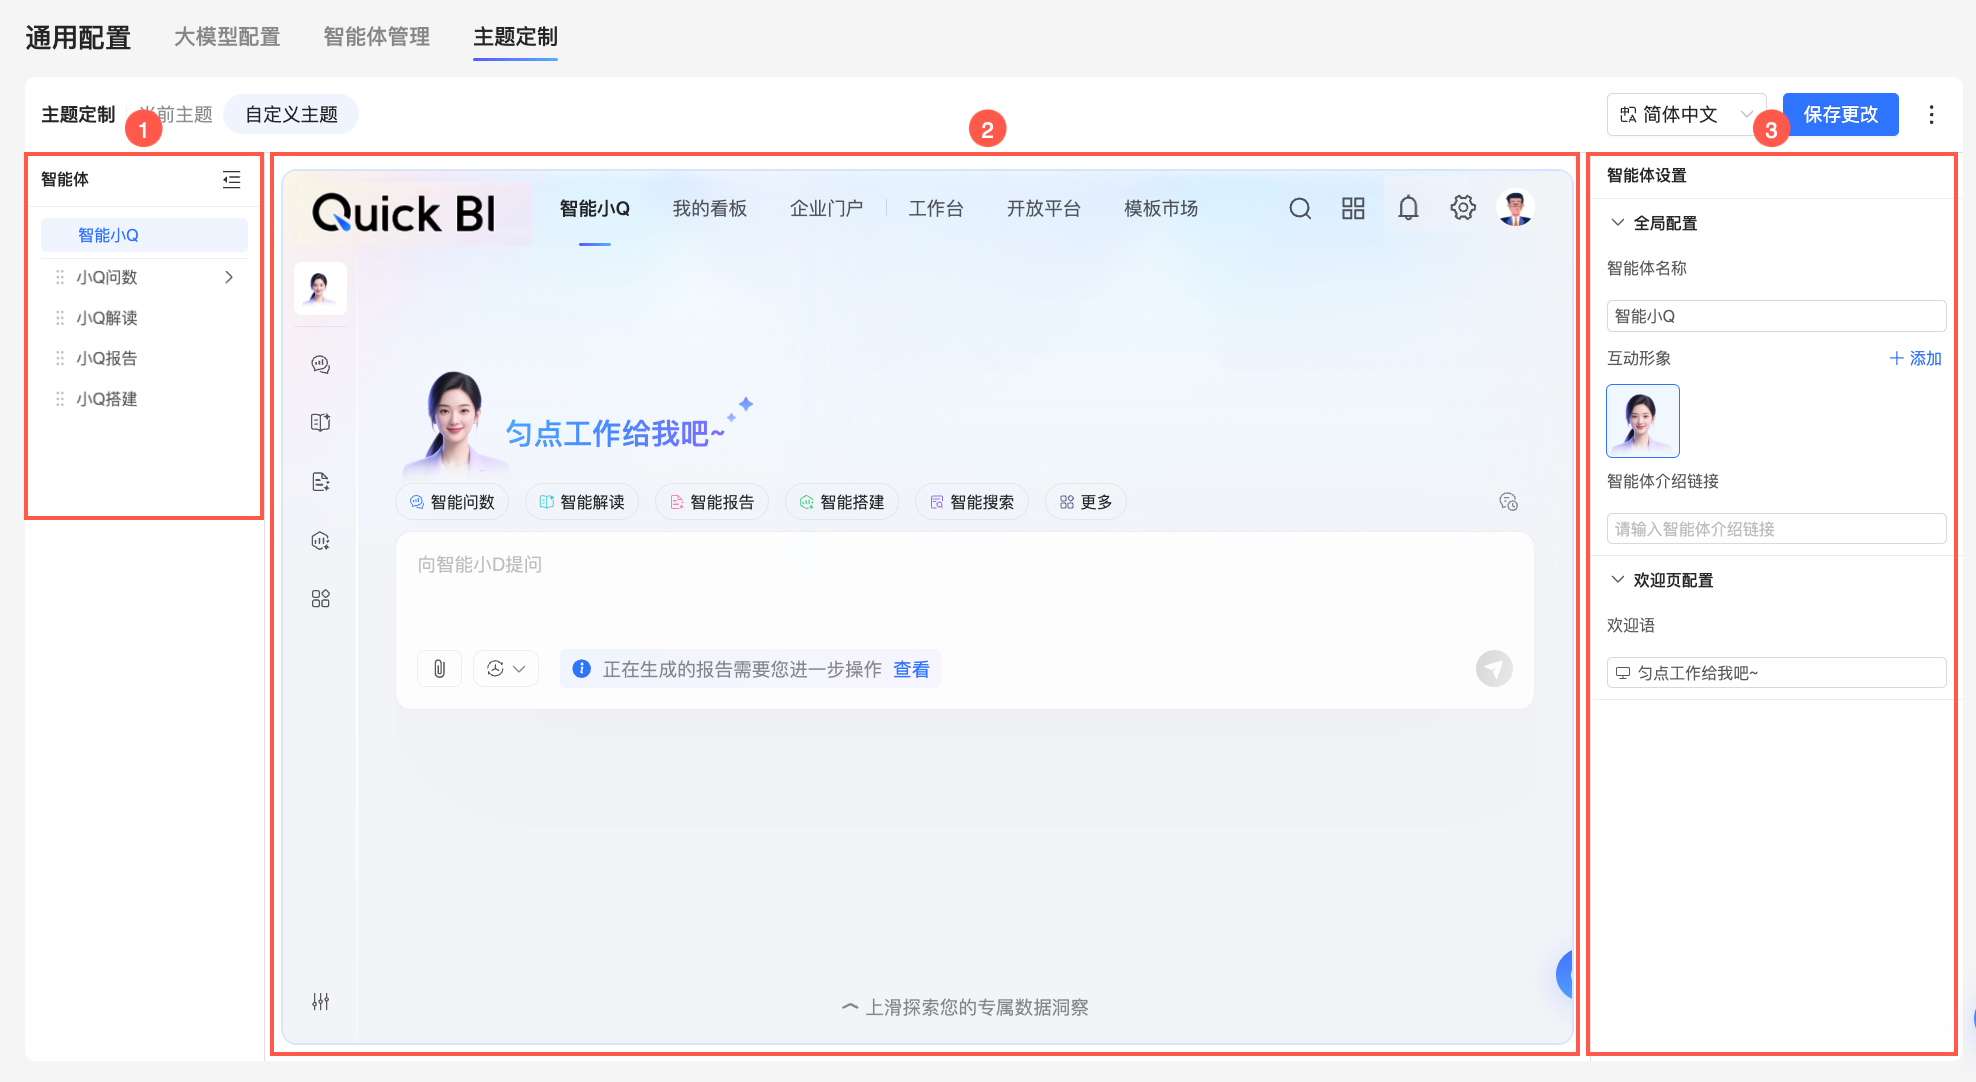
Select an agent: You can use the agent navigation bar (①) to quickly switch to the settings for a different agent. The Intelligent Q option is the main entry page for the feature, while the other options are for each sub-agent.
You can also drag the
 icon next to any sub-agent to adjust its order in the navigation bar of the user-facing feature page.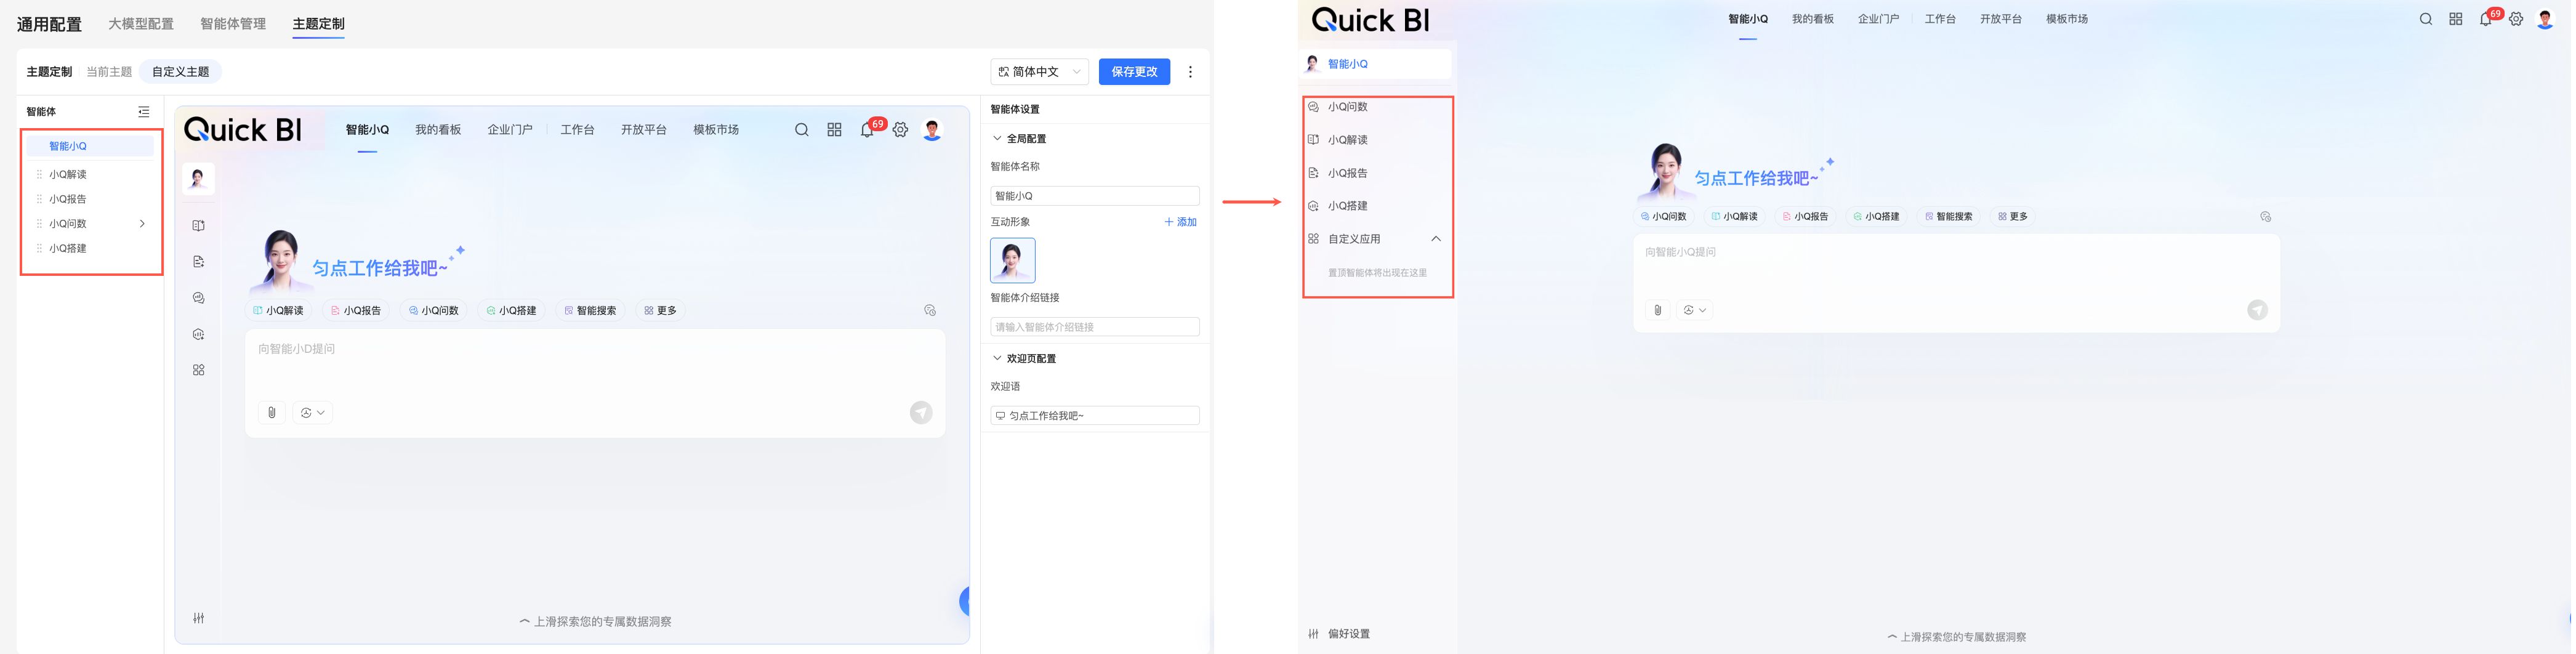
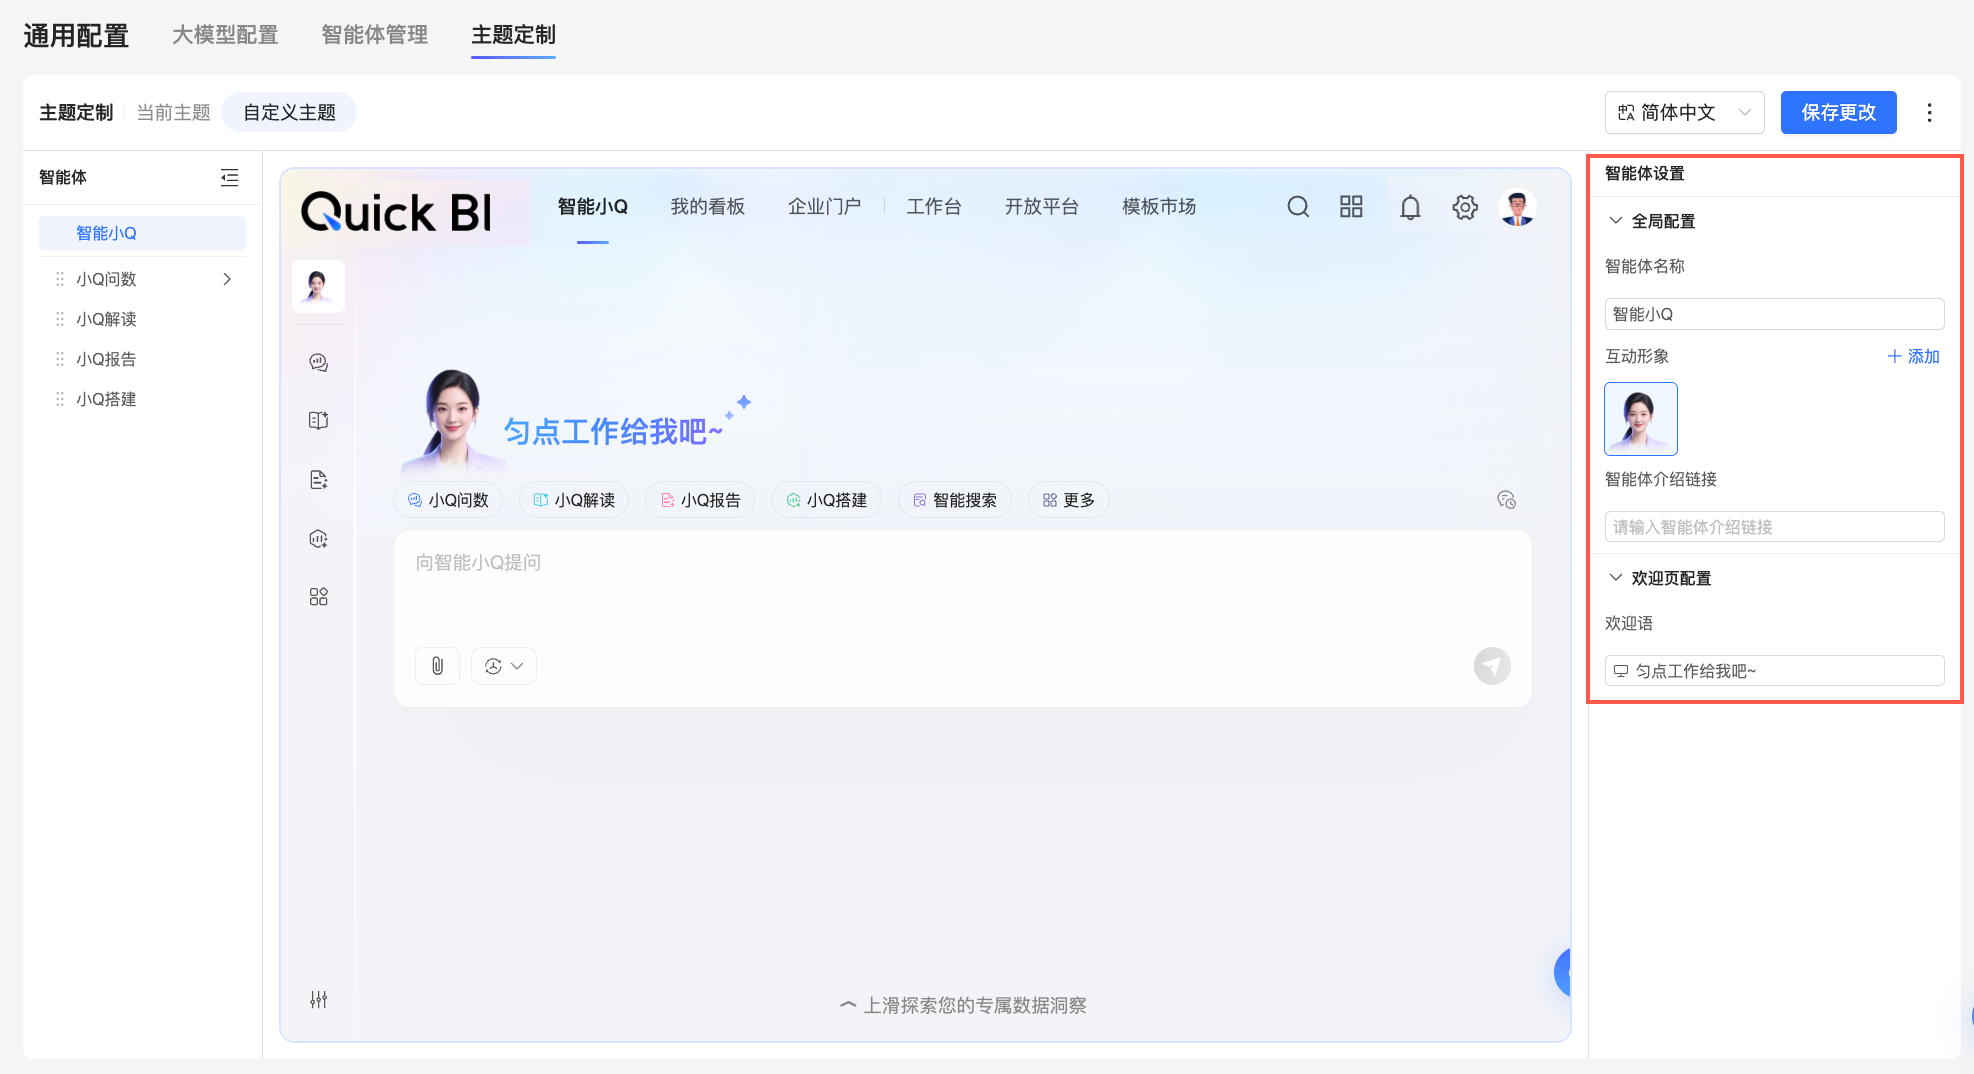
Configure parameters: On an agent's configuration page, you can configure its global configuration and welcome page configuration in the agent settings panel (③). The available parameters vary slightly between agent page types. The following sections provide details.
Intelligent Q: This is the main entry page for Intelligent Q. Here, you can configure the main page's interactive avatar and welcome message.

Parameter
Description
Global configuration
Agent name
Changes the display name for the Intelligent Q feature throughout the product.
For example, you can change the default name "Intelligent Q" to "Smart Analytics". After you save, the new name appears on the feature page, and all instances of "Intelligent Q" are replaced with "Smart Analytics".
NoteThe agent name must be 10 characters or less, cannot contain special characters, and cannot have leading or trailing spaces.
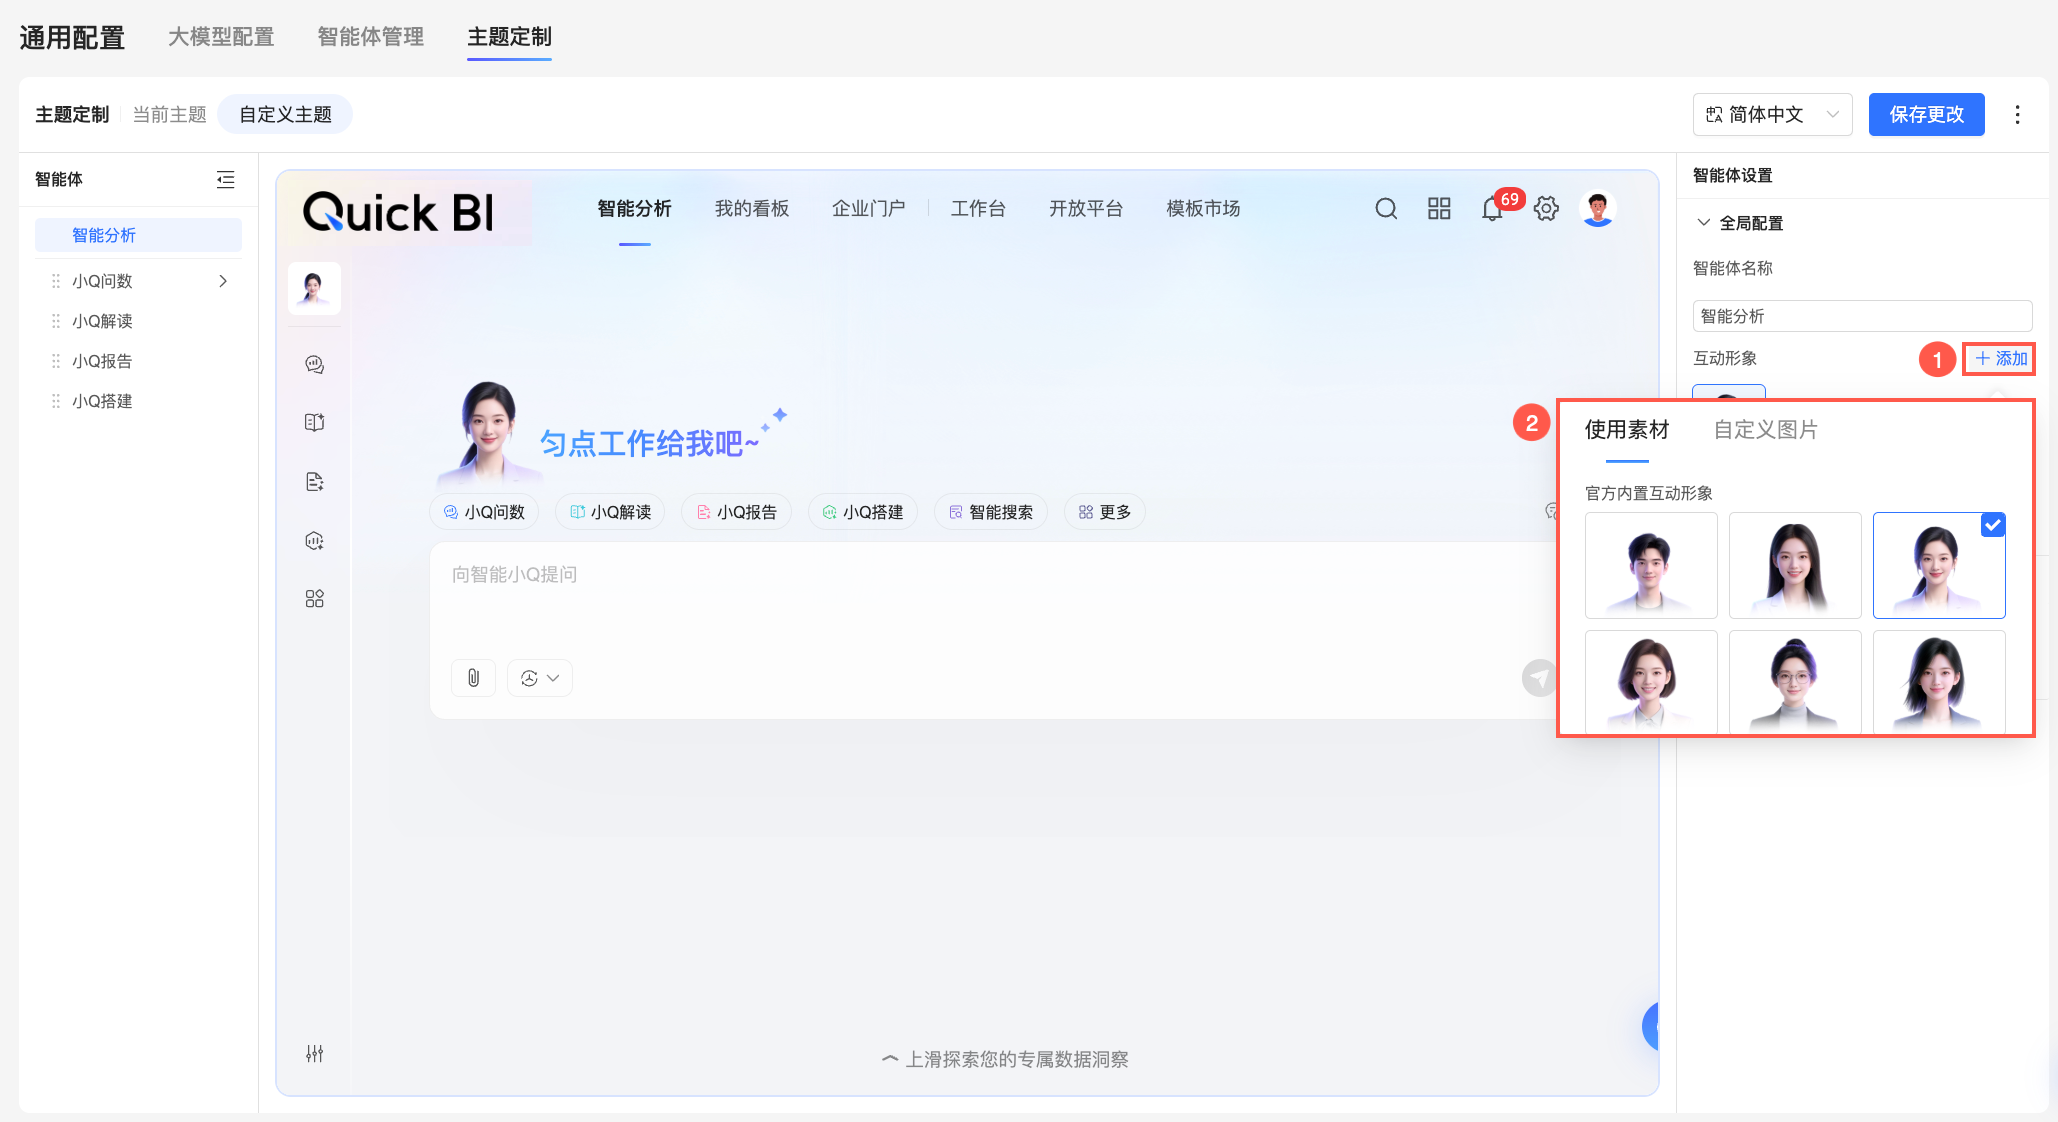
Interactive avatar
Click Add to add an interactive avatar in the dialog box. You can select a built-in avatar or upload a custom one from a local file, such as a company mascot or brand character.
NoteYou can add up to three interactive avatars.
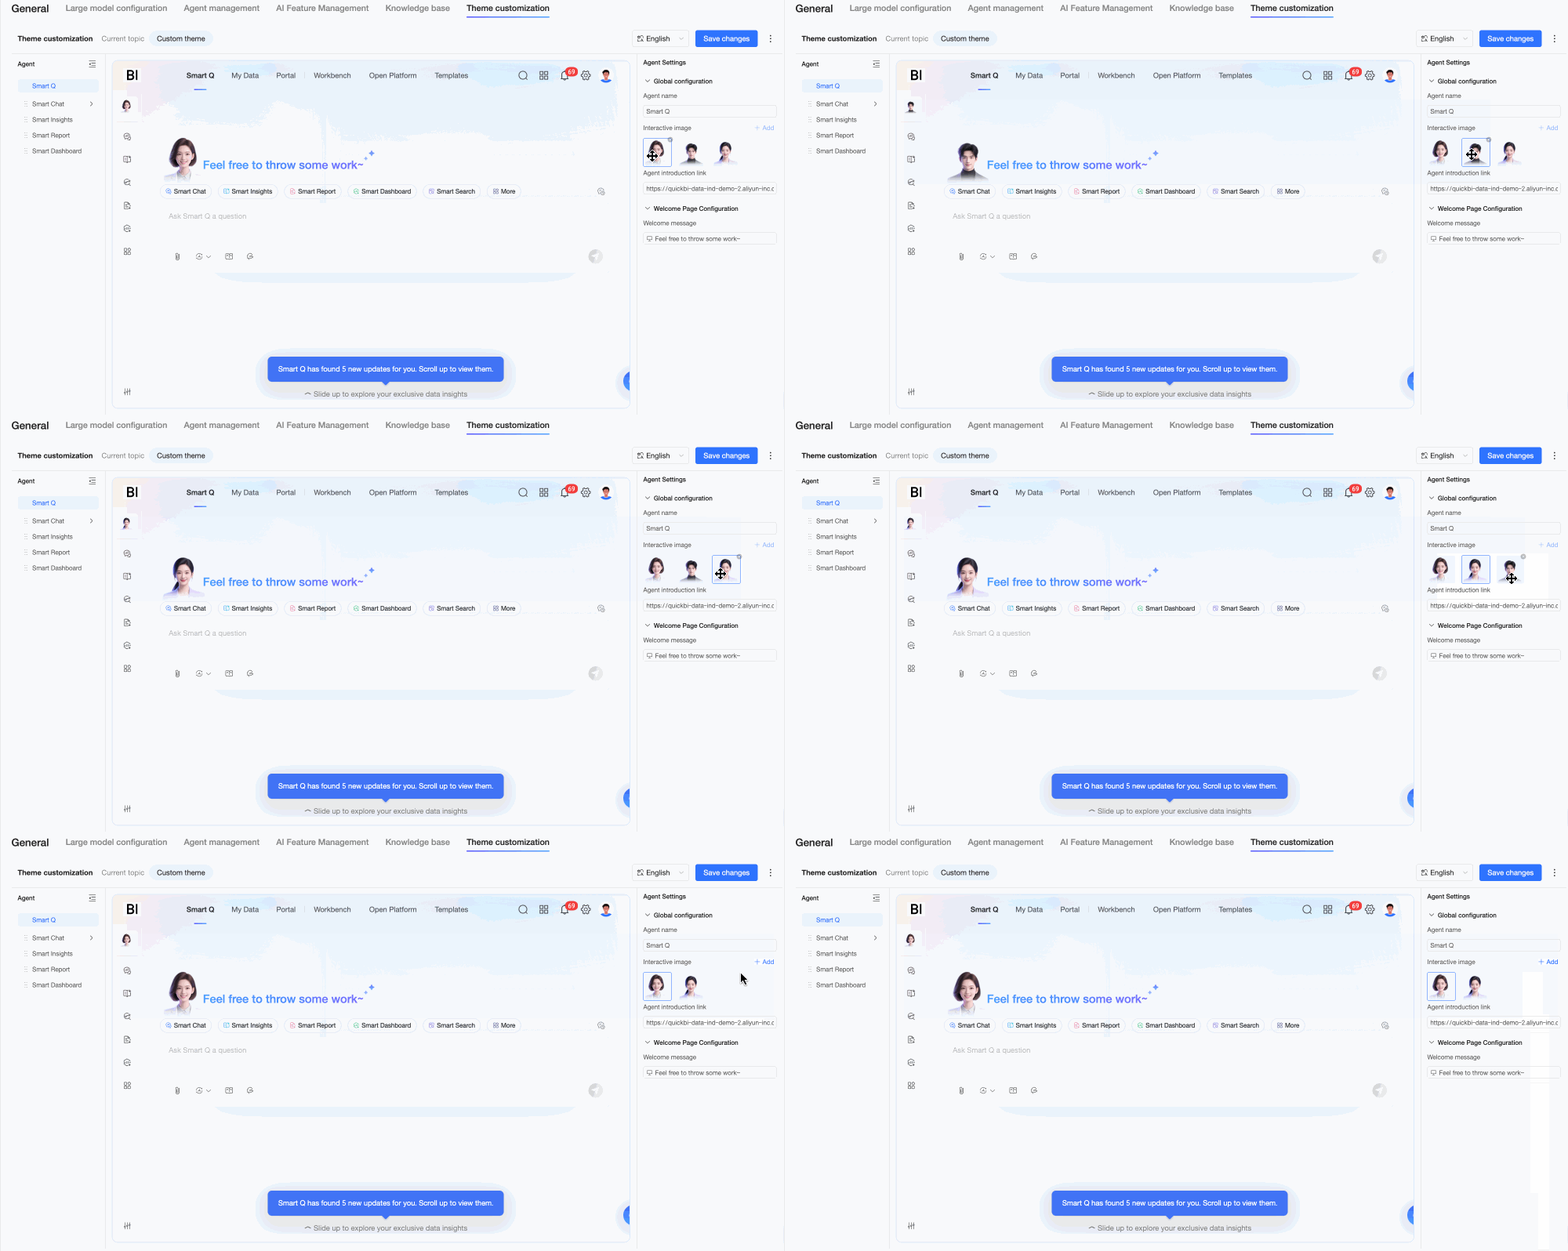
After you add an avatar, you can perform the following actions in the avatar list:
Switch avatar: Set the current agent's avatar.
Adjust order: Drag and drop to change the avatar order.
Delete avatar: When you no longer need an avatar, click the
icon in its upper-right corner to remove it.
Once the custom theme is applied, employees can also switch between enabled interactive avatars on the user-facing feature page based on personal preference or usage scenarios.
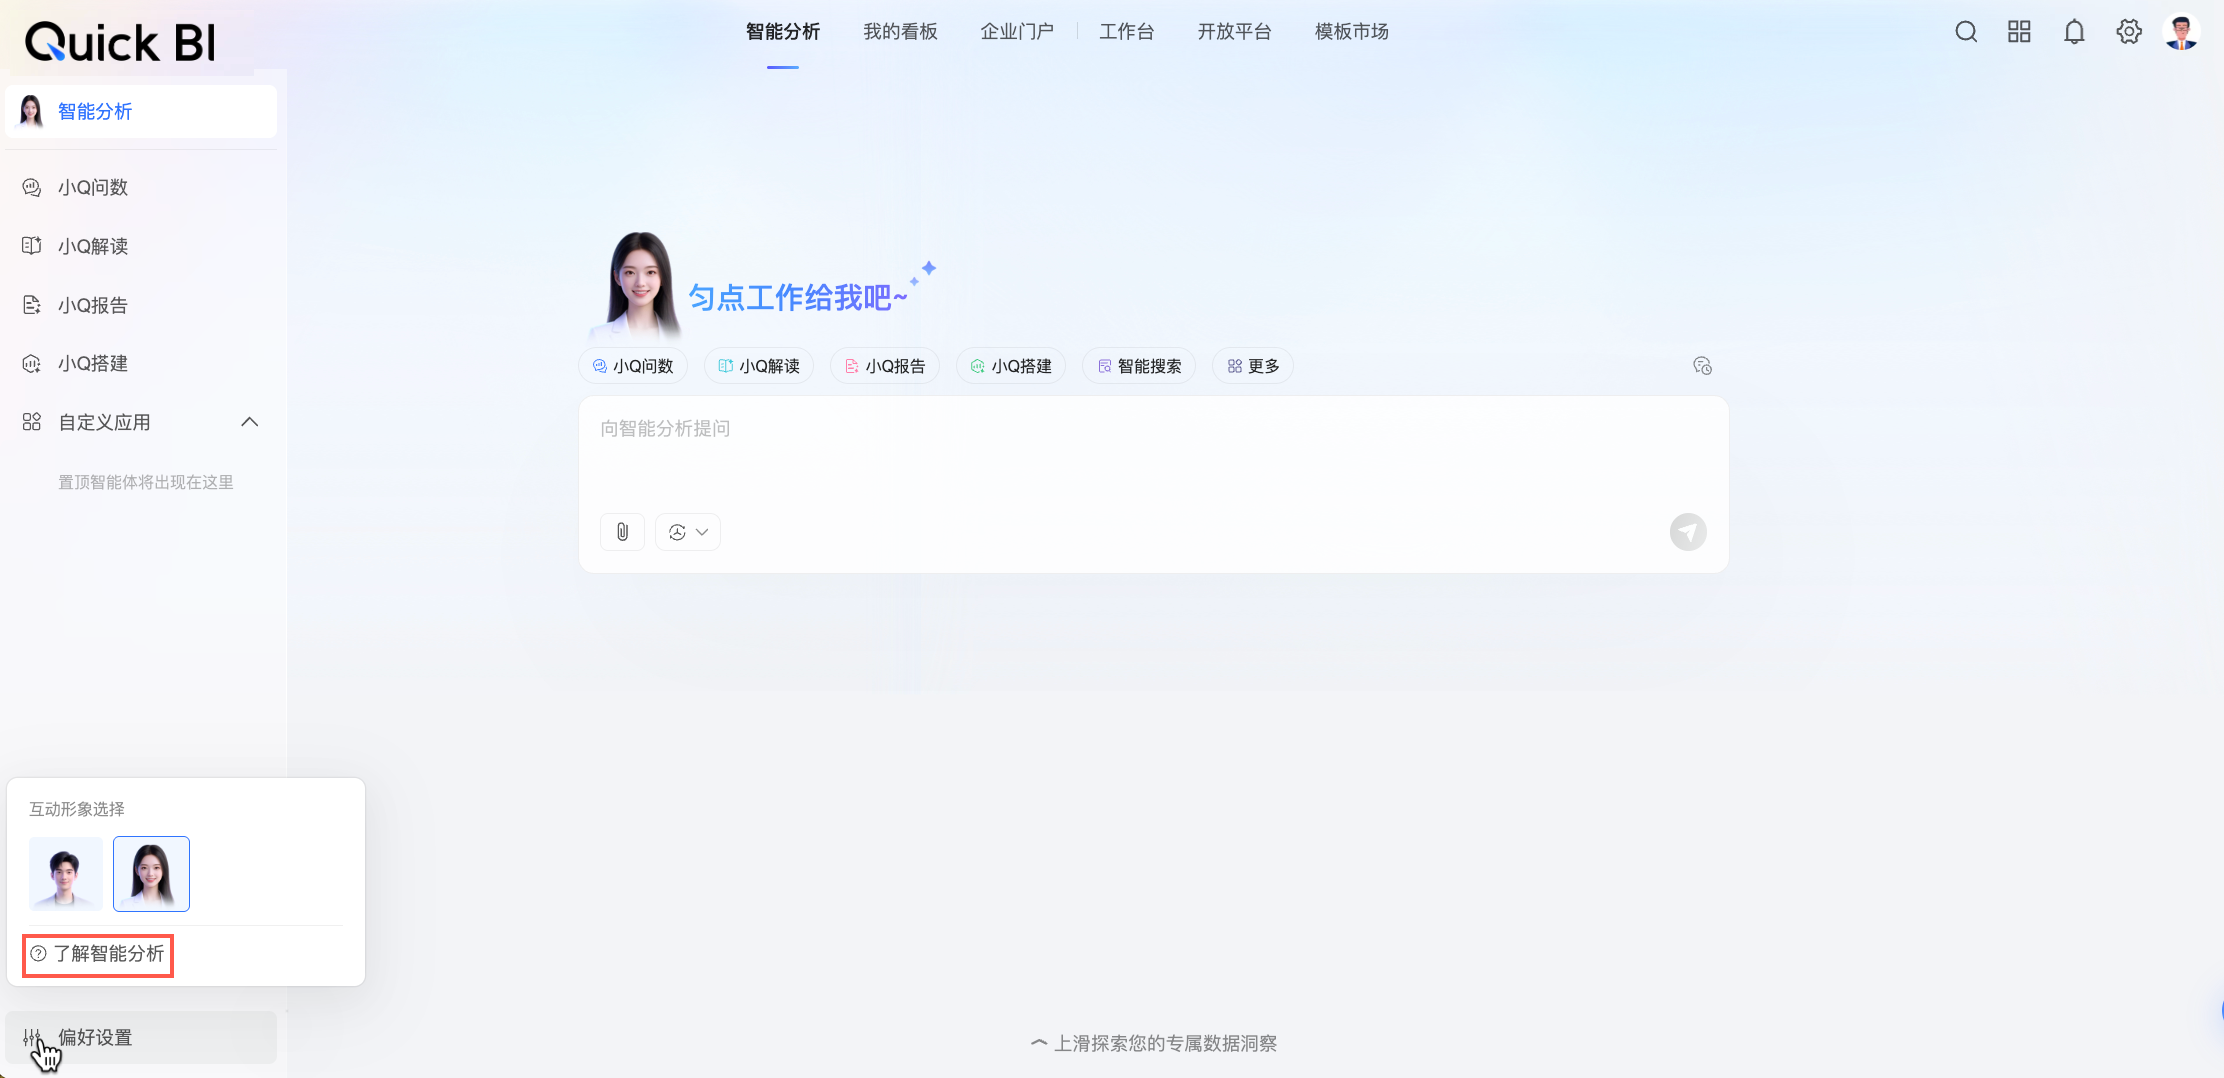
Agent introduction link
Enter a valid URL to associate an external informational page with the current agent. This can be used to provide more detailed support, such as internal help documentation, a user guide, or a dedicated introduction page for the agent.
After you save, a Learn More link appears in the preference settings on the feature page. Employees can click this link to navigate to the specified page and quickly get relevant information.
NoteIf you do not configure an agent introduction link, the Learn More link does not appear in the preference settings.
Welcome page configuration
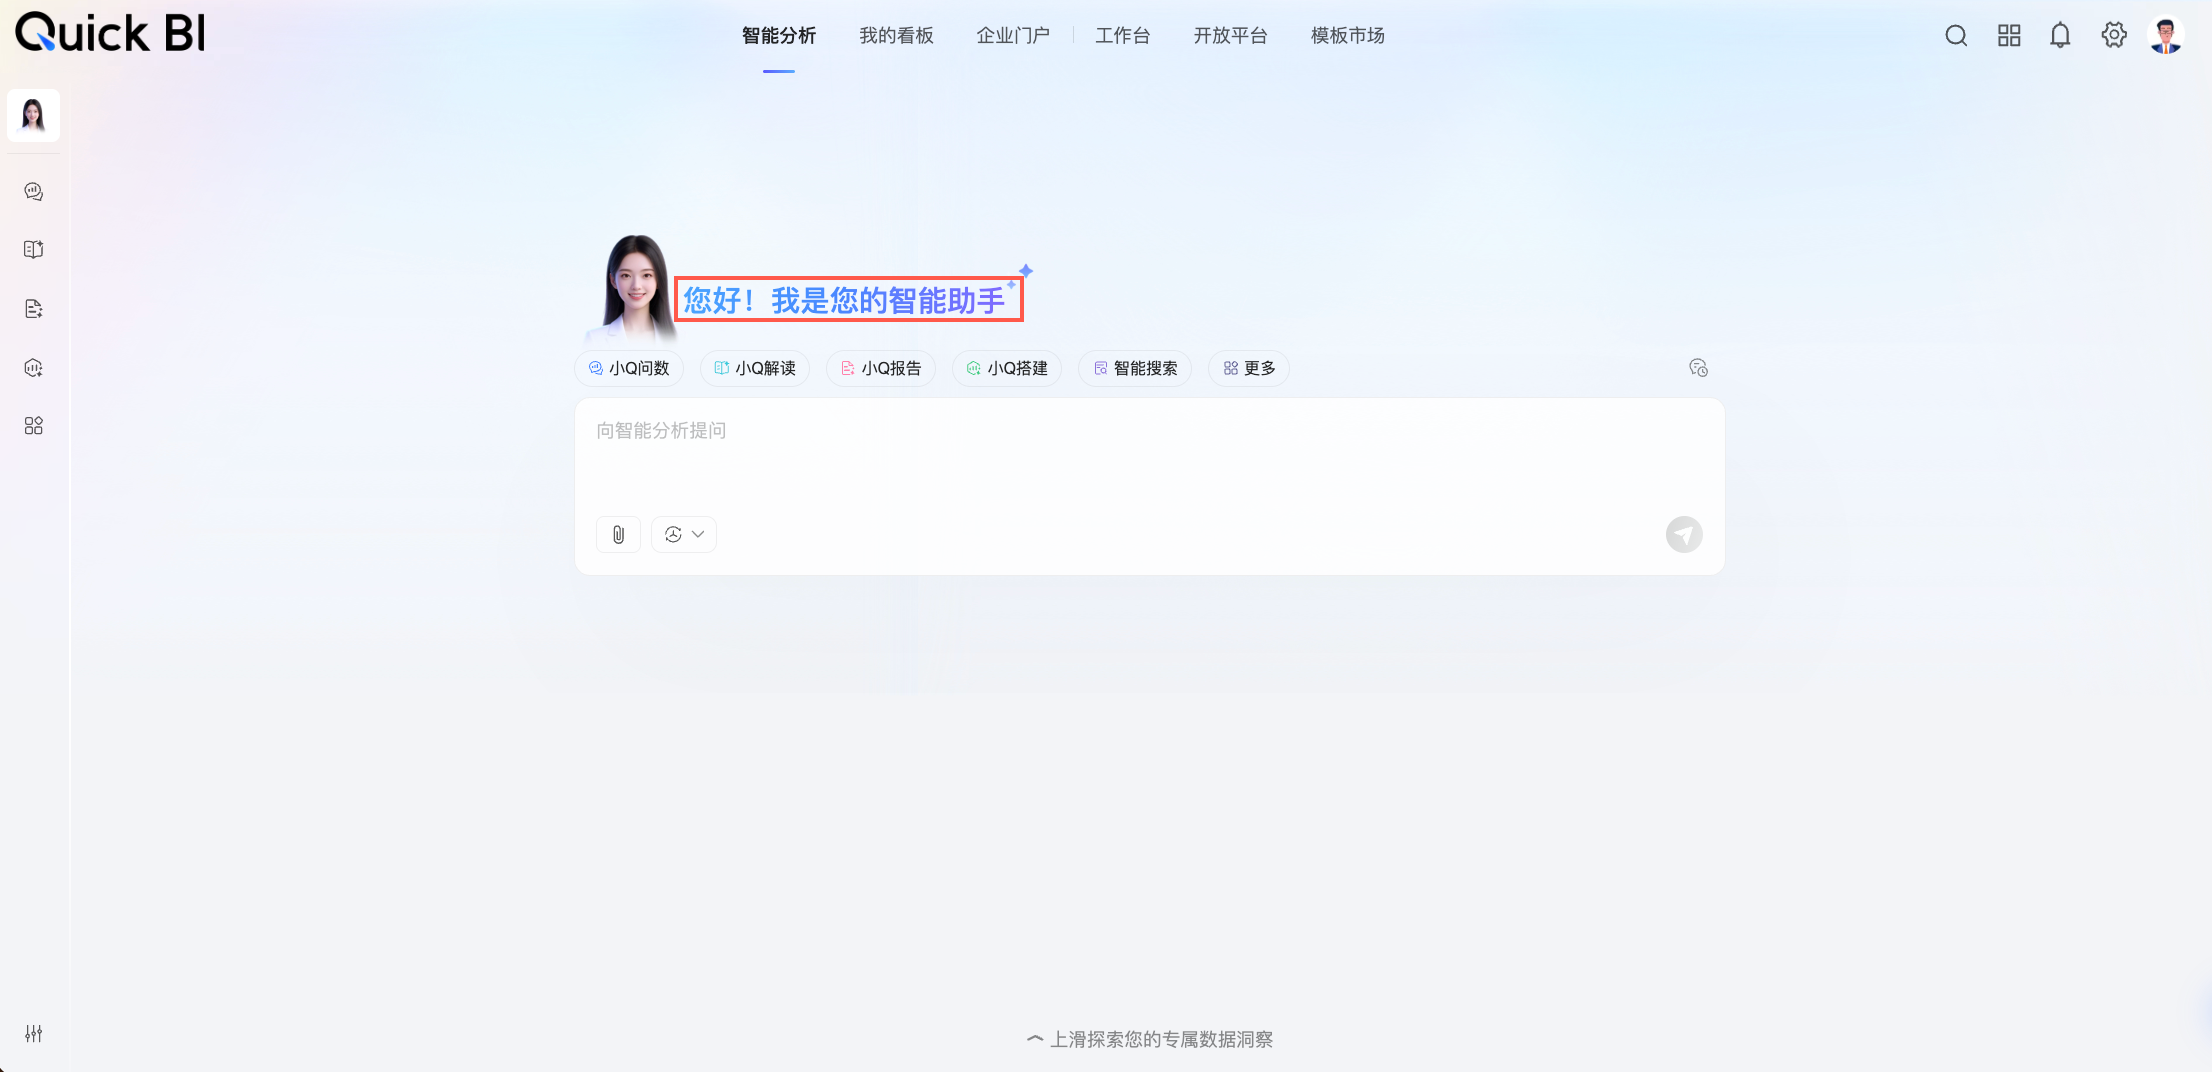
Welcome message
Sets the welcome message for the main page of the Intelligent Q feature. You can create a personalized welcome message based on your business scenarios or for user guidance, such as a company slogan, a friendly greeting, or an instructional prompt.
NoteYou can enter a maximum of 50 characters.
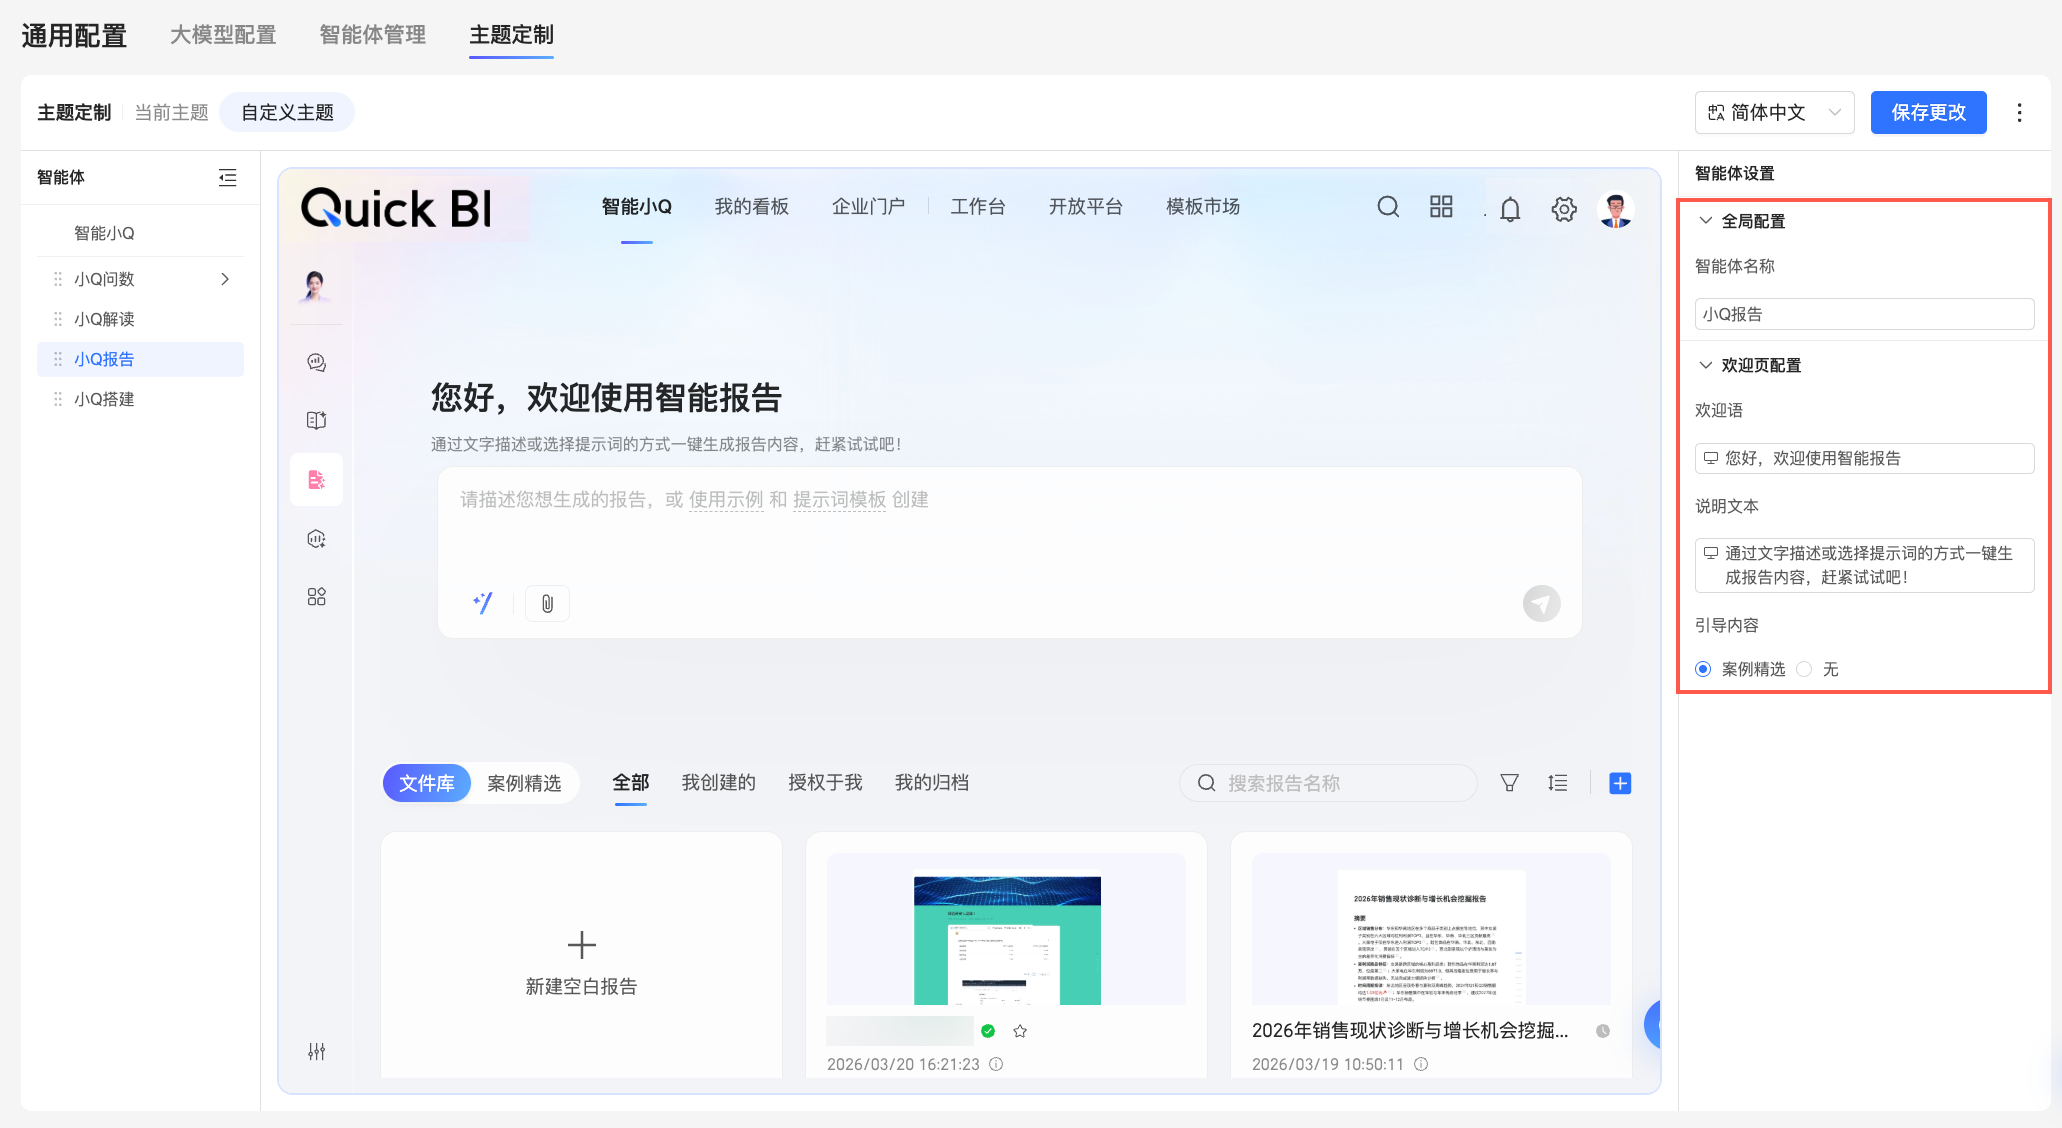
Sub-agents: These are the pages for specific Intelligent Q capabilities (for example, Q-Report). Each sub-agent can have its own agent name and welcome message.
Parameter
Description
Global configuration
Agent name
Changes the display name of the current sub-agent feature throughout the product.
For example, you can change the default name "Q-Report" to "Smart Report". After you save, the name is updated on the user-facing feature page, and all instances of "Q-Report" are replaced with "Smart Report".
NoteThe agent name must be 10 characters or less, cannot contain special characters, and cannot have leading or trailing spaces.
Welcome page configuration
Welcome message
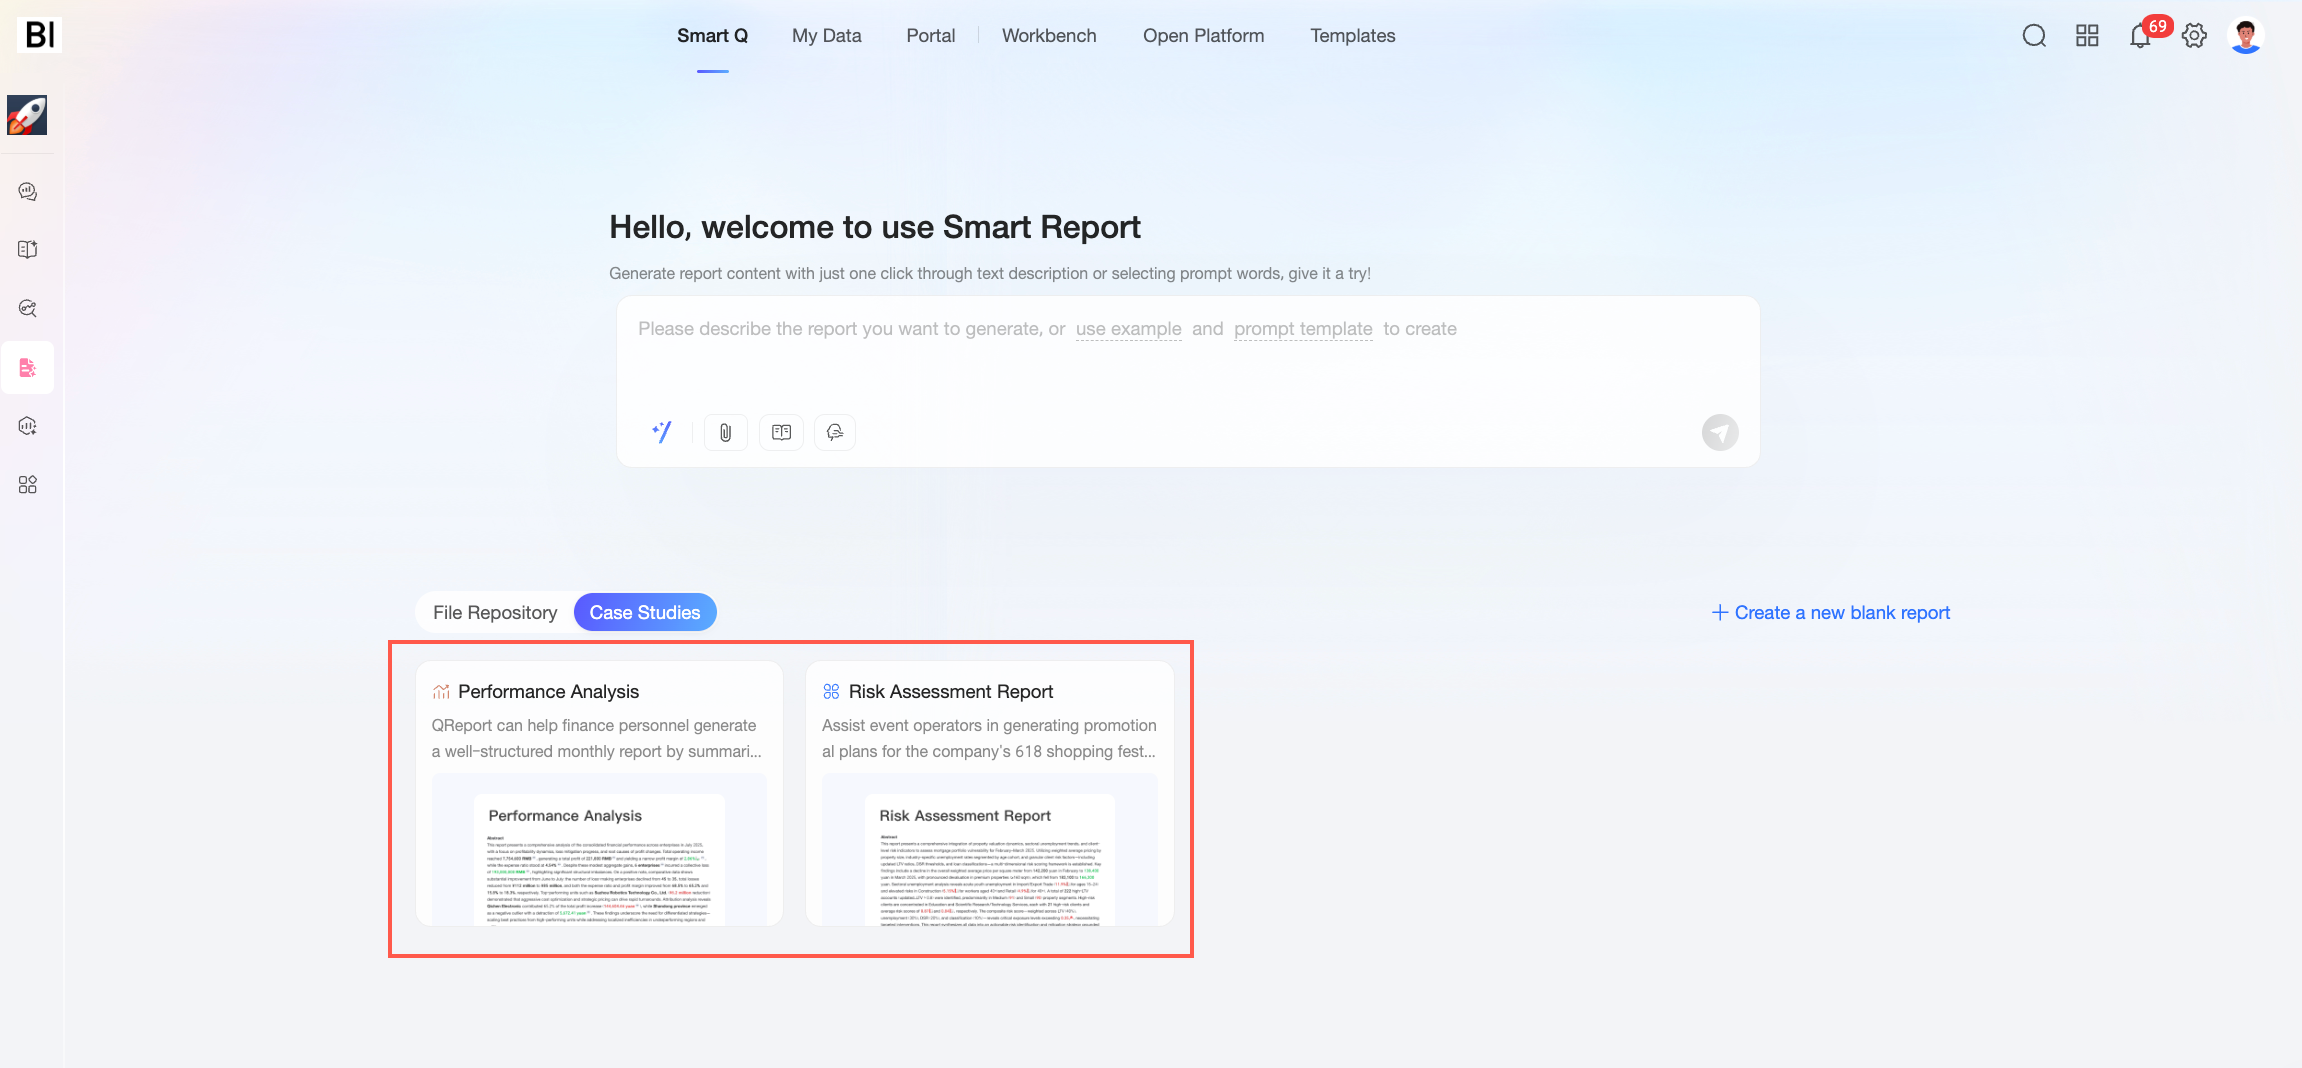
Sets the welcome message for the sub-agent's feature page. You can create a personalized welcome message based on the agent's specific function or for user guidance, such as a feature slogan, a friendly greeting, or an instructional prompt. For example, for Q-Report:
Feature slogan: Generate professional analysis reports with one click.
Friendly greeting: Hello, welcome to Smart Reports.
Instructional prompt: Describe your analysis requirements, and I will intelligently generate a report for you.
NoteYou can enter a maximum of 50 characters.
Descriptive text
Sets the text displayed under the welcome message. Use it to explain the sub-agent's value, usage, or required steps.
Example for Q-Report: Describe your needs using text or select prompt keywords to generate a report in one click. Try it now!
Guidance content
Specifies whether to display guidance content on the sub-agent's welcome page. This helps users quickly understand the agent's core capabilities and how to use them, making it easier to get started.
The configurable guidance content varies for different agents, allowing you to flexibly adjust the guidance strategy based on each agent's features and user needs. For example, for Q-Report, the guidance content is "Featured Cases", and for Q-Analytics, it is "Recommended Questions".
Preview the configuration: As you configure parameters, a live preview appears in the visualization area (②), allowing you to make immediate adjustments.
Save changes: Once you are satisfied with the configuration, click save changes. Your custom theme is then applied to the corresponding user-facing feature page.
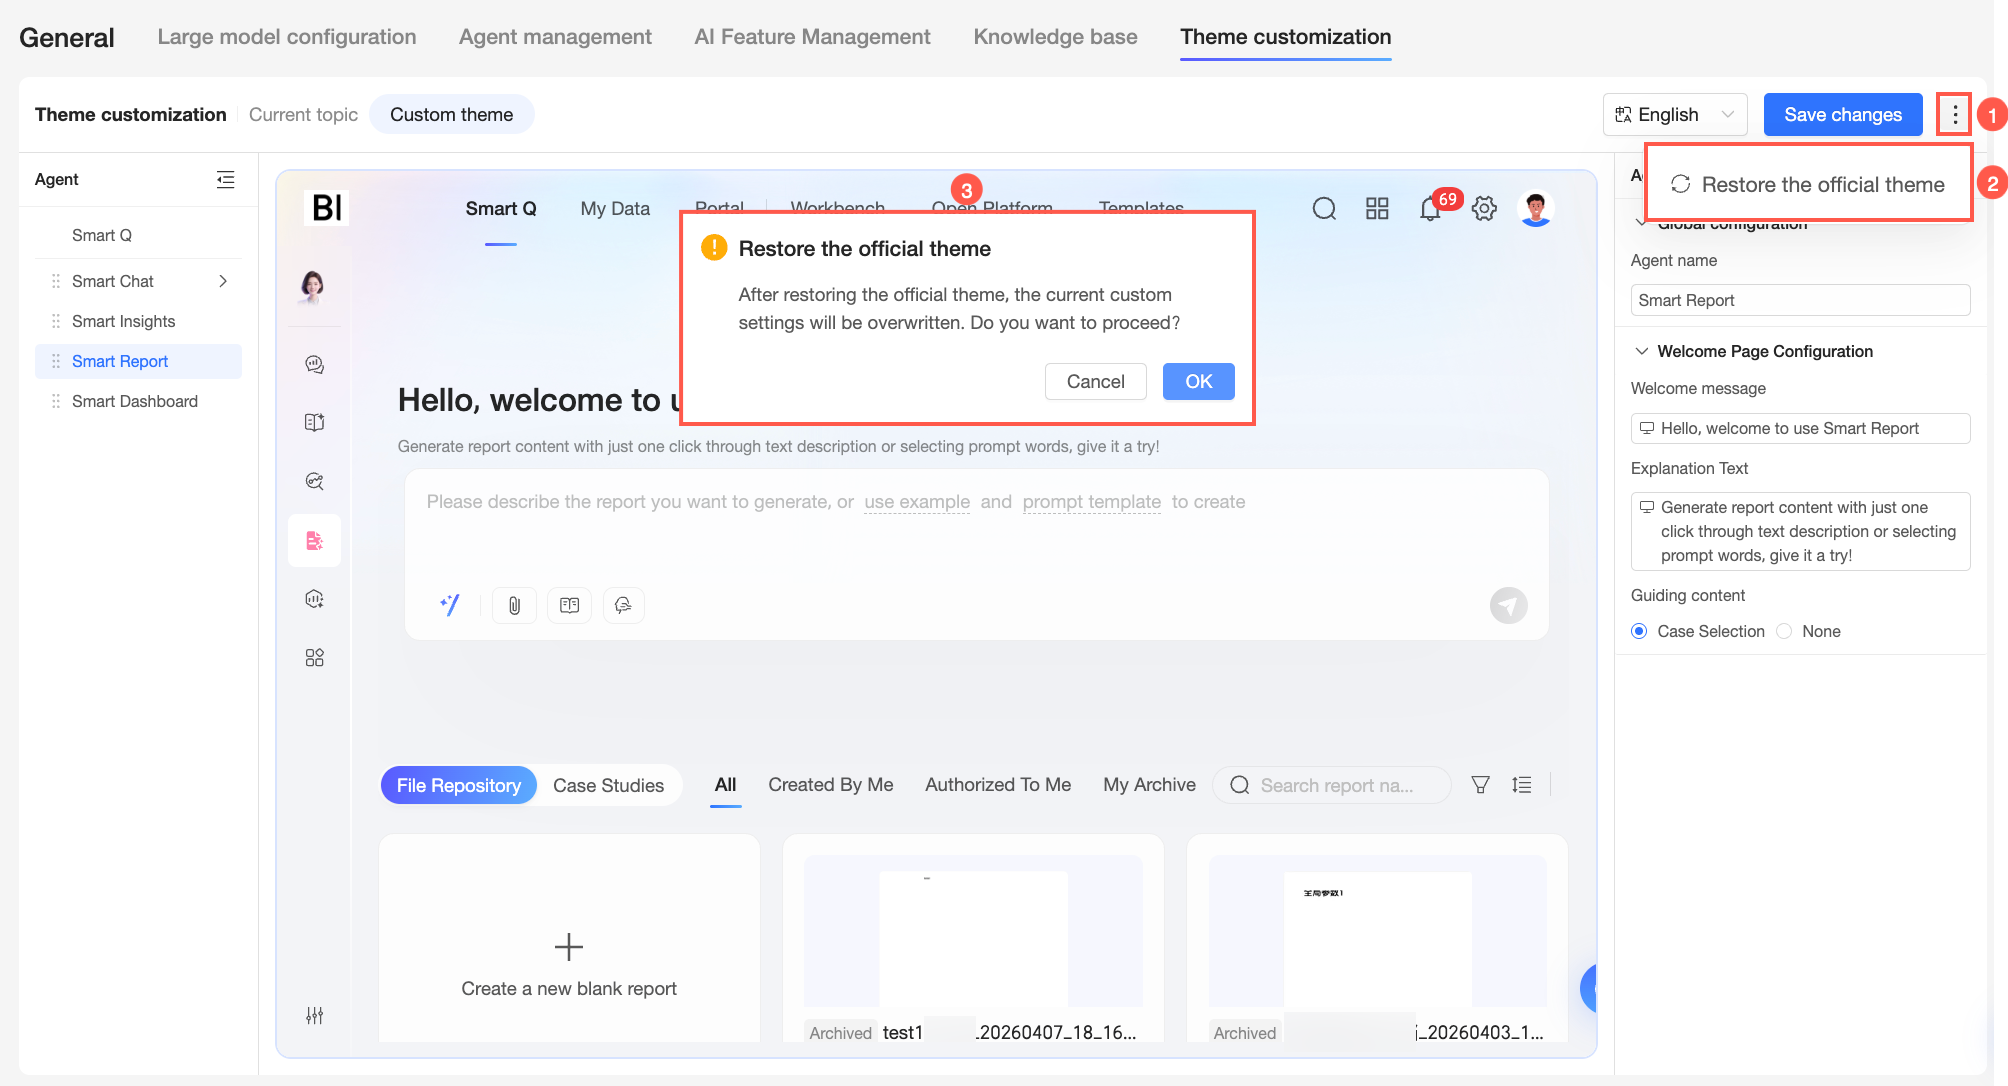
(Optional) Restore official theme: To revert your custom configuration to the default official theme, click the
icon in the upper-right corner, select restore official theme from the drop-down menu, and confirm in the pop-up dialog box.
 icon in its upper-right corner to remove it.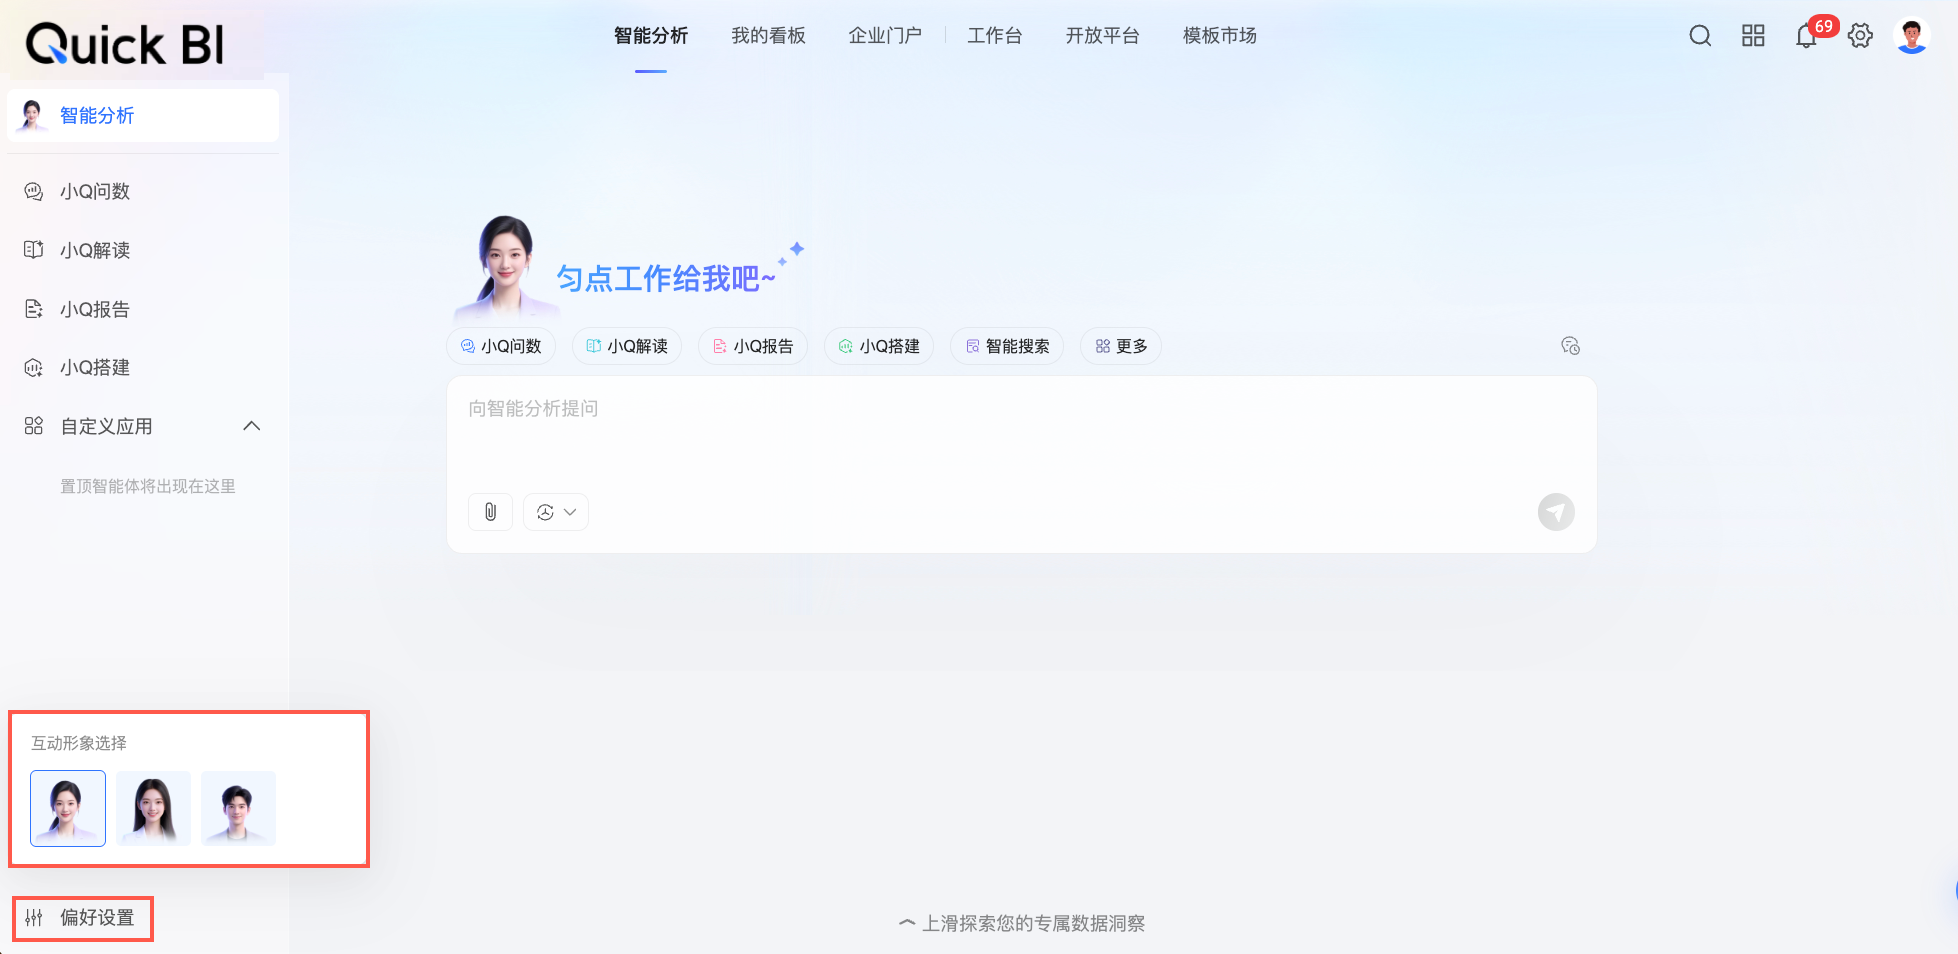
 icon in the upper-right corner, select restore official theme from the drop-down menu, and confirm in the pop-up dialog box.