Capturing and using controls
Overview
A control is the basic object a robot uses to simulate human interaction with a user interface. It represents any UI element that the robot might interact with during an automation process, such as an input box, a submit button, or a page title on a webpage, or a login button in a desktop application.
When you develop an automation process, for any specific operation, you must first capture the relevant element as a "control". You can then operate on this control to complete the desired action.
The product supports two methods for capturing controls:
-
Standard mode: Includes
auto-match mode,win32-UIA mode, andwin32-MSAA mode. This method extracts the UI structure of the target application, allowing you to perform various operations based on that structure. -
CV mode (computer vision): Use this mode when standard mode does not support an application's UI.
Start with standard modes such as auto-match mode, win32-UIA mode, or win32-MSAA mode. If these modes fail, use CV mode as a last resort.
Standard mode
Procedure
This section uses the control needed for Step 2: Search for "Alibaba Cloud" as an example to demonstrate how to capture a control:
-
Open the required page in your browser and click
Start Capturein the control panel of the editor. The control capture window appears. -
Click the
Capture Controlbutton (or press theF2key), move your mouse over the target control until a blue box locks onto it, and then click the left mouse button to complete the capture. The blue box locking process is shown below.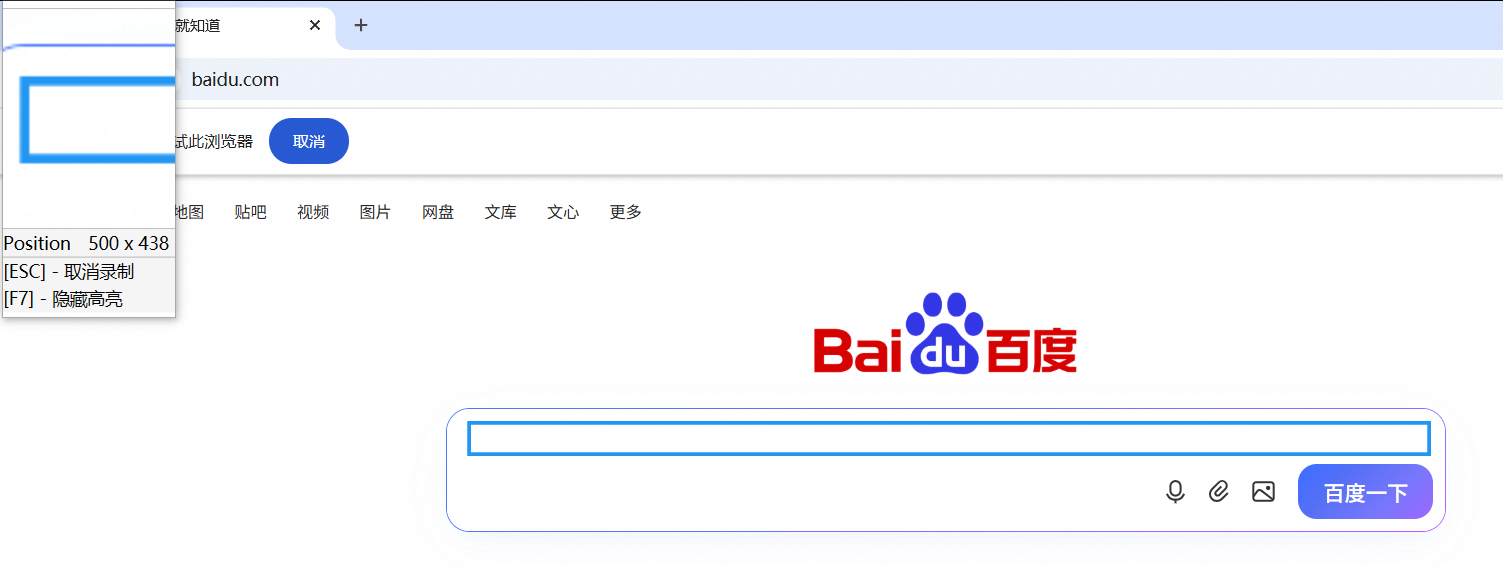
-
In the Edit Control window, enter a name for the control (①) and then validate it:
-
Select an action (②). For this example, select Input Text to test whether text can be entered into the Baidu input box.
-
In the Action Parameters, enter the text to input, for example, "test", in the Input Content field (③).
-
Then, click the
Verify Actionbutton (④ in the following figure). The text is entered successfully, and the verification is also successful (⑤ in the following figure). -
Click Save (⑥).
-
-
Similarly, you can capture the search button. During validation, select Click as the action and save the control after it validates successfully.
Selecting appropriate capture conditions
A control that previously worked may fail on a subsequent run, returning a "control not found" or timeout error. This can happen for the following reasons:
-
The attributes selected for the control are not robust. Their values change in different situations, making the control difficult to locate.
-
The target application's UI has been updated. The previously defined capture conditions no longer match the new UI elements.
Therefore, the key is to select appropriate capture conditions for your controls. You can configure these conditions by editing the attributes in the Capture Control window of the editor.
When you capture a control, the product automatically selects some attributes based on the current page. These default attributes are only guaranteed to work in the current context and may not be robust enough for all scenarios. You may need to optimize and adjust them.
Follow these basic principles when selecting capture conditions (editing attributes):
-
Start by selecting and editing attributes from the bottom of the list upwards.
-
Avoid attributes that are strongly dependent on the current page content. Use the
Containsoperator where appropriate. -
After each change, verify the control by using the
Highlight Controlbutton or theF5shortcut. -
Test the control in various situations.
Example
-
In this example, the goal is to get a stock price. The attributes automatically selected during capture:
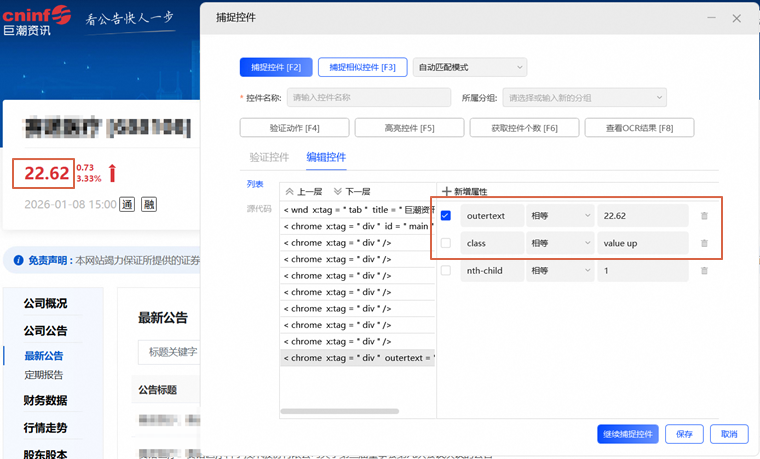
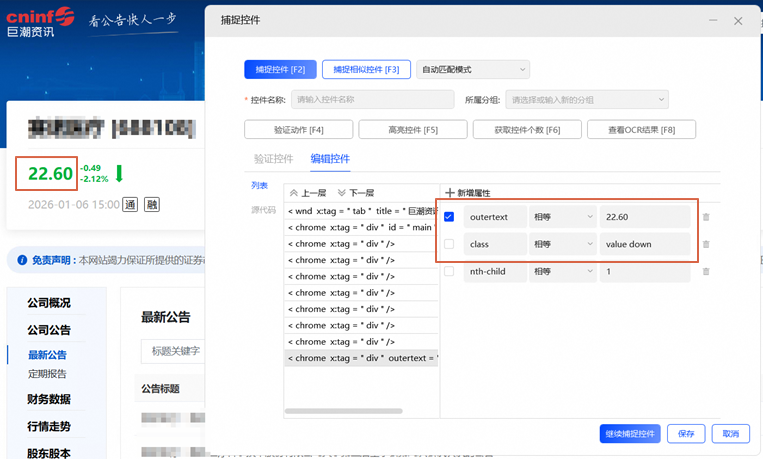
-
Several attributes at the lowest level are not ideal:
-
The
outertextis selected by default, but it is not a suitable capture condition. Its value is dynamic because it is the stock price we want to retrieve. -
The
classattribute is also not suitable for direct use, as its value changes depending on whether the stock price is up or down.
-
-
Based on the principles above, you have two options for selecting the control attributes:
-
Option 1: Analyze the
classattribute. Use theContainsoperator and set the value tovalue.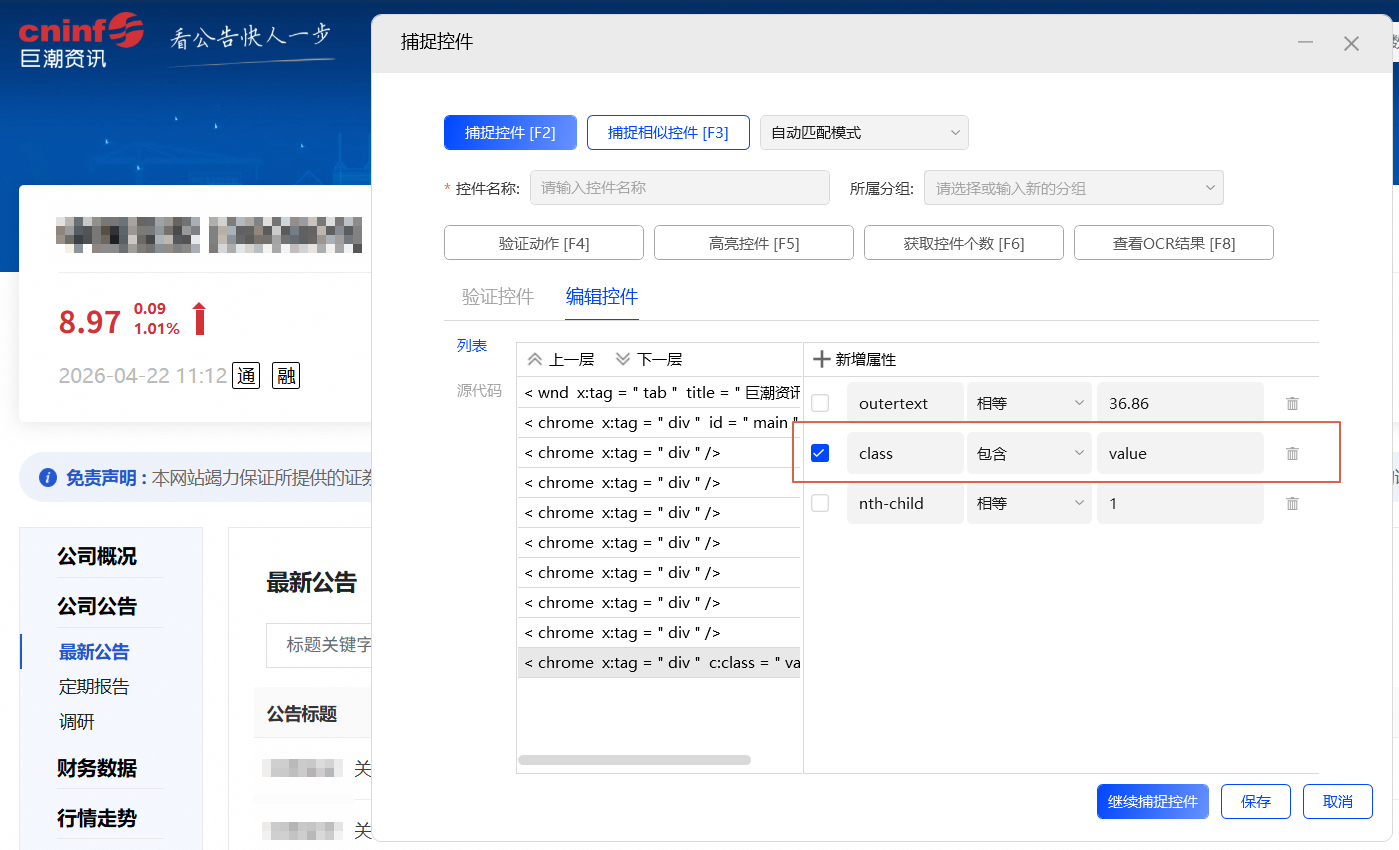
-
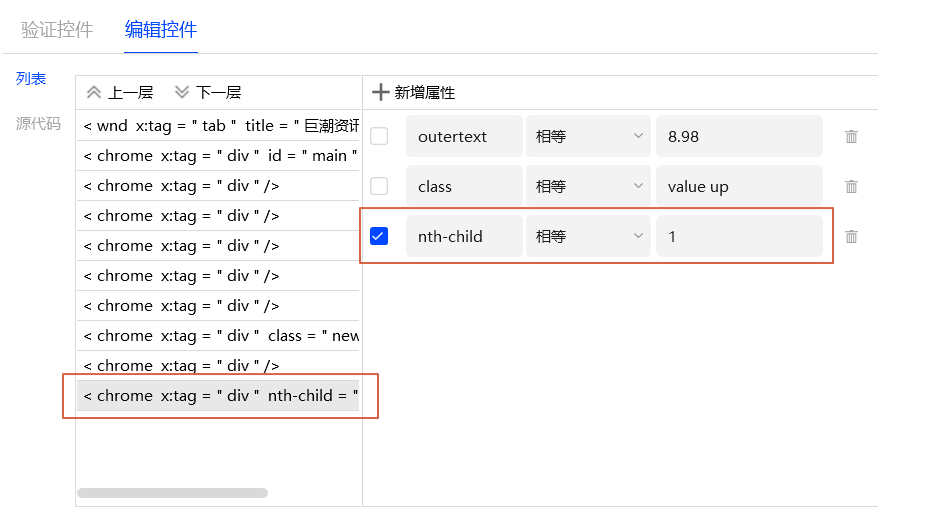
Option 2: Work your way up from the bottom of the attribute list and experiment.
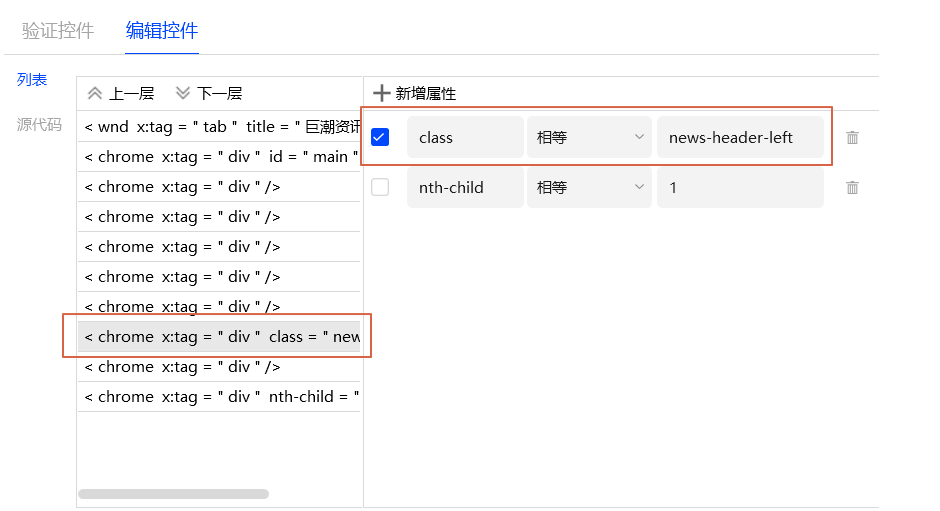

NoteA single control can often be defined using different attribute combinations. Choose the best option for your scenario.
-
Capturing similar controls
In scenarios such as data collection, you often need to operate on multiple similar elements on a page, such as items in a product list or search results. This section describes how to use the Capture Similar Controls feature to process these elements in bulk.
Procedure:
-
First, use
Capture Controlto capture an element on the page. -
Then, use
Capture Similar Controlsto capture another element on the page (Note: Do not select the same element). -
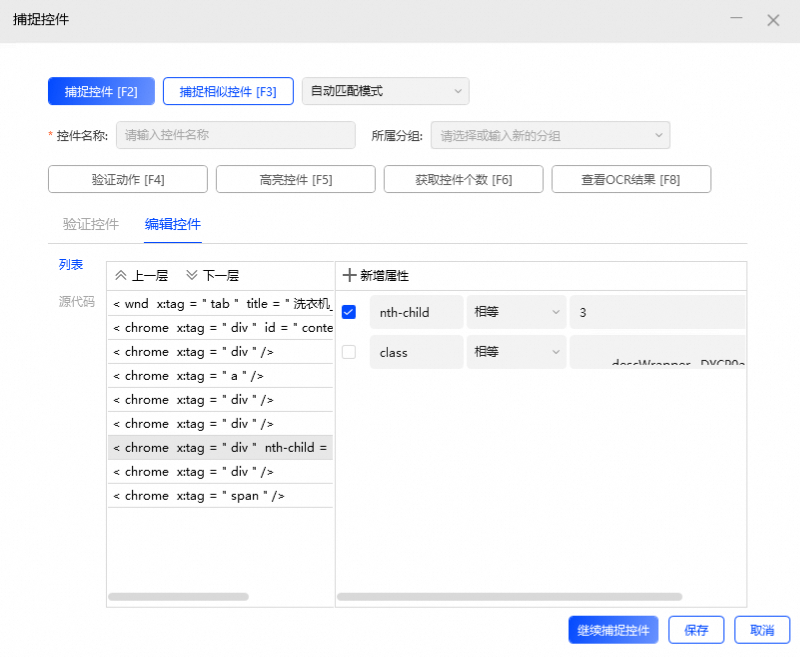
The product analyzes the attribute information from both captures and automatically selects a common set of attributes.
ImportantWhen you use
Capture Similar Controls, you must ensure that the first and second captured elements are similar. Otherwise, the "Merge failed. The provided selectors are not similar." error is reported. For example, search engine results often contain paid advertisements interspersed with organic results. If you try to capture these two types of elements together, a similar control cannot be generated because their element structures are different.
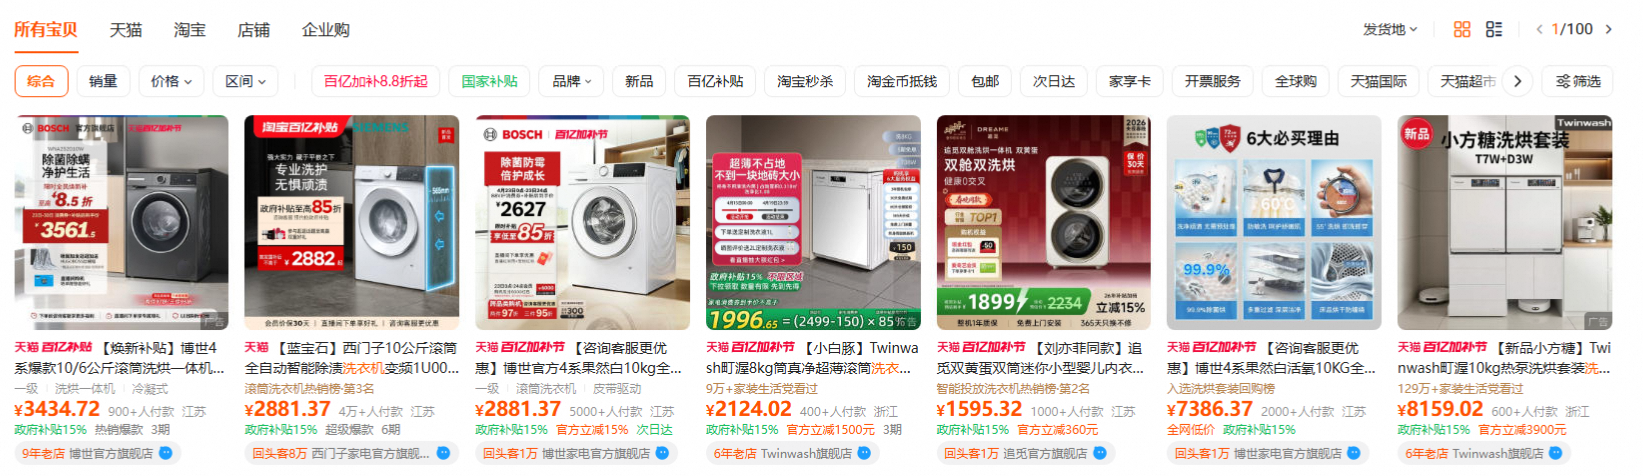
Example: Getting product names
The goal is to get the names of all products in a product list.
-
First, click
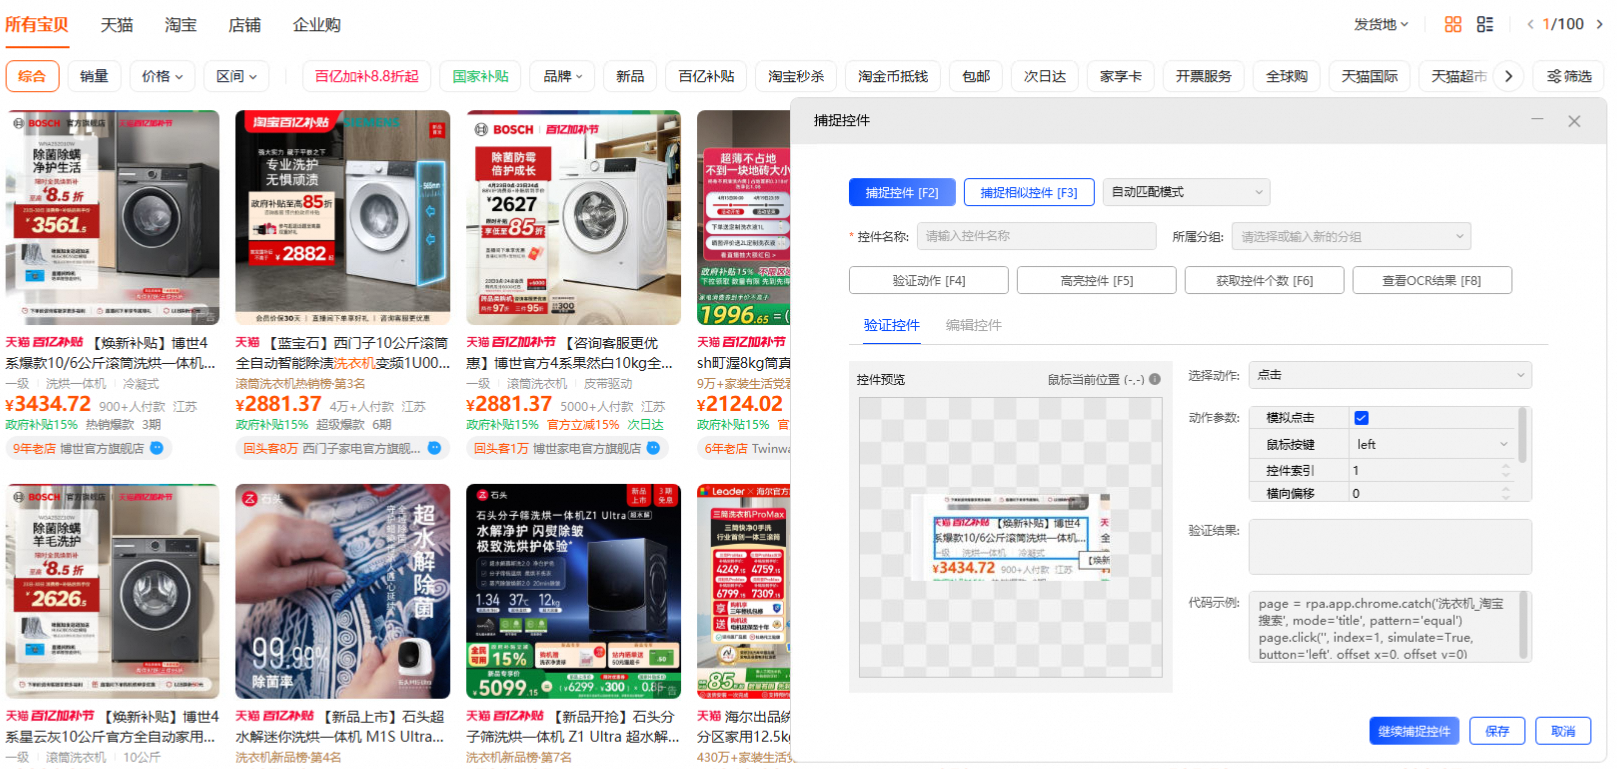
Capture Controlto capture the name of the first product (the text below the image). -
Click the
Capture Similar Controlsbutton to capture the name of the second product. The product modifies the attributes based on the results of the two captures, as shown in the following figure. -
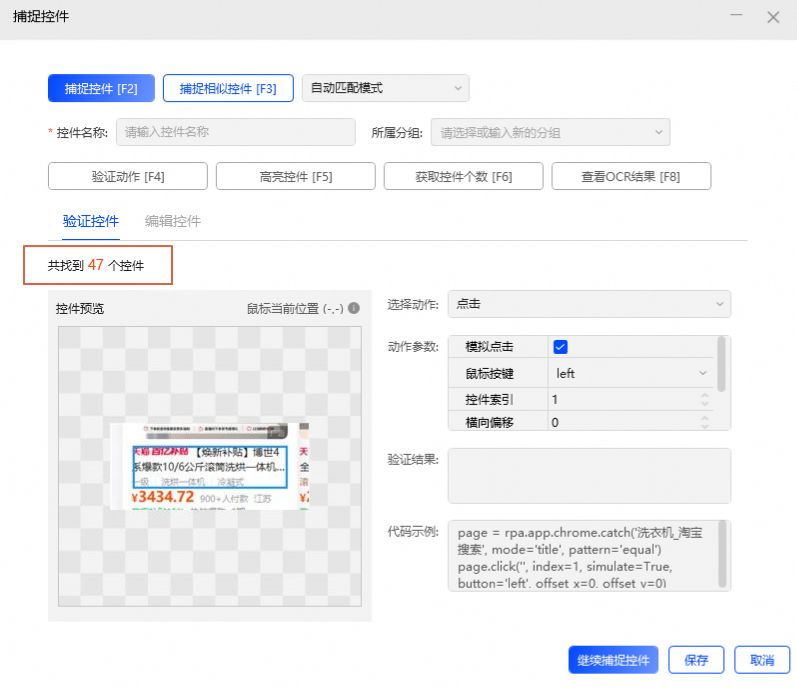
In the verification control, click the
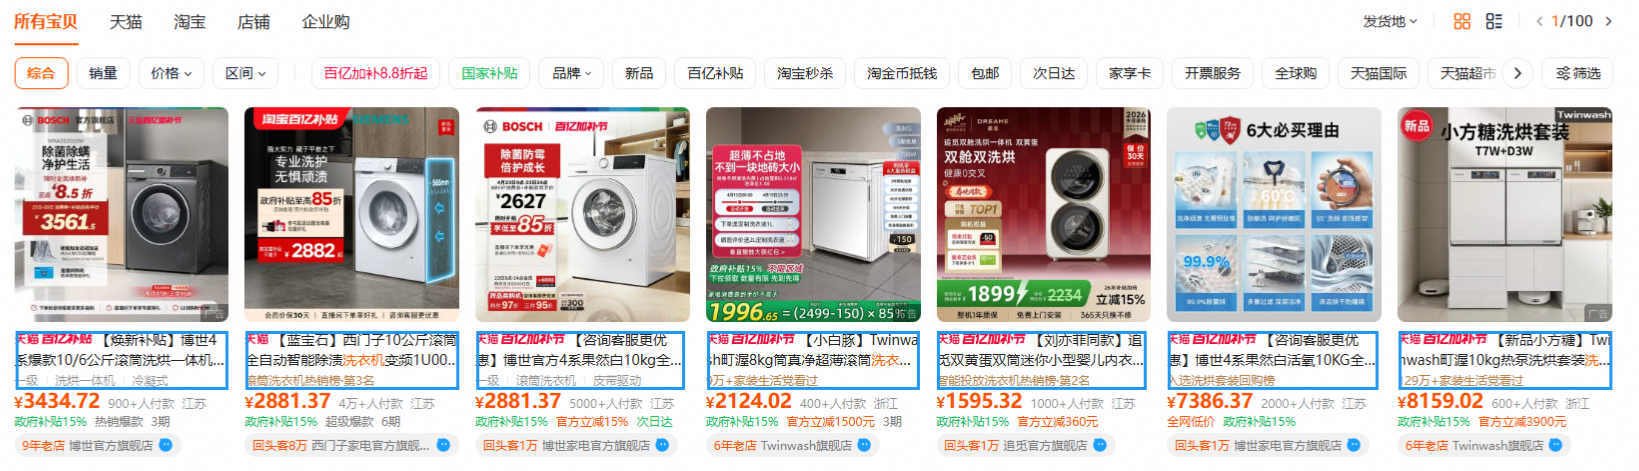
Highlight Controlbutton. You can see that multiple product titles on the page are selected. -
The number of matched controls is also displayed. Use this number to confirm whether the correct number of items has been captured.
ImportantThe properties automatically generated by the Capture Similar Controls feature are not guaranteed to be effective in all scenarios. Therefore, you may need to adjust them based on your actual situation. For more information, see Selecting appropriate capture conditions.
-
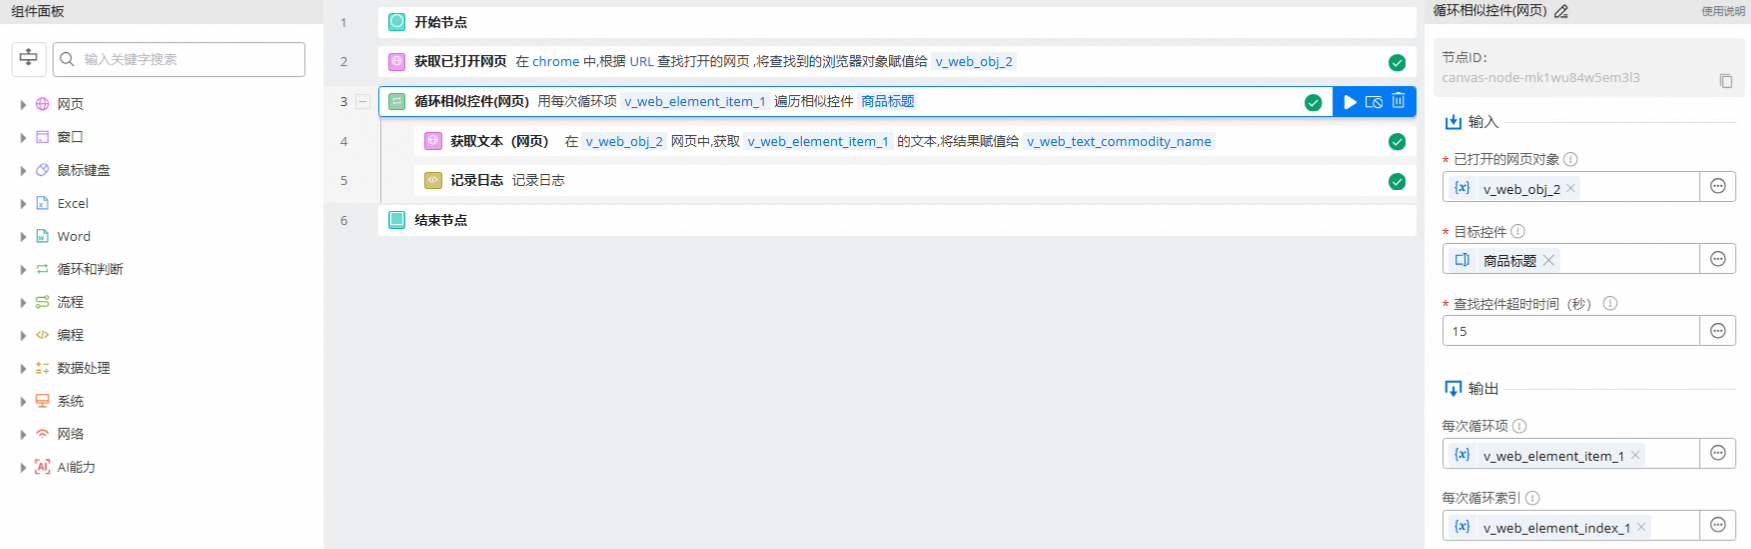
After the control is saved (in this example, the control is named "Product Title"), it is used in the process as follows:
ImportantThe control list index starts at 1.
-
Visual development mode
NoteCommon visual components include Loop Through Similar Controls (web), Get the Number of Similar Controls (web), Loop Through Similar Controls (window), and Get the Number of Similar Controls (window).
-
Coding development mode
page = rpa.app.chrome.catch('https://s.taobao.com/search', mode='url', pattern='contain')
num = page.count('商品标题')
for i in range(1,int(num)+1):
    title = page.text(element='商品标题',index=i)
    print(title)
-
Example: Getting multiple titles
CV mode
CV mode is supported in RPA Client version 4.8.3 and later. It is an upgraded version of the previous OCR recording mode.
CV mode is primarily used when standard mode cannot parse target UI elements. This method relies on images of the application interface that you capture. At runtime, the robot locates UI elements by comparing the live screen with these captured images.
Procedure
-
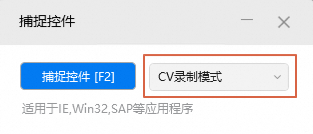
Before you click the
Capture Controlbutton, selectCV Recording Modefrom the mode list on the right. -
Click
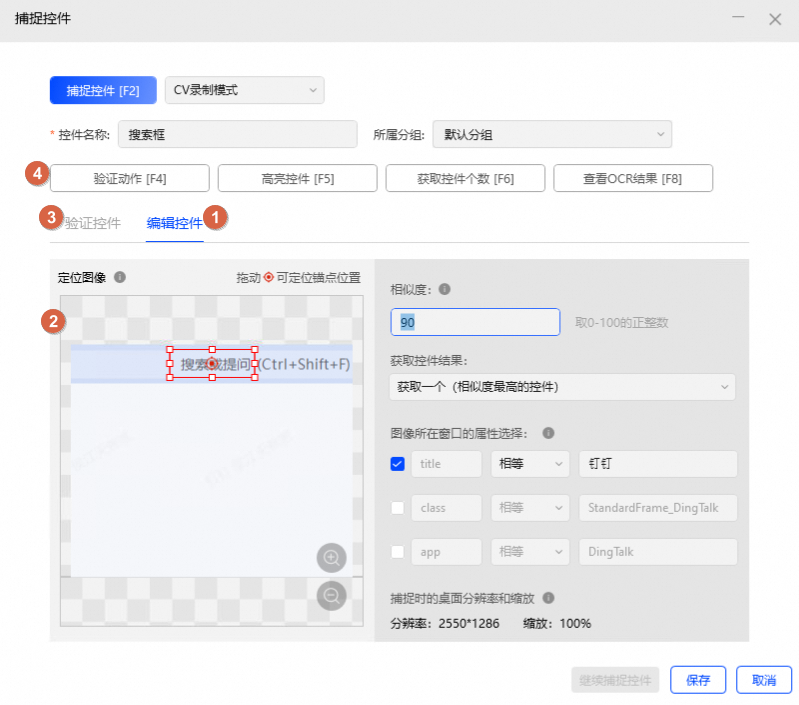
Capture Controland take a screenshot of the area you want to operate on. Releasing the mouse completes the capture. In the Capture Control window:-
Select
Edit control(① in the following figure) to view your captured target area. In the positioning image (② in the following figure), you can drag the anchor point to adjust the specific position of the operation in the target area. -
Click the
Verify Controlbutton (labeled ③ in the figure below), select a Verify Action for the control, and configure the parameters required for the action. -
Click the
Verify Actionbutton (④ in the following figure) to check in the UI whether the verification for the target region meets your expectations. -
If the validation is successful, enter a Control Name, assign the control to a Group (optional), and click Save.
-
You can then view the control in the editor's control panel. You can also select it directly from the control list during process development.
-
For an example of how to use CV controls, see Use CV mode to send a message in the DingTalk client.
Best practices
-
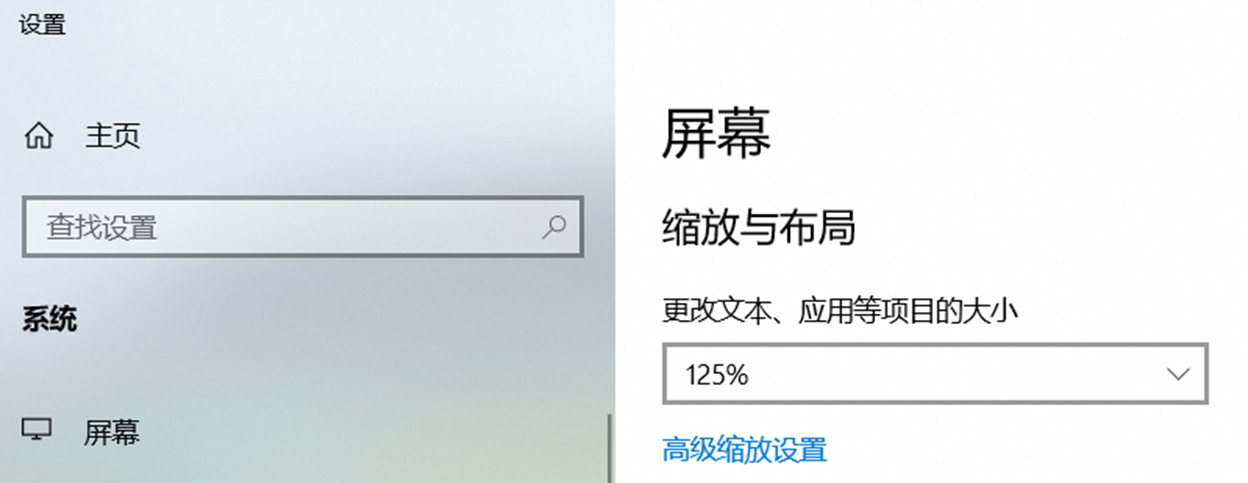
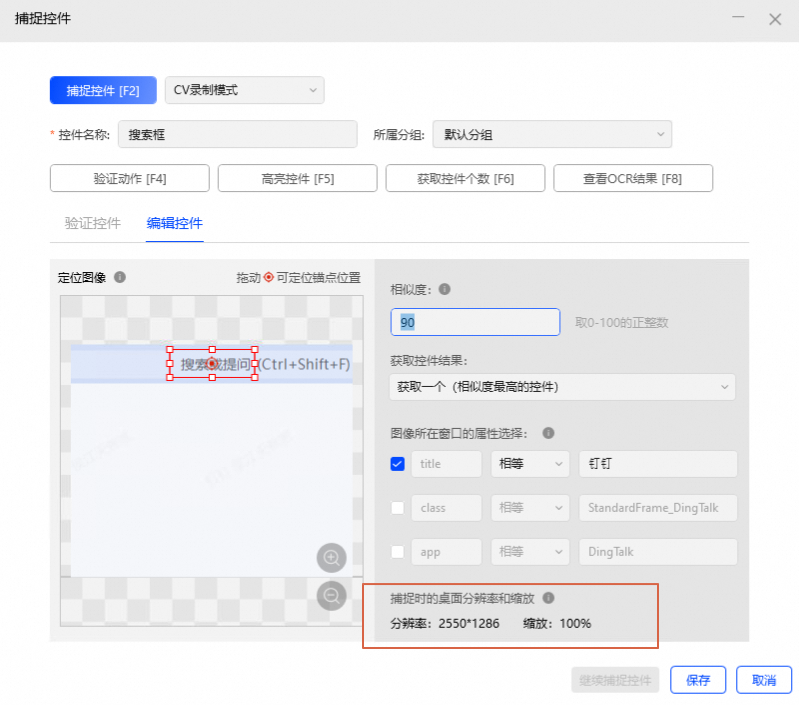
Ensure that the desktop scaling is the same on the computer used for development in the editor and on the computer where the robot runs.
-
In Windows, you can check desktop scaling under Settings > Display.
-
In the editor, you can view the desktop resolution and scaling settings that were active when the CV control was captured.
NoteYou must use editor version 4.11.0.1067 or later to view the resolution and scaling in the control capture window.
-
-
Avoid capturing areas that strongly depend on dynamic content.
-
When capturing a CV control, select a unique, texture-rich area on the page.