By creating a job template in SAE, you can run tasks automatically on a periodic schedule or manually trigger them by sending HTTP/HTTPS requests. After a task is complete, SAE quickly releases its computing resources.
Use cases
SAE Jobs are suitable for latency-insensitive, asynchronous, offline scenarios.
-
Time-driven processing: For example, sending promotional coupons at the top of the hour, updating daily revenue, or refreshing tag counts and audience data each day.
-
Batch data processing: For example, generating monthly statistical reports or updating SMS message statuses in batches that do not require real-time results.
-
Asynchronous decoupling: For example, refreshing the status of a promotion, running an offline query asynchronously, or decoupling from internal business logic.
-
CI/CD: Immediately releasing computing resources after CI/CD task completion.
For a comparison between SAE Jobs and self-managed open source products in different scenarios, see Use cases.
Prerequisites
If you use a primary account, you must activate Serverless App Engine and EventBridge and grant the required permissions.
If you want to use a RAM user, you must first complete the following steps:
-
Use your primary account to activate EventBridge.
-
Use your primary account to activate SAE Jobs and create the
AliyunServiceRoleForEventBridgeSendToSAEservice-linked role as prompted in the console. -
Use your primary account to grant the
AliyunEventBridgeReadOnlyAccesspermission to the RAM user. For more information, see Grant permissions to a RAM user.
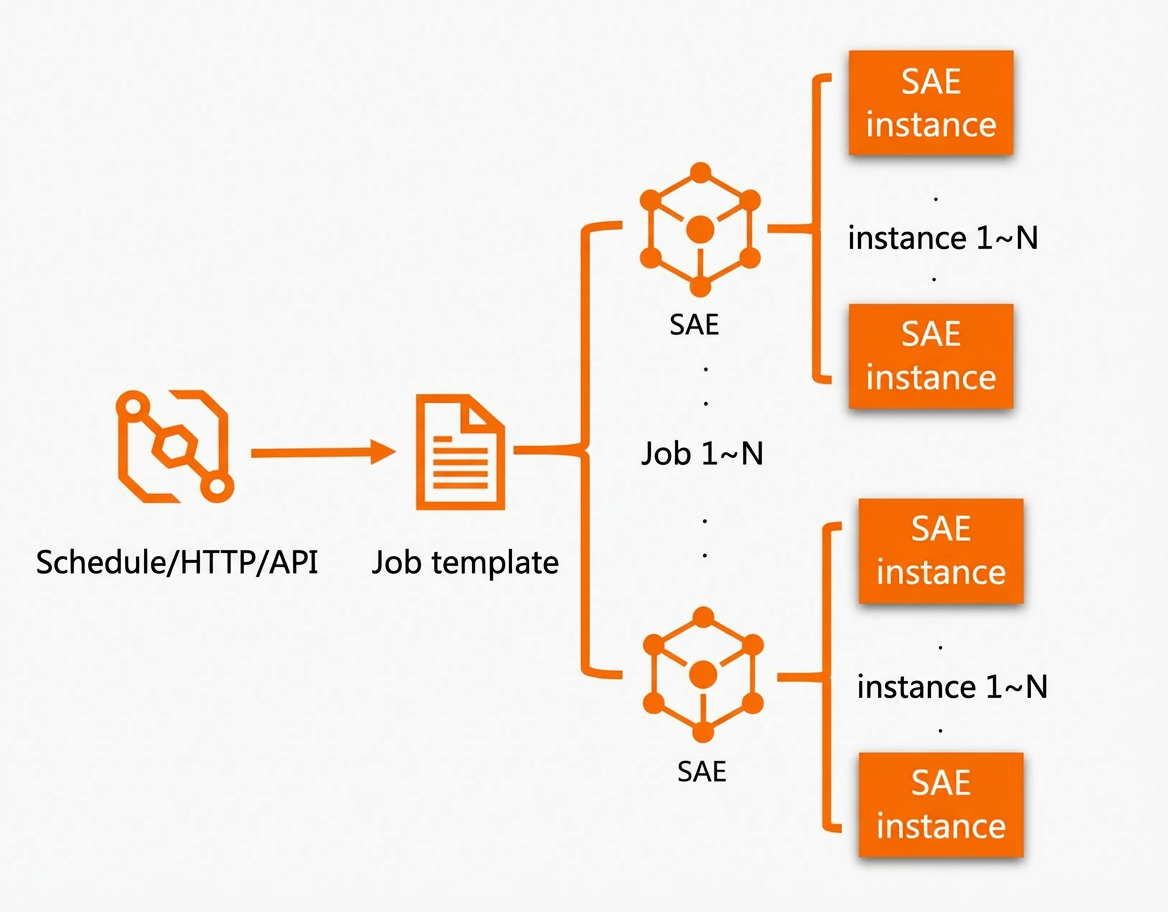
Workflow
-
To run a task, you must first create a job template.
-
Tasks are triggered by a scheduling rule or an HTTP/HTTPS request. Each trigger generates a new task based on the job template.
-
SAE creates a new instance to run each task.
Create a job template
-
Navigate to the SAE Job Templates page. In the top navigation bar, select a region and namespace, and then click Create job template.
-
On the Basic information page, configure the following parameters and click Next.
Parameter
Description
Job template name
Enter a custom name for the job template.
Namespace type
Select a System-created namespace or Select an existing namespace.
Task deployment method
-
Select image deployment: Click Set image. You can deploy your application by using a Demo image, an image from My Alibaba Cloud images (from an ACR instance under the same account), Other Alibaba Cloud account's private images (from an ACR instance under a different account), or a Custom image (from a non-ACR instance). You can also Use image from another job template. The process of creating, pushing, and pulling an image is the same as for deploying an application. For more information, see Deploy an application by using an image.
-
Code package deployment: Click Set code package for deployment. Select a Stack language and Code package type, then upload your code package and specify its runtime environment. The process of creating and uploading a code package is the same as for deploying an application. For more information, see Deploy an application by using a code package.
-
Shell script: Click Configure shell script and refer to the example on the page to configure the execution script for the task.
Instance type
-
Default: Provides stable performance. These instances cannot be preempted or evicted, making them suitable for scenarios that require high real-time performance and stability.
-
BestEffort: Performance may fluctuate significantly. These instances can be preempted and evicted, making them suitable for scenarios without strict requirements for real-time performance and stability.
-
BestEffort First: The system prioritizes scheduling BestEffort instances. If a BestEffort instance is preempted, the system automatically falls back to a Default instance to prevent task interruption.
Single instance specifications
Specify the CPU and memory specifications for a single instance when the task is running.
Number of concurrent instances
Specify the number of instances that should run concurrently at any given time.
-
-
On the Task settings page, configure the following parameters and click Next.
Parameter
Description
Task type
-
Periodic task
-
Cron expression: Defines the schedule for the task. You can manually enter a Cron expression or click Use generation tool to generate one interactively.
-
-
One-time task (HTTP/HTTPS trigger)
-
Request type: Select the request protocol that triggers the task as needed: HTTP, HTTPS, or HTTP&HTTPS.
-
Request method: Select one or more request methods that trigger the task: GET, POST, PUT, PATCH, DELETE, or HEAD.
-
Security configuration: Select a security configuration method from the drop-down list. The following options are available:
-
No configuration: No security configuration is required. All received URL requests are converted into events and pushed to EventBridge.
-
Secure domain: Enter the secure domain names. Only URL requests from these domains are converted into events and pushed to EventBridge. All other requests are filtered.
-
IP range: Enter an IP address or a CIDR block. Only URL requests from the specified IP address or CIDR block are converted into events and pushed to EventBridge. All other requests are filtered.
-
-
Concurrency policy
Expand More settings and select a concurrency policy.
-
Allow: Allows tasks to run concurrently. The scheduled trigger continuously creates new tasks.
-
Forbid: Prohibits tasks from running concurrently. A new task is not created if the previous task has not yet completed.
-
Replace: If the previous task has not yet completed, the new task replaces it.
Timeout period
Specify the maximum run time for a task. If the task exceeds this time, the system attempts to terminate it. The value must be in the range [0, 604800], measured in seconds. The default value is 3,600.
Number of retries
Specify the number of times to retry a failed task. The value must be in the range of [0, 10]. The default value is 3.
Enable task sharding
Turn on the Enable Task Sharding switch, then click Edit task sharding name to configure settings in the Edit task sharding name panel. This is often used for big data workloads to distribute shards evenly among multiple clients for execution.
-
-
(Optional) On the Advanced settings page, configure additional features as needed. The following descriptions use the image deployment method as an example.
-
Click Create and wait for the job template to be created.
-
To view the created job template, navigate to the SAE Job Templates page. In the top navigation bar, select the target region and namespace. Click the target job template to open its details page.
Run and stop Jobs
Run a periodic task
A periodic task runs automatically based on the Cron expression that you set when you created the job template.
Run a one-time task
A one-time task can be triggered by an HTTP or HTTPS request. The request protocol and method depend on the configuration you set in the job template.
-
Navigate to the SAE Job Templates page. In the top navigation bar, select the target region and namespace, and then click the target job template to open its details page.
-
In the Job Settings section, get the public request URL or internal request URL. If you are making a request from the public internet, use the public request URL.
-
Trigger the task by sending a request. You can configure the POST method to pass specific parameters in the request body in JSON format. For details about the parameters, see ExecJob.
-
Example 1: Specify environment variables in the call.
curl -d '{"Envs":[{"name":"aaa","value":"bbb"},{"name":"ccc","value":"ddd"}]}' -H 'Content-Type: application/json' <url> # Note: Replace <url> with the actual URL. -
Example 2: Specify the number of concurrent instances in the call.
curl -d '{"Replicas":"3"}' -H 'Content-Type: application/json' <url> # Note: Replace <url> with the actual URL.
-
Run a Job manually
-
Navigate to the SAE Job Templates page. In the top navigation bar, select the target region and namespace, and then click the target job template to open its details page.
-
On the Job Template Details page, click Run job manually in the upper-right corner.
Stop a Job
-
Navigate to the SAE Job Templates page. In the top navigation bar, select the target region and namespace, and then click the target job template to open its details page.
-
On the Job Template Details page, click Stop job in the upper-right corner and follow the on-screen instructions.
Manage task history
-
Navigate to the SAE Job Templates page. In the top navigation bar, select the target region and namespace, and then click the target job template to open its details page.
-
In the navigation pane on the left, click Task history. On the Task history page, view the task execution status and perform actions as needed.
-
To delete a task, click Delete in the Actions column and follow the on-screen instructions.
-
To view details, click a task ID to open the Task record details page and view the instance status.
-
View task events
-
Navigate to the SAE Job Templates page. In the top navigation bar, select the target region and namespace, and then click the target job template to open its details page.
-
In the navigation pane on the left, click Event information. In the search box at the top, you can search for events by Source Name, Reason, Source Type, or Severity.
Edit and delete a job template
-
Navigate to the SAE Job Templates page. In the top navigation bar, select the target region and namespace, and then click the target job template to open its details page.
-
In the upper-right corner, click Edit job template or Delete job template and follow the on-screen instructions.
When you delete a job template, the system deletes all task instances created from that template, including the template's creation information. It also deletes the associated SLS Project that was purchased on your behalf and disables the log collection feature.
Roll back a version
If a modified job template causes issues, you can roll it back to a historical version.
-
Navigate to the SAE Job Templates page. In the top navigation bar, select the target region and namespace, and then click the target job template to open its details page.
-
In the upper-right corner, click Roll back to historical version.
-
On the Roll back to historical version page, select the desired version and click OK.