SAG inline deployment
This tutorial shows you how to use Smart Access Gateway (SAG) to connect two on-premises branches, one in Hangzhou and one in Ningbo, to Alibaba Cloud Virtual Private Clouds (VPCs) in the China (Shanghai) and China (Beijing) regions.
Prerequisites
Before you begin, ensure that you meet the following requirements:
-
VPCs are created in the China (Shanghai) and China (Beijing) regions. For more information, see Create and manage a VPC.
-
A Cloud Enterprise Network (CEN) instance is created, and the VPC in the China (Shanghai) region is attached to the CEN instance. For more information, see Create a CEN instance.
-
The VPC in the China (Beijing) region is attached to the same CEN instance. For more information, see Attach a network instance.
Background
A company has created Alibaba Cloud VPCs in the China (Shanghai) and China (Beijing) regions. The company wants to connect its on-premises branches in Hangzhou and Ningbo to Alibaba Cloud to enable communication between the branches and cloud resources. The Hangzhou branch uses the CIDR block 10.10.0.0/12, and the Ningbo branch uses 10.20.0.0/12. Clients in both branches connect directly to Alibaba Cloud using SAG-100WM devices.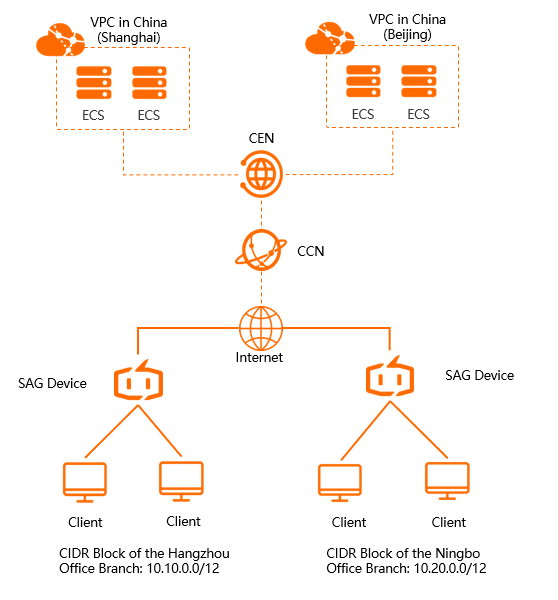
Procedure
The following figure illustrates the procedure.
Step 1: Purchase SAGs
After purchasing SAG devices on the Alibaba Cloud console, Alibaba Cloud ships the physical devices to you and creates SAG instances for managing network configurations.
-
Log on to the Smart Access Gateway console.
-
On the Smart Access Gateway page, click Purchase SAG.
-
Select Create SAG (CPE).
-
On the Smart Access Gateway page, configure the SAG device with the following parameters, and then click Buy Now.
-
Region: The area where the SAG device is used. In this example, select Mainland China.
-
Instance Type: The model of the SAG device. In this example, select SAG-100WM.
-
Have SAG Devices Already: Specifies if you have an SAG hardware device. In this example, select No.
-
Version: The edition of the SAG device. In this example, the default value Standard Edition is used.
-
Quantity: The number of SAG devices to purchase. In this example, enter 1.
-
Region: The area where the SAG bandwidth is used. This area must match that of the SAG device and cannot be changed.
-
Instance Name: The name of the SAG instance.
The name must be 2 to 128 characters long, start with a letter or a Chinese character, and can contain digits, periods (.), hyphens (-), and underscores (_).
-
Peak Bandwidth: The peak bandwidth for the network connection. In this example, select 30 Mbps.
-
Subscription Duration: The subscription duration.
-
-
Confirm the order details, select the terms of service, and then click Buy Now.
-
In the Receiving Address dialog box, enter the shipping address for the device, and then click Buy Now.
-
On the Pay page, select a payment method and complete the payment.
-
Repeat these steps to purchase an SAG device for each branch. This tutorial requires one device for the Hangzhou branch and one for the Ningbo branch.
You can check the order status on the Smart Access Gateway instance page. The SAG device is typically shipped within two business days after you place the order. If the shipment is delayed, you can check the shipping status by following these steps:
-
On the Smart Access Gateway page, find the target SAG instance.
-
In the Operation column, click the
 icon and select View Shipping Update.
 -
In the Order Updates panel, view the shipping updates.
After the order is placed, the Status column of the instance displays Pending Shipment.
-
Step 2: Connect SAGs
-
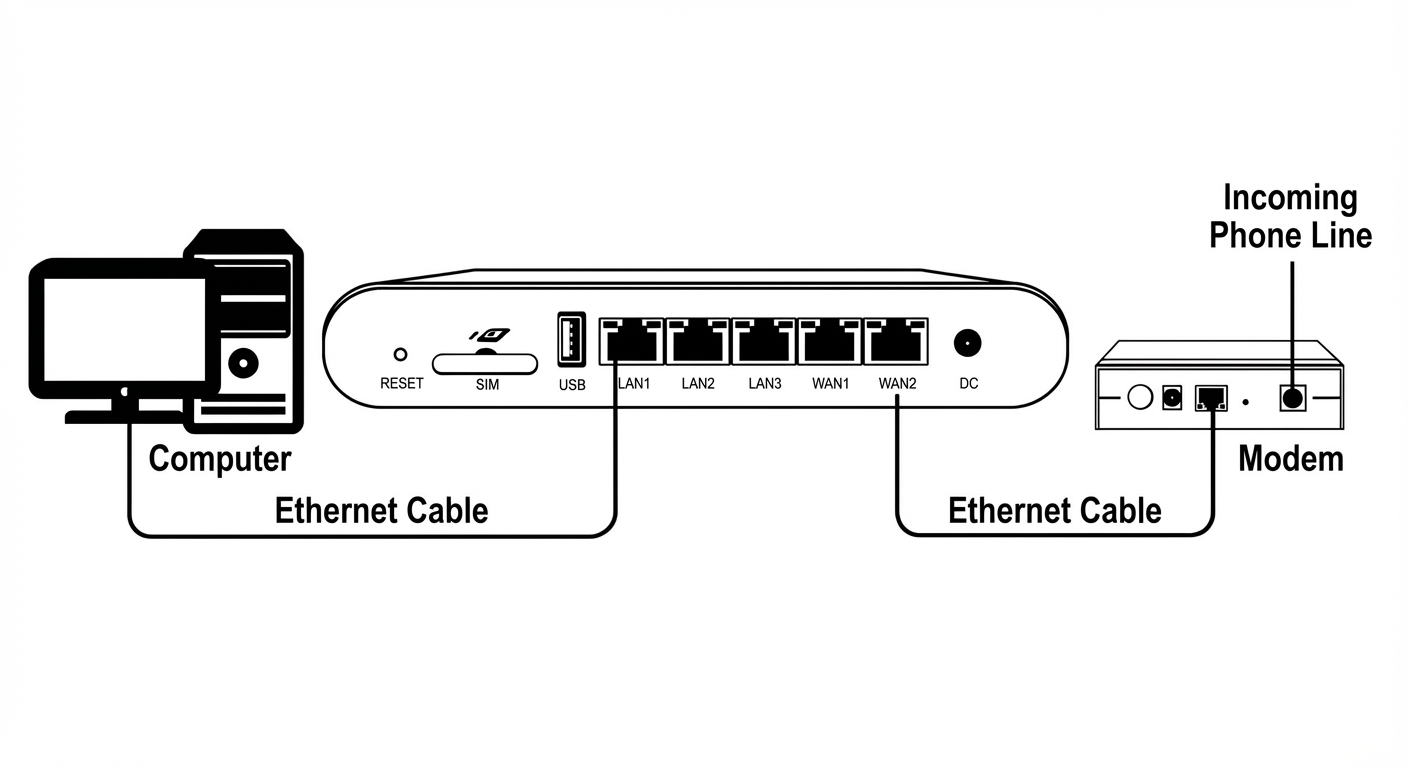
After receiving an SAG device, ensure that all accessories are included. For a list of accessories, see SAG-100WM device specifications.
-
Power on the SAG device. Connect its WAN port to a modem and its LAN port to a local client.
-
In this tutorial, clients in the Hangzhou and Ningbo branches use the default gateway configuration to connect directly to Alibaba Cloud through the SAG devices. If you need to configure the WAN and LAN ports, see Configure a WAN port and Configure a LAN port.
-
Repeat this step to connect the SAG device for the other branch.
Step 3: Activate SAGs
After receiving the SAG devices, you must activate them.
-
Log on to the Smart Access Gateway console.
-
In the left-side navigation pane, click Smart Access Gateway .
In the top navigation bar, select the region.
-
On the Smart Access Gateway page, find the target SAG instance and click Activate in the Operation column.
-
Click the ID of the target instance. On the instance details page, go to the Device Settings tab, enter the serial number of the SAG device, and then click Add Device to associate it with the instance.
From the Hardware Type drop-down list, select the device model, for example, sag-100wm.
-
Repeat this step to activate and associate the SAG device for the other branch.
Step 4: Configure network connections
After activating and connecting the SAG devices, you must configure network settings on the Smart Access Gateway console to advertise the on-premises routes to Alibaba Cloud.
-
Log on to the Smart Access Gateway console.
In the top navigation bar, select the region.
-
In the left-side navigation pane, click Smart Access Gateway . On the Smart Access Gateway page, find the target SAG instance and click Network Configuration in the Operation column.
-
Configure the method for synchronizing on-premises routes.
-
Click Method to Synchronize with On-premises Routes.
-
Select Static Routing, and then click Add Static Route to add the private CIDR block of the on-premises branch.
For the Hangzhou branch, enter the CIDR block 10.10.0.0/12. Because this branch uses the default gateway configuration, it allocates IP addresses for local clients from the 10.10.0.0/12 CIDR block.
-
Click OK.
-
-
Attach the SAG instance to a Cloud Connect Network.
-
Create a Cloud Connect Network (CCN) instance. For more information, see Create a CCN instance.
-
After creating the CCN instance, return to the Network Configuration page of the target SAG instance and click Network Instance Details.
-
In the Associated Instances Under Current Account section, click Attach Network to attach the CCN instance.
-
Network Type: Select CCN.
-
Resource Group: Select a resource group.
-
Network Instance: Select the ID of the CCN instance that you created.
-
-
Click OK.
-
-
Repeat these steps to configure the network for the other SAG instance.
Attach the SAG instances for both the Hangzhou and Ningbo branches to the same CCN instance.
Step 5: Attach CCN to CEN
Attach the CCN instance to a CEN instance to connect the on-premises branches to Alibaba Cloud.
-
Log on to the Smart Access Gateway console.
-
In the left-side navigation pane, click CCN.
-
Find the CCN instance that you want to bind and click Bind CEN Instance in the Operation column.
-
In the Bind CEN Instance pane, select the desired CEN instance. Clicking OK enables communication between the SAG devices in the CCN instance and the VPCs attached to the CEN instance.
-
Existing CEN: Select an existing CEN instance.
-
Create CEN: Select this option to create a new CEN instance.
-
Step 6: Configure security groups
Configure security group rules to allow the on-premises branches to access resources in the VPCs.
-
Log on to the ECS console.
-
In the left-side navigation pane, choose .
-
On the Security Groups page, click the ID of the security group associated with your ECS instance.
-
On the Security Group Rules tab, go to the Inbound tab and click Add Manually.
-
Add a security group rule that allows access from the on-premises branches.
Set Authorization Object to the private CIDR blocks of the on-premises branches: 10.10.0.0/12 for the Hangzhou branch and 10.20.0.0/12 for the Ningbo branch. For more information, see Add a security group rule.
-
Repeat these steps for the security groups in both the China (Shanghai) VPC and the China (Beijing) VPC. This allows the Hangzhou and Ningbo branches to access resources in the VPCs.
Step 7: Test the connection
After completing the configuration, test the connection by accessing cloud resources in the VPCs from a client in an on-premises branch.