Connect a Spring Boot application to SchedulerX
SchedulerX is a distributed job scheduling service in Microservices Engine (MSE). It uses a server-agent architecture: the SchedulerX server handles scheduling and coordination, while an agent embedded in your Spring Boot application executes jobs. After connecting your application, you can define, schedule, and monitor jobs from the SchedulerX console.
Video demo
For a video demonstration of how to connect a Spring Boot application to SchedulerX, see Video demo.
Prerequisites
Before you begin, make sure you have:
A Spring Boot 2.x or 3.x project
(Optional) A namespace for resource isolation -- see the "Create a namespace" section of Namespace management
Step 1: Create a SchedulerX application
Configure basic settings
Log in to the MSE SchedulerX console and select a region in the top navigation bar.
In the left-side navigation pane, click Application Management. Select a Namespace and click Create Application.
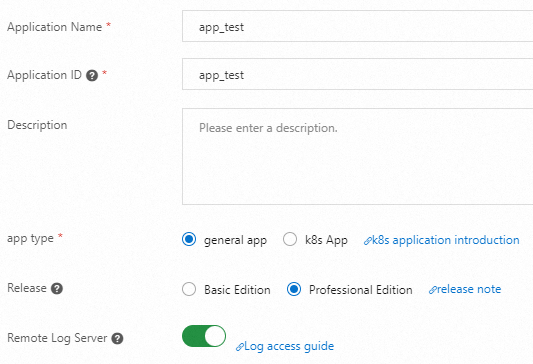
Enter the following settings and click Next.
ImportantCreate resources in the correct region and namespace. Make sure the resource information is valid.
Setting
Description
Default
Application Name
A descriptive name for the application.
None
Application ID
The GroupID for agent access. Must be unique within the namespace. Can match the Application Name.
None
Application Type
Regular App -- not deployed in Kubernetes or does not require Kubernetes jobs. k8s App -- deployed in Kubernetes and requires Kubernetes jobs.
Regular App
Edition
Select an edition based on your needs.
Professional Edition
Simple Log Service
Enable to view scheduling logs in the console. Requires a Log4j or Logback configuration.
Off
load5
Maximum 5-minute load average. Cannot exceed the number of CPU cores on the client machine.
0
Memory Usage
If the average memory usage in the past 5 minutes exceeds this threshold, the worker is marked busy.
90%
Disk Usage
If disk usage exceeds this threshold, the client machine is marked busy.
95%
Trigger Busy Machine
Continue triggering jobs when the machine is busy.
On
Setting
Description
Default
Maximum Number Of Jobs
Maximum jobs supported in a group.
1000
Automatic Scale-out
Enable to auto-scale. Requires Global Job Count.
Off
Traffic Throttling
Enable to throttle traffic. Requires Task Instance Concurrency.
Off
Calendar
Schedule using Financial Day (trading day) or Workday (business day).
0
Configure notifications
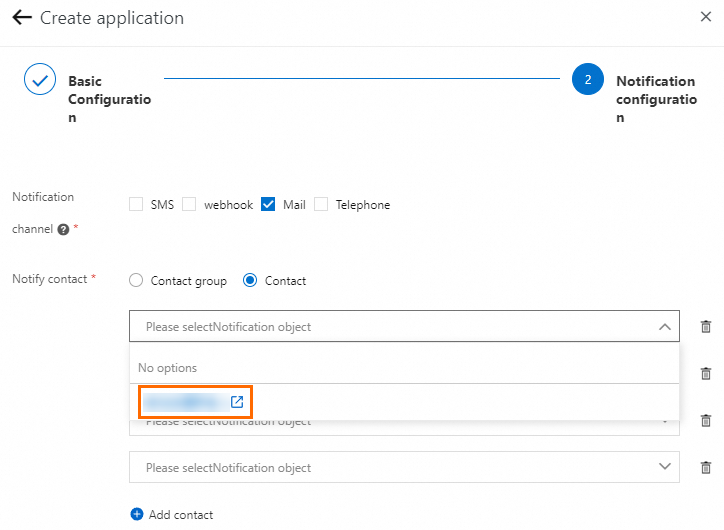
On the Notification Configuration page, select a Notification Channel and set Contacts. Add contacts individually or use a contact group. To create a contact group, see Create a notification contact or notification contact group.
Setting
Description
Notification Channel
Text Message, Email, Webhook, or Phone.
Email
Email address of the contact.
Webhook
Webhook URL for WeCom, Lark, or DingTalk. Separate multiple URLs with commas (,). For DingTalk, add the keyword "SchedulerX" (case-sensitive) to the robot configuration. For webhook setup details, see Webhook configuration description. For information about how to obtain a webhook URL, see DingTalk Developer Documentation, WeCom Developer Documentation, and Lark Developer Documentation.
Mobile Phone Number
Phone number of the contact.
Refresh the page and confirm that your application appears under the selected region and namespace.
Step 2: Add the SchedulerX dependency
Add the schedulerx2-spring-boot-starter dependency to the pom.xml file of your Spring Boot project:
<dependency>
  <groupId>com.aliyun.schedulerx</groupId>
  <artifactId>schedulerx2-spring-boot-starter</artifactId>
  <version>1.11.5</version>  <!-- Replace with the latest version -->
</dependency>Replace the version with the latest agent version. For version history, see Agent release notes.
If your project uses Logback, exclude the bundled Log4j dependencies:
<dependency>
  <groupId>com.aliyun.schedulerx</groupId>
  <artifactId>schedulerx2-spring-boot-starter</artifactId>
  <version>1.11.5</version>
  <exclusions>
    <exclusion>
      <groupId>org.apache.logging.log4j</groupId>
      <artifactId>log4j-api</artifactId>
    </exclusion>
    <exclusion>
      <groupId>org.apache.logging.log4j</groupId>
      <artifactId>log4j-core</artifactId>
    </exclusion>
    <exclusion>
      <groupId>log4j</groupId>
      <artifactId>log4j</artifactId>
    </exclusion>
  </exclusions>
</dependency>
Step 3: Configure connection parameters
Add the following properties to application.properties:
# Required: SchedulerX connection settings
spring.schedulerx2.endpoint=${endpoint}
spring.schedulerx2.namespace=${namespace}
spring.schedulerx2.groupId=${groupId}
# The appKey parameter is supported only in versions 1.2.1 and later.
spring.schedulerx2.appKey=${appKey}

# If you do not use an appKey, you can use an Alibaba Cloud AccessKey and SecretKey, or an STS token.
#spring.schedulerx2.aliyunAccessKey=${aliyunAccessKey}
#spring.schedulerx2.aliyunSecretKey=${aliyunSecretKey}
#spring.schedulerx2.stsToken=${aliyunStsToken}
Parameter sources:
Log in to the SchedulerX console. In the left-side navigation pane, click Applications. Find the application that you want to manage and click AccessConfig in the Operation column. In the AccessConfig panel, select Spring Boot from the dropdown.
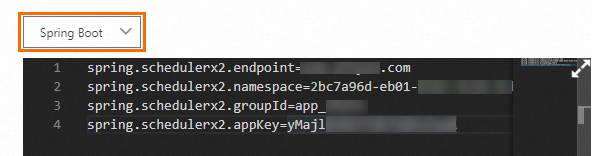
Parameter description:
endpoint: The endpoint of SchedulerxWorker. The value must match the endpoint of the region in which your application is deployed. For more information, see Endpoints.
namespace: The ID of the namespace to which the application belongs. You can view the namespace ID on the Namespaces page of the SchedulerX console.

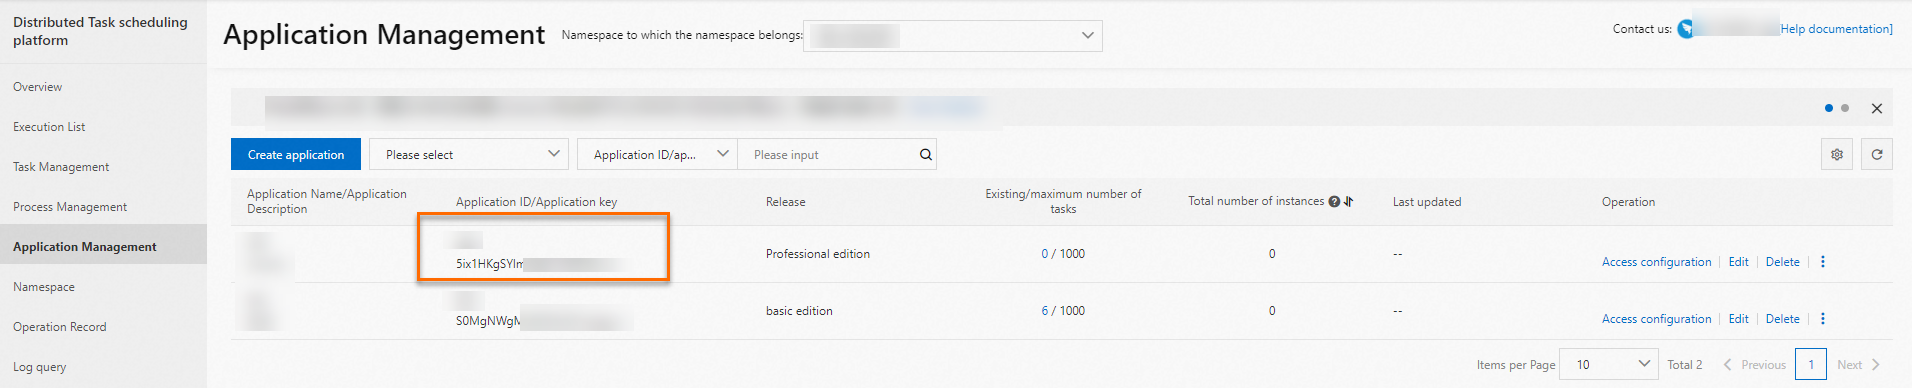
groupId and appKey: The ID and key of the application. You can view the values on the Applications page of the SchedulerX console.
aliyunAccessKey and aliyunSecretKey: The AccessKey ID and AccessKey secret of your Alibaba Cloud account.
SchedulerX and the agent must be in the same region. A region mismatch causes connection failure. If the application runs outside Alibaba Cloud (on-premises or another cloud provider), enable Internet access and create a SchedulerX application in the Internet region. See Connect to SchedulerX over the Internet from an on-premises environment.
If the application uses YAML, add these settings to application.yml instead:
spring:
  schedulerx2:
    endpoint: ${endpoint}
    namespace: ${namespace}
    groupId: ${groupId}
appKey: ${appKey}To manage multiple applications from a single client, separate the application IDs with commas: spring.schedulerx2.groupId=animals.dog,animals.cat. Each application is isolated for permission management and does not require a separate worker.
Optional parameters
The following parameters support advanced use cases:
Parameter | Description | Default | Since |
| Enable or disable the SchedulerX starter. |
| 0.1.7 |
| Specify the IP address when the machine has multiple NICs or uses a VPN. | Auto-detected | 0.1.7 |
| Port for the agent to listen on. | Random available port | 0.1.7 |
| Block application startup if SchedulerX fails to initialize. |
| 1.1.0 |
| Allow all jobs on the agent to share one thread pool. |
| 1.2.1.2 |
| Thread pool size when sharing is enabled. |
| 1.2.1.2 |
| Labels for targeting specific workers during canary release or stress testing. | None | 1.2.2.2 |
| Use cgroup to collect agent metrics. Enable manually in Kubernetes environments. |
| 1.2.2.2 |
| cgroup path in the container. |
| 1.2.2.2 |
| Log heartbeat data to |
| 1.2.4 |
| Interval (ms) to check task completion in the Map model. Lower values increase scheduling frequency for second-granularity jobs. |
| 1.2.5.2 |
| Interpret second-granularity job intervals in milliseconds instead of seconds. |
| 1.2.5.2 |
| Require the primary node to run broadcast jobs. |
| 1.8.13 |
| Max retries after broadcast dispatch fails. Retry interval is fixed at 2 seconds. |
| 1.8.13 |
| Enable dispatching of second-granularity standalone jobs. |
| 1.8.13 |
Step 4: Create a job processor
Create a class that extends JavaProcessor to define job logic. The following example prints a message on each run:
package com.aliyun.schedulerx.test.job;

import com.alibaba.schedulerx.worker.domain.JobContext;
import com.alibaba.schedulerx.worker.processor.JavaProcessor;
import com.alibaba.schedulerx.worker.processor.ProcessResult;
import org.springframework.stereotype.Component;

@Component
public class MyHelloJob extends JavaProcessor {

    @Override
    public ProcessResult process(JobContext context) throws Exception {
        System.out.println("hello schedulerx2.0");
        return new ProcessResult(true);  // Return true to indicate success
    }
}@Componentregisters the class as a Spring bean so SchedulerX can discover it.Extend
JavaProcessorand overrideprocessto define the job logic.Return
new ProcessResult(true)for success ornew ProcessResult(false)for failure.
Step 5: Verify the connection
Start your Spring Boot application.
Log in to the MSE SchedulerX console. In the left-side navigation pane, click Applications.
Find your application and click View instances in the Operation column.

Check the Total number of instances column:
0: The connection failed. Check your configuration parameters (region, endpoint, namespace, and GroupID) and verify network connectivity.
Greater than 0: The connection succeeded.

What to do next
After the connection is verified, create a job in the SchedulerX console to trigger your job processor. See the "Create a job" section of Job management.
Troubleshooting
Symptom | Possible cause | Solution |
Agent fails to connect (0 instances) | Region mismatch between SchedulerX and the agent | Confirm both use the same region. Check the |
Agent fails to connect (0 instances) | Application runs outside Alibaba Cloud without an Internet endpoint | Enable Internet access and create a SchedulerX application in the Internet region. See Connect over the Internet. |
Agent fails to connect (0 instances) | Incorrect GroupID or AppKey | Open Applications > AccessConfig in the console and confirm the values. |
Application startup blocked | SchedulerX failed to initialize with | Set |
See also
Connect an agent to SchedulerX -- other connection methods (non-Spring Boot)