This guide shows you how to integrate OpenClaw with Feishu. Once integrated, you can use natural language to interact with OpenClaw in Feishu group chats and one-on-one conversations.
Before you begin
Before you configure a channel, you must purchase and configure a Simple Application Server instance with the OpenClaw application image by following the steps below or the instructions in Deploy an OpenClaw image. If you have already done this, you can skip this section.
Integrate with Feishu
The OpenClaw plugin integration method is only supported for instances with image version OpenClaw 2026.2.9 or later. To integrate this channel on an older version, see Integrate a channel by using AppFlow. You can view the current image version of your instance in the section of the Simple Application Server overview page.
OpenClaw offers two Feishu integration methods. Select the tab that matches your image version to view the corresponding steps.
OpenClaw 2026.5.19 and later
Connect via console QR code
-
Log on to the Simple Application Server console, find your OpenClaw server, and go to the Application Details tab.
-
On the Channels card, click Add Channel and select Feishu from the drop-down list.
-
Keep the default IM access by QR code tab selected and click Scan to Configure.
-
After the command finishes running, a QR code appears. Scan the QR code with Feishu to connect.
Generating the QR code usually takes 30 seconds to 2 minutes. Please wait.
-
After scanning the code, click Close.
-
Verify the connection by talking to the bot.
The first conversation may take 30 seconds to 2 minutes to initialize. Please wait.
OpenClaw versions earlier than 2026.5.19
Complete the integration in the Channel configuration section of the old console.
Console QR code
This method is supported only for OpenClaw image versions 2026.3.28 and later. For other versions, use the Manual configuration method.
-
Log on to the Simple Application Server console, find your OpenClaw server, and go to the Application Details tab.
-
In the Channel configuration section, find the Feishu area and click Scan to Configure.
-
After the command finishes running, a QR code appears. Scan the QR code with Feishu to connect.
Generating the QR code usually takes 30 seconds to 2 minutes. Please wait.
-
After scanning the code, click Close.
-
Verify the connection by talking to the bot.
The first conversation may take 30 seconds to 2 minutes to initialize. Please wait.
Manual configuration
1. Create a Feishu application
-
Go to the Feishu Open Platform and click Create custom app. Enter the application name and description, select an icon, and click Create.
-
In the left-side navigation pane, click Credentials & Basic Information. Copy the App ID (for example,
cli_xxx) and App Secret. -
In the left-side navigation pane, click Permission Management. Click the Batch import/export permissions button, paste the following JSON configuration, click Next, confirm to add permissions, and then click Request to enable.
-
In the left-side navigation pane, click . Select the By feature tab, find the Bot card, and click Configuration.

-
Configure event subscriptions.
-
In the Simple Application Server console, go to the instance details page. In the section, enter the App ID and App Secret you obtained earlier and click Application.
-
On the Feishu Open Platform, click Event subscriptions in the left-side navigation pane. On the Event configuration tab, for Subscription type, select Receive events via long connection, and click Save.
-
On the Event configuration page, click Add event, search for the event
im.message.receive_v1(Receive message), and click OK.
-
-
On the Version Management & Release page, create a version. Enter the App version and Release notes, click Save, and then submit the version for review and publication.
2. Configure the bot
You can create a new group chat or add the bot to an existing one. In the Feishu group, mention the bot by using @bot to start a conversation, or search for the bot to start a private chat for testing.
To use the bot in an external group, see the configuration document Bot supports external groups and one-on-one chats with external users.
-
Add the bot by following this path: .
-
Click the bot's avatar and then click Send Message to send a private message to the bot. You can also mention the bot in a group chat to send it a message.
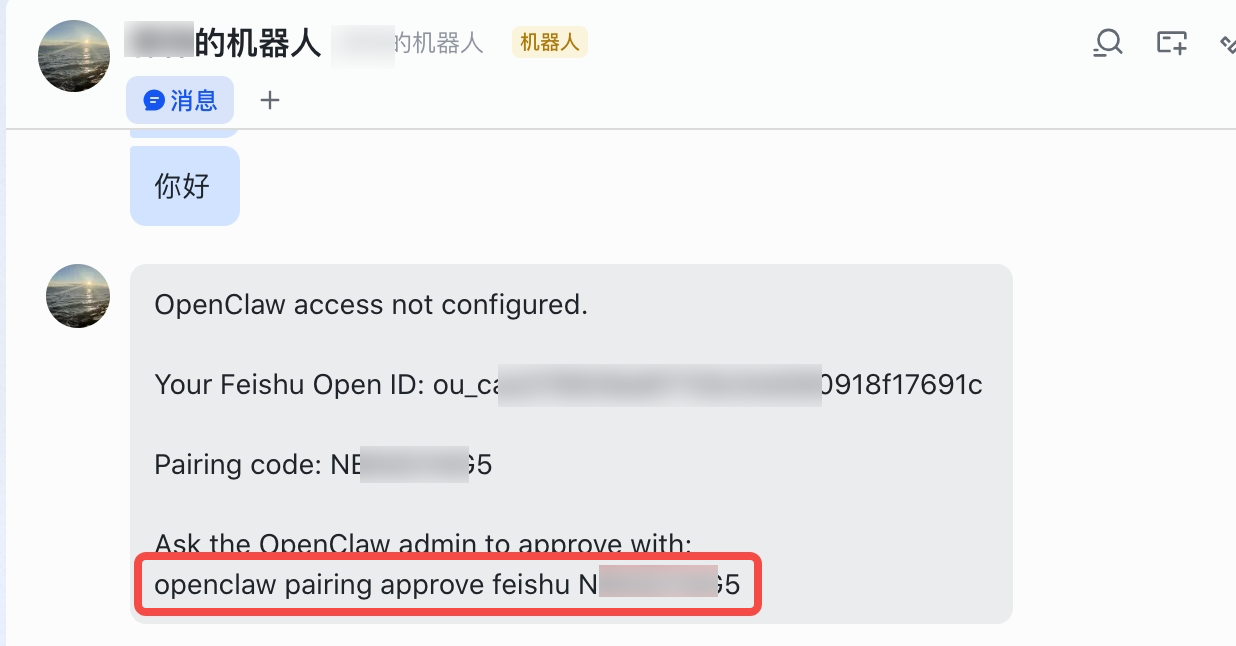
For OpenClaw versions earlier than 2026.3.13, you need to use a pairing code to connect to the bot. Follow the steps below.
-
Send a private message to the bot. The bot will reply with a pairing code.
-
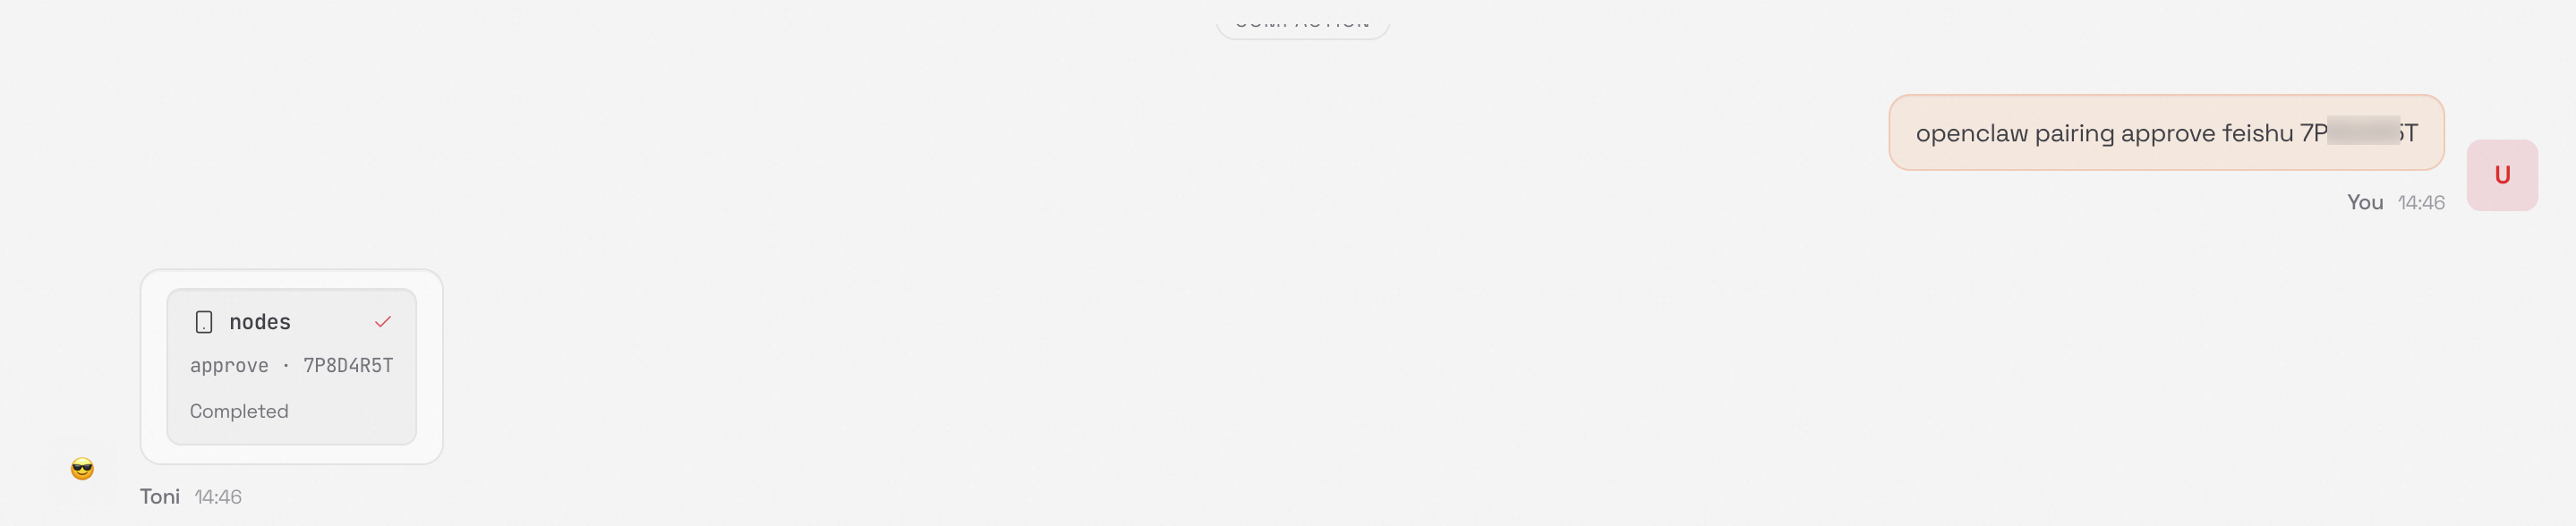
In the web UI, enter
openclaw pairing approve feishu <pairing_code>to complete the pairing.The <pairing_code> is the code the bot sent in the previous step.
 Important
If you see the error "No pending pairing requests," see How do I pair OpenClaw with Feishu by using terminal commands?.
FAQ
Pair with Feishu via terminal
-
Log on to the server.
-
Log on to the Simple Application Server console.
-
In the server list, find the target server card and click Remote Connection. In the connection window that appears, click Log on Now in the Connect with One-click on Workbench section.
-
-
Get the pairing code.
In the terminal, run the following command to find the pairing code for a Feishu bot with a pending pairing request. Copy the pairing code from the query results.
openclaw pairing list feishu
-
Complete the pairing.
In the terminal, run the following command to approve the pairing request. Replace YXXX with the actual pairing code you obtained in the previous step.
openclaw pairing approve feishu YXXX
Configure scheduled tasks for Feishu
You can create a scheduled task by talking to OpenClaw.
-
Get the webhook URL of the group bot:
-
In the group chat, click .
-
Click Add bot and select Custom bot. Enter a name and description for the bot, click Add , and copy the webhook URL.
-
-
In your conversation with OpenClaw, create the task. The required format is the scheduled task content followed by the group bot's webhook URL. For example, you can create a scheduled task to check the real-time weather.
-
To verify the scheduled task, ask the agent to send the message immediately for a test. Then, check the group chat where the bot is located to confirm that the task was executed.
If you need to modify or cancel a scheduled task, you can ask the agent to do so directly in the conversation.
To configure scheduled tasks using AppFlow, see How to configure scheduled tasks using AppFlow.