Use external authorization APIs
API Gateway supports external authorization. This feature lets you integrate a custom remote interface. Before API Gateway forwards a request to a backend server, it first sends the request to this custom interface for authorization. This interface then determines whether the request can be forwarded to the backend server.
As shown in the following figure, step 2 represents the call to the custom remote interface.
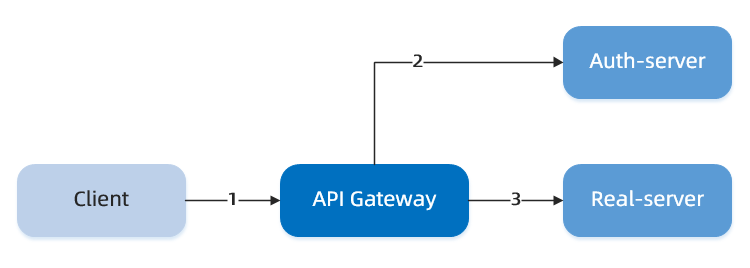
This topic describes how to use external authorization APIs. The procedure is as follows:
Write an external authorization API: Develop and define an external authorization interface locally.
Create an external authorization API: In the API Gateway console, configure a corresponding external authorization API.
Attach an API: Attach the created external authorization API to a business API to activate it.
Write an external authorization API
You can develop an external authorization interface locally. When an API requires authorization, API Gateway calls this external interface to perform the check. The protocol type for the external authorization interface is not restricted, but the format of the request and response bodies is. The request and response must both be JSON strings in the following format:
Request body
{
	"context" : {
  	"key": "value"
  }
}
Field description: The request contains only the context field, which uses a key-value format. The parameters in this field are derived from the client request and must be configured in the API Gateway console.
Response body
{
	"success" : true/false,
  "principal" : {
  	"key" : "value"
  },
  "failResponseHeader" : {
  	"key" : "value"
  },
  "failResponseBody": jsonarray/jsonobject
  "failResponseStatus": ${httpcode}
}
Field descriptions:
success: Specifies whether to allow the request to be forwarded to the backend server.principal: If the request is allowed to be forwarded to the backend server, you can pass information to the backend server in a key-value format.If the backend server uses an HTTP interface, the principal is placed in the header.
If the backend server uses a SOFARPC interface, the principal is placed in the baggage.
failResponseHeader: If the request is not allowed to be forwarded to the backend server, you can set the response header that is returned to the client.failResponseBody: If the request is not allowed to be forwarded to the backend server, you can set the response body that is returned to the client.failResponseStatus: If the request is not allowed to be forwarded to the backend server, you can set the response HTTP status code.
The specifications for the external authorization API are as follows:
AuthRequest
public class AuthRequest {
  private Map<String,String> context;
}
AuthResponse
public class AuthResponse {
  private boolean             success;
  private Map<String,String>  principal;
  private Map<String, String> failResponseHeader;
  private Object              failResponseBody;
  private int                 failResponseStatus;
}
Interface example
@PostMapping("/testAuth")
public AuthResponse testAuth(@RequestBody AuthRequest authRequest) {
    String sid = authRequest.getContext().get("sid");
    AuthResponse response = new AuthResponse();

    if (sid != null) {
     	Map<String, String> principal = new HashMap<>();
        principal.put("uid", sid + "_uid");
        response.setSuccess(true);
        response.setPrincipal(principal);
    } else {
    	response.setSuccess(false);

        Map<String, String> failResponseHeader = new HashMap<>();

        String queryKey = authRequest.getContext().get("queryKey");
        if (queryKey.equalsIgnoreCase("q")) {
            failResponseHeader.put("header-to-client", "query");
        } else {
            failResponseHeader.put("header-to-client", "no-query");
        }

        response.setFailResponseHeader(failResponseHeader);

        Map<String, String> failResponseBody = new HashMap<>();

        String bodyKey = authRequest.getContext().get("bodyKey");
        if (bodyKey.equalsIgnoreCase("b")) {
            failResponseBody.put("body-to-client", "b");
        } else {
            failResponseBody.put("body-to-client", "no-b");
        }

        response.setFailResponseBody(JSON.toJSONBytes(failResponseBody));

        response.setFailResponseStatus(401);

    }

    return response;
}
Create an external authorization API
After you develop the external authorization interface locally, you must configure a corresponding external authorization API in the API Gateway console. The procedure is as follows:
In the API Gateway console, choose API Publishing > External Authorization API in the navigation pane on the left.
On the External Authorization API list page, click Create External Authorization API in the upper-right corner.
On the page that appears, configure the following parameters for the external authorization API:
External Authorization API Name: Required. A unique name to identify the API. The name can contain letters, digits, underscores (_), and hyphens (-). It must be 32 characters or less in length and start with a letter.
Backend Service Type: Currently, only System Cluster is supported. This is the cluster where the gateway forwards frontend requests.
Protocol Type: The supported protocols are HTTP and SOFARPC.
HTTP protocol:
URI of the request: Required. The request URI of the resource. The URI must start with a forward slash (/), be 200 characters or less in length, and contain only letters, digits, underscores (_), and hyphens (-). Example:
/home/{id}.Method: The external authorization API must use the POST method.
SOFARPC protocol:
Interface Name: Required. The name must start with a lowercase letter and can contain letters, digits, periods (.), colons (:), and at signs (@). Example:
com.alipay.testapp.xxxx.ConfigFacade:1.0@DEFAULT.Service identity: Optional. Specifies the unique ID of the service.
Method Name: The name can contain letters and digits and must start with a lowercase letter. Example:
getUserID.
Timeout: Required. The timeout period for the API request, in milliseconds (ms).
Cache Switch: Specifies whether to enable caching for the authorization result.
If you enable caching and the authorization server returns a success response, the result is cached. The authorization server is not requested again during the cache validity period.
The cache duration must be between 5 s and 1 hour.
Routing Policy: Required. The routing policy that the gateway uses after it receives a request. For more information, see Create a routing rule.
System Cluster: Required. Select the backend cluster that provides this authorization service.
External API Parameters: These are the parameters in request.context. You can fetch these parameters from the Header, Body, Cookie, and Query of the request.
For example, based on the configuration in the preceding figure, when the gateway calls the authorization server, it fetches parameters as follows:
Fetches the value of headerKey from the Header.
Fetches the value of queryKey from the Query.
Fetches the value of bodyKey from the Body. For example, if the Body is {"bodyKey":"abc", "other": "xx"}, the value abc is fetched. A
contextis constructed using all the preceding key-value pairs. Then, the authorization server is called. The final request is as follows:{ "context" : { "bodyKey" : "abc", "queryKey" : "q", "headerKey": "h" } }
After you confirm that the API configuration is correct, click Create.
Attach an API
After you configure the external authorization API, you can attach it to a business API to activate it. The procedure is as follows:
On the API Publishing > External Authorization API page, click the name of the external authorization API that you created to go to its details page.
On the External Authorization API Details > Attached APIs tab, click Attach API.
In the window that appears, select the API that you want to attach, and then click OK.
To detach an API, go to the External Authorization API Details > Attached APIs tab, find the API that you want to detach, click Detach in the Actions column, and then confirm the operation.
A business API can be attached to only one external authorization API.
An external authorization API can only be attached to business APIs that use the same frontend protocol.