This topic describes how to use DataWorks to synchronize full or incremental data from one Tablestore time series table to another.
Background information
Data Integration is a stable, efficient, and elastic data synchronization platform. It provides high-speed and stable data movement and synchronization between various disparate data sources in complex network environments. You can create offline sync nodes directly in the Data Studio (DataStudio) interface to perform periodic offline (batch) data synchronization.
Synchronization types
Full data synchronization
Synchronizes all existing time series data from the source time series table to the destination time series table.
Incremental data synchronization
Periodically synchronizes new data from the source time series table to the destination time series table. For example, you can synchronize data once a day.
Prerequisites
You have created a destination time series table. You have also obtained the instance names, endpoints, and region IDs for the source and destination tables.
You have created an AccessKey for your Alibaba Cloud account or a Resource Access Management (RAM) user with permissions on Tablestore.
You have Purchase and created a workspace in the region where the source or destination table is located.
You have created a Serverless resource group and attached it to the workspace. For more information about billing, see Billing of Serverless resource groups.
If the source and destination tables are in different regions, follow the steps below to create a VPC peering connection for cross-region network connectivity.
The following example describes a scenario in which the DataWorks workspace and the source table instance are in the China (Hangzhou) region, and the target table is in the China (Shanghai) region.
-
Attach a VPC to the Tablestore instance.
-
Log on to the Tablestore console. In the top navigation bar, select the region where the target table is located.
-
Click the instance alias to navigate to the Instance Management page.
-
On the Network Management tab, click Bind VPC. Select a VPC and vSwitch, enter a VPC name, and then click OK.
-
Wait for the VPC to attach. The page automatically refreshes to display the VPC ID and VPC Address in the VPC list.
NoteWhen you add a Tablestore data source in the DataWorks console, you must use this VPC address.

-
-
Obtain the VPC information for the DataWorks workspace resource group.
-
Log on to the DataWorks console. In the top navigation bar, select the region where your workspace is located. In the navigation pane on the left, click Workspace to go to the Workspaces page.
-
Click the workspace name to go to the Workspace Details page. In the left navigation pane, click Resource Group to view the resource groups attached to the workspace.
-
To the right of the target resource group, click Network Settings. In the Data Scheduling & Data Integration section, view the VPC ID of the attached virtual private cloud.
-
-
Create a VPC peering connection and configure routes.
-
Log on to the VPC console. In the navigation pane on the left, click VPC Peering Connection and then click Create VPC Peering Connection.
-
On the Create VPC Peering Connection page, enter a name for the peering connection and select the requester VPC instance, accepter account type, accepter region, and accepter VPC instance. Then, click OK.
-
On the VPC Peering Connection page, find the VPC peering connection and click Configure route in the Requester VPC and Accepter columns.
For the destination CIDR block, enter the CIDR block of the peer VPC. For example, when you configure a route entry for the requester VPC, enter the CIDR block of the accepter VPC. When you configure a route entry for the accepter VPC, enter the CIDR block of the requester VPC.
-
Full data synchronization
Step 1: Add data sources
Add Tablestore data sources for the instances that contain the source and destination time series tables.
Go to the Data Integration page.
Log on to the DataWorks console. After switching to the destination region, click in the navigation pane on the left. In the drop-down list, select the corresponding workspace and click Go to Data Integration.
In the navigation pane on the left, click Data Source.
On the Data Sources page, click Add Data Source.
In the Add Data Source dialog box, select Tablestore as the data source type.
In the Add Tablestore Data Source dialog box, set the data source parameters as outlined in the table below.
Parameter
Description
Data Source Name
The name of the data source. The name can contain only letters, digits, and underscores (_), and must start with a letter.
Data Source Description
The description of the data source. The description cannot exceed 80 characters in length.
Region
Select the region where the Tablestore instance is located.
Tablestore Instance Name
The name of the Tablestore instance.
Endpoint
The endpoint of the Tablestore instance. We recommend that you use the VPC address.
AccessKey ID
The AccessKey ID and AccessKey secret of an Alibaba Cloud account or a Resource Access Management (RAM) user.
AccessKey Secret
Test the connectivity of the resource group. You must perform this test when you create a data source to ensure that the resource group used by the sync task can connect to the data source. Otherwise, the data synchronization task cannot run properly.
In the Connection Configuration section, for the target resource group, click Test Network Connectivity in the Connection Status column.
After the connectivity test passes, the Connectivity Status changes to Connected. Click Complete. The new data source then appears in the data source list.
NoteIf the connectivity test fails and the status is Failed, use the connectivity diagnostic tool to troubleshoot the issue. If the resource group still cannot connect to the data source, submit a ticket or .
Step 2: Configure an offline sync task
Data Studio (Old Version)
1. Create an offline sync task node
Log on to the DataWorks console.
In the left-side navigation pane, choose Data Development > Data Studio.
On the Data Studio page, expand the Data Integration node in the left-side directory tree.
Right-click Offline Synchronization, and then select Create Node > Offline Sync.
In the Create Node dialog box, enter a node name and click Confirm.
2. Configure the sync task
Under Data Integration, double-click the new offline sync task node.
Configure the network and resources.
Select the data source, data destination, and resource group for the offline sync task, and then test the connectivity.
In the Network and Resource Configuration step, set Data Source to Tablestore and Data Source Name to the newly created data source.
Select a resource group.
After you select a resource group, the system displays information, such as the region and specifications of the resource group. The system also automatically tests the connectivity between the resource group and the selected data source.
NoteIf the data source and the resource group are not connected, configure network connectivity based on the on-screen instructions or the relevant documentation. For more information, see Overview of network connection solutions.
Serverless resource groups allow you to specify the maximum number of CUs for a sync task. If your sync task fails due to an out-of-memory (OOM) error, you can increase the CU value for the resource group.
Set Data Destination to Tablestore and Data Source Name to the new destination data source.
The system automatically tests the connectivity between the resource group and the selected data source.
When the connectivity test is successful, click Next.
Configure and save the task.
In the Configure Task step, click the
 icon. In the dialog box that appears, click OK.
On the script configuration page, edit the script.
The following code provides a sample script. Replace the parameters in the configuration file with your information as needed.
{ "type": "job", "version": "2.0", "steps": [ { "stepType": "ots", "parameter": { "datasource": "MySourceTablestoreDatasource", "table": "source_timeseries_table", "newVersion": "true", "mode": "normal", "isTimeseriesTable": "true", "envType": 1, "column": [ { "name": "_m_name" }, { "name": "_data_source" }, { "name": "_tags" }, { "name": "_time" }, { "name": "string_col", "type": "STRING" }, { "name": "bool_col", "type": "BOOL" }, { "name": "int_col", "type": "INT" }, { "name": "double_col", "type": "DOUBLE" } ] }, "name": "Reader", "category": "reader" }, { "stepType": "ots", "parameter": { "datasource": "MyTargetTablestoreDatasource", "table": "target_timeseries_table", "newVersion": "true", "mode": "normal", "isTimeseriesTable": "true", "envType": 1, "column": [ { "name": "_m_name" }, { "name": "_data_source" }, { "name": "_tags" }, { "name": "_time" }, { "name": "string_col", "type": "STRING" }, { "name": "bool_col", "type": "BOOL" }, { "name": "int_col", "type": "INT" }, { "name": "double_col", "type": "DOUBLE" } ] }, "name": "Writer", "category": "writer" } ], "setting": { "errorLimit": { "record": "" }, "locale": "en", "speed": { "throttle": false, "concurrent": 2 } }, "order": { "hops": [ { "from": "Reader", "to": "Writer" } ] } }ImportantIf a field has the INTEGER data type, set its type to INT. DataWorks automatically converts INT to INTEGER. If you set the type directly to INTEGER, an error is reported in the log and the task fails.
The following table describes the parameters that you must replace for Tablestore Reader.
Parameter
Description
datasource
The name of the Tablestore data source for the source table.
table
The name of the source table.
column
The column information to read from the source table.
The following table describes the parameters that you must replace for Tablestore Writer.
Parameter
Description
datasource
The name of the Tablestore data source for the destination table.
table
The name of the destination table.
column
The attribute columns to write data to.
ImportantThe order of columns to write to the destination table must be the same as the order of columns read from the source table.
Click the
 icon to save the configuration.
3. Run the sync task
Click the
 icon.
icon.In the Parameters dialog box, select the resource group to run the task.
Click Run.
Data Studio (New Version)
1. Create an offline sync task node
Log on to the DataWorks console.
In the left-side navigation pane, choose Data Development > Data Studio.
On the Data Studio page, click the
 icon to create a node.
In the Create Node dialog box, set Node Type to Offline Sync, enter a node name, and then click Confirm.
2. Configure the sync task
In the Project Directory, click the new offline sync task node.
Configure the network and resources.
Select the data source, data destination, and resource group for the offline sync task, and then test the connectivity.
In the Network and Resource Configuration step, set Data Source to Tablestore and Data Source Name to the newly created data source.
Select a resource group.
After you select a resource group, the system displays information, such as the region and specifications of the resource group. The system also automatically tests the connectivity between the resource group and the selected data source.
NoteIf the data source and the resource group are not connected, configure network connectivity based on the on-screen instructions or the relevant documentation. For more information, see Overview of network connection solutions.
Serverless resource groups allow you to specify the maximum number of CUs for a sync task. If your sync task fails due to an out-of-memory (OOM) error, you can increase the CU value for the resource group.
Set Data Destination to Tablestore and Data Source Name to the new destination data source.
The system automatically tests the connectivity between the resource group and the selected data source.
When the connectivity test is successful, click Next.
Configure and save the task.
In the Configure Task step, click Code Editor. When the dialog box appears, click OK.
On the script configuration page, edit the script.
The following code provides a sample script. Replace the parameters in the configuration file with your information as needed.
{ "type": "job", "version": "2.0", "steps": [ { "stepType": "ots", "parameter": { "datasource": "MySourceTablestoreDatasource", "table": "source_timeseries_table", "newVersion": "true", "mode": "normal", "isTimeseriesTable": "true", "envType": 1, "column": [ { "name": "_m_name" }, { "name": "_data_source" }, { "name": "_tags" }, { "name": "_time" }, { "name": "string_col", "type": "STRING" }, { "name": "bool_col", "type": "BOOL" }, { "name": "int_col", "type": "INT" }, { "name": "double_col", "type": "DOUBLE" } ] }, "name": "Reader", "category": "reader" }, { "stepType": "ots", "parameter": { "datasource": "MyTargetTablestoreDatasource", "table": "target_timeseries_table", "newVersion": "true", "mode": "normal", "isTimeseriesTable": "true", "envType": 1, "column": [ { "name": "_m_name" }, { "name": "_data_source" }, { "name": "_tags" }, { "name": "_time" }, { "name": "string_col", "type": "STRING" }, { "name": "bool_col", "type": "BOOL" }, { "name": "int_col", "type": "INT" }, { "name": "double_col", "type": "DOUBLE" } ] }, "name": "Writer", "category": "writer" } ], "setting": { "errorLimit": { "record": "" }, "locale": "en", "speed": { "throttle": false, "concurrent": 2 } }, "order": { "hops": [ { "from": "Reader", "to": "Writer" } ] } }ImportantIf a field has the INTEGER data type, set its type to INT. DataWorks automatically converts INT to INTEGER. If you set the type directly to INTEGER, an error is reported in the log and the task fails.
The following table describes the parameters that you must replace for Tablestore Reader.
Parameter
Description
datasource
The name of the Tablestore data source for the source table.
table
The name of the source table.
column
The column information to read from the source table.
The following table describes the parameters that you must replace for Tablestore Writer.
Parameter
Description
datasource
The name of the Tablestore data source for the destination table.
table
The name of the destination table.
column
The attribute columns to write data to.
ImportantThe order of columns to write to the destination table must be the same as the order of columns read from the source table.
To save the configuration, click Save.

3. Run the sync task
To the right of the task, click Debug Configuration and select the resource group for the task.
Click Run.
Step 3: View the sync result
After the sync task runs, you can view the task status in the logs and the synchronization result in the destination time series table in the Tablestore console.
-
View the task running status and result at the bottom of the page. The following log information indicates that the sync task ran successfully.
2025-11-18 11:16:23 INFO Shell run successfully!
2025-11-18 11:16:23 INFO Current task status: FINISH
2025-11-18 11:16:23 INFO Cost time is: 77.208s
View the synchronization result in the destination time series table.
Go to the Instance Management page.
Log on to the Tablestore console.
In the top navigation bar, select a resource group and a region.
On the Overview page, click the instance alias or Instance Management in the Actions column.
On the Instance Details tab, click the Time Series Table List tab.
On the Time Series Table List tab, in the Actions column for the destination time series table, click Data Management.
On the Data Management tab, you can view the data synced to the time series table.
Incremental data synchronization
Step 1: Add data sources
Add data sources for the instances that contain the source and destination time series tables.
Step 2: Configure an offline sync task
Data Studio (Old Version)
1. Create an offline sync task node
Log on to the DataWorks console.
In the left-side navigation pane, choose Data Development > Data Studio.
On the Data Studio page, expand the Data Integration node in the left-side directory tree.
Right-click Offline Synchronization, and then select Create Node > Offline Sync.
In the Create Node dialog box, enter a node name and click Confirm.
2. Configure the sync task
Under the Data Integration node, double-click the new offline sync task node.
Configure the network and resources.
Select the data source, data destination, and resource group for the offline sync task, and then test the connectivity.
In the Network and Resource Configuration step, set Data Source to Tablestore Stream and Data Source Name to the newly created data source.
NoteThe Tablestore Stream plugin is used to export incremental data from Tablestore. For more information, see Configure a sync task for Tablestore Stream.
Select a resource group.
After you select a resource group, the system displays information, such as the region and specifications of the resource group. The system also automatically tests the connectivity between the resource group and the selected data source.
NoteIf the data source and the resource group are not connected, configure network connectivity based on the on-screen instructions or the relevant documentation. For more information, see Overview of network connection solutions.
Serverless resource groups allow you to specify the maximum number of CUs for a sync task. If your sync task fails due to an out-of-memory (OOM) error, you can increase the CU value for the resource group.
Set Data Destination to Tablestore and Data Source Name to the new destination data source.
The system automatically tests the connectivity between the resource group and the selected data source.
When the connectivity test is successful, click Next.
Configure and save the sync task.
In the Configure Task step, click the
icon. In the dialog box, click OK.On the script configuration page, edit the script.
The following code provides a sample script. Replace the parameters in the configuration file with your information as needed.
{
  "type": "job",
  "version": "2.0",
  "steps": [
    {
      "stepType": "otsstream",
      "parameter": {
        "datasource": "MySourceTablestoreDatasource",
        "dataTable": "source_timeseries_table",
        "newVersion": "true",
        "statusTable": "TableStoreStreamReaderStatusTable",
        "maxRetries": 30,
        "isExportSequenceInfo": false,
        "mode": "single_version_and_update_only",
        "isTimeseriesTable": "true",
        "startTimeString": "${startTime}",
        "endTimeString": "${endTime}",
        "envType": 1,
        "column": [
          {
            "name": "_m_name"
          },
          {
            "name": "_data_source"
          },
          {
            "name": "_tags"
          },
          {
            "name": "_time"
          },
          {
            "name": "string_col",
            "type": "STRING"
          },
          {
            "name": "bool_col",
            "type": "BOOL"
          },
          {
            "name": "int_col",
            "type": "INT"
          },
          {
            "name": "double_col",
            "type": "DOUBLE"
          }
        ]
      },
      "name": "Reader",
      "category": "reader"
    },
    {
      "stepType": "ots",
      "parameter": {
        "datasource": "MyTargetTablestoreDatasource",
        "table": "target_timeseries_table",
        "newVersion": "true",
        "mode": "normal",
        "isTimeseriesTable": "true",
        "envType": 1,
        "column": [
          {
            "name": "_m_name"
          },
          {
            "name": "_data_source"
          },
          {
            "name": "_tags"
          },
          {
            "name": "_time"
          },
          {
            "name": "string_col",
            "type": "STRING"
          },
          {
            "name": "bool_col",
            "type": "BOOL"
          },
          {
            "name": "int_col",
            "type": "INT"
          },
          {
            "name": "double_col",
            "type": "DOUBLE"
          }
        ]
      },
      "name": "Writer",
      "category": "writer"
    }
  ],
  "setting": {
    "errorLimit": {
      "record": ""
    },
    "locale": "en",
    "speed": {
      "throttle": false,
      "concurrent": 2
    }
  },
  "order": {
    "hops": [
      {
        "from": "Reader",
        "to": "Writer"
      }
    ]
  }
}
The following table describes the parameters that you must replace for Tablestore Stream Reader.
Parameter
Description
datasource
The name of the Tablestore data source for the source table.
dataTable
The name of the source table.
column
The column information to read from the source table.
The following table describes the parameters that you must replace for Tablestore Writer.
Parameter
Description
datasource
The name of the Tablestore data source for the destination table.
table
The name of the destination table.
column
The attribute columns to write data to.
ImportantThe order of columns to write to the destination table must be the same as the order of columns read from the source table.
Click the
icon to save the configuration.
3. Configure scheduling properties
Click Scheduling Configuration to the right of the task.
In the Scheduling Configuration panel, go to the Scheduling Parameters section and click Add Parameter. Add parameters as described in the following table. For more information, see Supported formats of scheduling parameters.
Parameter
Parameter Value
startTime
$[yyyymmddhh24-2/24]$[miss-10/24/60]
endTime
$[yyyymmddhh24-1/24]$[miss-10/24/60]
For example, if the task runs at 19:00:00 on April 23, 2023, startTime is 20230423175000 and endTime is 20230423185000. The task synchronizes new data from 17:50 to 18:50.
In the Time Property section, you can configure the time properties. For more information, see Configure time properties.
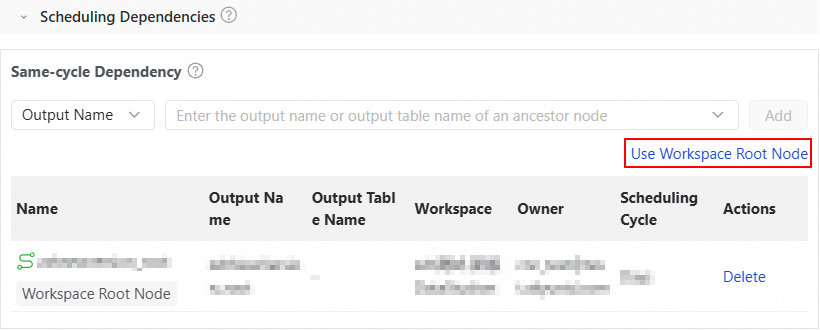
In the Scheduling Dependencies section, click Use Workspace Root Node. The system automatically generates the upstream node dependency.
Using the workspace root node indicates that the task has no upstream dependencies.
When the configuration is complete, close the Scheduling Configuration panel.
Click the
icon to save the configuration.
4. (Optional) Debug the script
Debug the script to ensure that the sync task can successfully synchronize incremental data from the source time series table to the destination time series table.
When you debug the script, data within the configured time range may be imported into the destination time series table multiple times. Data for the same time series is overwritten in the destination time series table.
Click the
icon.In the Parameters dialog box, select the resource group for the task and configure custom parameters.
The format for custom parameters is
yyyyMMddHHmmss. For example, 20230423175000.Click Run.
After the task is complete, you can view the data synchronization result in the destination time series table in the Tablestore console.
5. Submit the sync task
After you submit the sync task, it runs based on the configured scheduling properties.
Click the
icon.In the Submit dialog box, you can enter a change description as needed.
Click Confirm.
Data Studio (New Version)
1. Create an offline sync task node
Log on to the DataWorks console.
In the left-side navigation pane, choose Data Development > Data Studio.
On the Data Studio page, click the
icon to create a node.In the Create Node dialog box, set Node Type to Offline Sync, enter a node name, and then click Confirm.
2. Configure the sync task
In the Project Directory, click the new offline sync task node.
Configure the network and resources.
Select the data source, data destination, and resource group for the offline sync task, and then test the connectivity.
In the Network and Resource Configuration step, set Data Source to Tablestore Stream and Data Source Name to the newly created data source.
NoteThe Tablestore Stream plugin is used to export incremental data from Tablestore. For more information, see Configure a sync task for Tablestore Stream.
Select a resource group.
After you select a resource group, the system displays information, such as the region and specifications of the resource group. The system also automatically tests the connectivity between the resource group and the selected data source.
NoteIf the data source and the resource group are not connected, configure network connectivity based on the on-screen instructions or the relevant documentation. For more information, see Overview of network connection solutions.
Serverless resource groups allow you to specify the maximum number of CUs for a sync task. If your sync task fails due to an out-of-memory (OOM) error, you can increase the CU value for the resource group.
Set Data Destination to Tablestore and Data Source Name to the new destination data source.
The system automatically tests the connectivity between the resource group and the selected data source.
When the connectivity test is successful, click Next.
Configure and save the sync task.
In the Configure Task step, click Code Editor, and then click OK in the dialog box that appears.
On the script configuration page, edit the script.
The following code provides a sample script. Replace the parameters in the configuration file with your information as needed.
{
  "type": "job",
  "version": "2.0",
  "steps": [
    {
      "stepType": "otsstream",
      "parameter": {
        "datasource": "MySourceTablestoreDatasource",
        "dataTable": "source_timeseries_table",
        "newVersion": "true",
        "statusTable": "TableStoreStreamReaderStatusTable",
        "maxRetries": 30,
        "isExportSequenceInfo": false,
        "mode": "single_version_and_update_only",
        "isTimeseriesTable": "true",
        "startTimeString": "${startTime}",
        "endTimeString": "${endTime}",
        "envType": 1,
        "column": [
          {
            "name": "_m_name"
          },
          {
            "name": "_data_source"
          },
          {
            "name": "_tags"
          },
          {
            "name": "_time"
          },
          {
            "name": "string_col",
            "type": "STRING"
          },
          {
            "name": "bool_col",
            "type": "BOOL"
          },
          {
            "name": "int_col",
            "type": "INT"
          },
          {
            "name": "double_col",
            "type": "DOUBLE"
          }
        ]
      },
      "name": "Reader",
      "category": "reader"
    },
    {
      "stepType": "ots",
      "parameter": {
        "datasource": "MyTargetTablestoreDatasource",
        "table": "target_timeseries_table",
        "newVersion": "true",
        "mode": "normal",
        "isTimeseriesTable": "true",
        "envType": 1,
        "column": [
          {
            "name": "_m_name"
          },
          {
            "name": "_data_source"
          },
          {
            "name": "_tags"
          },
          {
            "name": "_time"
          },
          {
            "name": "string_col",
            "type": "STRING"
          },
          {
            "name": "bool_col",
            "type": "BOOL"
          },
          {
            "name": "int_col",
            "type": "INT"
          },
          {
            "name": "double_col",
            "type": "DOUBLE"
          }
        ]
      },
      "name": "Writer",
      "category": "writer"
    }
  ],
  "setting": {
    "errorLimit": {
      "record": ""
    },
    "locale": "en",
    "speed": {
      "throttle": false,
      "concurrent": 2
    }
  },
  "order": {
    "hops": [
      {
        "from": "Reader",
        "to": "Writer"
      }
    ]
  }
}
The following table describes the parameters that you must replace for Tablestore Stream Reader.
Parameter
Description
datasource
The name of the Tablestore data source for the source table.
dataTable
The name of the source table.
column
The column information to read from the source table.
The following table describes the parameters that you must replace for Tablestore Writer.
Parameter
Description
datasource
The name of the Tablestore data source for the destination table.
table
The name of the destination table.
column
The attribute columns to write data to.
ImportantThe order of columns to write to the destination table must be the same as the order of columns read from the source table.
Click Save.
3. Configure scheduling properties
Click Scheduling Configuration to the right of the task.
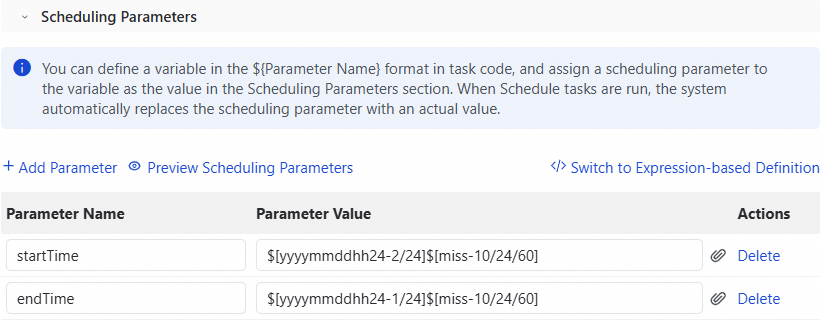
In the Scheduling Parameters section of the Scheduling Configuration panel, click Add Parameter. Add parameters as described in the following table. For more information, see Sources and expressions of scheduling parameters.
Parameter
Parameter Value
startTime
$[yyyymmddhh24-2/24]$[miss-10/24/60]
endTime
$[yyyymmddhh24-1/24]$[miss-10/24/60]
The following figure shows a configuration example.
For example, if the task runs at 19:00:00 on April 23, 2023, startTime is 20230423175000 and endTime is 20230423185000. The task synchronizes new data from 17:50 to 18:50.
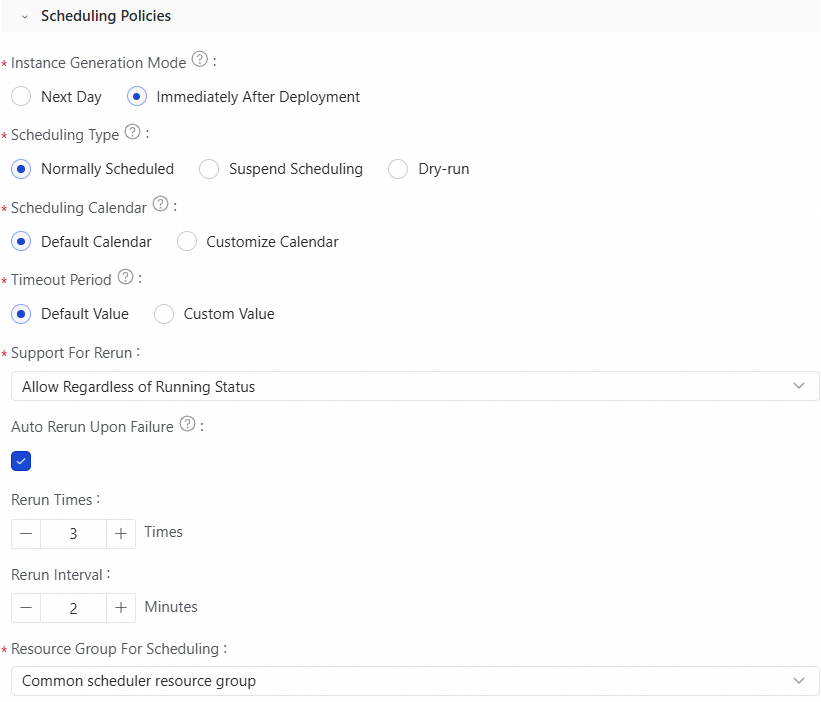
In the Scheduling Policy section, configure the policy. For more information, see Instance generation method: Generate instances immediately after deployment.
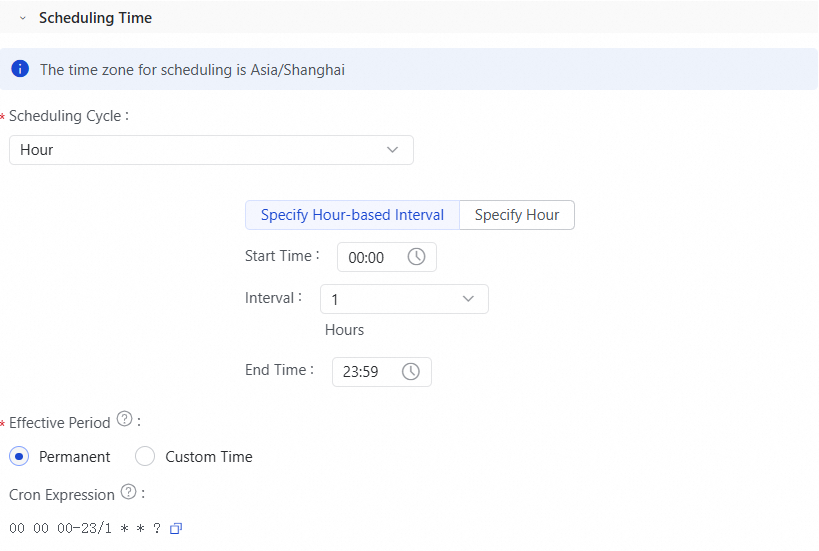
In the Scheduled Time section, configure the schedule. For more information, see Scheduled Time.
The following figure shows an example of how to configure the task to run automatically every hour on the hour.
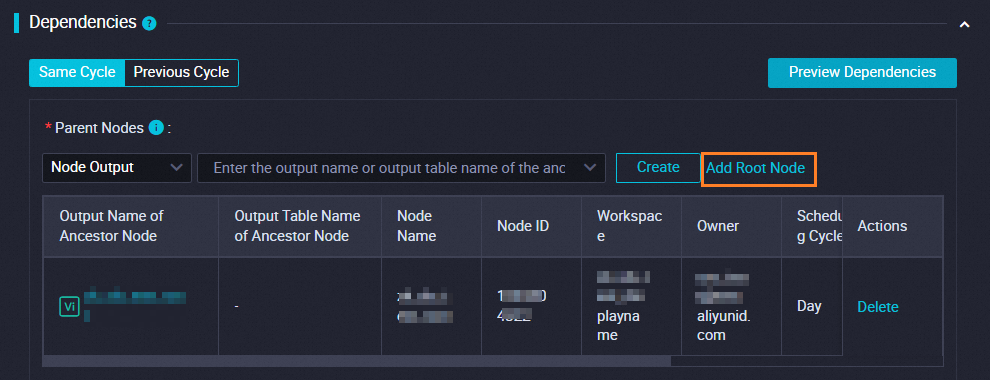
In the Scheduling Dependencies section, click Use Workspace Root Node. The system automatically generates the upstream node dependency information.
NoteUsing the workspace root node indicates that the task has no upstream dependencies.
After you complete the configuration, close the Scheduling Configuration panel.
To save the configuration, click Save.
4. (Optional) Debug the script
Debug the script to ensure that the sync task can successfully synchronize incremental data from the source time series table to the destination time series table.
When you debug the script, data within the configured time range may be imported into the destination time series table multiple times. Data for the same time series is overwritten in the destination time series table.
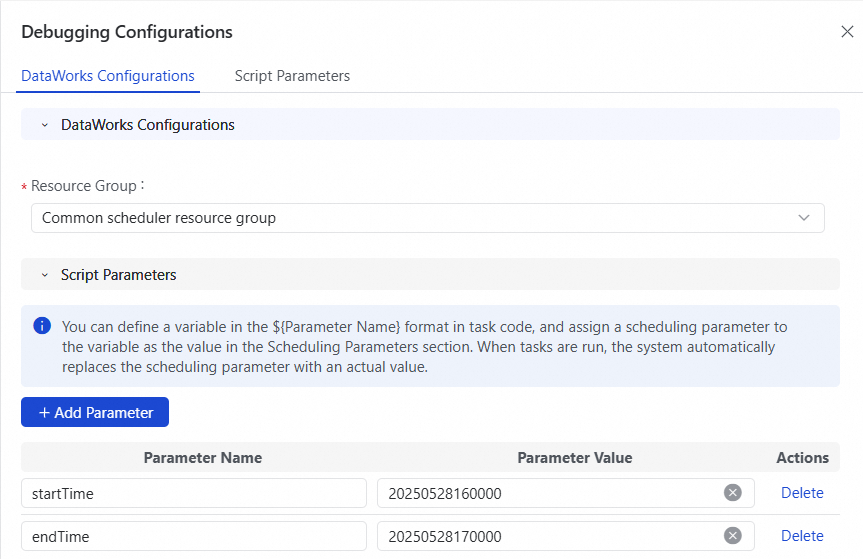
To the right of the task, click Debug Configuration. Select the resource group for the task and configure the script parameters.
The format for custom parameters is
yyyyMMddHHmmss. For example, 20250528160000.After completing the configuration, close the Debug Configuration panel.
Click Run.
After the task is complete, you can view the data synchronization result in the destination time series table in the Tablestore console.
5. Publish the sync task
After you publish the sync task, it runs based on the configured scheduling properties.
Click Publish.
On the Publish tab for the sync task, enter a description if needed. Then, click Start Publishing to Production.
Follow the process guide and click Confirm Publish.
Step 3: View the sync result
View the task status in the DataWorks console.
Data Studio (Old Version)
On the right of the sync task toolbar, click O&M.
On the Recurring Instances page, on the Instance View tab, you can view the runtime details of the instance. For more information, see Instance view.
Data Studio (New Version)
Click View recurring instances in O&M.
On the Instance View tab of the Recurring Instances page, you can view the runtime details of the instance. For more information, see Instance view.
View the synchronization result in the destination time series table.
Go to the Instance Management page.
Log on to the Tablestore console.
In the top navigation bar, select a resource group and a region.
On the Overview page, click the instance alias or Instance Management in the Actions column.
On the Instance Details tab, click the Time Series Table List tab.
On the Time Series Table List tab, in the Actions column for the destination time series table, click Data Management.
On the Data Management tab, you can view the data synced to the time series table.