Bill settlement and payment
For pay-as-you-go resources, pay your bills promptly after they are generated to avoid service interruptions caused by overdue payments.
When to make a payment
Pay your bill by the Due Date to avoid overdue payments. This date depends on whether you are a user on credit control:
-
Users not on credit control: Subscription-based cloud products require immediate payment upon ordering. For pay-as-you-go bills, the previous month's charges are deducted from your account balance on the first day of the following month.
-
Users on credit control: Your contract with Alibaba Cloud specifies a payment term that determines the due date. This term is based on the settlement cycle (such as monthly or quarterly) and the payment period (such as a specific number of calendar or business days).
If a bill is overdue by seven days, the system sends payment reminders through internal messages, emails, text messages, automated voice calls, or written correspondence. Notifications are sent to the contact information associated with your Alibaba Cloud account. Ensure that your contact information is current and correct. For some customers, an account manager may also contact you directly.
On the Overview of Monthly Bill page, you can find the due date for each bill in the Due Date field within the By Resource Purchase Account view.
How to make a payment
You can pay bills through automatic system write-offs or manual payments. In a multi-account enterprise scenario where a financial sub-aacount can manage bills independently, the main account can also use Unified Settlement to pay bills for multiple sub-accounts in batches and issue a consolidated invoice, or use a Transfer to send funds to a financial sub-account for payment.
Automatic write-off
You can use the Automatic Write-off feature to automatically settle your bills. For users not on credit control, the Automatic Write-off feature is enabled by default and cannot be disabled. For users on credit control, go to the Billing Account > Account Settings section to check the status of this feature.
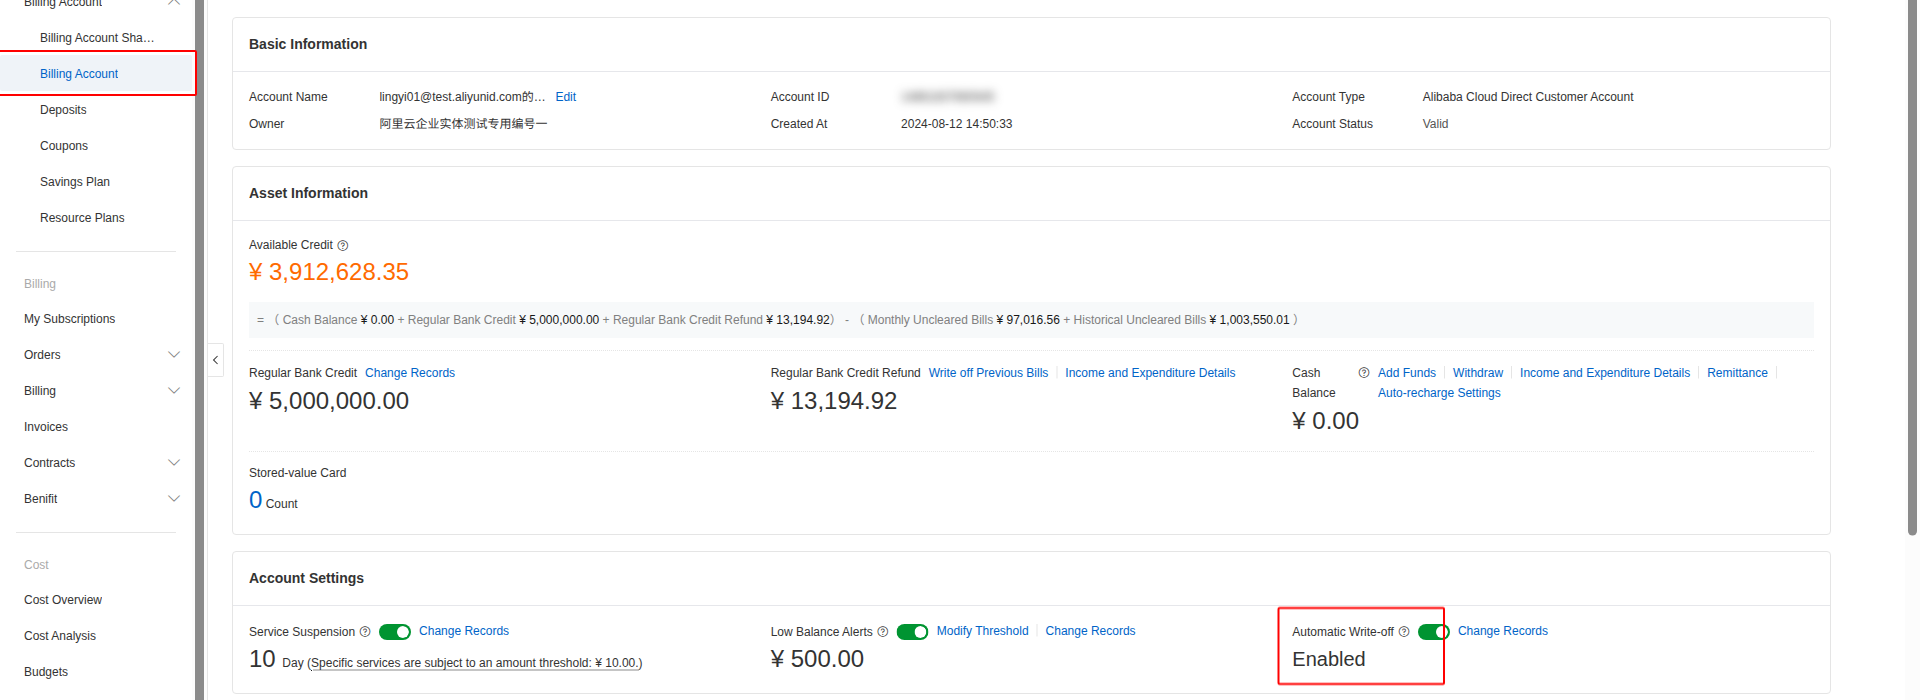
With Automatic Write-off enabled, the system automatically pays your bills after they are generated, as long as your account has sufficient available funds (account balance + credit limit - frozen amount > 0). The system deducts funds for payment in the following order of priority: stored value card → account balance.
If your available funds are insufficient, the system does not pay the bill automatically, and its status remains Not fully settled. You can top up your account on the Billing Account page. After you top up, the system automatically pays the unsettled bill.
Manual payment
Use this method when Automatic Write-off is disabled or when you need to make payments from different sources. You can pay bills individually or pay multiple outstanding bills at once from the console homepage.
-
Go to the payment page: You can pay a single bill, or pay multiple bills in a batch from the console homepage.
-
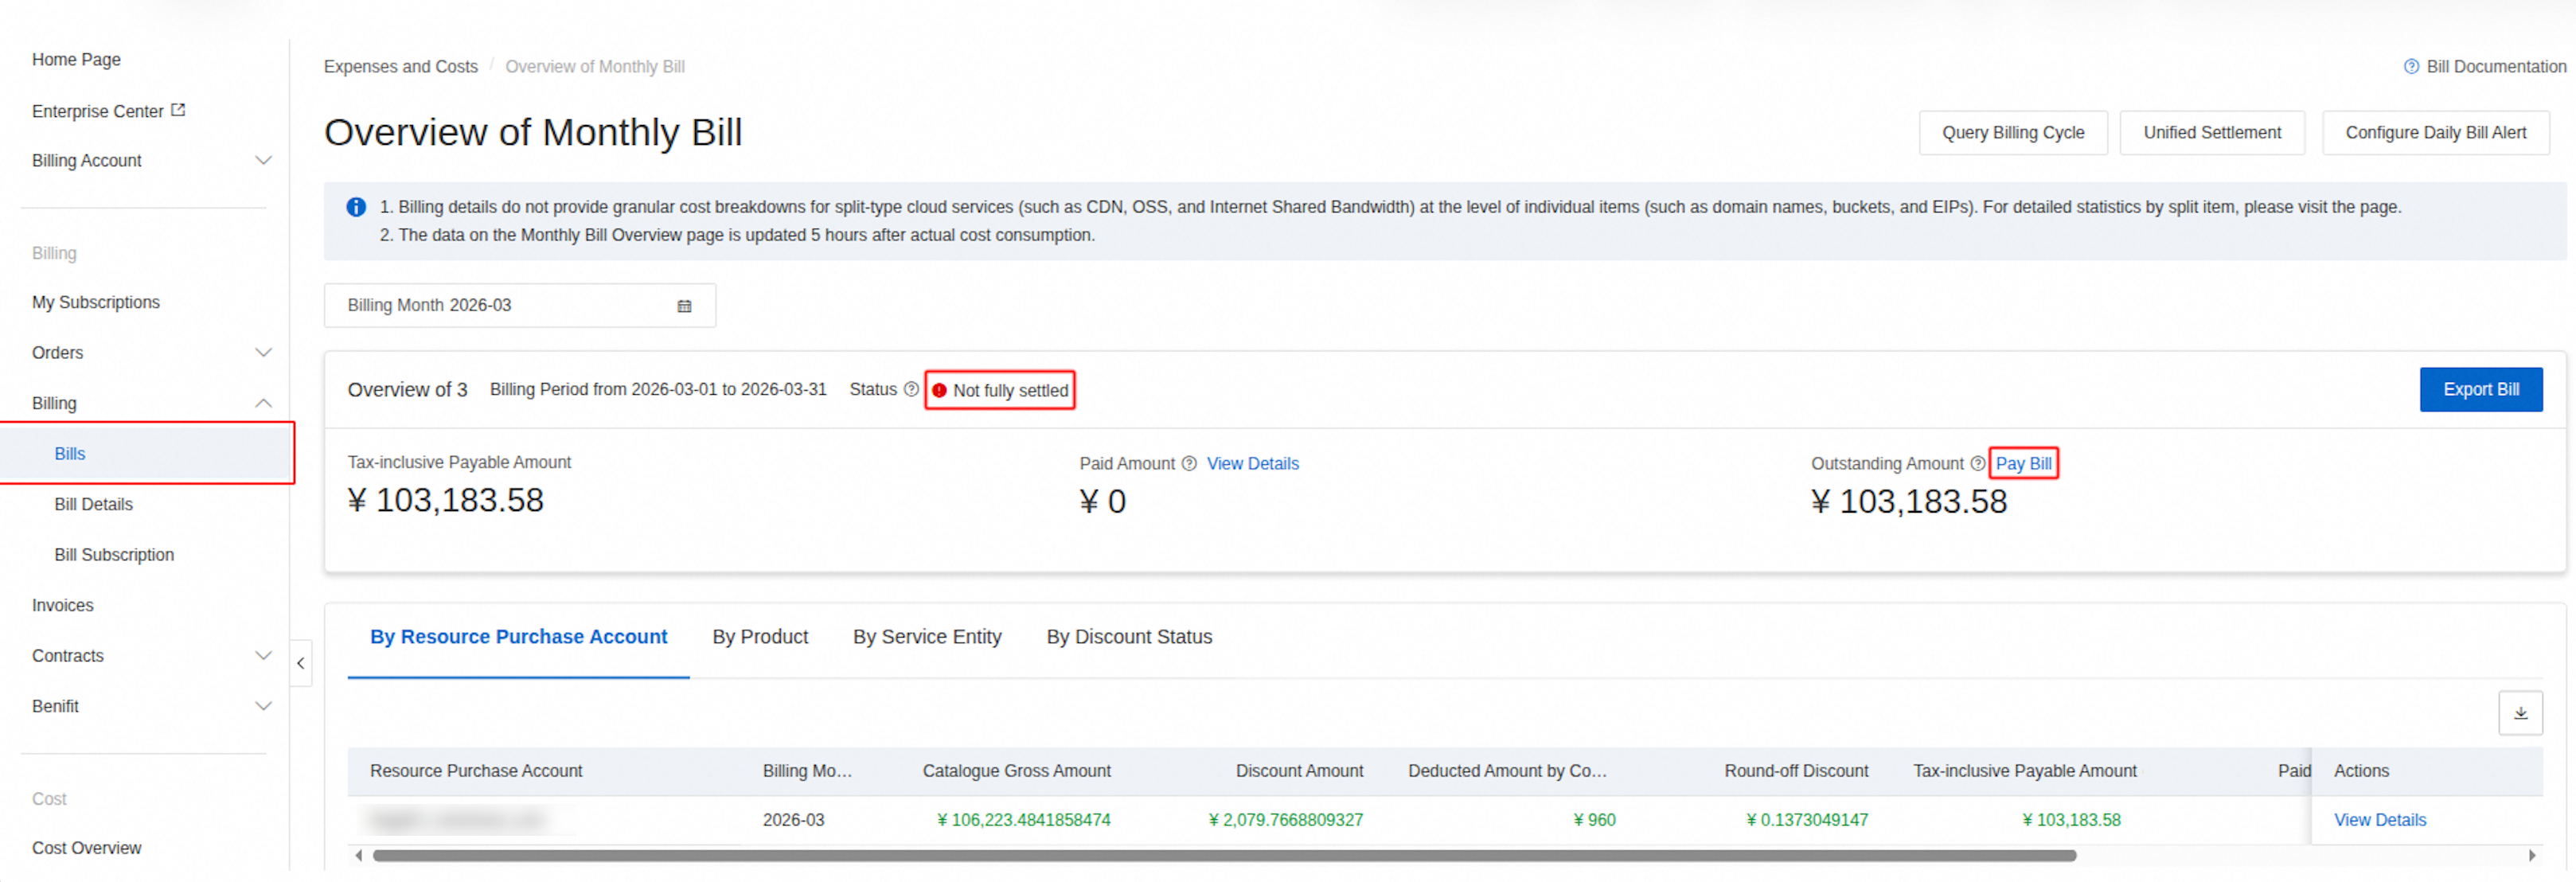
Pay a single bill: On the Overview of Monthly Bill page, find an Not fully settled monthly bill and click Pay Bill. In the side panel that appears, click Pay Bills.
-
Batch repayment from the homepage: In the Overview section of the Expenses and Costs console homepage, find Total Unpaid Amount and click Pay Bill. In the Repay panel, select one or more outstanding billing months (you can adjust the repayment amount for each row), then click Next. This lets you pay the outstanding bills for multiple months in a single operation.
-
-
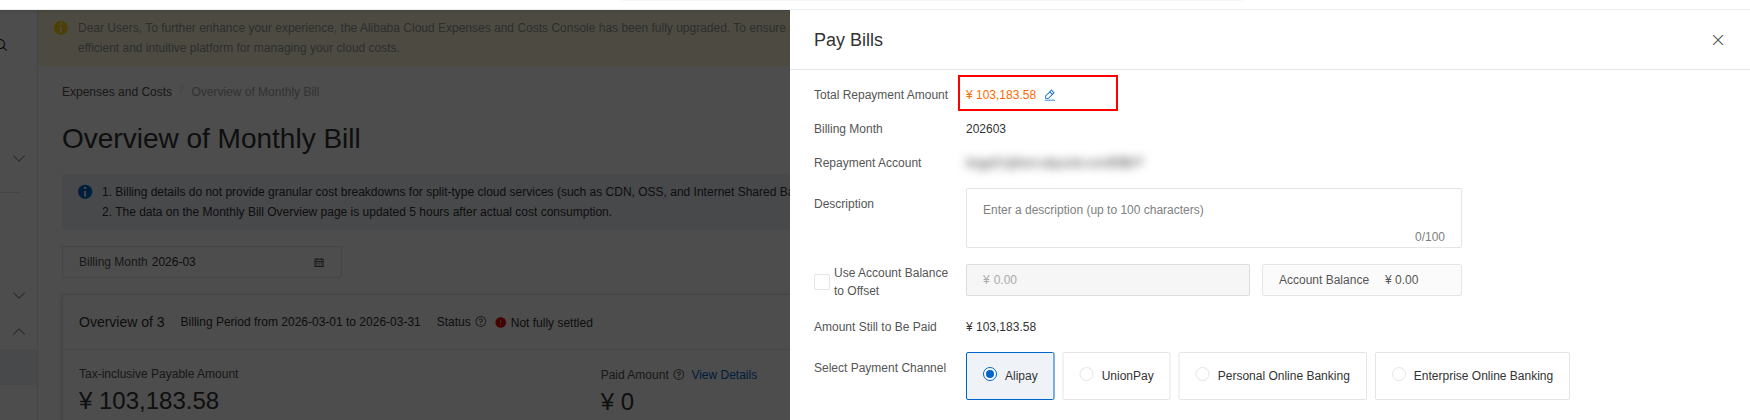
Set the amount: Specify the Total Repayment Amount (defaults to the outstanding amount and can be modified) and the amount to deduct from your account balance.
-
Select a payment method: You can select your account balance, Alipay, Huabei, personal online banking, corporate online banking, or UnionPay Online Payment. If you select online banking, you must select a specific bank.
-
Complete the payment: For external payment methods, a new page opens for payment. After the payment is successful, go to Transaction Details to view the record.
-
View the result: It takes about 30 minutes for the bill write-off status to update. You can refresh the page to check the status. Do not attempt to make the payment again during this time.
-
Manual payment temporarily disables the Automatic Write-off feature. The feature resumes automatically after the payment is complete.
-
If a user on credit control chooses to pay by billing cycle, selects Pay Bills, and selects the Use Account Balance to Offset checkbox, the system prioritizes using the account balance and any credit refund amount to cover the matching billing cycle. By default, credit refunds cannot be used for historical bills. The remaining amount is paid through an external payment method. This process ensures refund compliance and consistency between invoices and bills.
In multi-account enterprise scenarios where a finance sub-account can manage their own bills, you can use Unified Settlement and transfer payments.
Use Unified Settlement to pay bills for multiple financial sub-accounts users in batches and issue a consolidated invoice. Use transfer payment when a main account transfers funds to a financial sub-aacount to pay bills.
Unified settlement
A main account can use Unified Settlement to pay historical unsettled bills for multiple sub-accounts in a batch and issue invoices.
A Unified Settlement task is a one-time operation. You must create a new task each time you need to make a unified payment and issue an invoice for a new billing cycle or account. Follow these steps:
-
On the Overview of Monthly Bill page, click Unified Settlement in the upper-right corner to go to the page.
-
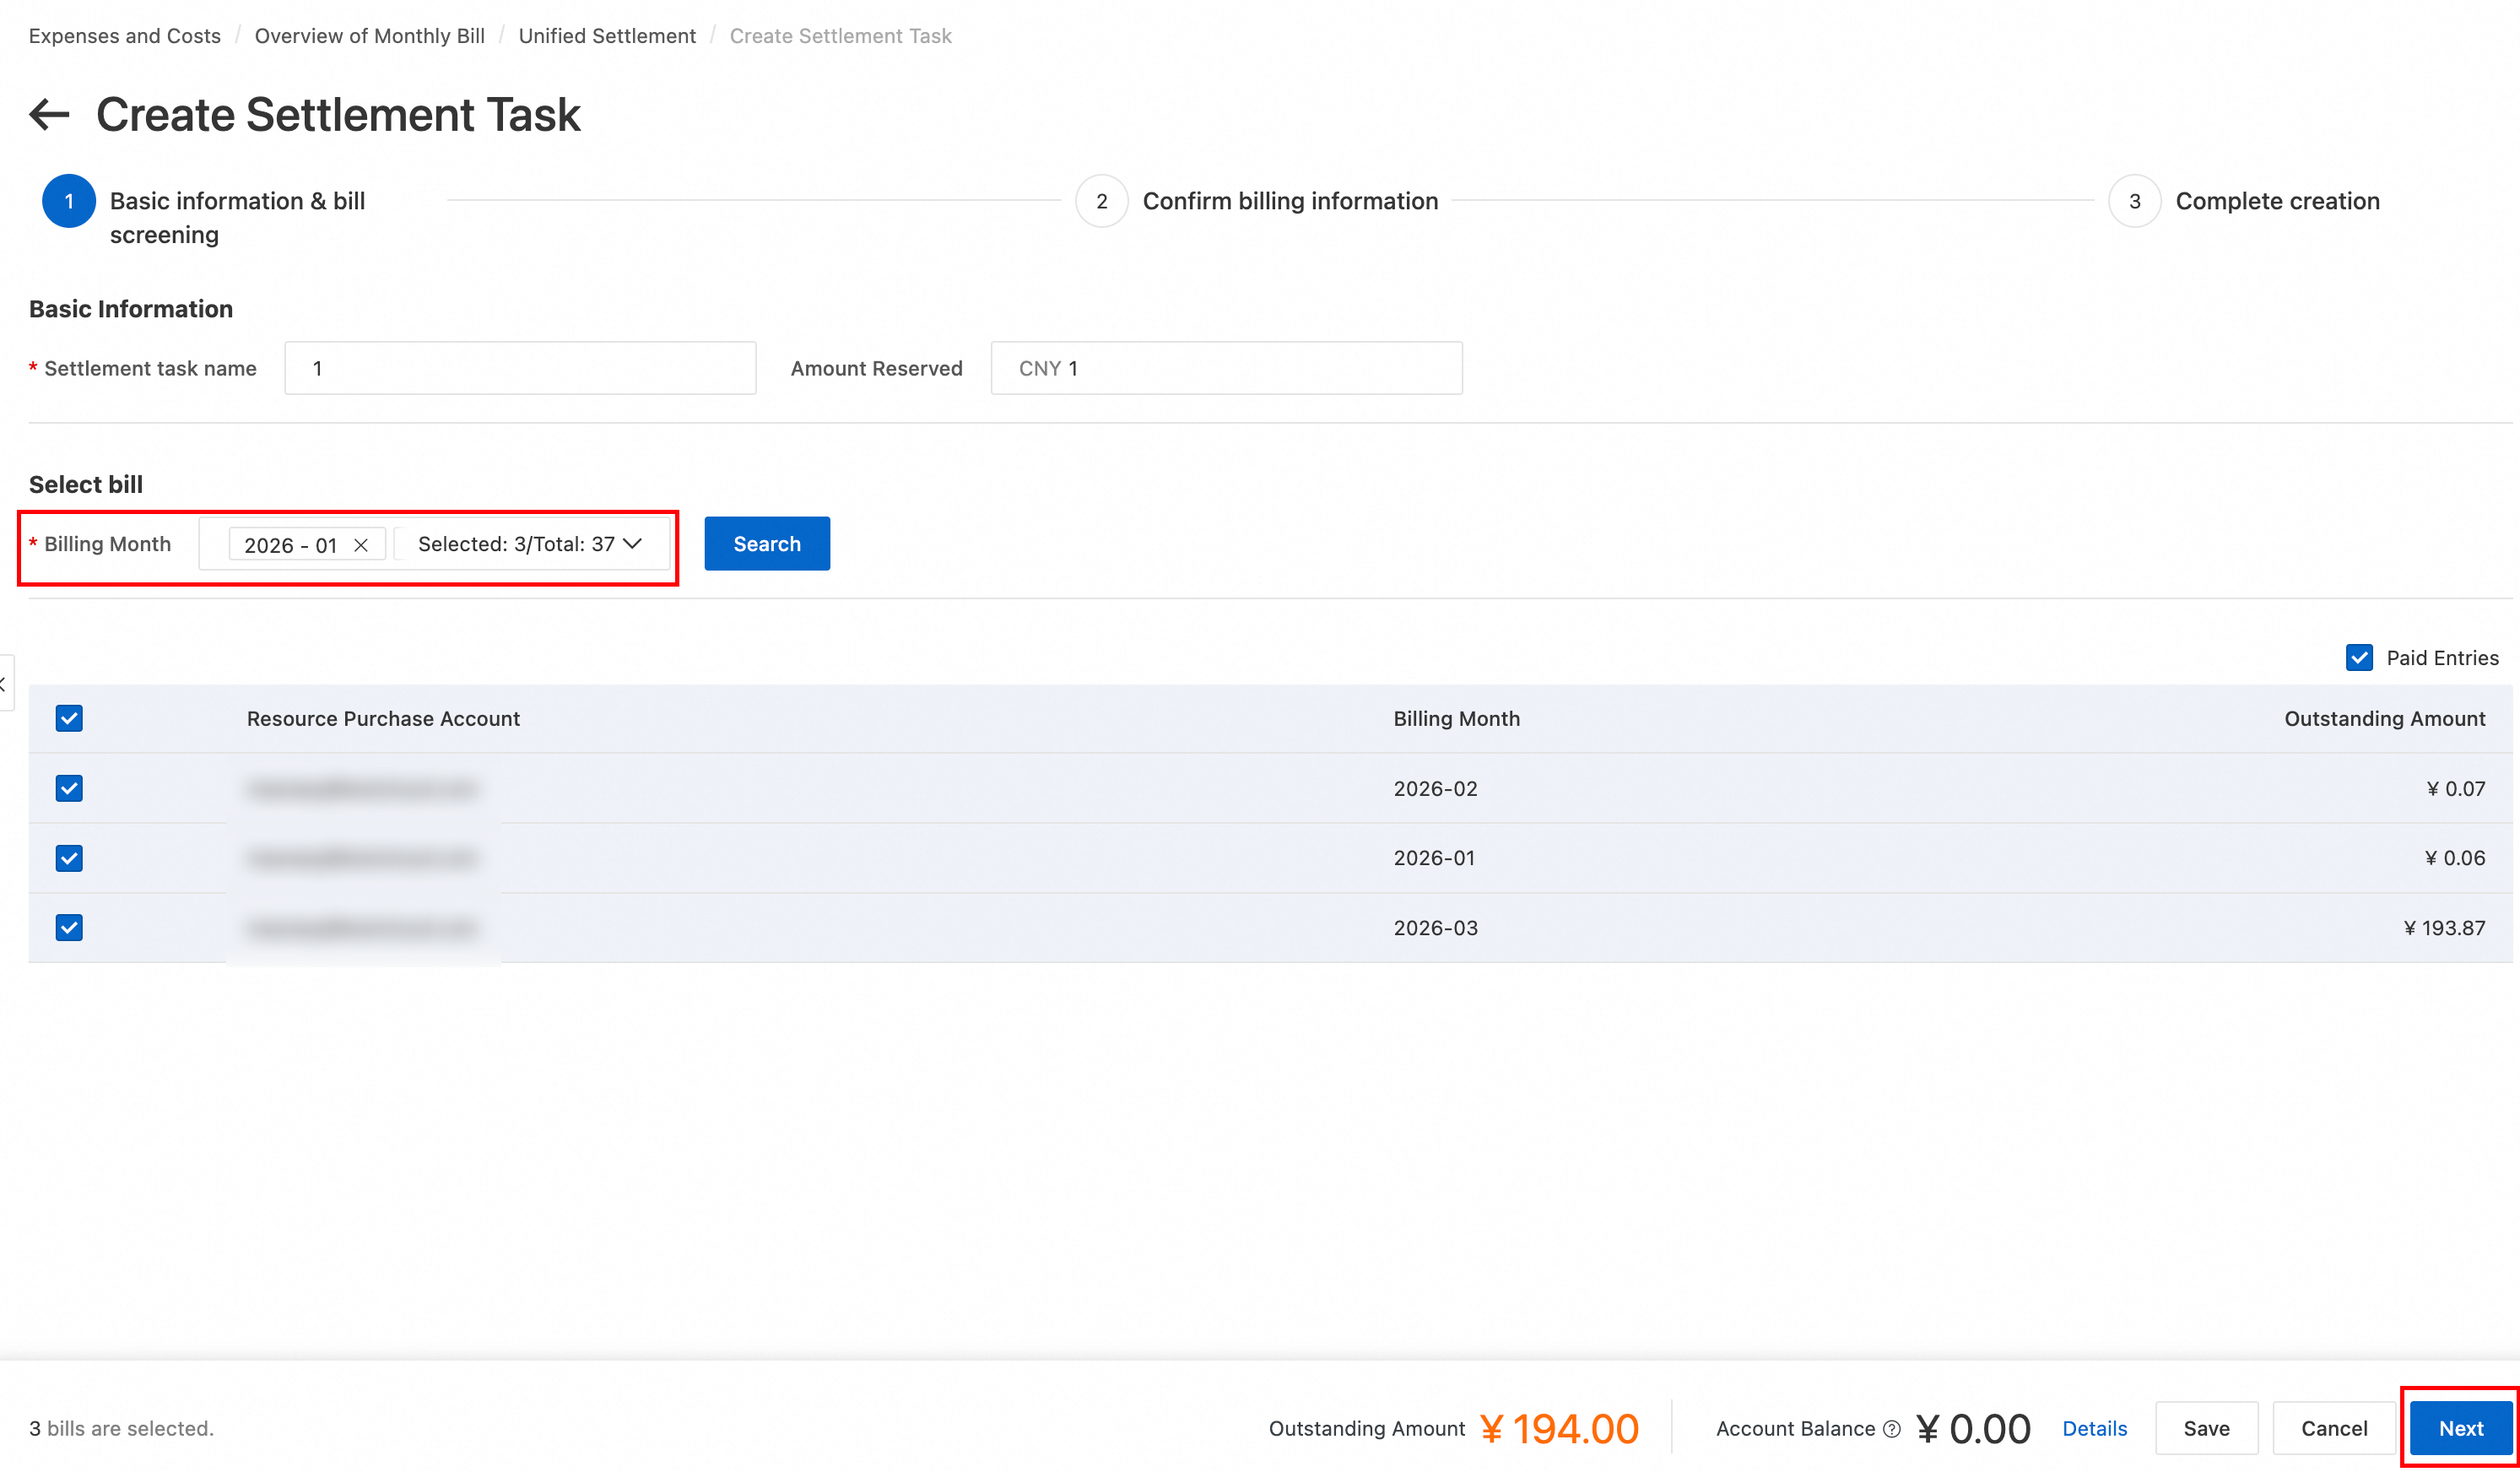
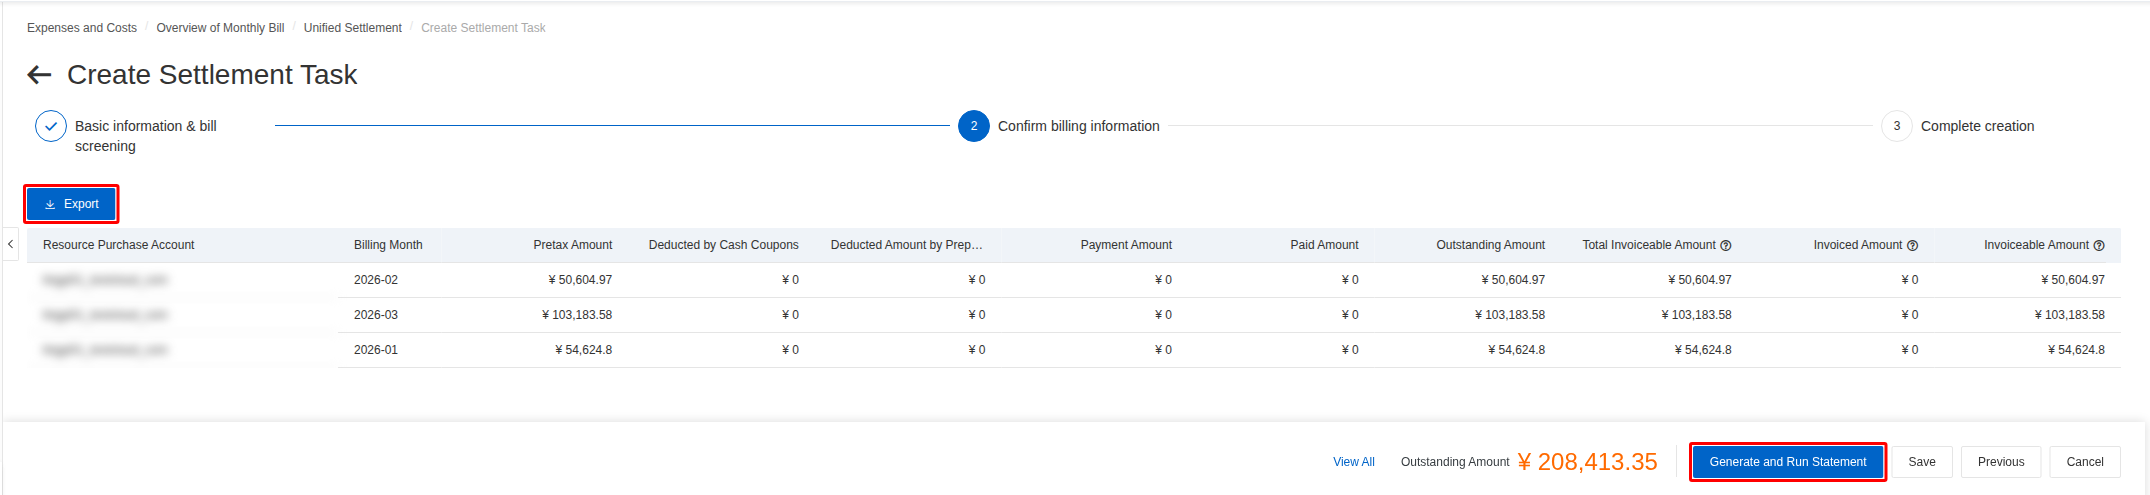
Click Create Settlement Task, select the accounts and billing cycles (up to three months) to settle, then click Next.
-
Verify the settlement details on the page, such as the account, billing cycle, and amount. You can also export the details as a CSV file for offline verification. After you confirm that the information is correct, click Generate and Run Statement. If your available funds are sufficient, the system completes the settlement immediately. Otherwise, the system completes it automatically after you top up your account, which takes about 1 to 2 minutes.
-
On the Unified Settlement page, you can edit, pause, close, issue invoices for, or delete settlement tasks.
Creating a settlement task disables the Automatic Write-off feature for the relevant accounts, and payments are made in the order specified in the settlement bill. After the task is closed or completed, the feature is restored.
Transfer payment
This method is suitable for scenarios where a main account transfers funds to a financial sub-aacount to pay bills. Follow these steps to transfer funds:
-
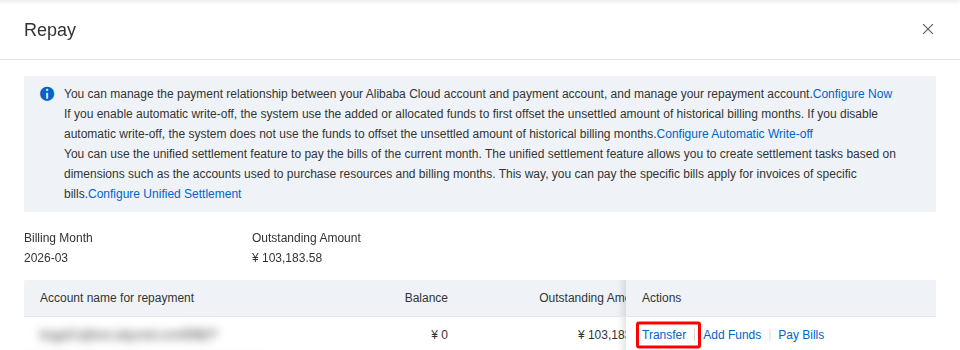
On the Overview of Monthly Bill page, select an unsettled bill for a financial sub-account, click Pay Bill, and select Transfer on the payment page.
-
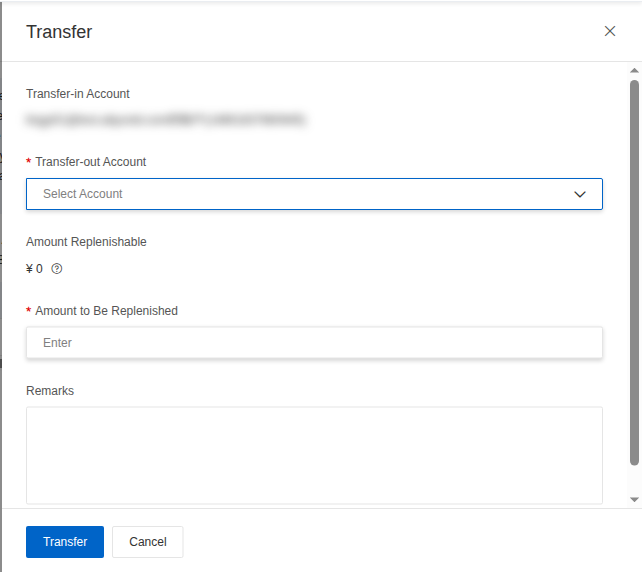
Select the Transfer-out Account, enter the Amount to Be Replenished, and click Transfer.
After the transfer is complete, if the financial sub-aacount has Automatic Write-off enabled, the system automatically pays historical unsettled bills first. If you disable Automatic Write-off, the system does not pay any bills.
View payment records
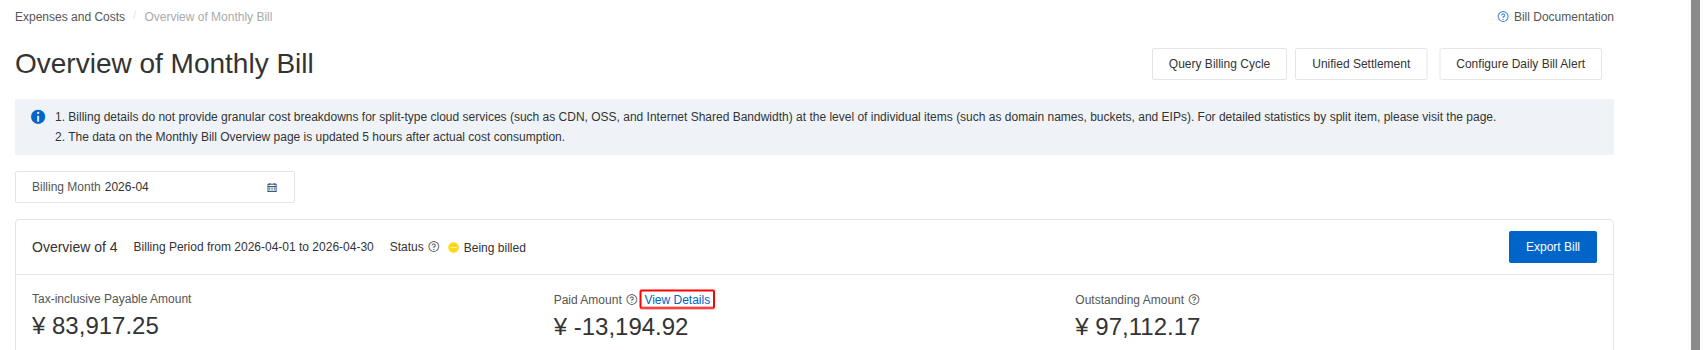
On the Overview of Monthly Bill page, in the Paid Amount column, click View Details to view the payment details for a bill. You can also click Deducted by Cash Coupons, Deducted Amount by Prepaid Card, or Payment Amount in the payment details panel that appears to view the detailed records for the corresponding payment method.
You can view payment records only for bills from January 2023 onwards.
FAQ
Why did my pay-as-you-go bill increase?
Starting from April 1, 2024, Alibaba Cloud has optimized the settlement method for pay-as-you-go resources:
-
Before the adjustment: Fees were calculated separately for each billing cycle and rounded down by truncating from the third decimal place. As a result, some very low usage might not have incurred actual charges because the amount became zero after this rounding.
-
After the adjustment: The system aggregates the entire month's fees and rounds the total down once by truncating from the third decimal place. This total is then deducted at 12:00 on the second day of the following month.
Because rounding is now performed on the monthly total, small fees that were previously truncated in each billing cycle accumulate. This may lead to a slightly higher total cost than before.
For more information, see Announcement on the Adjustment of Billing and Settlement Methods for Pay-As-You-Go Cloud Resources.
Why is my bill unsettled after enabling automatic write-off?
This issue usually occurs for one of the following reasons:
-
Insufficient available funds: If your available funds are less than or equal to 0, the system cannot complete the write-off, even if you have an account balance.
-
The monthly bill has not been generated: Alibaba Cloud officially generates monthly bills at 12:00 on the second day of the following month.
-
Special rules for users on credit control: Users on credit control may have special settlement rules as part of their agreement.
-
Stored value card restrictions: You can use a stored value card only within the month it is purchased. If a bill spans multiple months or you did not specify the card at the time of order, the system cannot use it for payment during automatic write-off.
-
A Unified Settlement task exists: If a Unified Settlement task has been created for the account, the system temporarily disables the Automatic Write-off feature. Funds are used for payment in the order specified by the settlement bill.
If you have ruled out all the preceding possibilities, go to Overview of Monthly Bill to check the specific billing cycle status and payment records.
Can I use refunds for past bills?
By default, you cannot use refunds to pay for bills from previous billing cycles. You can use them only for bills from the month of the refund and subsequent months.
However, direct customers of Alibaba Cloud who are users on credit control can enable the "Write off past bills" feature. This allows the Billing Account to be used to pay off historical unsettled bills. After this feature is enabled, the system automatically writes off past bills in the order they were generated.
Why can't I select accounts for transfer and settlement?
In Alibaba Cloud Cost Management, both the transfer and Unified Settlement features require you to establish a valid financial management relationship between a main account and a sub-account. You can set this up in the Billing Account > Manage Billing Accounts section.
For more billing questions, see Bill FAQ.