Server-side integration
The face verification server-side SDK lets you verify a user's identity on your server by submitting their name, ID card number, and facial image.
For questions about API integration, API usage, or other issues related to the visual AI capabilities of the Alibaba Cloud Vision Intelligence Platform, join our DingTalk support group (ID: 23109592) to contact us.
Become a developer
Use your Alibaba Cloud account to log in to the Alibaba Cloud Vision Intelligence Platform. If you do not have an Alibaba Cloud account, register one first.
Activate the service
Before you call the face verification API, you must activate the Face & Body service. This process requires you to upload images to an OSS bucket in the China (Shanghai) region. The service then accesses the images by using their URLs. For instructions on how to activate the OSS service, see Activate OSS. Follow these steps to activate the Face & Body service.
- Log in to the Alibaba Cloud Vision Intelligence Platform.
- In the top navigation bar, click Capabilities and then click Face & Body.
- On the Face & Body page, click Activate Now.Note The button text is Activate for Free for services in public beta and Activate Now for commercially available services. You are not charged until you start making API calls.
- Confirm the region, select the checkbox to agree to the service agreement, and then click Activate Now.
A message confirms that the service is activated.
Note After you activate the Face & Body service, you can call all APIs in this category without activating them individually.
Process file URLs
Log on to the OSS console.
When creating the bucket, select the same region as the Face & Body service:
China (Shanghai).NoteIf your OSS bucket is not in the
China (Shanghai)region, see Process file URLs for instructions.Upload the images to OSS.
For detailed instructions, see Upload files.
View the image URL.
In the list of uploaded images, click Details to view and copy the image URL.
RAM authorization
You must also grant RAM authorization to your account to access the required Alibaba Cloud resources. For detailed instructions, see Control access by using RAM policies.
Add dependency packages
Add the dependency package for your programming language.
Java
(Recommended) Add the POM dependency for the Face & Body service to your Java project.
<!-- https://mvnrepository.com/artifact/com.aliyun/facebody20200910 -->
<dependency>
    <groupId>com.aliyun</groupId>
    <artifactId>facebody20200910</artifactId>
    <version>${aliyun.facebody.version}</version>
</dependency>
Alternatively, you can download the SDK package for the Face & Body service and reference it directly.
AI category
SDK package name
SDK link
GitHub link
Face & Body
facebody20200910
Python
Open a command prompt and run the following command to install the Python SDK.
pip install alibabacloud_facebody20200910
Configure environment variables
Configure the ALIBABA_CLOUD_ACCESS_KEY_ID and ALIBABA_CLOUD_ACCESS_KEY_SECRET environment variables.
An AccessKey for an Alibaba Cloud account grants full access to all APIs. For improved security, we recommend using a RAM user for API access. For instructions, see Create a RAM user.
To avoid security risks, do not hard-code your AccessKey ID and AccessKey Secret in your project's source code. Leaking these credentials can compromise all resources in your account.
For Linux and macOS
In your IDE, open the terminal.
Run the following commands to configure the environment variables.
Replace
<access_key_id>with your RAM user's AccessKey ID and<access_key_secret>with your RAM user's AccessKey Secret. For information on configuring more advanced permissions, see Control access by using RAM policies.export ALIBABA_CLOUD_ACCESS_KEY_ID=<access_key_id> export ALIBABA_CLOUD_ACCESS_KEY_SECRET=<access_key_secret>
For Windows
Create two new system variables,
ALIBABA_CLOUD_ACCESS_KEY_IDandALIBABA_CLOUD_ACCESS_KEY_SECRET, and set their values to your AccessKey ID and AccessKey Secret, respectively. The following steps use Windows 10 as an example.Open File Explorer, right-click This PC, and select Properties.
In the navigation pane on the right, click Advanced system settings.
In the System Properties dialog box, on the Advanced tab, click Environment Variables.
In the Environment Variables dialog box, click New....
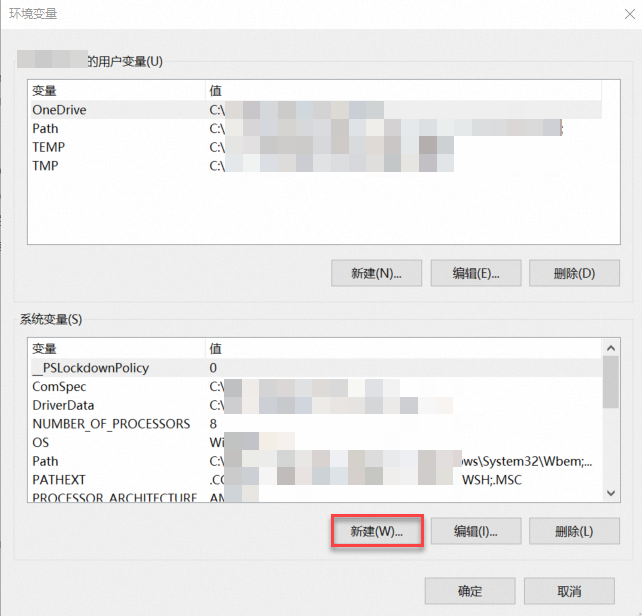
In the New System Variable dialog box, create the
ALIBABA_CLOUD_ACCESS_KEY_IDandALIBABA_CLOUD_ACCESS_KEY_SECRETvariables and set their values to your AccessKey ID and AccessKey Secret, respectively.Restart Windows for the changes to take effect.
Sample request
Java sample request
NoteReplace
<accessKeyId>and<accessSecret>in the code sample with your AccessKey ID and AccessKey Secret. To learn how to obtain an AccessKey, see Create an AccessKey.import com.aliyun.facebody20200910.models.ExecuteServerSideVerificationRequest; import com.aliyun.facebody20200910.models.ExecuteServerSideVerificationResponse; import com.aliyun.teaopenapi.models.Config; import com.aliyun.teautil.models.RuntimeOptions; import com.google.gson.Gson; import java.util.HashMap; import java.util.Map; public class TestExecuteServerSideVerification { public static void main(String[] args) { try { // To create an AccessKey ID and AccessKey Secret, see https://help.aliyun.com/document_detail/175144.html. // If you are using a RAM user's AccessKey, you must grant the AliyunVIAPIFullAccess permission to the RAM user. For more information, see https://help.aliyun.com/document_detail/145025.html. // The following code reads the AccessKey ID and AccessKey Secret from environment variables. Make sure you have configured them before running the sample. com.aliyun.facebody20200910.Client client = createClient(System.getenv("ALIBABA_CLOUD_ACCESS_KEY_ID"), System.getenv("ALIBABA_CLOUD_ACCESS_KEY_SECRET")); ExecuteServerSideVerificationRequest request = new ExecuteServerSideVerificationRequest(); request.setCertificateName("Real name"); request.setCertificateNumber("ID card number"); request.setFacialPictureUrl("Image URL"); request.setSceneType("server"); RuntimeOptions runtime = new RuntimeOptions(); Map<String, String> headers = new HashMap(); headers.put("Accept-Encoding", "identity"); ExecuteServerSideVerificationResponse response = client.executeServerSideVerificationWithOptions(request, headers, runtime); System.out.println("ExecuteServerSideVerificationResponse response: " + new Gson().toJson(response)); } catch (Exception e) { e.printStackTrace(); } } public static com.aliyun.facebody20200910.Client createClient(String accessKeyId, String accessKeySecret) throws Exception { Config config = new Config(); // Your AccessKey ID. config.accessKeyId = accessKeyId; // Your AccessKey Secret. config.accessKeySecret = accessKeySecret; // The endpoint of the service. config.endpoint = "facebody.cn-shanghai.aliyuncs.com"; return new com.aliyun.facebody20200910.Client(config); } }Python sample request
NoteReplace
<accessKeyId>and<accessSecret>in the code sample with your AccessKey ID and AccessKey Secret. To learn how to obtain an AccessKey, see Create an AccessKey.from alibabacloud_facebody20200910.client import Client from alibabacloud_tea_openapi.models import Config from alibabacloud_tea_util.models import RuntimeOptions from alibabacloud_facebody20200910.models import ExecuteServerSideVerificationRequest config = Config( # To create an AccessKey ID and AccessKey Secret, see https://help.aliyun.com/document_detail/175144.html. # If you are using a RAM user's AccessKey, you must grant the AliyunVIAPIFullAccess permission to the RAM user. For more information, see https://help.aliyun.com/document_detail/145025.html. # The following code reads the AccessKey ID and AccessKey Secret from environment variables. Make sure you have configured them before running the sample. access_key_id=os.environ.get('ALIBABA_CLOUD_ACCESS_KEY_ID'), access_key_secret=os.environ.get('ALIBABA_CLOUD_ACCESS_KEY_SECRET'), endpoint='facebody.cn-shanghai.aliyuncs.com', region_id='cn-shanghai', type='access_key' ) # init RuntimeObject runtime_option = RuntimeOptions() # init Client client = Client(config) request = ExecuteServerSideVerificationRequest( certificate_name="Real name", certificate_number="ID card number", facial_picture_url="Image URL" ) response = client.execute_server_side_verification_with_options(request, headers={"Accept-Encoding": "identity"}, runtime=runtime_option) print(response)
Sample response
{
    "RequestId": "1638718D-C4BA-4009-845D-AC26CACB8354",
    "Data": {
        "Pass": true,
        "VerificationToken": "f2a6bb31a5a9f04edd68eab08045****",
        "Reason": "Verification passed (Z8120)"
    }
}
This sample response shows a successful verification, where the face in the image matches the provided name and ID number. The fields are described below:
RequestId: The unique ID of the request.
Pass: Indicates whether the verification was successful. A value of
truemeans the verification passed.VerificationToken: A unique token for the verification request.
Reason: A message describing the verification result.