This topic describes a use case for implementing call transfer with dynamic IVR, explains the implementation logic, and provides a Java code example.
Use cases
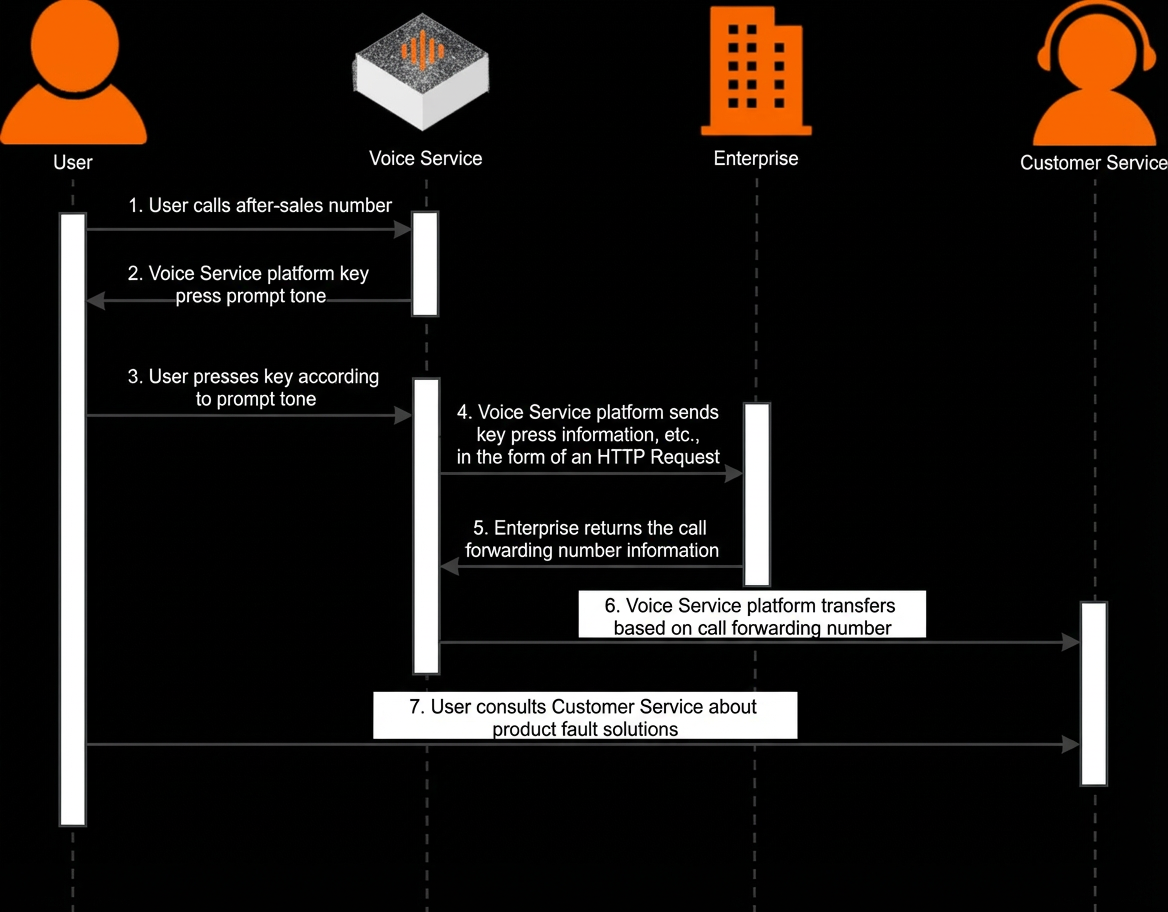
After-sales support is a key channel for resolving customer issues. In traditional models, customers call a hotline and are directly connected to a support agent. This requires every agent to have a comprehensive understanding of all potential product issues, which increases both the agents' workload and the company's training costs. To address this, companies can categorize product issues and provide targeted training to specialized support teams. When a customer calls the hotline, they can be routed to the appropriate agent based on their keypad input.
Solution overview
The dynamic IVR feature of Alibaba Cloud Voice Service provides built-in capabilities such as answering calls, playing audio prompts, collecting DTMF, and transferring calls. However, dynamic IVR requires you to provide the called number. To do this, you must implement a callback interface that the dynamic IVR can invoke. You configure this by providing an HTTP endpoint URL in the dynamic IVR settings. In the after-sales support scenario, you first apply for a phone number with inbound and outbound call capabilities on the Alibaba Cloud Voice Service platform and enable the dynamic IVR feature. When a customer calls this number due to a product issue, the workflow is as follows:
This topic demonstrates how to implement the callback interface that the voice platform invokes during the dynamic IVR flow by using Spring Boot.
How it works
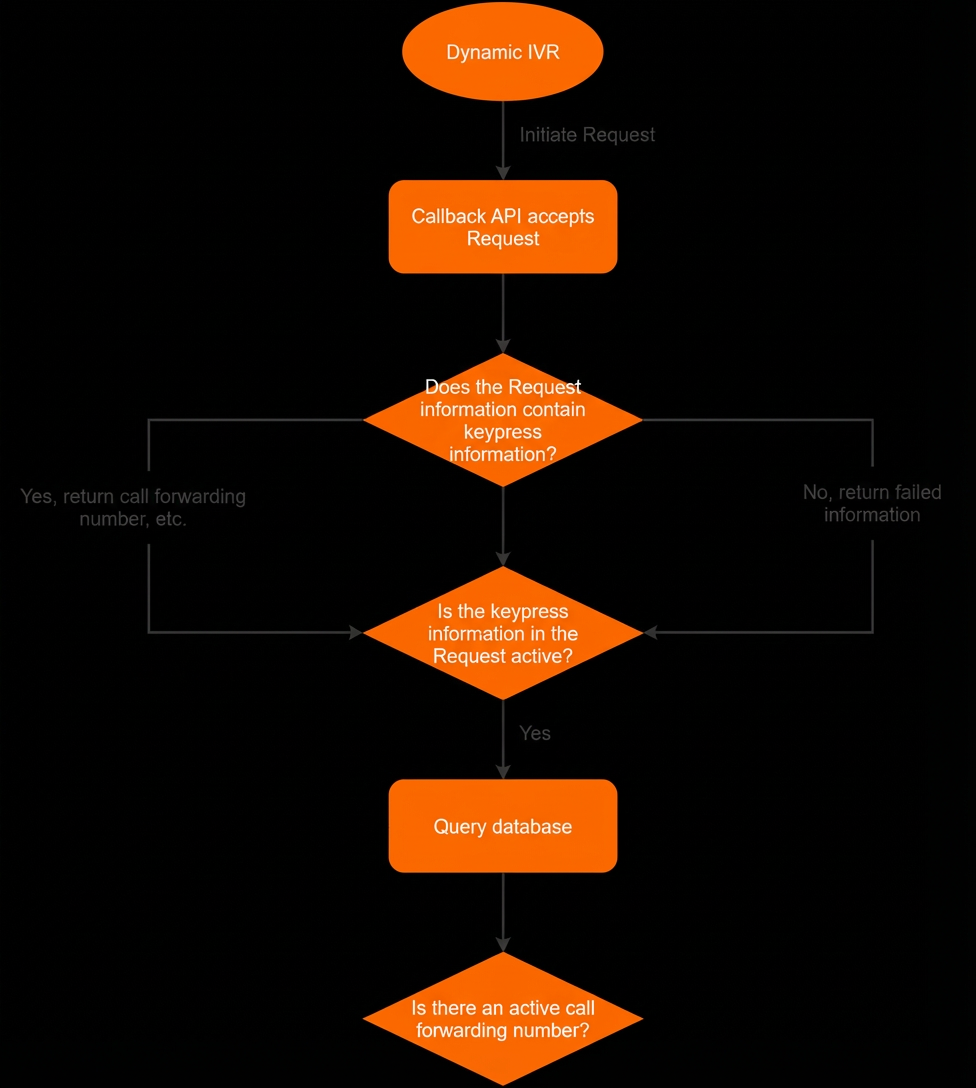
Based on the preceding use case, the callback interface receives requests from the dynamic IVR and returns a called number based on the logic shown in the following diagram. You can download the complete code and modify it to fit your business requirements.
Procedure
Step 1: Handle dynamic IVR requests
The dynamic IVR sends a request to your callback interface with parameters that include the caller, the service number, a timestamp, a unique call identifier, and optional DTMF. For details about the request and response formats, see Dynamic IVR call transfer callback interface.
public class VmsController {
    @Autowired
    private MyConfigration myConfig;
    @Autowired
    private IvrDaoImpl ivrDaoImpl;

    @RequestMapping("/http")
    public Result<Object> http(@RequestParam(value = "action")String action,
                           @RequestParam(value = "caller") String caller,
                           @RequestParam(value = "serviceNumber") String serviceNumber,
                           @RequestParam(value = "timestamp") String timestamp,
                           @RequestParam(value = "uuid") String uuid,
                           @RequestParam(value = "dtmf",required = false) Integer dtmf) {
      	// Write your code here.
        IvrReceive ivrObject = new IvrReceive(action,caller,serviceNumber,timestamp,uuid,dtmf);
        SearchResponse searchResponse = new SearchResponse(myConfig,ivrObject,ivrDaoImpl);;
        return searchResponse.noKeyResponse();
    }
}
The following code shows the design of the Result class for the response:
@Data
public class Result<T> {
    private String result;
    private String msg;
    private T data;
    private Result(String result, String msg){
        this.result = result;
        this.msg = msg;
    }
    /** Called on success. */
    public static<T> Result<T> ok(T data) {
        return new Result<T>(data);
    }
    public static<T> Result<T> ok(String result, String msg, T data){
        Result<T> success = ok(data);
        success.setResult(result);
        success.setMsg(msg);
        return success;
    }
    /** Called on failure. */
    public static <T> Result<T> err(String result, String msg) {
        return new Result<>(result,msg);
    }
}
Step 2: Process the request
In the application configuration file, define the valid DTMF. When your application receives a request from the dynamic IVR, it first checks if the request contains DTMF. If no DTMF is provided, the application returns a default called number. Otherwise, it validates the DTMF against the inputs defined in your configuration file. Valid DTMF triggers a database query to retrieve the corresponding called number. Invalid DTMF results in a failure response. You can modify the code in this step as needed.
-
The following table shows the database schema used in this example. The database stores the DTMF, the corresponding called number, the number's status, the display number, and a description of the number's purpose.
Field
Type
Null
Default
Description
keyCode
int
NO
NULL
The DTMF entered by the user.
phoneNumber
varchar(100)
NO
NULL
The corresponding called number.
status
int
NO
NULL
The status of the number.
-
0: The number is unavailable.
-
1: The number is available.
showNumber
varchar(100)
YES
NULL
The display number for the call transfer.
description
varchar(200)
YES
NULL
A description of the number's purpose.
-
-
Query the database based on the DTMF and status.
public class IvrDaoImpl implements IvrDao{
    @Autowired
    private JdbcTemplate jdbcTemplate;
    /** The request contains DTMF. */
    @Override
    public List<IvrBean> findInfo(Integer keyCode) {
        String sql = "select * from ivr where keyCode=? and status=1";
        Object[] params = new Object[]{keyCode};
        return jdbcTemplate.query(sql, params, new BeanPropertyRowMapper<IvrBean>(IvrBean.class));
    }
    /** The request does not contain DTMF. */
    @Override
    public List<IvrBean> findInfo(){
        String sql = "select * from ivr where status=1";
        return jdbcTemplate.query(sql, new BeanPropertyRowMapper<IvrBean>(IvrBean.class));
    }
}-
Process the dynamic IVR request based on your business logic and the query results.
public class SearchResponse {
    @Autowired
    private final KeyConfigs keyConfigs;
    private final IvrReceive ivrReceive;
    @Autowired
    private final IvrDao ivrDao;
    public Result<Object> result(){
        if(ivrReceive.getDtmf().equals(-1)){
            return noKeyResponse();
        }else if(compare()){
            return response();
        }else{
            return Result.err("fail","The entered key is not supported");
        }
    }
    /** Checks if the DTMF is valid. */
    public boolean compare() {
        Integer temp = ivrReceive.getDtmf();
        return keyConfigs.infoReturn().contains(temp);
    }
    /** Processes a request that contains DTMF. */
    public Result<Object> response(){
        Integer temp = ivrReceive.getDtmf();
        List<IvrBean> list = ivrDaoImpl.findInfo(temp);
        if(list.size() == 0){
            return Result.err("fail","No available called number found");
        }else{
            String phoneNumber = list.get(0).getPhoneNumber();
            String showNumber = list.get(0).getShowNumber() == null ? ivrReceive.getServiceNumber() : list.get(0).getShowNumber();;
        		return Result.ok("success", "Success", new Info(phoneNumber, showNumber));
        }
    }
    /** Processes a request that does not contain DTMF. */
    public Result<Object> noKeyResponse(){
        Integer temp = ivrReceive.getDtmf();
        List<IvrBean> list = ivrDaoImpl.findInfo();
        if(list.size() == 0){
            return Result.err("fail","No available called number found");
        }else{
            String phoneNumber = list.get(0).getPhoneNumber();
            String showNumber = list.get(0).getShowNumber() == null ? ivrReceive.getServiceNumber() : list.get(0).getShowNumber();;
            return Result.ok("success", "Success", new Info(phoneNumber, showNumber);
        }
    }
}


@AllArgsConstructor
@Data
class Info{
    private String called;          //  The destination number for the call transfer.
    private String showNumber;      //  The caller ID to display for the transferred call.
}
Step 3: Deploy the application on ECS
The dynamic IVR invokes the callback interface by using a URL in the format of IP address:port number. This topic uses an ECS instance to host the application and an EIP to provide a public IP address. The procedure is as follows:
-
Create an ECS instance, package your code into a JAR file, and upload the file to the instance.
-
For more information about how to create an ECS instance, see Create an instance by using the custom purchase method.
-
For more information about how to connect to an ECS instance, see Connection methods.
-
-
You can associate an EIP with an ECS instance in two ways:
-
When you create the ECS instance, select Assign IPv4 address in the Bandwidth and Security Group section. Then, select a bandwidth billing method, set the bandwidth, and select a security group.
-
If you have an existing ECS instance, see Associate an EIP with an instance for instructions.
-
-
Install the required Java environment on the ECS instance and run the application by using the
java -jar <jar_package_name>command.
Step 4: Configure the callback interface
You can configure dynamic IVR callback settings in two ways: a global default setting for all numbers, or a number-specific setting that overrides the global default for a particular number.
-
To view the EIP associated with your ECS instance, see View IP address information.
On the instance details page, find the instance's public IP address. This is the EIP you will use to configure the URL for the dynamic IVR callback interface.
-
Configure the dynamic IVR call transfer with the IP address and port number. For more information, see Dynamic IVR call transfer callback interface.
On the configuration page, the global default URL is set to
http://. The number-specific URL configuration section below allows you to configure independent callback URLs for specific numbers, including fields such as call start URL, ringing URL, in-call URL, and call end URL. When an IVR interaction occurs, the system prioritizes the number-specific URL. If a number-specific URL is not configured, the system uses the global default URL.:<port_number>/ivr/call?serviceCode=TransferNumber
Results
With the settings described above, assume the caller's number is 1553443**** and the service number is 1705675****. When the caller places the call, the following sequence occurs:
-
The service number (1705675****) automatically answers the call and plays an initial audio prompt.
-
The user enters DTMF digits and presses the # key to finish.
-
If the URL is accessible and returns a valid called number, the user hears an audio prompt indicating that the call is being transferred.
-
After the call transfer is complete, the user can speak with the agent at the new number.
-
If the callback interface URL is unavailable, the user hears an audio prompt indicating that the URL could not be accessed.
-
If the callback interface returns an unavailable number, the user hears an audio prompt indicating that the extension does not exist.