Use a gamepad
You can use a game controller to play games on Elastic Desktop Service. This article explains how administrators can configure peripheral policies, and how end users can connect, use, and troubleshoot a game controller.
Background information
Prerequisites
To use a game controller with your cloud computer, ensure the following requirements are met:
Image version:
2.2.13-R-20240829.224040or later.Driver: If you use an Xbox 360 controller, you must install the Xbox 360 controller driver.
Client version:
Windows client: V7.5 or later.
macOS client: V7.5 or later.
Android client: V7.4 or later.
Wuying Cloud Box: V7.5.2 or later.
Controller compatibility
Protocol type: PlayStation, Switch, and Xbox controllers are supported.
NoteXbox controllers are supported only on the Windows client because they require the Xbox driver.
For third-party controllers, the system identifies the protocol type based on whether the controller's name contains
Xbox,PS,Switch, ordualsense. If the name lacks these keywords, the controller defaults to the Xbox protocol on the Windows client and the Switch protocol on the macOS client.
Connection method: Bluetooth, USB, and 2.4G connections are supported. Supported connection methods may vary by controller model.
Button mapping: Only the Xbox 360 button mapping is supported.
Multi-controller: Not currently supported.
Compatible controllers
The following controller models passed our compatibility tests. We recommend using these controllers for the best experience.
Legend:
The icon indicates that the controller passed the compatibility test.
The icon indicates that the controller failed the compatibility test. Do not use this controller.
No icon indicates the controller has not been tested. We recommend against using these controllers.
In the following list, compatibility testing for the Android client covers only cloud gaming. For all other clients, testing covers both cloud computers and cloud gaming.
Controller model | Connection method | Windows client | macOS client | Android client | Wuying Cloud Box |
GameSir-T4n Lite | 2.4G/Bluetooth/USB | ||||
Sony PS5 | 2.4G/Bluetooth/USB | ||||
Sony PS4 | Bluetooth/USB | ||||
Betop Spartan 3 | 2.4G/Bluetooth/USB | ||||
ThundeRobot G50S (Pro-HD) | 2.4G/Bluetooth/USB | ||||
Flydigi Direwolf 2 | 2.4G/Bluetooth/USB | ||||
Machenike G5 Pro Max | 2.4G/Bluetooth/USB | ||||
ThundeRobot G30 | USB | ||||
MOBAPAD CHITU PRO-HD | 2.4G/Bluetooth/USB | ||||
Xbox One Controller | Bluetooth/USB | ||||
8BitDo | 2.4G/Bluetooth/USB | ||||
Nintendo Switch Pro Controller | Bluetooth/USB | ||||
Flydigi Vader 4 Pro | 2.4G/Bluetooth/USB |
Get peripheral information
For USB peripherals, you need the VID (Vendor ID) and PID (Product ID), which are required when you configure peripheral policies. Both VID and PID are hexadecimal values, such as 0xa12c, where the 0x prefix is typically optional. You can look up the VID and PID of a connected USB peripheral in several ways.
The availability of peripheral devices on a cloud computer depends on multiple factors, including the type and version of the Alibaba Cloud Workspace terminal, the cloud computer image type and version, the type and version of the local device running the Alibaba Cloud Workspace client, and the brand and model of the peripheral device. You can visit the peripheral compatibility page to check whether a specific peripheral is compatible with a cloud computer. The data on this page was obtained under laboratory conditions and may differ from actual results.
From the Alibaba Cloud Workspace terminal
Open and log on to the Alibaba Cloud Workspace client.
In the upper-right corner of the client, click the icon, and then select Settings.
In the left-side navigation pane of the Settings window, click Peripherals, and then view the VID and PID of the USB peripheral on the Local USB Peripherals panel.
From the computer's device manager
You can find the VID and PID of a peripheral in the device management information on your computer.
Windows
In the Start menu, search for and open Device Manager.
In the Device Manager window, navigate to , and then double-click the USB device you want to look up.
On the Details tab of the properties dialog box, select Hardware Ids from the Property drop-down list. The VID and PID are displayed in the text box below.
macOS
In the system menu bar, choose , and then click More Info in the dialog box.
At the bottom of the About This Mac panel, click System Report.
In the left-side navigation pane of the new window, choose Hardware > USB, select the USB device you want to look up in the right-side panel, and then view the VID and PID below.
From the floating menu
Click the floating menu and select Peripherals & Printers.
On the Advanced Management tab, view the VID and PID of the USB peripheral in the device list.
Use a third-party tool
You can use the USB Device Tree Viewer tool to view peripheral information. This tool supports only Windows.
Download the tool: https://www.uwe-sieber.de/usbtreeview_e.html#download.
Extract the downloaded package, and then double-click
UsbTreeView.exeto open it.In the left-side directory of the tool, select the USB device you want to look up, and then view the VID and PID in the Device ID section of the right-side panel.
Configure a peripheral policy
Peripheral management policies are part of the cloud computer policy, and must be created and maintained by an administrator in the console.
By default, gamepads can be used directly in cloud computers without any configuration. If you encounter issues, an administrator can configure custom peripheral rules on the console to resolve them.
The following examples use the EDS Enterprise Edition console. For the Business Edition procedure, see Manage policies.
General procedure for creating or modifying peripheral policies
Create a custom policy and associate it with a cloud computer
Modify a custom policy already associated with a cloud computer
Policy configuration
Configure custom peripheral rules
To prevent end users from configuring incorrectly on the client, administrators can create custom peripheral rules in the cloud computer policy. These rules have higher priority than the custom configurations specified by end users on the client. For information about the priority of peripheral policies in different dimensions, see Policy priority.
Configuration path: .
Settings: Set device type to Gamepad, enter the device name, VID, and PID, and set redirection mode to Forbid.
Configure gamepad connections
Some gamepads require specific steps to connect to certain Wuying terminals. Follow the steps below.
GameSir-T4n Lite
Wuying Magic Cube
Bluetooth connection
Ensure the gamepad has sufficient battery power.
Press the
A+Logokeys to power on the gamepad, switch it to Android mode (the indicator light flashes yellow), and enter Bluetooth pairing mode.On the Wuying Magic Cube, search for and connect to the Bluetooth device.
USB connection
Connect the USB data cable.
A solid yellow center indicator light indicates the gamepad is in Android mode.
macOS client
Press the Y+HOME keys to switch to Switch mode, and then connect to your Mac via Bluetooth.
Sony PS5/PS4
Wuying Magic Cube
Bluetooth connection
Ensure the gamepad has sufficient battery power.
Press and hold the Create button (①) and the
PSbutton (②) simultaneously. The gamepad enters Bluetooth pairing mode when its light bar (③) starts flashing.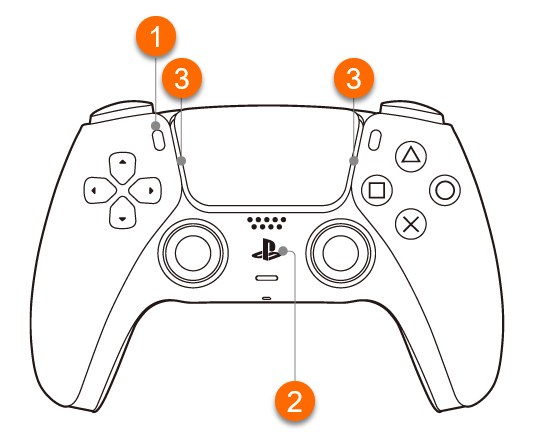
On the Wuying Magic Cube, search for and connect to the Bluetooth device.
USB connection
Connect the USB data cable.
Betop Spartan 3
Wuying Magic Cube
Bluetooth connection
Ensure the gamepad has sufficient battery power.
Briefly press the
LB+Logokeys. The gamepad enters Bluetooth pairing mode when the indicator light starts flashing blue.On the Wuying Magic Cube, search for and connect to the Bluetooth device.
USB connection
Press and hold the center
Logobutton. The gamepad switches to Switch mode when the indicator starts flashing dark blue.Connect the USB data cable.
macOS client
Press and hold the LB+Logo keys to power on the gamepad and enter Switch mode. Then, connect it to your Mac via Bluetooth.
ThundeRobot G50S (Pro-HD)
Wuying Magic Cube
Bluetooth connection
Ensure the gamepad has sufficient battery power.
On the back of the gamepad, switch to S mode. Press and hold the Home button in the center of the front panel to enter Bluetooth pairing mode.
On the Wuying Magic Cube, search for and connect to the Bluetooth device.
USB connection
Connect the USB data cable.
macOS client
Switch to Switch mode, then connect to your Mac via Bluetooth.
Flydigi Direwolf 2
Wuying Magic Cube
Bluetooth connection
Ensure the gamepad has sufficient battery power.
On the back of the gamepad, switch to NS mode. Press and hold the Home button at the bottom of the front panel to enter Bluetooth pairing mode.
On the Wuying Magic Cube, search for and connect to the Bluetooth device.
USB connection
On the back of the gamepad, switch the mode to USB (the leftmost option).
Connect the USB data cable.
Connect to the cloud computer. When connecting for the first time, a dialog box appears. Click Connect Now.
macOS client
Ensure the gamepad has sufficient battery power.
On the back of the gamepad, switch to NS mode. Press and hold the Home button at the bottom of the front panel to enter Bluetooth pairing mode.
On your Mac, search for and connect to the Bluetooth device.
Machenike G5 Pro Max
Wuying Magic Cube
Bluetooth connection
Ensure the gamepad has sufficient battery power.
On the back of the gamepad, switch to NS mode. Press and hold the center
Logobutton on the front panel to enter Bluetooth pairing mode.On the Wuying Magic Cube, search for and connect to the Bluetooth device.
If the functions of the A and B keys or the X and Y keys are swapped, navigate to . Select the gamepad and switch it to the third mode.
USB connection
On the back of the gamepad, switch the mode to USB (the leftmost option).
Connect the USB data cable.
Connect to the cloud computer. When connecting for the first time, a dialog box appears. Click Connect Now.
macOS client
Switch to NS mode, then connect to your Mac via Bluetooth.
MOBAPAD CHITU PRO-HD
Wuying Magic Cube
Bluetooth connection
Ensure the gamepad has sufficient battery power.
Press and hold the
D-pad Left+Homekeys to enter Android pairing mode.On the Wuying Magic Cube, search for and connect to the Bluetooth device.
USB connection
Connect the USB data cable.
macOS client
Connect to your Mac via Bluetooth.
Nintendo Switch Pro Controller
Wuying Magic Cube
Bluetooth connection
Ensure the gamepad has sufficient battery power.
Press and hold the pairing button on the controller until the Pro Controller device appears in the list of available devices on your Wuying Magic Cube.
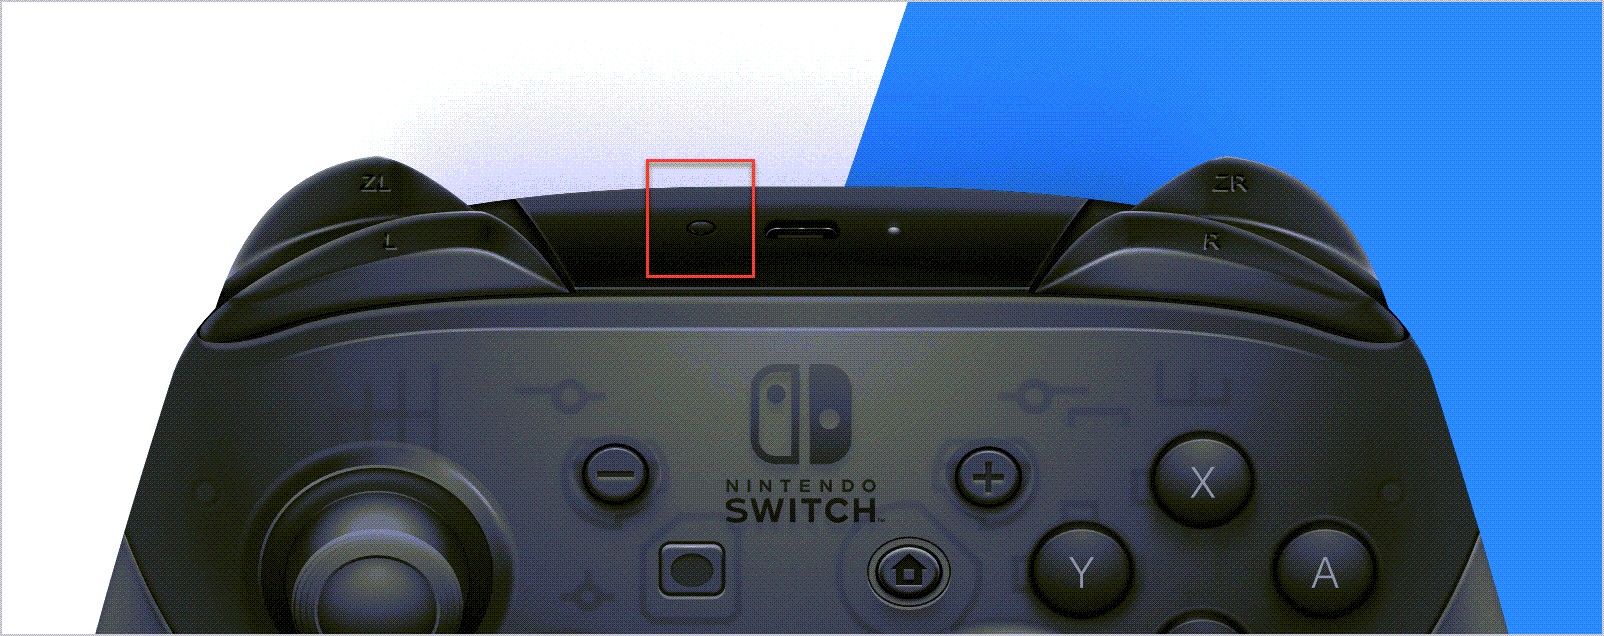
On the Wuying Magic Cube, search for and connect to the Bluetooth device.
USB connection
Connect the USB data cable.
Flydigi Vader 4 Pro
Wuying Magic Cube
Bluetooth connection
Ensure the gamepad has sufficient battery power.
On the back of the gamepad, switch to NS mode. Press and hold the Home button at the bottom of the front panel to enter Bluetooth pairing mode.
On the Wuying Magic Cube, search for and connect to the Bluetooth device.
USB connection
On the back of the gamepad, switch the mode to USB (the leftmost option).
Connect the USB data cable.
Connect to the cloud computer. When connecting for the first time, a dialog box appears. Click Connect Now.
When you connect a peripheral for the first time, a connection configuration dialog box appears in the lower-right corner of the cloud computer desktop. You can select the device type, set it to connect automatically, and save the current configuration.
Troubleshoot game controller issues
If you encounter issues with a game controller, follow these steps to resolve them.
Step | Check | Resolution |
A | Verify that your Wuying client type supports game controllers. Supported Wuying clients include:
Game controllers are not supported on other types of Wuying clients. | If your current Wuying client is not supported, go to the Wuying Client Download Page to download a supported client, or switch to a supported hardware terminal. |
B | Verify that your Wuying client version meets the requirements. Version requirements:
| If your Wuying client is outdated, update it. For more information, see
|
C | Verify that your game controller is on the list of supported models:
| If your game controller is not on the list, switch to a supported model. |
D | Verify that the cloud desktop image version supports game controllers. Game controllers are supported only on cloud desktop images of version | If your cloud desktop image is outdated, update the image by following these steps: |
E | Verify that the game controller is connected correctly to your local device. Windows
macOSOpen System Settings, find Game Controller, and verify that the game controller is connected. |
|
F | If the issue persists and you are using a USB connection, follow these steps to check the game controller's status in the local USB peripheral list:
| Disable the game controller and verify the connection status:
|
If the issue persists, submit a ticket for technical support.