Test Cases
Create test case libraries and manage test cases in Apsara DevOps Testhub.
Create a test case library
Before designing test cases, first create a test case library. On the Testhub homepage, click Create Test Case Library, enter a name and ID, select visibility, and then click OK. A test case library is a dedicated space for managing test cases. Create separate libraries for different products as needed.
Library visibility:
-
Public library: All organization members can view it.
-
Private library: Only library members can view it.
Library ID: The library ID consists of four English letters. Each test case receives an ID in the format “library ID + number.”
Library settings
After creating a test case library, go to in the lower-left corner to configure the following:
-
Library name: Customizable.
-
Library ID: Auto-generated by default, but you can customize it.
-
Visibility: Public (accessible to all organization members) or private (accessible only to library members).
Optionally, set a library thumbnail and detailed description.
Create use case folder
Test cases are organized in a tree structure. Design your folder hierarchy first, then add test cases under each folder. When you select a folder on the left, the right pane displays its test cases.
In the folder tree on the left side of the library page, hover over a target folder and click the + button on its right to create a subfolder. Folders support multilayer nesting (up to four levels). Use the Create button in the top-right corner to add new test cases. You can also use search, filters, and Batch Operations to manage existing cases.
Create a test case
A test case in Apsara DevOps Testhub includes the following fields:
-
Test case title.
-
Preconditions.
-
Execution steps and expected results (switchable to table mode).
-
Owner: The person responsible for designing the test case.
-
Priority.
-
Type: Common types such as functional testing and performance testing (select based on your scenario).
-
Tags.
-
Attachments.
In the Create Test Case dialog, the main area includes a Title text box, a Folder path selector (supports multilevel folders), a rich text editor for Preconditions, and a rich text editor for Description (switch description format using the Switch Type dropdown). The right-side property panel includes fields for Owner, Library, Priority (P0–P3), Type (such as functional testing), Tags, Iteration, and Attachments.
The body of the Test Steps section supports two edit modes. Switch between them using Switch Type.
-
Text description mode: Edit in two text boxes—Execution Description and Expected Result.
-
Table description mode: Edit Operation Steps and their corresponding Expected Results in a table.
The table has four columns: Ordinal Number, Operation Steps, Expected Result, and Operation. The Operation column provides copy and delete functions. Click + Add Step at the bottom to add a new row. Switch between text and table modes using the Switch Type button.
Import test cases
Click the Create button to add cases manually, or import local Excel or Xmind files into Apsara DevOps Testhub.
Click the dropdown arrow next to Create and select Import Data from the menu.
Import Excel
Before importing an Excel file, download the template from the webpage. The template includes all required fields. Using your own Excel file without this template may cause import failures.
When editing the Excel file, follow these rules:
-
Use this folder structure: Level 1|Level 2|Level 3 (use the VERTICAL LINE character from English input mode as the separator).
-
As the use case owner, enter the user's short name.
-
Set priority to exactly one of P0, P1, P2, or P3.
-
Match the test type text exactly as it appears in the dropdown menu on the Apsara DevOps page.
-
Tags are supported. Separate multiple tags with commas from English input mode.
-
Excel does not support the table mode for operation steps.
-
If some test cases fail to import, download the result Excel file, fix the failed entries, and reimport.
-
The imported folder structure depends entirely on the “Folder” column in the Excel file, not on the folder currently selected in the UI during import.
Supported file type: xlsx. You can import up to 10,000 test cases at once. Any case with invalid field values will be skipped entirely. Ensure your file contains only one worksheet—the system processes only the first worksheet if multiple exist.
Import Xmind mind maps
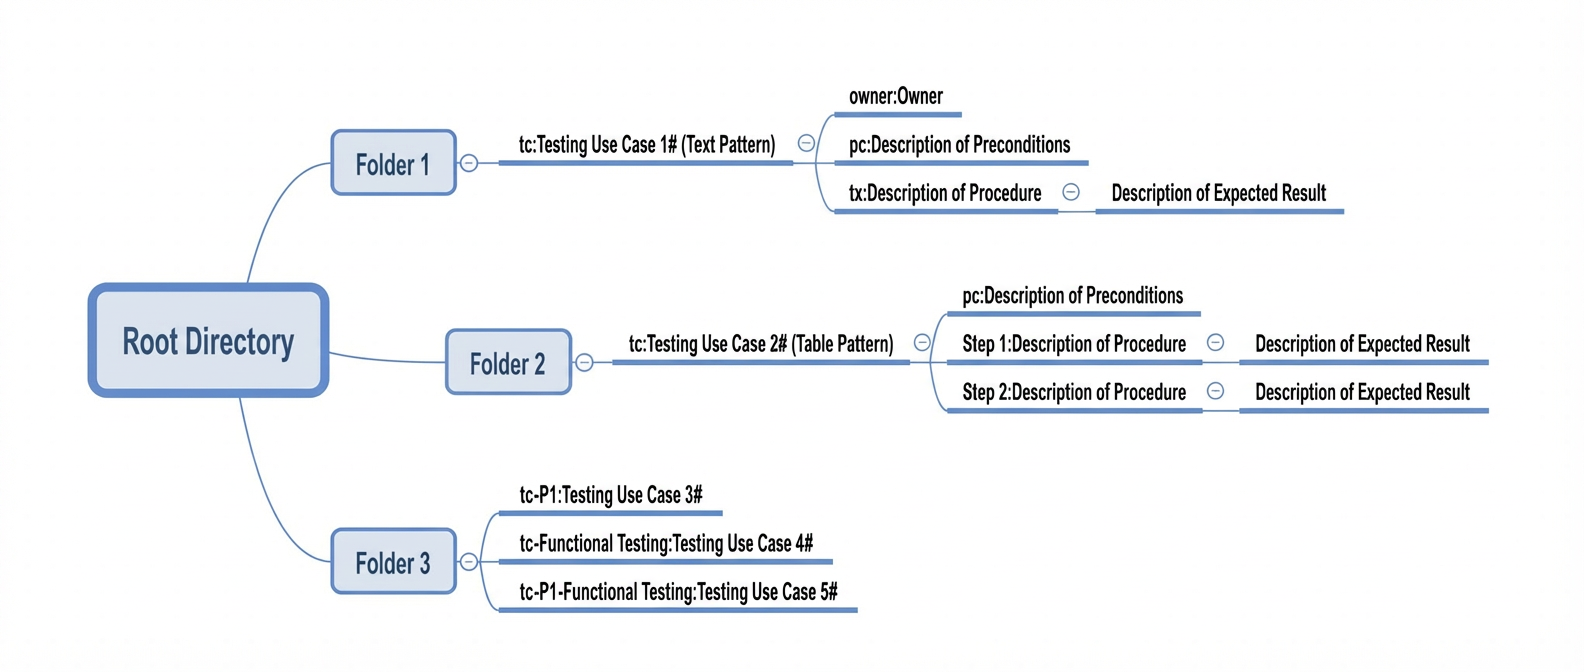
No template is needed for Xmind imports. Edit your Xmind file according to the following conventions.
Folders appear as child nodes under the root node. The structure supports up to eight levels of depth (excluding the root). Node names become folder names—no extra annotation is needed.
Annotate test case nodes with the following prefixes:
|
Node Annotation |
Corresponding Test Case Property |
|
tc |
Required. Text after the colon becomes the test case title. |
|
tc-p1 |
Creates a P1-priority test case. Title after the colon is optional. If omitted, priority defaults to P3. |
|
tc-Functional Testing |
Creates a functional testing case. Title after the colon is optional. If omitted, type remains empty. |
|
tc-p1-Functional Testing |
Creates a P1-priority functional testing case. Priority and type can be combined this way. |
|
owner |
Must appear under a tc node. Text after the colon sets the owner. Optional. If omitted, defaults to the user performing the import. |
|
pc |
(Text mode only) Must appear under a tc node. Text after the colon sets the preconditions. Optional. If omitted, preconditions remain empty. |
|
tx |
(Text mode only) Must appear under a tc node. Text after the colon sets the operation steps. Add expected results as child topics under the operation step node. Optional. If omitted, operation steps remain empty. |
|
Step[Number] |
(Table mode only) Must appear under a tc node. Text after the colon sets one operation step. A test case can have multiple steps. Add the corresponding expected result as a child topic directly under the step node. |
Export test cases
Go to your target test case library and export cases from a selected folder.
-
Select Show Subfolder Cases. In the top-right corner, choose .
NoteIf your library has a multilayer directory structure, check Show Subdirectory Test Cases before exporting. Otherwise, test cases under first- or second-level directories are not displayed by default, and the export shows a message indicating that no test cases have been selected.
-
Select export properties. Choose between System Properties or Custom Properties as needed. Click Start Export. Check progress and download the exported file from the Batch Operation Records tab.
System properties include fields such as ID, Title, Folder, Creation Time, Preconditions, Step Description, Expected Result, Archived Status, Owner, Priority, Type, and Tags. Select the ones you need.