This topic describes how to use the Flow-CLI tool to develop custom pipeline steps.
The Flow-CLI tool is fully upgraded. You can now use TypeScript to write the logic for steps. This method provides the following advantages over using Shell scripts:
Steps are based on TypeScript, which makes the step code testable and improves quality and stability.
Develop a step once and run it on multiple operating systems or architectures.
Reuse the basic capabilities provided by the @flow-step/step-toolkit SDK to develop steps faster and more easily. For more information, see the example description and the npm package address.
You can install and use the new version of Flow-CLI without affecting the existing custom steps in your organization.
Background information
Flow-CLI is a command-line interface (CLI) for Apsara DevOps Flow. You can use it to manage various resources in Flow. The `step` subcommand lets you run custom step logic in a pipeline to extend pipeline capabilities.
In Flow, a pipeline task run consists of multiple steps. A step is the smallest runnable unit and consists of a descriptive YAML file and a TypeScript code package. The YAML file defines the input parameters for the step at runtime, and the TypeScript code defines the execution logic for the step. This document guides you through the process of creating a custom step in Flow.
Procedure
Download and install
Make sure that Node.js is installed locally. Then, run the following command in the command prompt to install Flow-CLI.
npm i -g @flow-step/flow-cli --registry=https://registry.npmmirror.com
flow-cli -h  # The help information is displayed, which indicates that the installation is successful.
Log on to Flow
Log on to the central site
flow-cli login # Log onLog on to a regional site
flow-cli login <instance_URL>
# For example: flow-cli login https://xxx-cn-shenzhen.devops.aliyuncs.com/
Flow-CLI automatically opens a browser and navigates to the Flow logon page. If you are already logged on, a `success` message is displayed. After you log on, the command line prompts you to select an organization that is associated with your account. Enter the number that corresponds to the desired organization.
If you log on to Apsara DevOps Flow in a Linux environment, see the FAQ section.
Create a new step
flow-cli step initFollow the prompts to enter the basic information for the step. Note: The Step Sign must be unique within Apsara DevOps. If the sign is already used by another step, the creation fails.
Step Sign must start with an uppercase letter, followed by zero or more uppercase letters, lowercase letters, or numbers. For example, HelloV2Step.
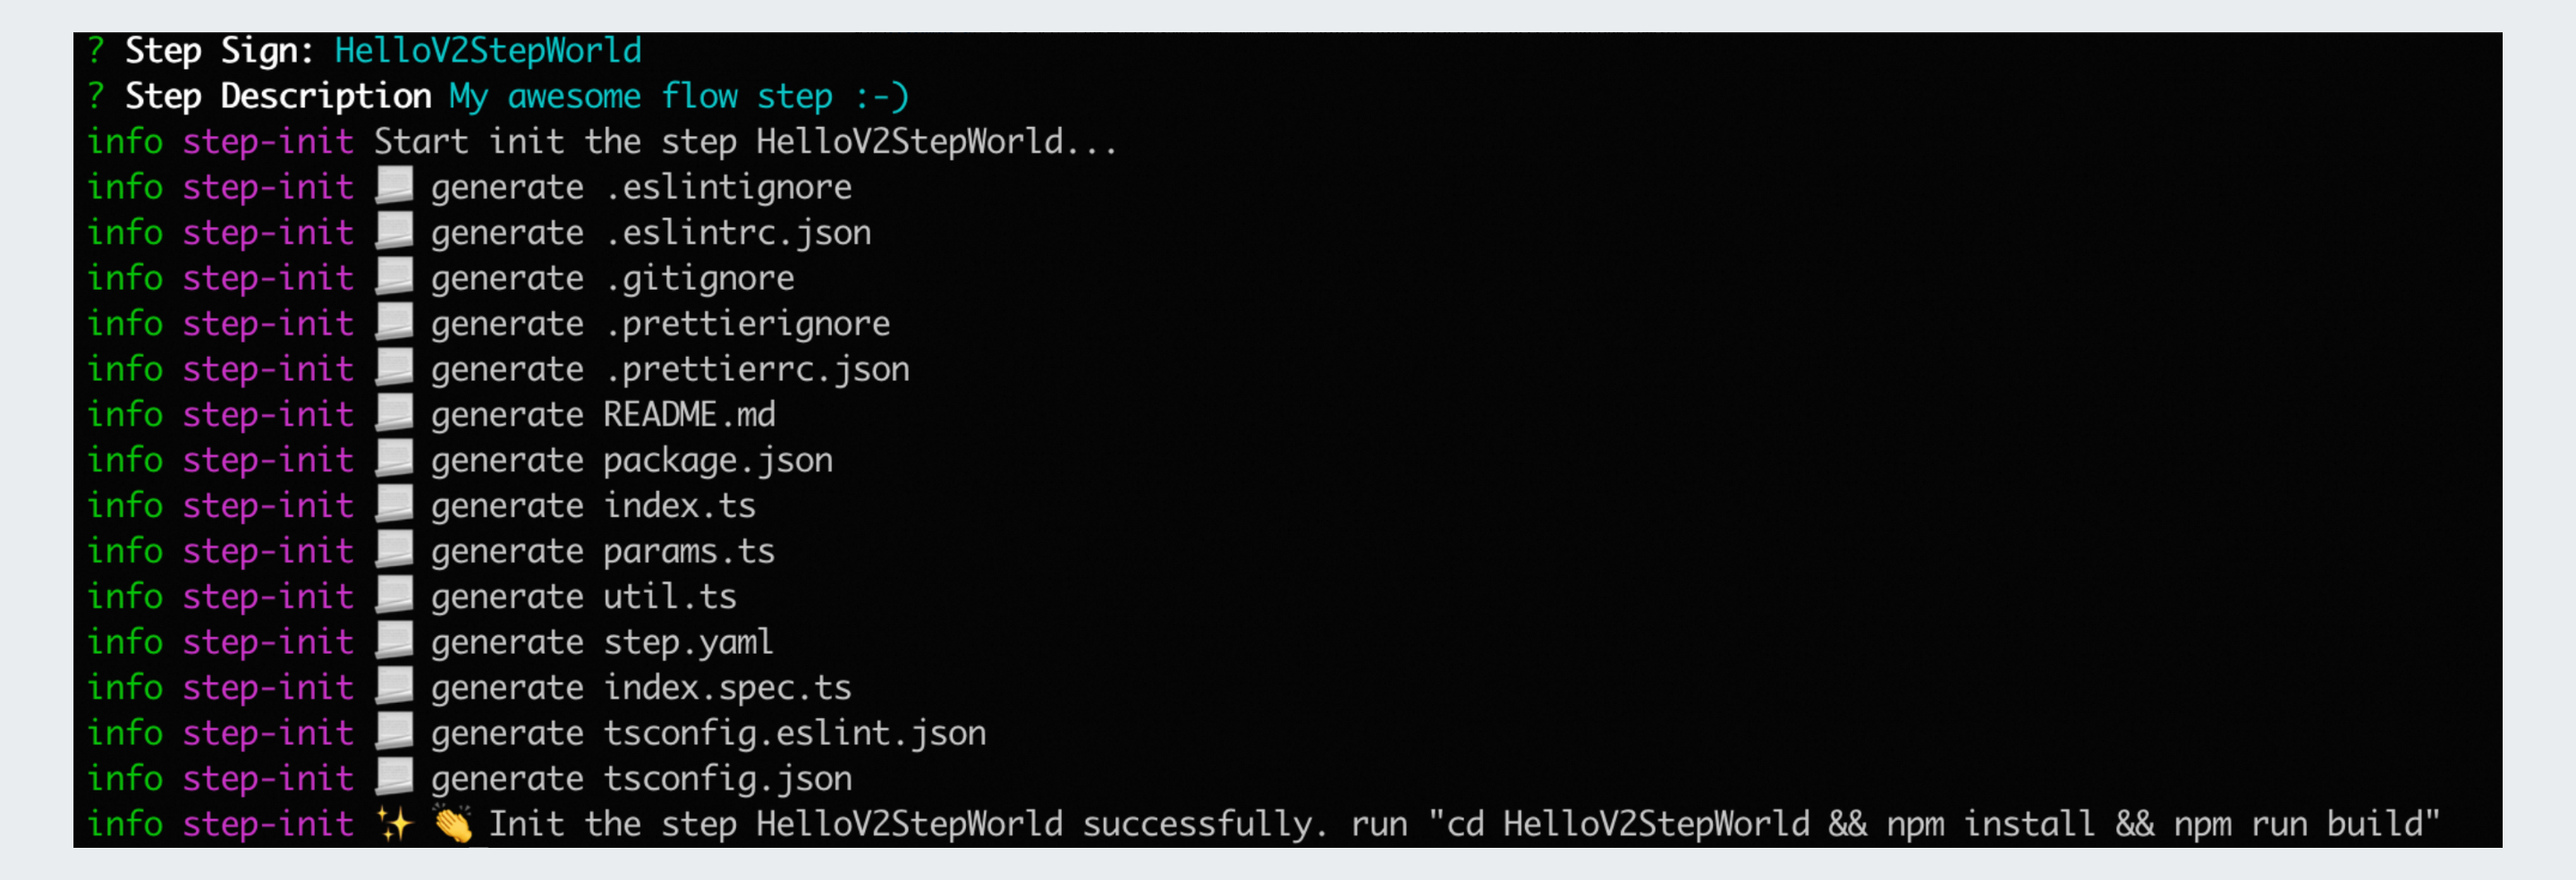
This command creates a local folder named after the Step Sign. In this example, the folder is HelloV2StepWorld. The folder contains the following files:
.
├── README.md     # Step description
├── package.json  # TypeScript project package declaration
├── src           # Step execution logic
│   ├── index.ts
│   ├── params.ts
│   └── util.ts
├── step.yaml     # A YAML file that describes all the information about the step
├── test          # Step unit tests
│   └── index.spec.ts
├── tsconfig.eslint.json
└── tsconfig.jsonstep.yaml: Defines the input parameters required for step execution. These are the configuration parameters required for the step when you configure it in the pipeline.src/index.ts: The entry source code file that is executed at runtime. In this file, you can retrieve environment variables from the pipeline and parameters configured instep.yaml, and then define your execution logic.
The following example describes the functions of these two key files in detail.
The step.yaml file defines the description of the step:
---
id: HelloV2StepWorld                      # Unique identifier of the step
name: HelloV2StepWorld                    # Name of the step
description: My awesome flow step :-)     # Description of the step
helpUrl: https://atomgit.com/flow-step-custom/HelloV2StepWorld  # Help link for the step
execution:
  executor: node
  main: dist/index.js
items:                                    # Input parameter form
  - label: input parameter
    name: abc
    type: input
    description: An input parameter of the input type named abc
    value: hello world
  - label: password parameter
    name: your_password
    type: password
    description: A password parameter of the password type named your_password
  - label: textarea parameter
    name: exclusion
    type: textarea
    value: |
      test/
      build/
    description: A textarea parameter of the textarea type named exclusion
  - label: select parameter
    name: select_version
    type: select
    value: v1.0.0
    datasource:
      - label: "v1.0.0"
        value: v1.0.0
      - label: "v1.0.1"
        value: v1.0.1
      - label: "v1.0.2"
        value: v1.0.2
    description: A select parameter of the select type named select_version
  - label: Parameter edf
    name: edf
    type: input
    showCondition: ${select_version} == "v1.0.0"
    description: Configure showCondition. This parameter is displayed only when select_version is v1.0.0.
  - label: Switch
    name: toggle
    type: checkbox
    value: false
The `items` section defines the input form for user configuration on the pipeline editing page. It supports various frontend components, such as `input` and `checkbox`. The example provides configurations for common components. For more information about the syntax, see Step YAML description language.
src/index.tscontains the execution logic of the step. When the step runs in a pipeline, it can retrieve system variables from the pipeline context and input parameters from users on the editing page. The script lists some of the available environment variables:async function runStep(): Promise<void> { const params = getParams() step.info(`PIPELINE_ID=${params.pipelineID}`) step.info(`PIPELINE_NAME=${params.pipelineName}`) step.info(`BUILD_NUMBER=${params.buildNumber}`) step.info(`WORK_SPACE=${params.workSpace}`) step.info(`PROJECT_DIR=${params.projectDir}`) step.info(`BUILD_JOB_ID=${params.buildJobID}`) const abc = process.env.abc ? process.env.abc as string : '' step.info(`Hello from flow-step HelloV2StepWorld, custom param abc=${abc}, upper value=${convertToUpperCase(abc)}`) // ... }
Next, run the installation and build commands for the new step. Run the commands that are displayed in the command prompt after initialization. In this example, the command is cd HelloV2StepWorld && npm install && npm run build. This command performs three operations:
cd HelloV2StepWorld: Switches to the folder of the new step.npm install: Installs the dependencies for the step.npm run build: Builds the step locally.

After the command is executed, a `dist` folder is created. The dist/index.js file is the file that the Flow step actually executes.
After you push the configuration of the custom step, the pipeline downloads the step from the step package storage service when it executes your custom step. Then, the pipeline executes the script file that you defined in the default `alinux3` container environment. You can customize the environment to use your own image in the YAML pipeline.
Publishing steps
Run one of the following commands based on your current directory:
Run this command from within the step directory
flow-cli step publish # Publish the stepRun this command from outside the step directory
flow-cli step publish ${your-step-folder} # Publish the stepThis command performs two actions:
Builds and packages the local TypeScript project, and then pushes it to the remote repository.
Publishes the step source information described in
step.yamlto the Apsara DevOps server.
After the step is published, enter the step version. In this example, the version is v1.0.0.
Run flow-cli step list to view the published steps.
Usage steps
Go to the Apsara DevOps Flow pipeline page and create a pipeline from an empty template. In the stage, add a task, add a step, and then select Organization Step to find the step that you created. Note: You must select a container environment. Otherwise, you cannot use the new version of custom steps.
After you add the step, configure its content. Click Save and Run. The step starts to run in the pipeline. You can view the logs to confirm that the TypeScript logic was executed.
Update steps
To update the step, modify the step.yaml file and the TypeScript code logic. Then, run flow-cli step publish again. Flow-CLI repackages the code and uploads the step.
If you go to the pipeline editing page and find that the step parameter settings have not changed, try refreshing the cache.
Deletion steps
To delete a published step, run flow-cli step remove "your_step_sign". Replace your_step_sign with the Step Sign of the step that you want to delete.
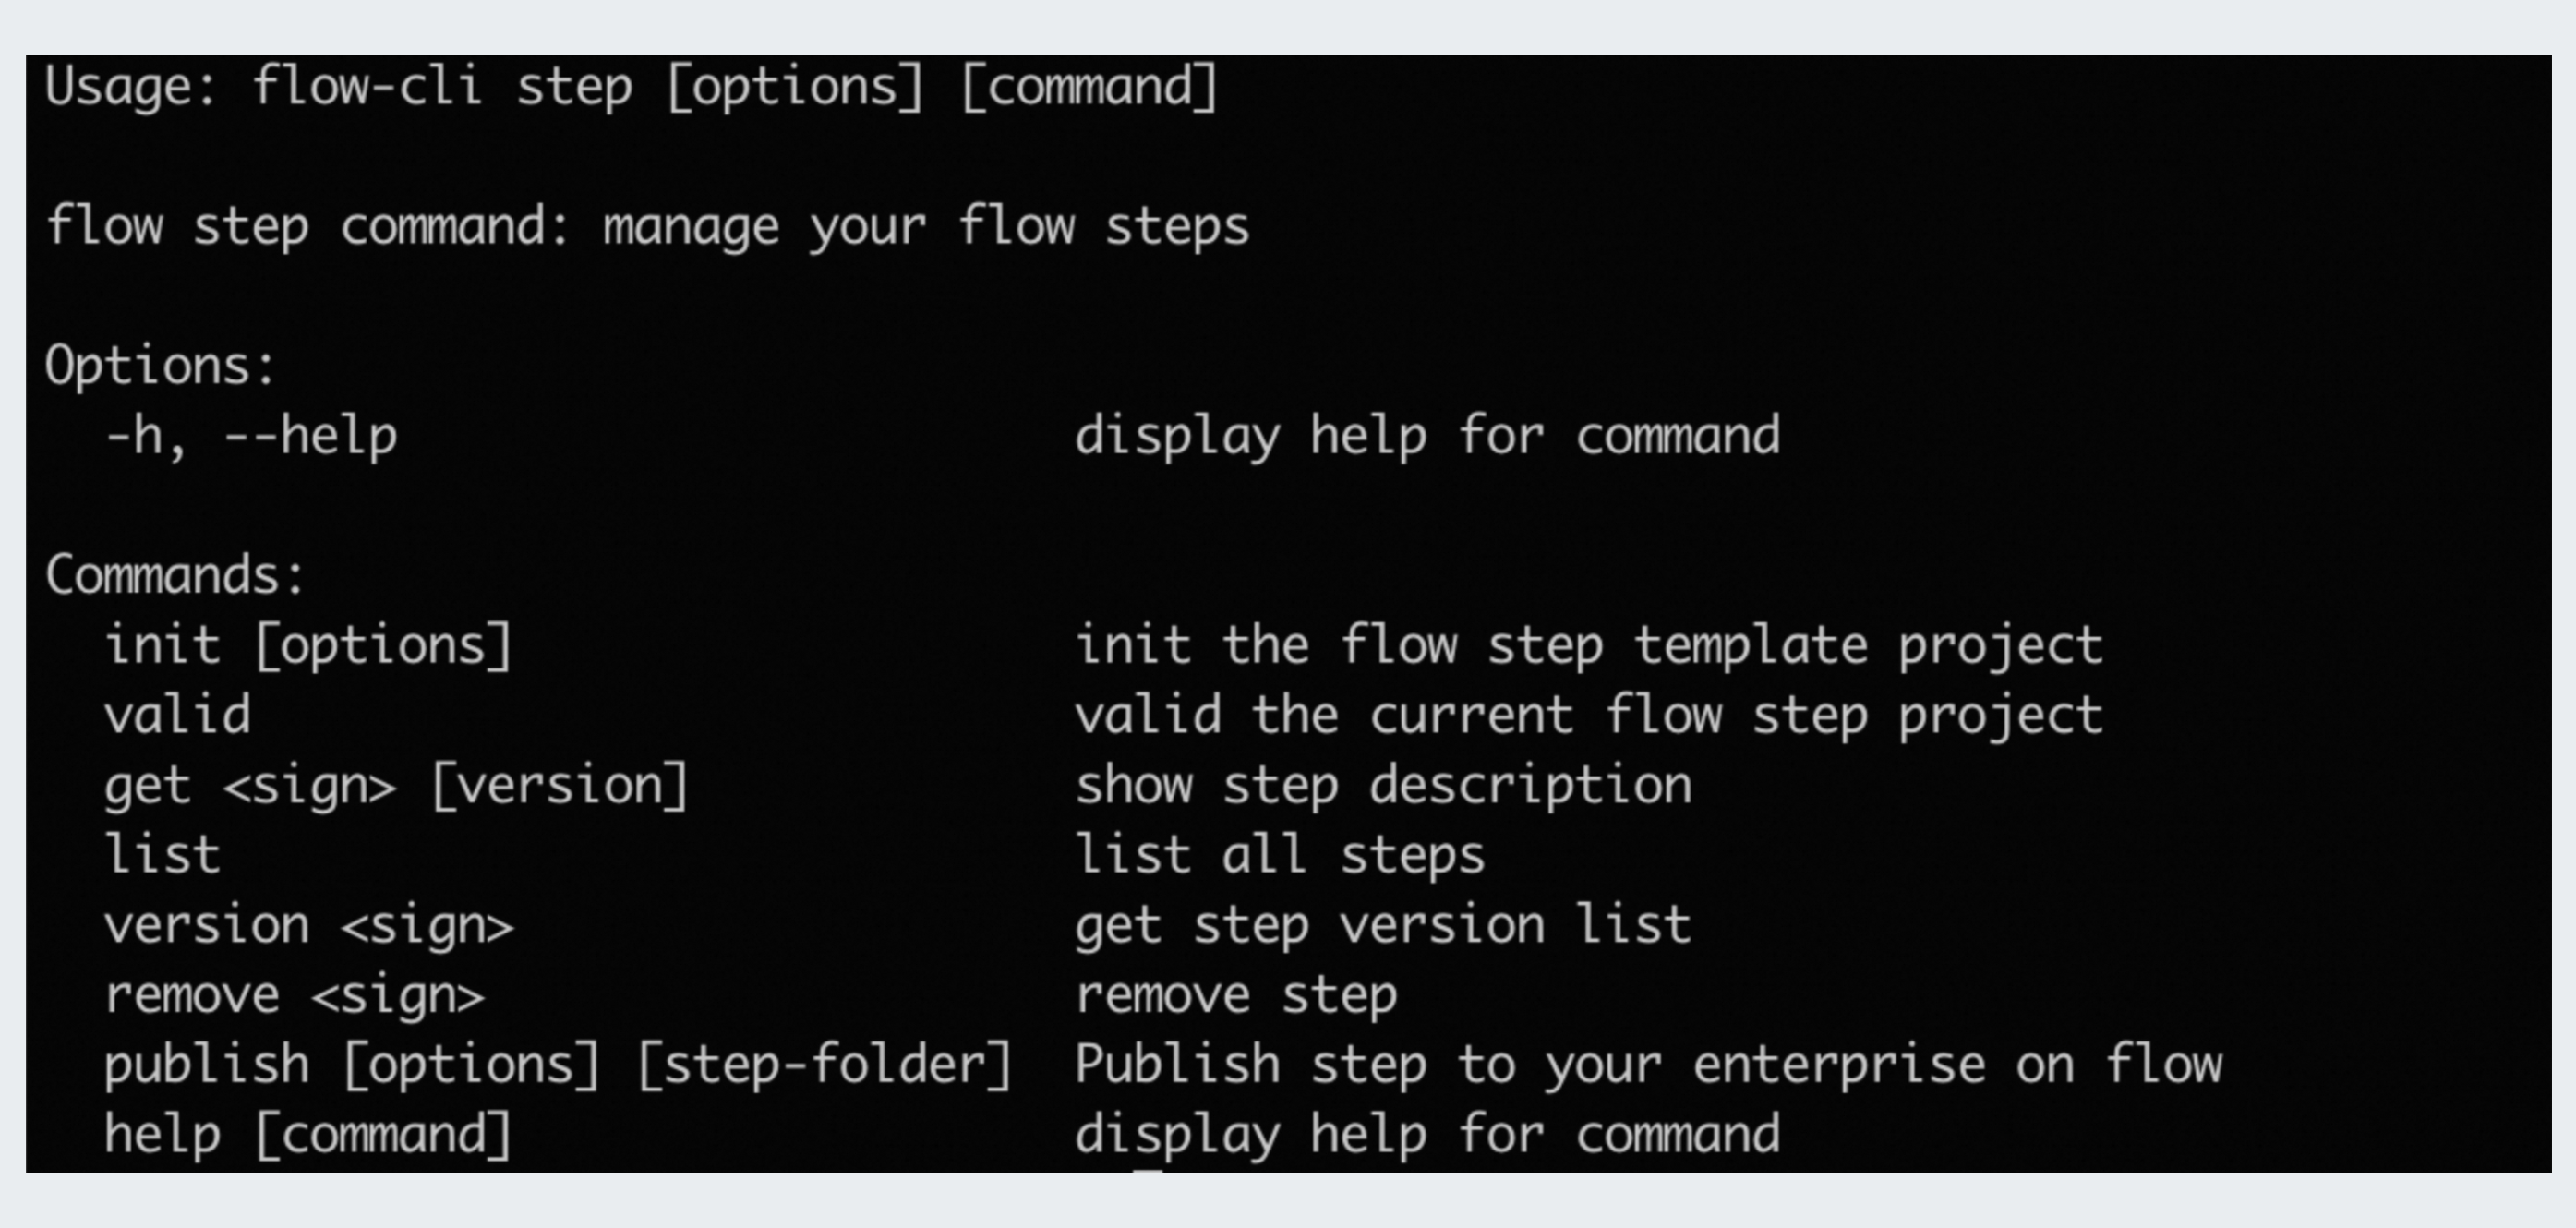
Other operations
Run the following command to view other commands that Flow-CLI supports.
FAQ
How do I log on if I do not have a local browser?
After you log on, the ~/.flow.json file is automatically generated in your local environment. Currently, Flow-CLI relies on the ~/.flow.json file for authentication. You can also manually create this file to log on. The file must contain the following content:
{"userToken":{"access_token":"ACCESS_TOKEN","token_type":"Bearer"},"organization":{"error":"","message":"","id":"","createdAt":"","updatedAt":"","creatorId":"","name":"","logo":"","location":"","category":"","description":"","website":"","background":"","contactPhone":"","desiredMemberCount":"","isDeleted":"","py":"","pinyin":"","isPublic":false,"defaultRoleId":"","defaultOrgRoleId":"","okrProgressMode":"","defaultTeamId":"","openId":"","source":""}}Replace ACCESS_TOKEN with your own value. To obtain the ACCESS_TOKEN value, perform the following step:
Access Apsara DevOps Flow. After you log on, right-click and select Inspect to open developer mode. View the cookies and search for `accessToken`. The value of `accessToken` is the ACCESS_TOKEN that you need. Replace the content and write it to the
~/.flow.jsonfile.