
本文详细介绍CentOS所处的生命周期阶段,以及可以采取哪些应对方案来应对CentOS停止维护后的风险。
CentOS生命周期概述
CentOS Linux 是一个免费提供的、社区支持的Linux发行版,由CentOS项目社区贡献者开发、分发和维护。2020年CentOS项目宣布将把全部投资转移到CentOS Stream,作为即将发布的Red Hat Enterprise Linux版本的上游开发平台 。CentOS Linux更新和发布在2021年至2024年期间停止,并在CentOS Linux 7于2024年6月30日达到生命周期结束(End of Life,EOL)时结束。
截至2024年6月30日,CentOS Linux所有版本已全部停止维护,进入EOL阶段,阿里云在CentOS Linux EOL后已经同步停止提供更新的镜像、软件更新和安全补丁等支持。继续使用CentOS可能会使您面临未修补漏洞和潜在安全风险,为避免操作系统停止维护带来的影响,建议所有使用CentOS任意版本的阿里云ECS用户尽早了解风险并制定相应的应对策略。
各个版本的CentOS的生命周期如下表所示。
版本 | 发布日期 | 进入EOL停服阶段 |
CentOS 8 | 2019-09-24 | 2021-12-31 |
CentOS 7 | 2014-07-07 | 2024-06-30 |
CentOS 6 | 2011-11-27 | 2020-11-30 |
CentOS 5 | 2007-04-12 | 2017-03-31 |
CentOS停止维护后的影响
基于CentOS官方对于CentOS Linux项目的变更计划,使用CentOS操作系统的用户将会受到如下影响:
2021年12月31日以后,使用CentOS 8的用户将无法获得包括问题修复和功能更新在内的任何软件维护和支持。
2024年06月30日以后,使用CentOS 7的用户将无法获得包括问题修复和功能更新在内的任何软件维护和支持。
对于阿里云公共镜像及ECS服务来说:
已经使用CentOS创建的ECS实例将继续正常运行,不会受到影响。
对于CentOS操作系统的服务支持将和CentOS官方日期保持同步。
CentOS 停止维护后建议方案概述
操作系统的停服(EOL)事件需要您结合业务现状合理关注。比如对应的业务即将下线,那么可暂不处理。
CentOS 7/8 EOL后,镜像仓库保留原有软件包,无需手动切换源,可以继续使用CentOS 7/8系统中的软件包。如您在阿里云上继续使用CentOS 6,则需要为CentOS 6切换源地址。
对公网提供服务以及对系统稳定性、安全性要求高的业务需要认真评估停服风险,并及时制定应对方案:
针对新增业务,您可以选择使用与CentOS兼容,且处于主流支持阶段的操作系统承载您的业务,不建议您使用已经进入EOL阶段的CentOS镜像新建ECS实例继续提供服务。
针对存量业务,建议您立即开始准备进行操作系统的迁移替换。
如果您使用的是CentOS 7操作系统,短期内您可以考虑先订阅阿里云为您提供的免费延长生命周期ELS服务,获取最新的安全更新和错误修复,并在ELS阶段结束前,若您想提高操作系统的长期稳定性,建议您尽快进行操作系统迁移替换。
如果您当前使用了除CentOS 7以外的其他CentOS操作系统版本,由于没有可以订阅的ELS服务,若您想提高操作系统的长期稳定性,建议您尽快进行操作系统迁移替换。如果您需要保留CentOS系统兼容性,您可以选择迁移至与CentOS兼容的操作系统。
替换操作系统
第一步:选择目标操作系统
替换操作系统前,需要先选择替换的目标操作系统,您可以综合考虑安全合规、稳定性、操作系统兼容性、预算、长期策略等因素。可替代CentOS的Linux操作系统详情如下。
与CentOS二进制兼容的操作系统
使用与CentOS二进制兼容的操作系统,可以让您在迁移至新系统重新部署环境时直接运行原操作系统上编译的应用程序和软件,无需因为接口的变化而重新编译。迁移至与CentOS兼容的操作系统不能保证BUG的兼容性,您可以查阅目标操作系统的社区支持文档解决此类问题。
操作系统 | 简介 | 是否收费 | 技术支持 | 相关链接 |
Alibaba Cloud Linux | Alibaba Cloud Linux由阿里云官方提供,完全兼容RHEL/CentOS。该操作系统针对阿里云做了大量优化,并由阿里云免费提供长期支持和维护。 | 阿里云支持 | ||
Anolis OS | Anolis OS由龙蜥社区(OpenAnolis)提供,100%兼容CentOS 8软件生态,且兼容其他主流Linux发行版。该操作系统是完全开源、中立且开放的发行版,具备企业级的高性能、稳定性、安全性以及可靠性。 | 否 | 阿里云支持 | |
Red Hat Enterprise Linux | Red Hat Enterprise Linux是Red Hat公司提供的企业版操作系统,您需要付费使用并可以享受Red Hat的订阅服务。 | 涉及镜像操作系统许可证费用,请参见Red Hat。 | 阿里云联合Red Hat原厂支持 | |
CentOS Stream | CentOS Stream是一个滚动升级的版本,由CentOS官方提供。 | 否 | 社区支持 | |
Rocky Linux | Rocky Linux是一个社区化的企业级操作系统,兼容RHEL,作为CentOS的替代版本。 | 否 | 社区支持 | |
AlmaLinux | AlmaLinux是CloudLinux团队构建的CentOS社区分支,1:1兼容RHEL,支持不停机更换操作系统。 | 否 | 社区支持 |
其他操作系统
操作系统 | 简介 | 是否收费 | 技术支持 | 相关链接 |
SUSE Linux Enterprise Server | SUSE Linux Enterprise Server是SUSE公司推出的一种可适应任何环境的操作系统,并专门针对性能、安全性和可靠性进行了优化。 | 涉及镜像操作系统许可证费用,请参见镜像计费。 | 阿里云联合SUSE原厂支持 | |
Ubuntu | Ubuntu是由Canonical开发的Linux发行版,您可以基于Ubuntu安装图形化桌面,以便于使用。 | 否 | 社区支持 | |
Debian | Debian是一个流行的Linux操作系统,以其稳定性、安全性和自由软件原则而闻名。 | 否 | 社区支持 | |
OpenSUSE | OpenSUSE是一个基于Linux内核的操作系统,由OpenSUSE项目社区开发维护,并且得到了SUSE等公司的赞助。 | 否 | 社区支持 |
第二步:评估替换方案
替换操作系统时,您可以根据业务部署情况选择以下阿里云为您推荐方案:
如果业务可以接受短暂停机,且具备重新部署业务系统的能力,可以选择更换系统盘(更换操作系统)方案。适合开发、测试环境或紧急情况下的快速系统替换。
如果业务部署在系统盘上,或对停机时间敏感,建议重新部署环境(重新购买新实例)方案进行迁移。适用于生产环境或对可用性和稳定性有严格要求的系统。
如果您重新部署环境有困难,可以尝试原地迁移替换方式。
第三步:替换操作系统前测试准备
测试准备 | 说明 |
评估对业务的影响 |
|
数据备份 | 迁移过程会对ECS云服务器进行创建普通云盘快照、操作系统内核版本转换、软件包重新安装升级、停止、启动等操作。建议提前做好重要数据备份,合理安排迁移窗口期,避免因上述操作对业务造成影响。 |
确保没有正在创建中的快照 | 如果有正在创建中的快照会导致迁移失败,请您等待快照创建完成后,再开始替换操作。 |
全面测试验证 | 在迁移替换前,强烈建议您预先在目标操作系统环境下完成所有业务应用程序的全面测试验证,以确保应用程序与目标操作系统之间的兼容性及性能表现,从而有效避免迁移后可能出现的业务运行不畅或功能失效等问题。 同时,迁移前和迁移过程中,系统会对原实例进行迁移条件检测及迁移预评估。如果源系统不满足迁移条件或迁移预评估失败,迁移会出错中断,并不能保证一定能迁移升级成功,建议您提前熟悉迁移条件限制及出错排查文档并进行测试。迁移问题,请参见操作系统迁移中问题(Linux)。 |
第四步:进行操作系统替换
重新部署环境的步骤和注意事项
自定义购买实例替换原实例或针对已有实例更换操作系统(更换系统盘)两种方案的操作步骤如下。
数据备份:在操作前,请通过创建自定义镜像或者创建快照等方式,对原实例环境做好数据备份。
工作负载迁移:在购买新实例或者更换操作系统后,需要重新部署与业务相关的运行环境。例如安装软件和库(apt、yum等)、配置环境变量、部署应用等。可参考如下流程:
收集原实例应用软件信息,导出关键应用配置及数据文件。
如您购买新实例,需要对照原实例应用软件信息,重新安装指定的应用软件,并将原实例导出的应用配置及数据文件导入。
若您的业务程序是基于C/C++一类编译型语言编写的,请基于新系统重新编译您的业务程序。
测试应用业务是否正常。
业务切换:
如您购买新实例,并完成了工作负载迁移和业务验证,则可以暂停原实例业务,将目标实例的应用业务正式切换上线运行。
如您采用更换操作系统,则需要在原有实例上直接更换系统盘后进行工作负载迁移和业务验证,请注意做好原实例的数据备份和信息收集。
原地迁移的步骤
原地迁移方式仅适用于目标操作系统为CentOS二进制兼容的操作系统,支持的目标操作系统如下表所示。
原操作系统 | 目标操作系统 | 步骤说明和参考文档 |
CentOS 7/CentOS 8 | Alibaba Cloud Linux | 如您希望了解Alibaba Cloud Linux 3与CentOS 7的区别,请参考文档Alibaba Cloud Linux 3与CentOS 7的区别,具体的迁移操作,可以操作系统迁移在可视化界面中完成迁移。 |
Anolis OS | 具体的迁移操作,可以操作系统迁移在可视化界面中完成迁移。 | |
Red Hat Enterprise Linux | 具体的迁移操作,可以通过登录ECS实例内部使用Red Hat提供的Convert2RHEL工具进行迁移,或者操作系统迁移在可视化界面中完成迁移。 | |
CentOS 7 | AlmaLinux | 具体的迁移操作,可以参考文档ELevating CentOS 7 to AlmaLinux,登录ECS实例内部完成迁移。 |
CentOS | Rocky Linux 8 | 具体的迁移操作,可以参考文档How to migrate to Rocky Linux from CentOS,登录ECS实例内部完成迁移。 |
Rocky Linux 9 |
订阅延长生命周期支持
阿里云为您提供了免费的CentOS 7安全更新订阅服务(即延长生命周期ELS服务),该服务涵盖自2024年06月30日至2025年06月30日期间的重大安全更新和错误修复。2025年06月30日后,阿里云将停止提供CentOS 7安全更新订阅。如果您因业务需求需要继续使用CentOS,可以订阅CentOS的延长生命周期支持,以获得安全更新、补丁修复及技术支持,但我们仍建议您立即开始准备操作系统升级迁移工作,降低业务安全风险。
阿里云仅提供有限的技术协助,无法保证提供所有的安全更新和错误修复,并且不承担由于安全更新订阅服务可能引发的故障责任。
您在订阅完成后,系统并不会自动进行漏洞修复和软件包更新,这些操作需要您使用YUM工具手动完成,请参见基于YUM的安全更新操作。订阅的详细信息如下:
订阅名称 | 提供方 | 收费情况 | 订阅包含的内容 | 订阅步骤 |
CenOS 7延长安全更新 | 阿里云 | 免费 | 订阅CentOS 7安全更新,阿里云将提供重大安全更新(CVE)和错误修复。
|
常见问题
如何将CentOS 7转换为Red Hat Enterprise Linux(RHEL)7?
以下为您介绍如何在阿里云上将CentOS 7转换成RHEL 7,您也可以参考Red Hat官方文档来进行转换。
(条件必选)如果您是阿里云服务器并且安装了云安全中心,需要先卸载云安全中心客户端。
说明云安全中心是CentOS默认的安全增强工具,而RHEL 7则使用Red Hat提供的安全增强工具。云安全中心与RHEL 7中的工具可能存在不兼容性和冲突,因此在转换过程中需要卸载云安全中心客户端,以确保系统的稳定性和兼容性。
运行以下命令,将系统软件包升级到最新版本。
sudo wget -O /etc/yum.repos.d/CentOS-Base.repo https://mirrors.aliyun.com/repo/Centos-7.repo
sudo wget -O /etc/yum.repos.d/epel.repo https://mirrors.aliyun.com/repo/epel-7.repo
运行以下命令,更新系统软件包并重启系统。
sudo yum -y update sudo reboot运行以下命令,从Red Hat官方网站下载并安装convert2rhel工具。
sudo curl -o /etc/pki/rpm-gpg/RPM-GPG-KEY-redhat-release https://security.access.redhat.com/data/fd431d51.txt sudo curl -o /etc/yum.repos.d/convert2rhel.repo https://cdn-public.redhat.com/content/public/repofiles/convert2rhel-for-rhel-7-x86_64.repo sudo yum -y install convert2rhel在阿里云上为ECS实例购买软件许可证(邀测)。
购买Red Hat Enterprise Linux许可证并激活后,您才能下载RHEL软件。
运行以下命令,将CentOS 7转换为RHEL 7。
sudo convert2rhel -y --no-rhsm --enablerepo rhui-rhel-7-server-rhui-rpms --enablerepo rhui-rhel-7-server-rhui-extras-rpms --enablerepo rhui-rhel-7-server-rhui-optional-rpms转换过程需要花费一定时间,请您耐心等待。出现类似如下回显信息时,表示转换完成。
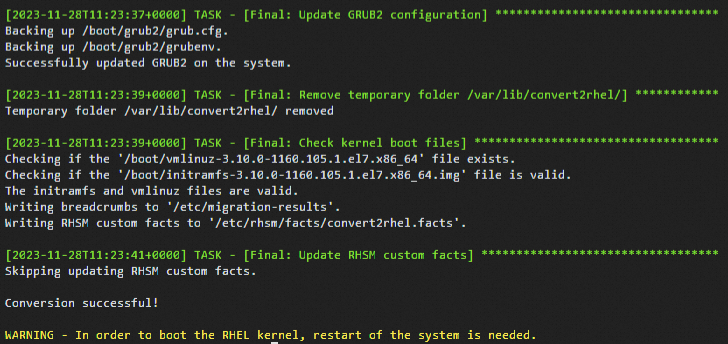
运行以下命令,重启系统。
转换结束后会提示重启系统,重启系统可以引导新的RHEL内核,然后执行
cat /etc/redhat-release检查操作系统是否转换成功。sudo reboot转换完成后,ECS实例详情页的操作系统(取决于创建实例时所选镜像的操作系统属性)与实际的操作系统(Red Hat Enterprise Linux Server release 7.9)不同,如果您希望修订实例的操作系统平台信息,可以校准操作系统。
如何为CentOS 6 EOL后切换源地址?
CentOS 6的源地址http://mirror.centos.org/centos-6/内容已移除,目前第三方的镜像站中均已移除CentOS 6的源。阿里云的源http://mirrors.cloud.aliyuncs.com和http://mirrors.aliyun.com也无法同步到CentOS 6的源。当您在阿里云上继续使用默认配置的CentOS 6的源会发生报错。报错示例如下图所示:
您可以通过以下步骤,在CentOS 6操作系统的ECS实例中将源配置按照网络环境不同进行切换。
yum源
专有网络VPC类型实例需切换为
http://mirrors.cloud.aliyuncs.com/centos-vault/6.10/经典网络类型实例需切换为
http://mirrors.aliyuncs.com/centos-vault/6.10/
epel源
专有网络VPC类型实例需切换为
http://mirrors.cloud.aliyuncs.com/epel-archive/6/经典网络类型实例需切换为
http://mirrors.aliyuncs.com/epel-archive/6/
本文主要说明ECS实例中的相关操作与配置。如果您的服务器不是ECS实例,需保证服务器具有公网访问能力,并且源地址http://mirrors.cloud.aliyuncs.com需要替换为http://mirrors.aliyun.com。例如,切换yum源为http://mirrors.aliyun.com/centos-vault/6.10/;切换epel源为http://mirrors.aliyun.com/epel-archive/6/。
登录CentOS 6系统的ECS实例。
具体操作,请参见ECS远程连接方式概述。
运行以下命令编辑
CentOS-Base.repo文件。sudo vim /etc/yum.repos.d/CentOS-Base.repo按i进入编辑模式,修改以下内容切换源。
[base] name=CentOS-6.10 enabled=1 failovermethod=priority baseurl=http://mirrors.cloud.aliyuncs.com/centos-vault/6.10/os/$basearch/ gpgcheck=1 gpgkey=http://mirrors.cloud.aliyuncs.com/centos-vault/RPM-GPG-KEY-CentOS-6 [updates] name=CentOS-6.10 enabled=1 failovermethod=priority baseurl=http://mirrors.cloud.aliyuncs.com/centos-vault/6.10/updates/$basearch/ gpgcheck=1 gpgkey=http://mirrors.cloud.aliyuncs.com/centos-vault/RPM-GPG-KEY-CentOS-6 [extras] name=CentOS-6.10 enabled=1 failovermethod=priority baseurl=http://mirrors.cloud.aliyuncs.com/centos-vault/6.10/extras/$basearch/ gpgcheck=1 gpgkey=http://mirrors.cloud.aliyuncs.com/centos-vault/RPM-GPG-KEY-CentOS-6编辑完成后,按Esc键,并输入
:wq保存退出文件。运行以下命令编辑
epel.repo文件。sudo vim /etc/yum.repos.d/epel.repo按i进入编辑模式,修改以下内容切换源。
[epel] name=Extra Packages for Enterprise Linux 6 - $basearch enabled=1 failovermethod=priority baseurl=http://mirrors.cloud.aliyuncs.com/epel-archive/6/$basearch gpgcheck=0 gpgkey=http://mirrors.cloud.aliyuncs.com/epel-archive/RPM-GPG-KEY-EPEL-6编辑完成后,按Esc键,并输入
:wq保存退出文件。
yum源和epel源切换完成后,即可使用sudo yum install命令安装所需软件包。
如何在CentOS 6实例切换源配置?
使用自定义镜像创建新的ECS实例,在启动实例时cloud-init会自动初始化系统的源配置。如果您后续需要通过已切换源的ECS实例创建自定义镜像,并且需要保留已切换的源配置,需要您在创建自定义镜像前,按照以下操作在已切换源的ECS实例中修改cloud-init的配置文件/etc/cloud/cloud.cfg。
运行以下命令编辑/etc/cloud/cloud.cfg文件。
sudo vim /etc/cloud/cloud.cfg按i进入编辑模式,使用
#注释掉cloud_init_modules:下的- source-address模块。注释后,文件内的配置信息如下所示:
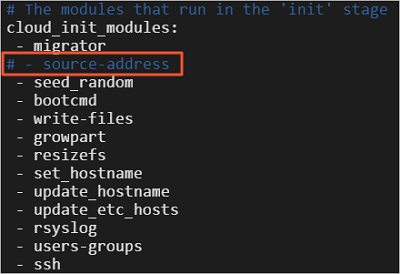
编辑完成后,按Esc键,并输入
:wq保存退出文件。
相关文档
操作系统的生命周期和各个阶段的特点,以及应对停服或者延长支持阶段的常规方案,请参见操作系统生命周期概述。