Linux通常被广泛应用于服务器操作系统领域,绝大多数Linux服务器操作系统默认不提供图形用户界面。服务器管理员需通过命令行界面与Linux服务器进行交互。本文将为您介绍Linux系统中的常用命令。
管理进程
ps
命令介绍
ps命令是Process Status的缩写,用来查看当前系统中正在运行的进程信息快照。
常用参数说明
参数 | 含义 |
-A | 显示所有程序。 |
-a | 显示现行终端机下的所有程序。 |
-e | 此选项的效果和指定“A”选项相同。 |
-f | 显示UID、PPIP、C与STIME栏位。 |
-u | 以用户为主的格式来显示程序状态。 |
-U | 列出属于该用户的程序的状态,也可以使用用户名来指定。 |
-x | 显示所有程序,不以终端机来区分。 |
更多参数说明,可运行man ps进行查看。
使用示例
查看所有进程信息。
ps -ef通过程序名称关键字查找程序进程信息(指定-e、-f参数)。
ps -ef | grep <key_word>请将上述命令中的
<key_word>替换为您指定的关键字。通过程序名称关键字查找程序进程信息(指定-a、-u、-x参数)。
ps -aux | grep <key_word>请将上述命令中的
<key_word>替换为您指定的关键字。查看进程树信息。
ps -ejH查看包含线程数据的进程信息。
ps -eLf使用自定义字段格式展示线程信息。
ps -eo pid,tid,class,rtprio,ni,pri,psr,pcpu,stat,wchan:14,comm查看指定PID的指标的信息,示例中PID为1,指标信息为comm=。
ps -q 1 -o comm=
top
命令介绍
top命令为Linux系统运行中的进程提供了动态实时视图,可以显示系统的概览信息及Linux内核当前管理的进程列表。
常用参数说明
参数选项 | 说明 |
-d | 指定top命令刷新频率。 |
-p | 指定PID以监控指定进程的状态。 |
-s | 在安全模式下运行top命令,此模式下将去除交互模式带来的潜在危险。 |
-i | 使top不显示任何闲置或者僵死进程。 |
-c | 显示完整命令而不是只显示命令名称。 |
资源监控字段说明
下图展示了部分监控字段及其数值,具体数值会因采样周期的不同而有所变化。该图仅供参考,具体数据应以您的实际数据为准。
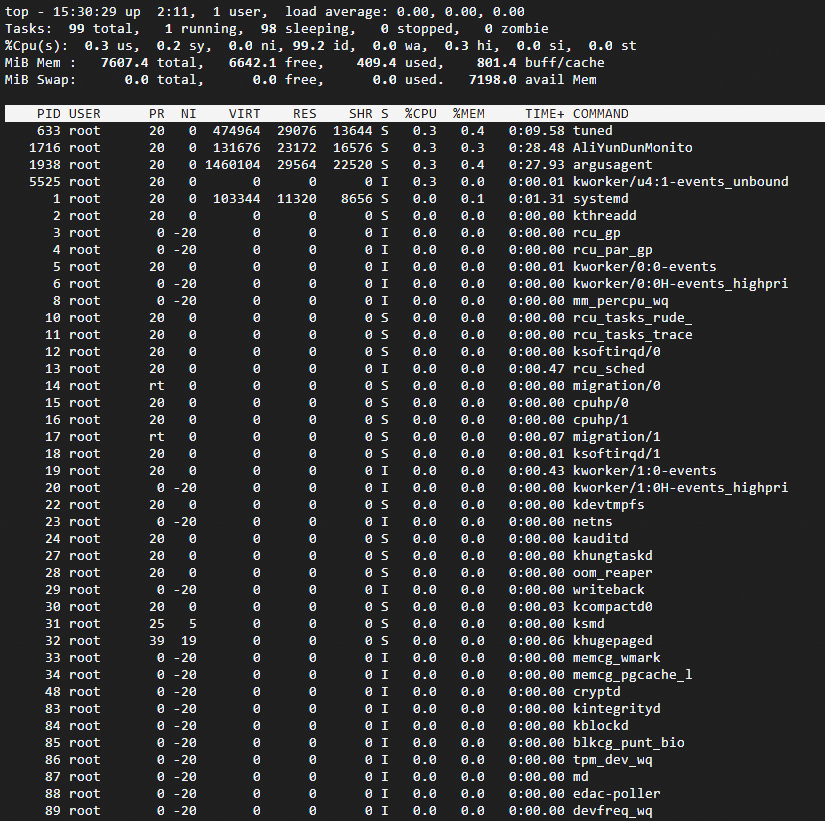
主要参数说明如下
使用示例
按指定采集频率查看系统指标
运行如下命令,按指定采集频率展示系统指标。示例中指定采集频率为3 秒一次。
top -d 3说明执行top命令,默认会以5s的采集频率展示系统指标。
定制top命令指标展示界面
默认情况下top命令展示的指标如系统摘要信息及进程指标监控字段说明所示。如需修改展示的指标界面,您可以在top交互式命令界面下按
f键,以便筛选您需要的指标视图。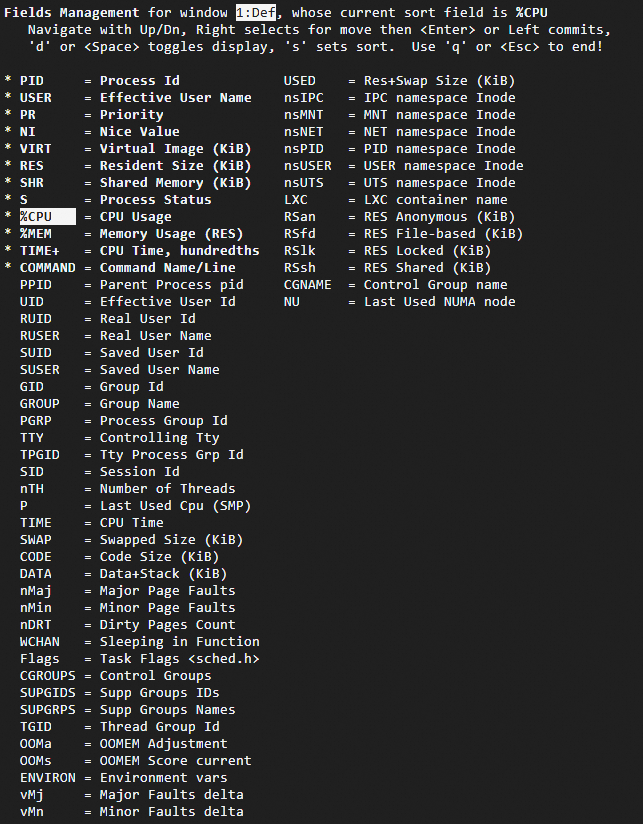
在视图字段管理界面,相关操作,请参见下表。
按键
说明
↑,↓
进行字段选择。
→
选择整列,之后可以使用上下键移动整列的显示位置。
空格
选择隐藏还是显示该字段,带*的为显示。
s
将当前光标所在列设置为排序列。
q
退出视图字段管理界面。
使用top命令的交互模式
运行top命令后,系统将进入交互模式。在该模式下,用户可以通过按键与命令进行交互。有关交互模式所支持的命令,请参见下表。
按键
说明
1
展示每个逻辑CPU的指标状况。
u
按u键之后,输入Linux系统用户名,可以查看该用户相关的进程。
E
切换内存指标的计量单位,在Kib、MiB、GiB、TiB、PiB、EiB之间切换。
x
显示排序列。
y
显示运行中的进程。
?
显示帮助信息。
通过PID号找到对应的进程名及所在目录
执行
top命令动态显示进程信息。 以aliyun-service程序为例,查看到PID为1325 。
执行以下命令查看对应程序的目录。
cd /proc/1352
ls -ail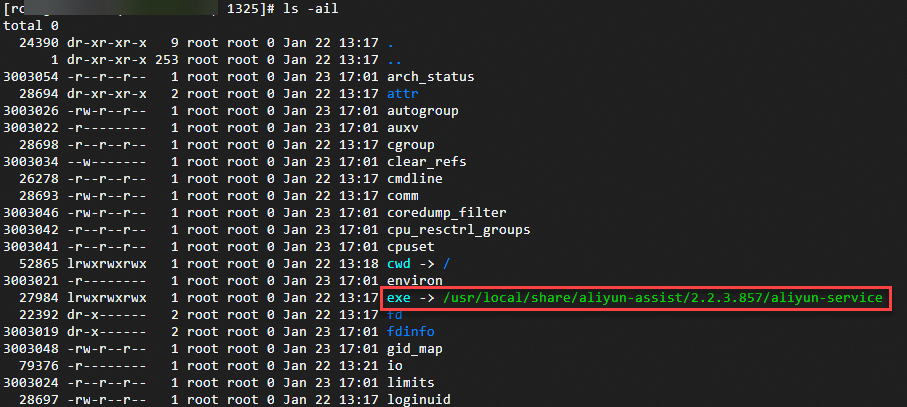
通过PID结束对应进程
执行top命令,进入交互模式后,按
k键,输入要结束进程的PID之后按Enter键以结束对应进程。
kill
命令介绍
kill命令用于在Linux中手动结束进程。
常用参数说明
参数 | 说明 |
-l | 列出可用的信号的名称。 |
-L | 在表格中列出信号名称。 |
使用示例
杀死所有可以杀死的进程。
sudo kill -9 -1显示信号编号 11 所代表的信号名称。
sudo kill -l 11在表格中列出所有可用的信号。
sudo kill -L结束指定PID的进程。
sudo kill -9 <PID>请将上述命令中的
<PID>替换为您指定的进程PID。
killall
命令介绍
killall命令用于在Linux中通过进程名称结束进程。
常用参数说明
参数 | 说明 |
-g | 杀死属于该进程组的进程。 |
-i | 交互模式,杀死进程前会征求确认信息。 |
-v | 报告信号是否成功发送。 |
使用示例
杀死top进程。
sudo killall top查看系统信息
在使用Linux实例过程中,可以使用uname命令查询系统信息。
uname
命令介绍
uname命令用于输出系统信息。
常用参数说明
选项 | 说明 |
-a | 输出全部信息。 |
-s | 输出内核名称。 |
-n | 输出网络节点主机名。 |
-r | 输出内核发行版本。 |
-v | 输出内核版本信息。 |
-m | 输出机器硬件名称。 |
-P | 输出处理器类型。 |
-i | 输出硬件平台信息。 |
-o | 输出操作系统信息。 |
使用示例
查看全部系统信息。
uname -a执行
uname -m或arch命令查看CPU架构,不同架构回显信息如下:ARM架构显示:

x86架构显示:

dmidecode
dmidecode 命令主要用于从Linux系统 BIOS(基本输入输出系统)中提取和显示与硬件相关的信息。它读取 DMI(桌面管理接口)表,提供关于计算机硬件配置的详细信息,包括但不限于:
系统信息:包括制造商、产品名称、版本、序列号、系统型号等。
处理器信息:包括处理器的型号、速度、核心数等信息。
内存信息:包括内存插槽的数量、容量、类型、速度等信息。
主板信息:包括主板的制造商、版本、序列号等。
BIOS 信息:包括 BIOS 的版本、发布日期等。
电源信息:电源相关的规格和型号。
设备信息:包括各种硬件组件的信息,如网络适配器等。
输出系统的完整 DMI 信息。
sudo dmidecode如果只想查看特定的DMI信息,可以使用
-t参数,例如仅输出与内存相关的信息:sudo dmidecode -t memory
查看物理CPU和内存信息
总核数 = 物理CPU个数 × 每颗物理CPU的核数
总逻辑CPU数 = 物理CPU个数 × 每颗物理CPU的核数 × 超线程数
通过如下命令,可以查看物理CPU和内存相关信息。
查看物理CPU个数。
cat /proc/cpuinfo| grep "physical id"| sort| uniq| wc -l查看每个物理CPU中core的个数,即CPU核数。
cat /proc/cpuinfo| grep "cpu cores"| uniq查看逻辑CPU的个数。
cat /proc/cpuinfo| grep "processor"| wc -l查看CPU型号。
cat /proc/cpuinfo | grep name | cut -f2 -d: | uniq -c查看内存信息。
cat /proc/meminfo
查看CPU详细信息
执行lscpu命令查看CPU详细信息,不同架构回显信息如下:
ARM架构显示:

x86架构显示:

查看OS信息
执行cat /proc/version命令查看OS信息及编译器版本,不同架构回显信息如下:
x86架构显示:

ARM架构显示:

查看管理磁盘
df
命令介绍
df命令用于报告文件系统磁盘空间使用情况。
常用参数说明
选项 | 说明 |
-a | 包含伪(pseudo)、重复和无法访问的文件系统。 |
-B | 输出前将块大小转换为指定大小。 |
-h | 以 1024 为幂显示大小(例如,1023M)。 |
-H | 以 1000 为幂输出大小(例如,1.1G)。 |
-k | 等效于 --block-size=1K。 |
-l | 仅列出本地的文件系统。 |
-t | 只显示指定类型的文件系统信息。 |
使用示例
查看磁盘空间使用情况,结果以MB为单位。
df -BM回显结果示例如下。
Filesystem     1M-blocks  Used Available Use% Mounted on
tmpfs               742M   22M      721M   3% /run
/dev/vda3         39943M 2542M    35556M   7% /
tmpfs              3708M    0M     3708M   0% /dev/shm
tmpfs                 5M    0M        5M   0% /run/lock
tmpfs               742M    1M      742M   1% /run/user/0
lsblk
命令介绍
lsblk命令用于列出块设备信息。
常用参数说明
参数 | 说明 |
-a | 列出所有设备,包含空设备及内存盘设备。 |
-b | SIZE列使用bytes作为输出。 |
-f | 输出信息中包含文件系统。 |
使用示例
查看块设备信息,包含文件系统信息。
lsblk -f回显结果示例如下。
NAME FSTYPE FSVER LABEL UUID FSAVAIL FSUSE% MOUNTPOINTS vda |-vda1 |-vda2 vfat FAT32 6175-F96E `-vda3 ext4 1.0 df02e0a1-d28d-41b1-99c2-58f2b684cc79 34.7G 6% /获取磁盘序列号SN。
不同Linux发行版获取方法可能存在差异,以下方法适用于Alibaba Cloud Linux 3/CentOS 7/Ubuntu18。参考以下步骤进行操作。
查看系统挂载的块存储设备。
lsblk使用以下命令获取存块储设备的磁盘序列号SN,此处以vda设备为例。
udevadm info --query=all --name=/dev/vda | grep ID_SERIAL
blkid
命令介绍
blkid命令用于查看块设备属性信息。
使用示例
查看块设备属性信息
blkid /dev/vda回显结果示例如下。
/dev/vda: PTUUID="bdee1c7f-46fc-4838-9a74-9exxxxxxxxaf" PTTYPE="gpt"fdisk
命令介绍
fdisk命令是Linux分区表操作工具。
常用参数说明
参数 | 说明 |
-l | 列出指定设备的分区表信息。 |
-u | 以扇区数而不是以柱面数的形式显示分区表中各分区的信息。 |
使用示例
查看设备分区情况。
sudo fdisk -lu回显结果示例如下。
Disk /dev/vda: 40 GiB, 42949672960 bytes, 83886080 sectors
Units: sectors of 1 * 512 = 512 bytes
Sector size (logical/physical): 512 bytes / 512 bytes
I/O size (minimum/optimal): 512 bytes / 512 bytes
Disklabel type: gpt
Disk identifier: BDEE1C7F-46FC-4838-9A74-9E57F8FD63AF

Device      Start      End  Sectors  Size Type
/dev/vda1    2048     4095     2048    1M BIOS boot
/dev/vda2    4096   413695   409600  200M EFI System
/dev/vda3  413696 83886046 83472351 39.8G Linux filesystem
mount
命令介绍
mount命令用于挂载一个文件系统。
常用参数说明
参数 | 说明 |
-a | 挂载所有在 |
-L | 以给定的标签挂载分区。 |
-r | 以只读模式挂载文件系统。 |
-w | 以读写模式挂载文件系统。 |
-U | 以指定的 |
使用示例
挂载fstab中配置的所有文件系统。
sudo mount -a以读写模式挂载指定文件系统。
sudo mount -w /dev/vdb1 /mnt
umount
命令介绍
umount命令用于卸载一个文件系统。
常用参数说明
参数 | 说明 |
-r | 如果卸载失败,尝试以只读方式重新挂载。 |
-a | 卸载所有在 |
-t | 只卸载指定类型的文件系统。如果要一次指定多个文件系统, 可以用逗号分隔。 |
-f | 强制卸载。 |
使用示例
强制卸载指定分区。
sudo umount -f /dev/vdb1管理服务
systemctl
命令介绍
systemctl命令用于服务管理。
常用参数说明
参数 | 说明 |
-a | 表示列出所有已加载的单元或者属性。 |
常用单元命令
命令 | 说明 |
start | 启动指定的已加载单元。 |
stop | 停止指定的已加载单元。 |
restart | 重新启动指定的已加载单元。 |
reload | 要求指定的单元重新加载它们的配置。 |
status | 显示指定单元的运行时状态信息。常见的服务运行状态如下所示。
|
常用单元文件命令
命令 | 说明 |
enable | 启用指定的单元或单元实例。 |
disable | 停用指定的单元或单元实例。 |
使用示例
重新启动
nginx服务。sudo systemctl restart nginx查看
nginx服务状态。sudo systemctl status nginx设置
nginx服务开机启动。sudo systemctl enable nginx查看开机启动的服务列表。
sudo systemctl list-unit-files --type=service --state=enabled
管理资源占用
lsof
命令介绍
lsof命令用于列出打开的文件。
如果您使用的Linux发行版没有预装lsof工具,您可以使用对应的软件包管理工具进行安装。
Alibaba Cloud Linux、CentOS、RHEL:
sudo yum install lsof。Ubuntu、Debian:
sudo apt install lsof。
常用参数说明
参数 | 说明 |
-p | 输出指定进程打开的文件。 |
-l | 输出中使用ID代替用户名。 |
-u | 输出指定用户打开的文件。 |
-c | 输出 |
-d | 输出包含指定描述符的项。 |
-i | 输出符合指定条件的项。可选参数如下:
|
回显信息说明
运行lsof命令后的回显信息示例如下:

相关参数说明如下。
参数 | 说明 |
COMMAND | 命令名称。 |
PID | 进程ID。 |
TID | 线程ID,如果为空代表列出的是进程。 |
TASKCMD | 任务名称,通常与 COMMAND 相同。 |
USER | 用户ID号或登录名。 |
FD | 文件描述符。 |
TYPE | 与文件关联的节点类型。 |
DEVICE | 设备号。 |
SIZE/OFF | 文件大小/偏移量,以字节为单位。 |
NODE | 文件结点。 |
NAME | 文件挂载点和文件所在的系统。 |
使用示例
列出指定进程打开的文件
sudo lsof -p 1请将上述命令中的
1进程PID替换为您指定的进程PID。查看指定用户相关进程打开的文件
sudo lsof -u <user-name>请将上述命令中的
<user-name>替换为您指定的Linux系统用户名。查看打开指定文件的相关进程信息
sudo lsof <file-name>请将上述命令中的
<file-name>替换为您指定的文件名。输出 TYPE 为 IPv4 的所有项
sudo lsof -i 4
netstat
命令介绍
netstat命令用于显示TCP、UDP的端口和进程等相关情况。
常用参数说明
参数 | 说明 |
-t | 仅显示TCP相关选项。 |
-u | 仅显示UDP相关选项。 |
-i | 显示网卡列表。 |
-n | 拒绝显示别名,能显示数字的全部转化为数字。 |
-l | 仅列出在Listen(监听)的服务状态。 |
-p | 显示建立相关链接的程序名。 |
-s | 显示网络统计信息。 |
使用示例
查看8000端口的占用情况。
netstat -tunlp | grep 8000请将上述命令中的
8000端口替换为您指定的进程PID。查看所有TCP端口使用情况。
netstat -ntlp
vmstat
命令介绍
vmstat(Virtual Memory Statistics)是用于报告虚拟内存统计信息的命令,可以使用该命令,从系统维度查看操作系统的虚拟内存、进程、CPU等指标信息。
常用参数说明
vmstat命令的使用格式如下。
vmstat [-n] [delay [count]] 参数选项 | 说明 |
-n | 只在开始时显示一次各字段名称。 |
[delay] | 刷新时间间隔。如果不指定,只显示一条结果。 |
[count] | 刷新次数。如果不指定刷新次数,但指定了刷新时间间隔,刷新操作不会自动停止,您需要按 |
使用示例
执行如下命令,使用vmstat每1秒统计一次各进程的CPU使用情况,连续统计4次。
vmstat -n 1 4返回示例类似如下。
procs -----------memory---------- ---swap-- -----io---- -system-- ------cpu-----
 r  b   swpd   free   buff  cache   si   so    bi    bo   in   cs us sy id wa st
 1  0      0 2684984 310452 2364304    0    0     5    17   19   35  4  2 94  0  0
 0  0      0 2687504 310452 2362268    0    0     0   252 1942 4326  5  2 93  0  0
 0  0      0 2687356 310460 2362252    0    0     0    68 1891 4449  3  2 95  0  0
 0  0      0 2687252 310460 2362256    0    0     0     0 1906 4616  4  1 95  0  0
回显结果主要字段说明如下。
r:表示系统中CPU等待处理的线程。一个CPU每次只能处理一个线程,所以该数值越大,通常表示系统运行越慢。
us:用户模式消耗的CPU时间百分比。该值较高时,说明用户进程消耗的CPU时间比较多。如果该值长期超过50%,则需要对程序算法或代码等进行优化。
sy:内核模式消耗的CPU时间百分比。
wa:I/O等待消耗的CPU时间百分比。该值较高时,说明IO等待比较严重,这可能是磁盘大量作随机访问造成的,也可能是磁盘性能出现了瓶颈。
id:处于空闲状态的CPU时间百分比。如果该值持续为0,同时sy是us的两倍,则通常说明系统面临CPU资源短缺。
获取用户登录信息
Linux系统中用户登录记录相关文件说明如下。
用户登录信息通常记录在
/var/run/utmp、/var/log/wtmp、/var/log/btmp、/var/log/lastlog等文件中。who、w和users等命令通过/var/run/utmp文件查询当前登录用户的信息。last命令通过/var/log/wtmp文件查询当前与过去登录系统的用户的信息。lastb命令通过/var/log/btmp文件查询所有登录系统失败的用户的信息。lastlog命令通过/var/log/lastlog文件查询用户最后一次登录的信息。
who
who命令用于查看当前登录系统的用户信息,返回结果类似如下。

w
w命令显示当前登录的用户名并显示该用户当前执行的任务,返回结果类似如下。

users
users命令用于显示当前登录的用户名,返回结果类似如下。

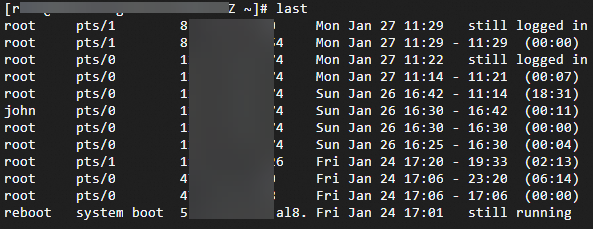
last
last命令用于查看截止当前登录过系统的所有用户信息,返回结果类似如下。
lastb
lastb命令显示所有登录系统失败的用户的信息,返回结果类似如下。

lastlog
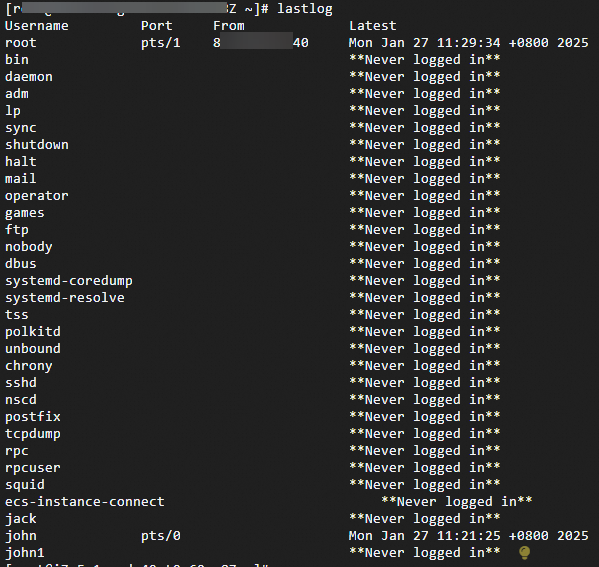
lastlog命令用于查看用户最后一次登录系统的信息,返回结果类似如下。
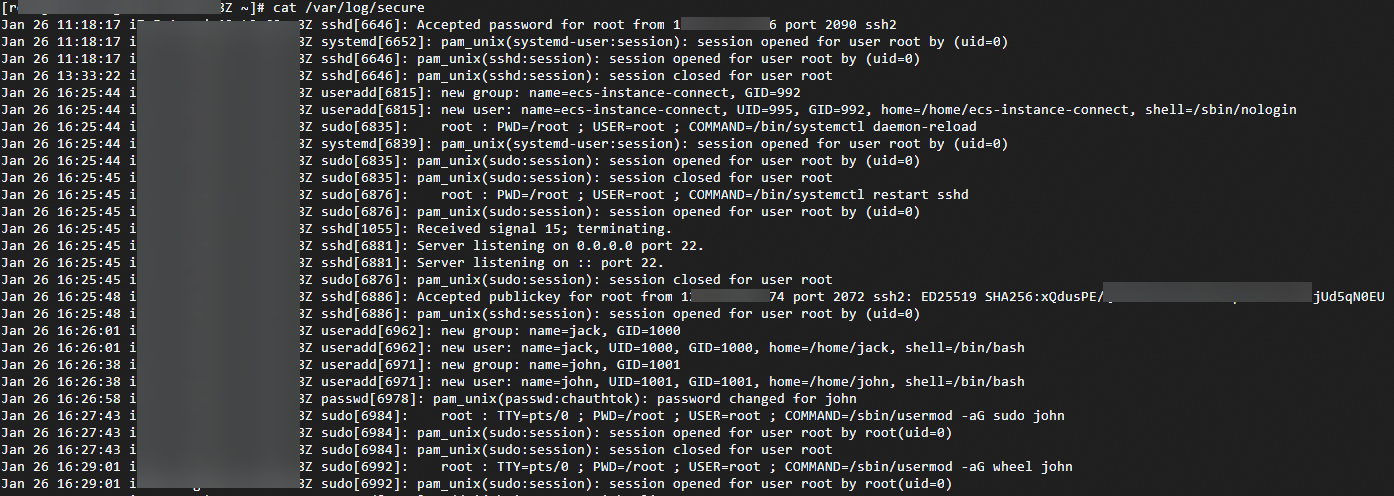
cat /var/log/secure
cat /var/log/secure命令用于查询所有用户登录系统的记录,返回结果类似如下。
管理用户
在Linux系统中,您可以通过useradd、wheel、passwd和userdel等命令有效地管理系统用户及其权限。
useradd
命令介绍
useradd 命令主要用于添加新用户。该命令和adduser功能基本相同。创建完成后,您可以通过cat /etc/passwd | grep username查看用户信息。
在创建用户时,需要root权限或相应的sudo权限。
使用
useradd创建用户后,建议立即设置用户密码。确保在创建用户时,主组和附加组是存在的,否则会导致添加用户失败。
常用参数说明
参数 | 说明 |
-d | 指定用户的主目录。如果不指定,系统会使用默认的 |
-m | 创建用户的主目录。如果指定了 |
-s | 指定用户的登录 Shell,默认是 |
-g | 指定用户的主组。如果组不存在,则需要先创建。 |
-G | 指定用户加入的附加组。多个附加组直接用英文逗号隔开。 |
-p | 为用户设置密码。注意,该密码需要经过加密,不应直接在命令行中使用明文密码。示例如下: |
-u | 指定用户的用户ID。 |
-e | 设置账户的有效期,格式为 YYYY-MM-DD。 |
使用示例
创建一个新用户
jack,并为其指定主目录和登录 Shell目录:useradd -m -d /home/jack -s /bin/bash jack创建完成后,您可以通过
cat /etc/passwd | grep jack查看到如下信息:jack:x:1000:1000::/home/jack:/bin/bash用户创建后,可以使用
passwd命令为用户设置密码:passwd jack创建一个新用户
alice,并将其添加到developers组:useradd -m -G developers alice创建一个新用户
bob,并设置用户ID为 1001:useradd -m -u 1001 bob添加拥有root权限的用户。步骤如下:
重要建议遵循安全最佳实践,仅在必要的情况下授予用户root权限。
使用
useradd命令创建一个新用户john。useradd john为新创建的用户设置密码。
passwd john为了让新用户拥有 root 权限,可以将用户添加到
wheel组中。wheel组通常用于授予用户 sudo 权限。执行grep '^wheel:' /etc/group查询wheel组成员。sudo usermod -aG wheel john测试新用户的sudo权限。切换到新用户,并尝试使用
sudo命令:su - john sudo ls /root如果一切正常,会被要求输入密码,输入正确的密码后,系统将列出
/root目录的内容,表明新用户拥有 sudo 权限,也可以使用john进行远程登录。(可选)修改sudoers文件。在文件中,为用户添加特定的权限。
sudo visudo
userdel
命令介绍
userdel 命令主要用于删除用户账户。
常用参数说明
参数 | 说明 |
-r | 同时删除用户的主目录和该目录下的文件。 |
-f | 强制删除用户,即使用户当前正在登录。 |
使用示例
删除用户
john:切换到root用户,执行
cat /etc/passwd | grep john查看用户目录,返回如下信息,john:x:1001:1001::/home/john:/bin/bash删除名为
john的用户,但其用户目录和文件仍然会保留。userdel john删除用户
john及其用户目录和所有与该用户相关的文件,userdel -r username强制删除用户,即使该用户当前正在使用系统。
userdel -f username
wheel
命令介绍
wheel 是一个用户组,主要功能是控制谁可以使用 su 命令切换到超级用户账户(通常是root用户)。
wheel组默认已经存在。如果不存在,可以使用sudo groupadd wheel命令创建。默认的情况下,普通用户通过su命令且输入了正确的root密码,就可以切换到root用户,对系统进行管理和配置。
为了加强系统的完全性,可以使用Linux特殊的wheel用户组来限制普通用户切换到root管理员用户,只有加入到wheel组,才可以使用su切换到root管理员用户。
使用示例
检查用户是否在 wheel 组中。
groups username将用户添加到 wheel 组中。
sudo usermod -aG wheel username使用
visudo命令安全编辑/etc/sudoers文件,%wheel ALL=(ALL) ALL表示wheel组的成员可以使用sudo执行所有命令。如果想要允许
wheel组的用户无密码使用sudo,可以修改为:%wheel ALL=(ALL) NOPASSWD: ALL
