本文介绍如何在Java运行环境(Maven或Serverless Devs工具)编译程序,并打包为ZIP包或JAR包。编译打包完成后,您可以在函数计算控制台或使用Serverless Devs工具上传代码包。
Java运行时依赖库
要创建部署代码包,请将函数代码和依赖库共同编译并打包为ZIP包或JAR包。
函数计算平台为Java运行时提供以下依赖库:
com.aliyun:fc-java-core:定义了请求处理程序中使用的handler接口和context对象等信息。
com.aliyun:fc-java-events:提供了常用的事件源的event类型。
以上依赖库可通过Maven中央存储库获取。获取以上依赖库后将其添加到您的pom.xml文件中,如下所示:
<!-- https://mvnrepository.com/artifact/com.aliyun.fc.runtime/fc-java-core -->
<dependency>
    <groupId>com.aliyun.fc.runtime</groupId>
    <artifactId>fc-java-core</artifactId>
    <version>1.4.1</version>
</dependency>

<!-- https://mvnrepository.com/artifact/com.aliyun.fc.runtime/fc-java-event -->
<dependency>
    <groupId>com.aliyun.fc.runtime</groupId>
    <artifactId>fc-java-event</artifactId>
    <version>1.2.0</version>
</dependency>如果依赖包太大,可将依赖打包到层中,以减少代码包体积。具体操作,请参见创建自定义层。
使用Maven编译并部署
前提条件
安装Java和Maven。关于Java的详细信息,请参见官网。关于Maven的详细信息,请参见Installing Apache Maven。
操作步骤
创建一个Java项目,其中App.java文件路径如下。
src/main/java/example/App.java在App.java文件中输入示例代码。具体示例代码,请参见事件请求处理程序(Event Handler)、HTTP请求处理程序(HTTP Handler)或上下文。
package example; import com.aliyun.fc.runtime.Context; import com.aliyun.fc.runtime.StreamRequestHandler; import java.io.IOException; import java.io.InputStream; import java.io.OutputStream; public class App implements StreamRequestHandler { @Override public void handleRequest(InputStream inputStream, OutputStream outputStream, Context context) throws IOException { outputStream.write(new String("hello world").getBytes()); } }在pom.xml文件中配置
build,示例如下。<build> <plugins> <plugin> <groupId>org.apache.maven.plugins</groupId> <artifactId>maven-shade-plugin</artifactId> <version>3.2.1</version> <executions> <execution> <phase>package</phase> <goals> <goal>shade</goal> </goals> <configuration> <filters> <filter> <artifact>*:*</artifact> <excludes> <exclude>META-INF/*.SF</exclude> <exclude>META-INF/*.DSA</exclude> <exclude>META-INF/*.RSA</exclude> </excludes> </filter> </filters> </configuration> </execution> </executions> </plugin> </plugins> </build>说明您可以使用Apache Maven Shade插件或Apache Maven Assembly插件,以上示例仅以Apache Maven Shade插件为例。
打开命令行窗口,切换至项目的根目录,然后执行
mvn clean package命令打包。示例代码如下。
[INFO] Scanning for projects...
 ...  ....   ....
[INFO] --------------------------< example:example >---------------------------
[INFO] Building java-example 1.0-SNAPSHOT
[INFO] --------------------------------[ jar ]---------------------------------
 ...  ....   ....
[INFO] ------------------------------------------------------------------------
[INFO] BUILD SUCCESS
[INFO] ------------------------------------------------------------------------
[INFO] Total time:  11.681 s
[INFO] Finished at: 2020-03-26T15:55:05+08:00
[INFO] ------------------------------------------------------------------------
如果显示编译失败,请根据输出的编译错误信息调整代码。
如果编译成功,编译后的JAR包位于项目文件夹内的target目录内,并根据pom.xml内的artifactId、version字段命名为HelloFCJava-1.0-SNAPSHOT.jar。
重要 针对macOS和Linux操作系统,压缩前请确保代码文件具有可读和可执行权限。
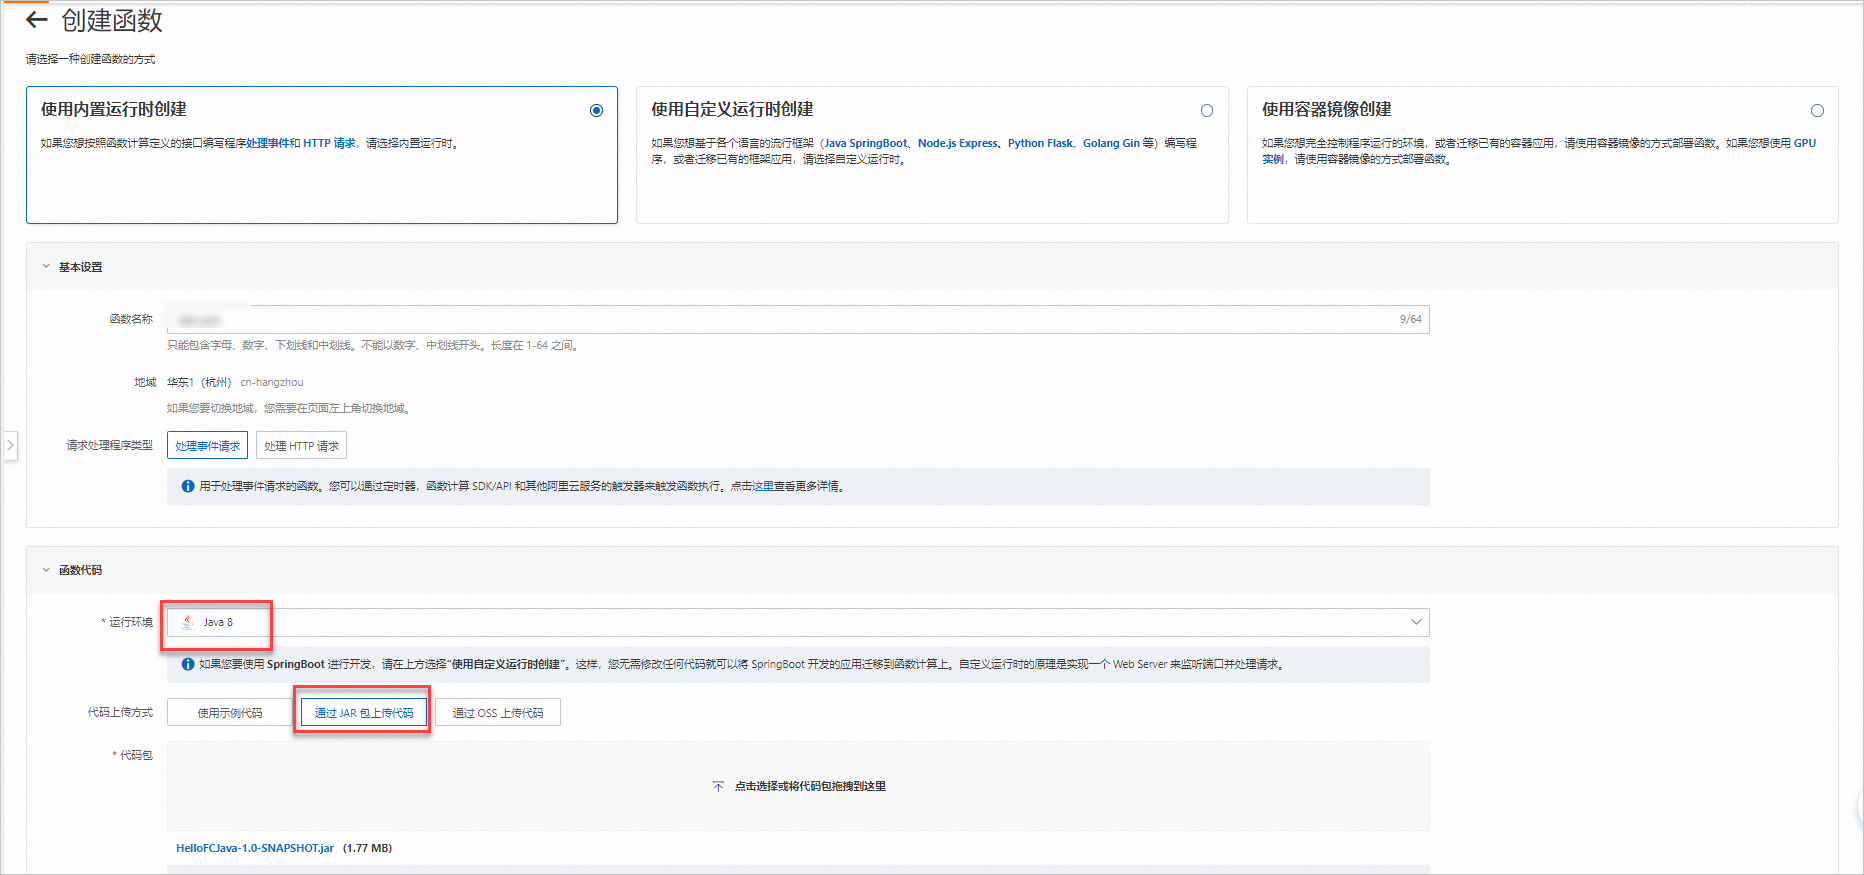
登录函数计算控制台,上传代码包。

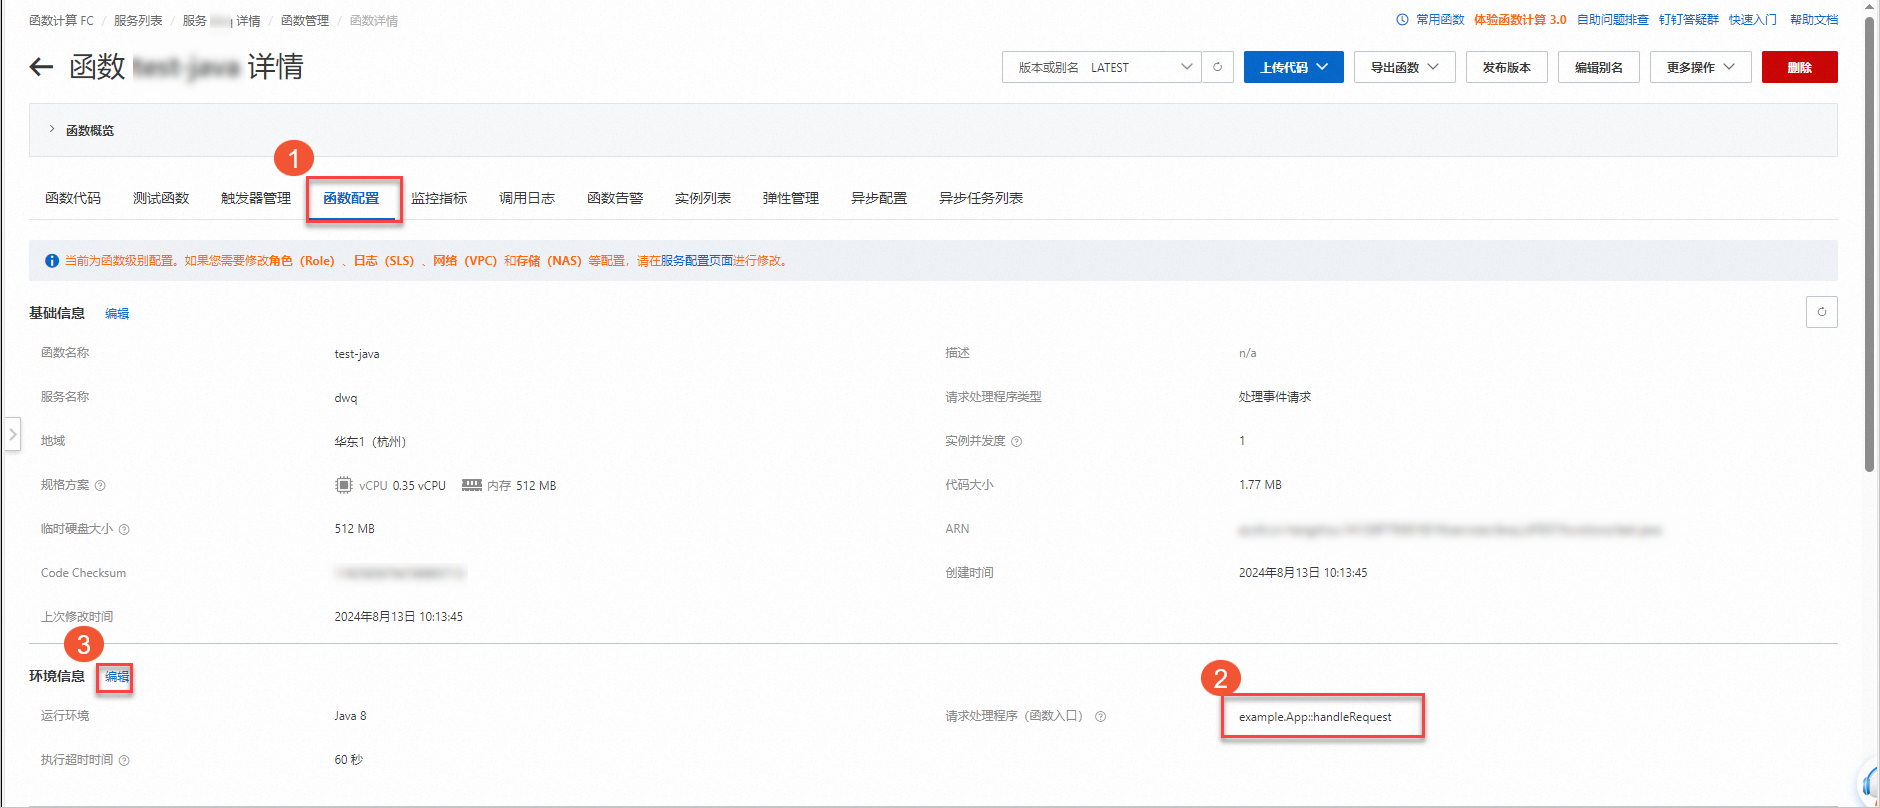
在函数配置页签,确认请求处理程序(函数入口)正确性,您的请求处理程序需配置为
[包名].[类名]::[方法名]。例如,您的包名为example,类名为App,方法名为handleRequest,则请求处理程序可配置为example.App::handleRequest,如果不正确点击编辑进行修改。
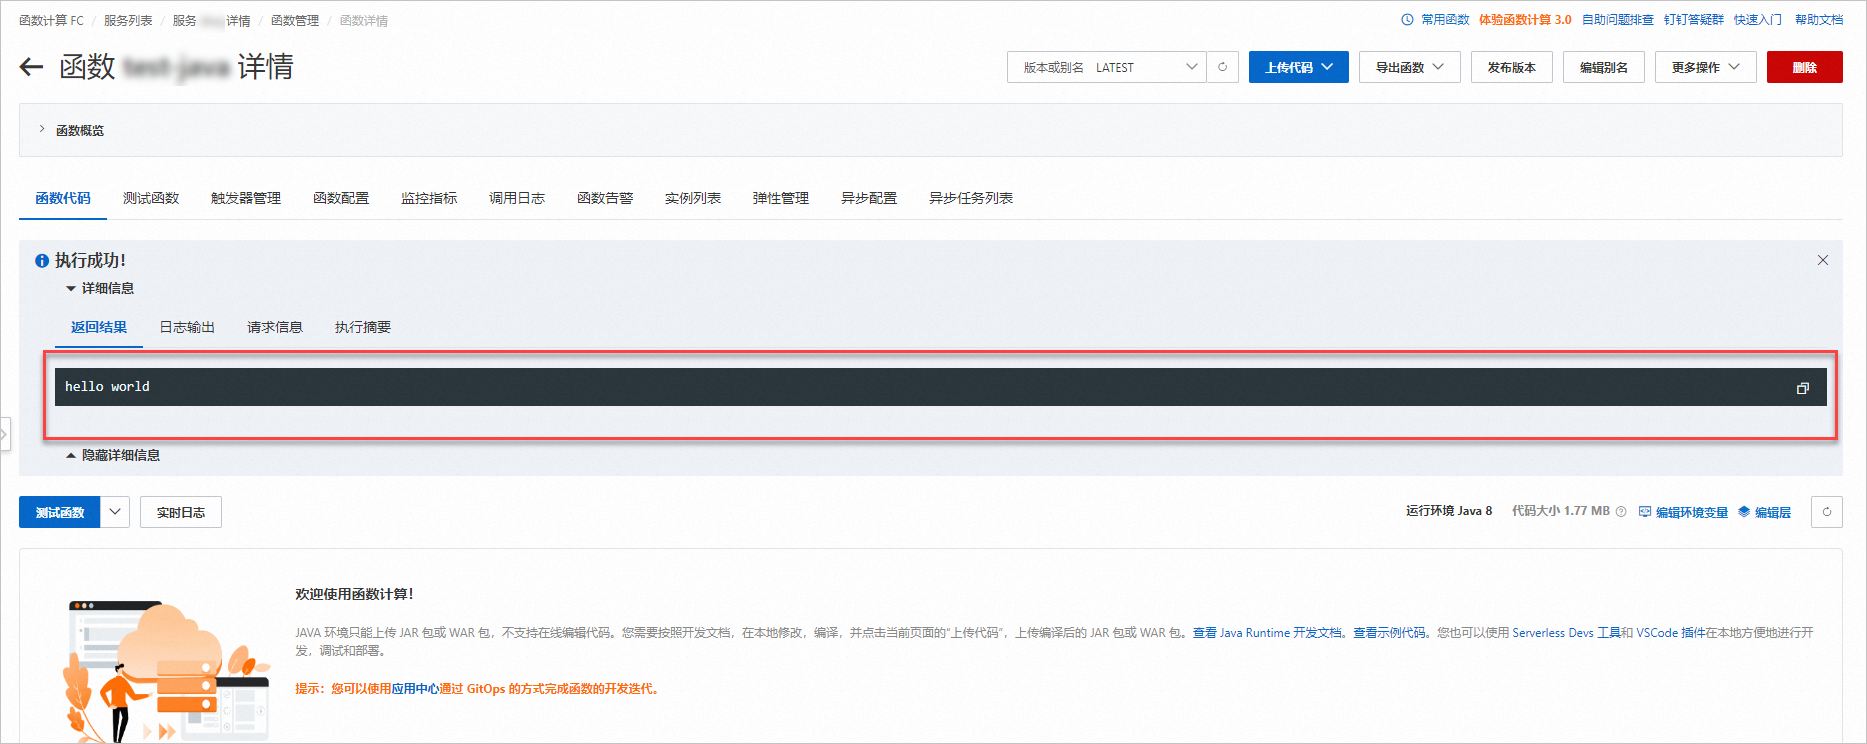
在函数代码页签,单击测试函数进行测试。

使用Serverless Devs编译并部署
前提条件
操作步骤
执行以下命令,初始化项目。
s init devsapp/start-fc-event-java8 -d start-fc-event-java8s init devsapp/start-fc-event-java8:表示基于事件请求处理程序模板来初始化项目。-d start-fc-event-java8:表示将项目文件输出到指定目录。
执行完命令后,按照提示选择地域、服务名、函数名和密钥配置。
说明您也可以执行
s init按照提示选择模板。执行以下命令,进入项目目录。
cd start-fc-event-java8执行以下命令,部署项目。
s deploy执行该命令会先执行
pre-deploy,pre-deploy会执行mvn package编译打包,然后上传部署代码包。输出示例如下:[2022-04-07 12:00:09] [INFO] [S-CORE] - Start the pre-action [2022-04-07 12:00:09] [INFO] [S-CORE] - Action: mvn package [INFO] Scanning for projects... [INFO] [INFO] ------------------------< example:HelloFCJava >------------------------- [INFO] Building HelloFCJava 1.0-SNAPSHOT [INFO] --------------------------------[ jar ]--------------------------------- ...... [INFO] ------------------------------------------------------------------------ [INFO] BUILD SUCCESS [INFO] ------------------------------------------------------------------------ [INFO] Total time: 3.617 s [INFO] Finished at: 2022-04-07T20:00:14+08:00 [INFO] ------------------------------------------------------------------------ [2022-04-07 12:00:14] [INFO] [S-CORE] - End the pre-action ✔ Checking Service, Function (0.64s) ✔ Creating Service, Function (0.71s) Tips for next step ====================== * Display information of the deployed resource: s info * Display metrics: s metrics * Display logs: s logs * Invoke remote function: s invoke * Remove Service: s remove service * Remove Function: s remove function * Remove Trigger: s remove trigger * Remove CustomDomain: s remove domain helloworld: region: cn-hangzhou service: name: hello-world-service function: name: start-fc-event-java8 runtime: java8 handler: example.App::handleRequest memorySize: 128 timeout: 60执行
s invoke命令进行测试。输出示例如下:
➜  start-fc-event-java8 s invoke
========= FC invoke Logs begin =========
FC Initialize Start RequestId: b246c3bf-06bc-49e5-92b8-xxxxxxxx
FC Initialize End RequestId: b246c3bf-06bc-49e5-92b8-xxxxxxxx
FC Invoke Start RequestId: b246c3bf-06bc-49e5-92b8-xxxxxxxx
FC Invoke End RequestId: b246c3bf-06bc-49e5-92b8-xxxxxxxx

Duration: 7.27 ms, Billed Duration: 8 ms, Memory Size: 128 MB, Max Memory Used: 65.75 MB
========= FC invoke Logs end =========

FC Invoke Result:
hello world


End of method: invoke
