
本文以 Java SpringBoot 为例,向您介绍自研应用与 IDaaS 的对接。
前言
阅读本篇前,请确认您已了解:自研应用接入 SSO。
IDaaS 自研应用采用 OIDC 授权码模式,该模式向下兼容 OAuth 2.0 协议授权码模式,所以可以采用 OAuth 工具包spring-boot-starter-oauth2-client完成对接开发。
该工具包封装了所有的 OIDC 授权码模式调用流程和 id_token 解析过程,使用起来非常简单。
操作步骤
引入工具包
在pom.xml中增加依赖:spring-boot-starter-oauth2-client,示例如下:
<parent>
    <groupId>org.springframework.boot</groupId>
    <artifactId>spring-boot-starter-parent</artifactId>
    <version>2.4.1</version>
</parent>
<properties>
    <java.version>8</java.version>
</properties>
<dependencies>
    <dependency>
        <groupId>org.springframework.boot</groupId>
        <artifactId>spring-boot-starter-web</artifactId>
    </dependency>
    <dependency>
        <groupId>org.springframework.boot</groupId>
        <artifactId>spring-boot-starter-oauth2-client</artifactId>
    </dependency>
</dependencies>
配置 IDaaS 信息
在application.properties文件中配置client_id,client_secret及issuer-uri。
spring.security.oauth2.client.registration.aliyunidaas.client-id=app_***
spring.security.oauth2.client.registration.aliyunidaas.client-secret=CS***
spring.security.oauth2.client.provider.aliyunidaas.issuer-uri=<issuer>上述信息,均可在应用创建后获取,请参考自研应用接入 SSO。
配置 Security 需要 OAuth 认证
import org.springframework.security.config.annotation.web.builders.HttpSecurity;
import org.springframework.security.config.annotation.web.configuration.EnableWebSecurity;
import org.springframework.security.config.annotation.web.configuration.WebSecurityConfigurerAdapter;
@EnableWebSecurity
public class SecurityConfig extends WebSecurityConfigurerAdapter {
    @Override
    protected void configure(HttpSecurity http) throws Exception {
        http.authorizeRequests()
            .anyRequest().authenticated()
            .and()
            .oauth2Login();
    }
}
获取 User 信息
工具包会自动完成所有的授权调用,以及 id_token 验证。通过注入@AuthenticationPrincipal OAuth2User user即可获得最终的用户信息:
import org.springframework.security.core.annotation.AuthenticationPrincipal;
import org.springframework.security.oauth2.core.user.OAuth2User;
import org.springframework.web.bind.annotation.GetMapping;
import org.springframework.web.bind.annotation.RestController;
@RestController
public class SampleController {
    @GetMapping("/user")
    public OAuth2User user(@AuthenticationPrincipal OAuth2User user) {
        return user;
    }
}
最后可尝试在 /user 端点输出用户信息:
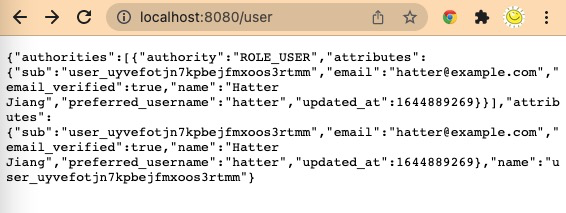
使用这些用户信息,直接将用户登录,即可完成 SSO 过程。
包含代理服务时的配置
如果将应用部署在代理后面,如阿里云SLB、Nginx等,过程中可能发生如下情况:
-
用户访问 https://www.example.com
-
OIDC登录跳转时产生的
redirect_uri变成了 http://127.0.0.1:8080/oauth2/authorization/aliyunidaas,会导致无法登录。
想要解决这个问题,您必须修改 SpringBoot 生成 redirect_uri 的配置,具体方法是:
-
在 SpringBoot 配置文件中增加配置项:
server.forward-headers-strategy = NATIVE -
如果您使用了阿里云SLB,则需要在SLB的高级配置中,勾选通过 X-Forwarded-Proto 头字段获取 SLB 的监听协议。
-
如果您在SLB与应用之间有Nginx代理,则需要在代理上配置:
proxy_set_header Host $host; proxy_set_header X-Forwarded-Proto $proxy_x_forwarded_proto; -
如果用户直接通过Nginx以HTTPS方式提供服务,则需要配置:
proxy_set_header Host $host;
proxy_set_header X-Forwarded-Proto https;
如果您使用了其他代理类服务或软件,需要自行查找配置,最终需要确保SpringBoot收到的请求中传入了正确的 Host 及 X-forwarded-Proto 这两个HTTP Header。
相关参考资料
https://datatracker.ietf.org/doc/html/rfc7239
https://docs.nginx.com/nginx/admin-guide/web-server/reverse-proxy/