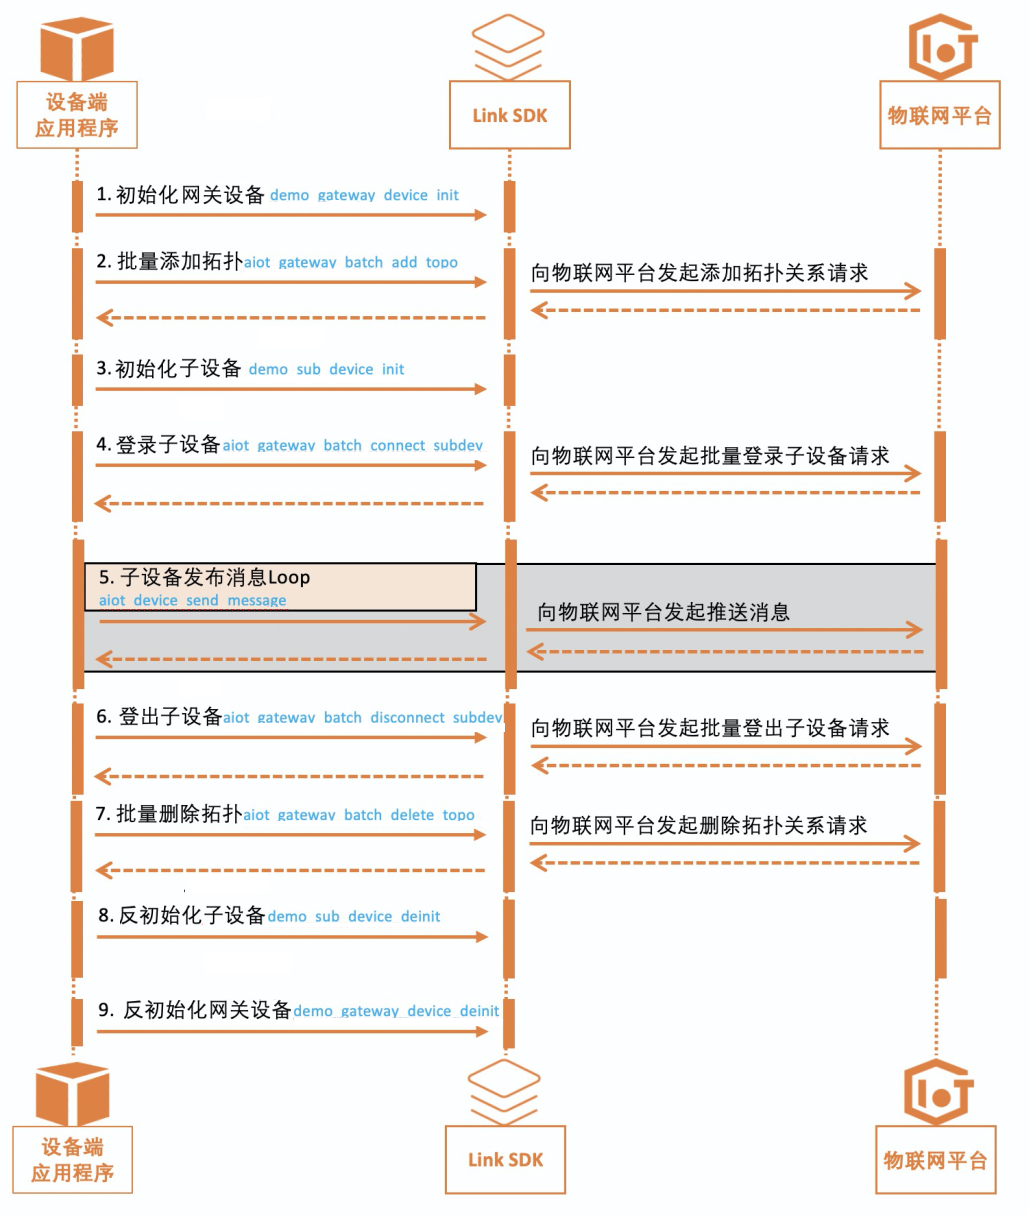
本文介绍子设备通过网关与物联网平台建立连接,以及消息收发的过程。
前提条件
使用流程
如下功能时序图,以设备的应用程序demos/gateway_sync_demo.c和demos/gateway_async_demo.c为例,介绍网关模块的基础功能。

步骤1:初始化网关设备
添加头文件。
#include "aiot_gateway_api.h"

    /* 配置SDK的底层依赖 */
    aiot_sysdep_init(aiot_sysdep_get_portfile());
实现网关设备初始化函数。
该函数包含创建设备句柄、连接参数配置、网关设备建连。
static void* demo_gateway_device_init(char *product_key, char *device_name, char *device_secret, char *host, uint16_t port)
{
    int32_t res = STATE_SUCCESS;
    /* 创建设备 */
    void *device = aiot_device_create(product_key, device_name);
    if (device == NULL) {
        printf("device create failed\n");
        return NULL;
    }
    /* 设置设备密钥 */
    aiot_device_set_device_secret(device, device_secret);

    /* 连接配置参数初始化 */
    aiot_linkconfig_t* config = aiot_linkconfig_init(protocol);
    /* 设置服务器的host、port */
    aiot_linkconfig_host(config, host, port);

    /* 设置设备连接参数 */
    aiot_device_set_linkconfig(device, config);

    /* 设备建连 */
    res = aiot_device_connect(device);
    if (res < STATE_SUCCESS) {
        /* 尝试建立连接失败, 销毁MQTT实例, 回收资源 */
        aiot_linkconfig_deinit(&config);
        aiot_device_delete(&device);
        printf("aiot_device_connect failed: -0x%04X\n\r\n", -res);
        return NULL;
    }

    /* 建连成功返回设备对象 */
    aiot_linkconfig_deinit(&config);
    return device;
}
实现网关模块回调函数。
/* 网关模块的消息回调 */
void demo_gateway_msg_callback(void *device, const aiot_gateway_msg_t *msg, void *userdata)
{
    switch(msg->type){
        case AIOT_GWRECV_CONNECT_REPLY:{
            /* 子设备批量建连返回 */
        }
        break;
        case AIOT_GWRECV_DISCONNECT_REPLY:{
            /* 子设备批量断连结果返回 */
        }
        break;
        case AIOT_GWRECV_ADD_TOPO_REPLY:{
            /* 子设备添加topo关系结果返回 */
        }
        break;
        case AIOT_GWRECV_DELETE_TOPO_REPLY:{
            /* 子设备删除topo关系结果返回 */
        }
        break;
        case AIOT_GWRECV_TOPO_CHANGE_NOTICE:{
            printf("type[%d] subdev_num %d status %d\r\n", msg->type, msg->subdev_num, msg->data.topo_change.status);
        }
        break;
    }
}
网关设备正常建连后,会设置网关模块的回调函数。
 /* 网关设备完成初始化,启动建连,如果失败返回NULL */
    void *gateway_device = demo_gateway_device_init(gateway_product_key, gateway_device_name, gateway_device_secret, host, port);
    if(gateway_device == NULL) {
        return -1;
    }
    /* 设置网关消息回调 */
    aiot_gateway_set_msg_callback(gateway_device, demo_gateway_msg_callback, NULL);
步骤2:批量添加拓扑关系
使用同步接口
aiot_gateway_batch_add_topo添加拓扑关系,返回值为STATE_SUCCESS表示添加成功。/* 子设备添加topo */ res = aiot_gateway_batch_add_topo(gateway_device, sub_device_meta, subdev_num); if(res >= STATE_SUCCESS) { printf("aiot_gateway_batch_add_topo success %d\r\n", res); } else { printf("aiot_gateway_batch_add_topo error %d\r\n", res); demo_gateway_device_deinit(gateway_device); return -1; }使用异步接口
aiot_gateway_batch_add_topo_async添加拓扑关系,需在网关模块的回调函数中监听类型为AIOT_GWRECV_ADD_TOPO_REPLY的消息,msg->data.reply.code为200表示添加成功。/* 子设备添加topo,异步调用 */ res = aiot_gateway_batch_add_topo_async(gateway_device, sub_device_meta, subdev_num); if(res >= STATE_SUCCESS && 0 == demo_wait_expect_resp(&resp.add_topo_resp, 200, timeout_ms)) { printf("aiot_gateway_batch_add_topo_async success %d\r\n", res); } else { printf("aiot_gateway_batch_add_topo_async error %d\r\n", res); demo_gateway_device_deinit(gateway_device); return -1; }
步骤3:初始化子设备
初始化子设备包含创建设备句柄、设置设备密钥、设置子设备回调函数,可以通过回调参数userdata区分具体设备。
void *demo_sub_device_init(aiot_subdev_meta_info_t *device)
{
    /* 创建设备 */
    void *sub_device = aiot_device_create(device->product_key, device->device_name);
    if (sub_device == NULL) {
        printf("subdev_device failed\n");
        return NULL;
    }
    /* 设置设备密钥 */
    aiot_device_set_device_secret(sub_device, device->device_secret);
    /* 设置设备消息回调及状态变化回调
     * demo中子设备与网关设备使用的相同回调函数,最后的参数userdata可设置不同参数以做区分
     * */
    aiot_device_set_event_callback(sub_device, demo_msg_callback, demo_status_callback, demo_result_callback, NULL);
    return sub_device;
}步骤4:子设备接入物联网平台
使用同步接口
aiot_gateway_batch_connect_subdev接入物联网平台,返回值为STATE_SUCCESS表示接入成功。/* 子设备建连,同步接口 */ res = aiot_gateway_batch_connect_subdev(gateway_device, subdev_table, subdev_num); if(res >= STATE_SUCCESS) { printf("aiot_gateway_batch_connect_subdev success %d\r\n", res); } else { printf("aiot_gateway_batch_connect_subdev error %d\r\n", res); demo_gateway_device_deinit(gateway_device); demo_sub_device_deinit(subdev_table, subdev_num); return -1; }使用异步接口
aiot_gateway_batch_connect_subdev_async接入物联网平台,需在网关模块的回调函数中监听类型为AIOT_GWRECV_CONNECT_REPLY的消息,msg->data.reply.code为200表示接入成功。/* 子设备建连,异步接口 */ res = aiot_gateway_batch_connect_subdev_async(gateway_device, subdev_table, subdev_num); if(res >= STATE_SUCCESS && 0 == demo_wait_expect_resp(&resp.connect_resp, 200, timeout_ms)) { printf("aiot_gateway_batch_connect_subdev_async success %d\r\n", res); } else { printf("aiot_gateway_batch_connect_subdev_async error %d\r\n", res); demo_gateway_device_deinit(gateway_device); demo_sub_device_deinit(subdev_table, subdev_num); return -1; }
步骤5:子设备发送物模型消息
 char *property_params = "{\"LightSwitch\": 0}";
    for(i = 0; i < sizeof(sub_device_meta) / sizeof(aiot_subdev_meta_info_t); i++) {
        /* 子设备发送物模型消息 */
        aiot_device_dm_property_post(subdev_table[i], property_params, 1);
    }
    /* 网关发送物模型消息 */
aiot_device_dm_property_post(gateway_device, property_params, 1);步骤6:子设备退出物联网平台
使用同步接口
aiot_gateway_batch_disconnect_subdev退出物联网平台,返回值为STATE_SUCCESS表示退出成功。/* 子设备断开连接 */ res = aiot_gateway_batch_disconnect_subdev(gateway_device, subdev_table, subdev_num); if(res >= STATE_SUCCESS) { printf("aiot_gateway_batch_disconnect_subdev success %d\r\n", res); } else { printf("aiot_gateway_batch_disconnect_subdev error %d\r\n", res); demo_gateway_device_deinit(gateway_device); demo_sub_device_deinit(subdev_table, subdev_num); return -1; }使用异步接口
aiot_gateway_batch_disconnect_subdev_async退出物联网平台,需在网关模块的回调函数中监听类型为AIOT_GWRECV_DISCONNECT_REPLY的消息,msg->data.reply.code为200表示退出成功。/* 子设备断开连接 */ res = aiot_gateway_batch_disconnect_subdev_async(gateway_device, subdev_table, subdev_num); if(res >= STATE_SUCCESS && 0 == demo_wait_expect_resp(&resp.disconnect_resp, 200, timeout_ms)) { printf("aiot_gateway_batch_disconnect_subdev_async success %d\r\n", res); } else { printf("aiot_gateway_batch_disconnect_subdev_async error %d\r\n", res); demo_gateway_device_deinit(gateway_device); demo_sub_device_deinit(subdev_table, subdev_num); return -1; }
步骤7:批量删除拓扑关系
使用同步接口
aiot_gateway_batch_delete_topo删除拓扑关系,返回值为STATE_SUCCESS表示删除成功。/* 子设备删除topo */ res = aiot_gateway_batch_delete_topo(gateway_device, sub_device_meta, subdev_num); if(res >= STATE_SUCCESS) { printf("aiot_gateway_batch_delete_topo success %d\r\n", res); } else { printf("aiot_gateway_batch_delete_topo error %d\r\n", res); demo_gateway_device_deinit(gateway_device); demo_sub_device_deinit(subdev_table, subdev_num); return -1; }使用异步接口
aiot_gateway_batch_delete_topo_async删除拓扑关系,需在网关模块的回调函数中监听类型为AIOT_GWRECV_DELETE_TOPO_REPLY的消息,msg->data.reply.code为200表示删除成功。/* 子设备删除topo */ res = aiot_gateway_batch_delete_topo_async(gateway_device, sub_device_meta, subdev_num); if(res >= STATE_SUCCESS && 0 == demo_wait_expect_resp(&resp.delete_topo_resp, 200, timeout_ms)) { printf("aiot_gateway_batch_delete_topo_async success %d\r\n", res); } else { printf("aiot_gateway_batch_delete_topo_async error %d\r\n", res); demo_gateway_device_deinit(gateway_device); demo_sub_device_deinit(subdev_table, subdev_num); return -1; }
步骤8:反初始化子设备
删除子设备前,将子设备和网关中断连接,否则会出现内存异常。
void demo_sub_device_deinit(void **subdev_table, int32_t num)
{
    int i = 0;
    for(i = 0; i < num; i++) {
        aiot_device_delete(&subdev_table[i]);
    }

    free(subdev_table);
}步骤9:反初始化网关设备
static void demo_gateway_device_deinit(void *device)
{
    int32_t res = STATE_SUCCESS;
    res = aiot_device_disconnect(device);
    if (res < STATE_SUCCESS) {
        printf("aiot_device_disconnect failed: -0x%04X\n", -res);
    }
    aiot_device_delete(&device);
}