
本文档阐明了为 RDS for Supabase 实例集成 GitHub OAuth 2.0 认证的核心目的、实现方式与预期效果。通过在 RDS Supabase 实例中配置 GitHub 作为身份提供商(IdP),应用可实现基于 GitHub 账号的无密码登录,以此简化用户注册流程并提升安全性。
业务场景说明
一个基于 RDS for Supabase 构建的开发者协作平台,面临着简化新用户注册流程以提升转化率的业务挑战。传统的邮箱密码注册方式不仅增加了用户的操作负担,还要求平台投入资源维护用户凭证的存储与安全,带来了额外的开发与合规成本。
通过集成 GitHub 作为第三方认证提供商,可达成以下业务价值:
提升用户转化率:开发者用户群体普遍拥有 GitHub 账号,一键登录极大降低了注册门槛,预计可将新用户注册转化率提升 30% 以上。
降低安全风险:应用不再存储用户密码,将凭证管理与验证的责任转移至 GitHub,利用其成熟的安全体系(如双因素认证)来保护用户账户,从而降低了凭证泄露风险。
简化开发与维护:免去自建账户体系的复杂性,开发团队可专注于核心业务功能的迭代,缩短产品上线周期。
前提条件
已创建一个可用的RDS Supabase项目,具体请参考开通RDS Supabase项目。
说明若第三方认证提供商位于海外(如 GitHub、Google),为了保证认证过程的稳定性和访问速度,推荐购买海外地域的 RDS Supabase 实例。
拥有GitHub账号。
方案架构
本方案采用标准的 OAuth 2.0 授权码流程(Authorization Code Flow)实现用户认证。整体架构涉及用户端应用、RDS for Supabase 后端以及 GitHub 认证服务器三者之间的交互。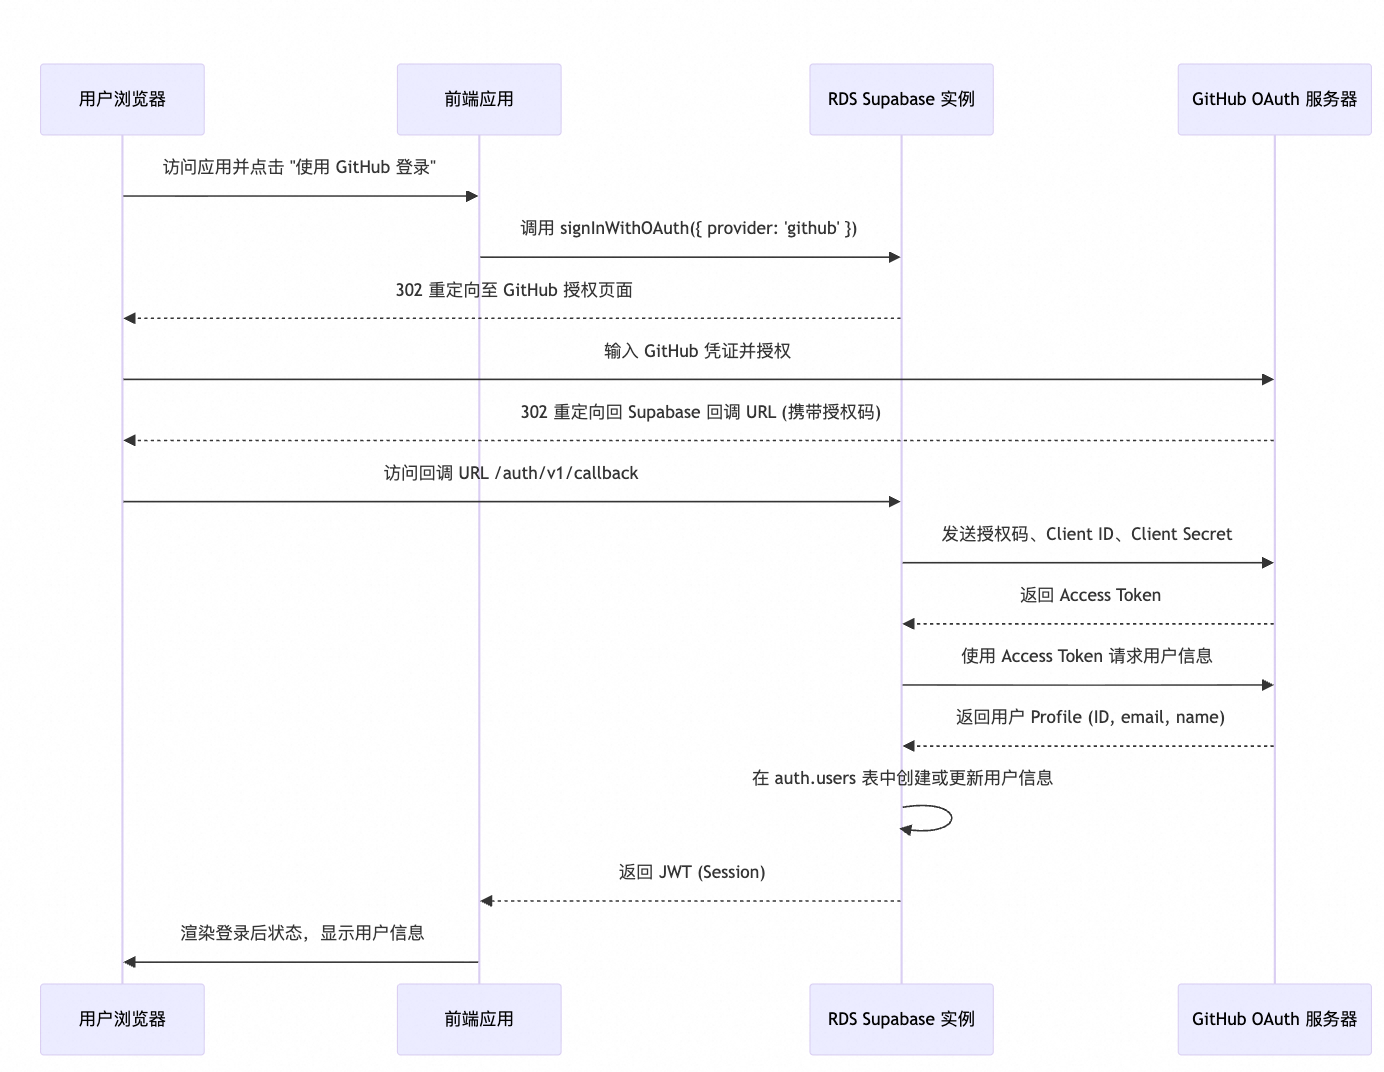
架构说明:
技术选型:选择 OAuth 2.0 是因为其作为开放标准,被广泛应用于第三方授权场景,具有高安全性与互操作性。RDS for Supabase 内置了对主流 OAuth 2.0 提供商的支持,简化了集成工作。
关键组件交互:
前端应用 (Client):触发登录流程,并在认证成功后从 RDS Supabase 接收 JWT(JSON Web Token)以维持会话。
RDS Supabase (Backend):作为 OAuth 2.0 的客户端,负责处理与 GitHub 的所有后端通信,包括交换授权码、获取 Access Token 及用户信息。它还将用户信息持久化到内置的
auth.users表中。GitHub (Authorization Server):负责验证用户身份,并向 RDS Supabase 安全地提供用户授权信息。
网络配置:RDS Supabase 实例必须启用公网访问权限,以便向 GitHub API 端点(
github.com)发起 HTTPS 请求。同时,为了安全,应配置白名单,仅允许前端应用服务器的 IP 地址访问 RDS Supabase 实例。
实施步骤
以下步骤将指导完成从 GitHub 应用创建到 RDS Supabase 配置验证的全过程。
1. 创建并配置 GitHub OAuth Application
此步骤的目标是在 GitHub 平台注册一个 OAuth Application,以获取 API 认证所需的 Client ID 和 Client Secret。
登录 GitHub 账户,导航至 Settings > Developer settings > OAuth Apps。
单击 New OAuth App。
在注册页面填写应用信息。关键配置如下:
Application name: 应用的自定义名称,例如
MySaaS Platform。Homepage URL: 应用的线上主页地址,例如
https://app.example.com。Authorization callback URL: 认证成功后 GitHub 重定向的目标地址。必须精确设置为 RDS Supabase 实例的外网访问地址并附加
/auth/v1/callback路径。该地址可在 RDS Supabase 实例详情页的网络信息中找到,格式如下:https://<Supabase外网地址>/auth/v1/callback说明 Supabase外网地址不应包含端口号。
成功注册后,页面将显示生成的
Client ID。单击 Generate a new client secret 创建密钥。重要
Client Secret仅在生成时完整显示一次。必须立即复制并妥善保管,用于后续配置。泄露此密钥将导致严重的安全风险。
2. 配置 RDS Supabase 实例认证参数
此步骤的目标是在 RDS Supabase 实例中启用 GitHub 认证,并填入上一步获取的凭证。
进入 RDS 控制台 > AI 应用开发,选择目标地域后,单击项目ID进入实例详情页。
在左侧导航栏中,单击 Auth配置。
在 身份验证提供商 列表中找到并单击 GitHub。
配置以下参数:
是否启用GITHUB登录:开启此开关。
GitHub OAuth App 的 Client ID:填入从 GitHub 获取的
Client ID。GitHub OAuth App的Client Secret:填入已保存的
Client Secret。授权回调地址:再次填入与 GitHub OAuth Application 配置中完全一致的
Authorization callback URL,用于校验。
单击 确认。配置生效后,实例将自动重启。
3. 配置网络访问与安全策略
此步骤的目标是确保网络链路的通畅与安全,允许 RDS Supabase 访问公网 GitHub API,并限制仅授权应用可访问 Supabase。
配置实例公网访问:在实例详情页的网络信息区域,确保 允许实例访问公网 开关处于开启状态。此配置允许 Supabase 实例向 GitHub 服务器发起出站 API 请求。
配置访问白名单:在实例详情页的白名单信息区域,单击 添加白名单分组,将前端应用服务器的公网出口 IP 地址或地址段加入白名单。此配置确保了只有受信任的来源才能访问 Supabase 实例的 API 端点。
4. 功能验证与数据确认
此步骤的目标是通过一个最小化的客户端应用验证完整的认证流程,并检查用户数据是否已成功同步至 RDS Supabase。
构建验证客户端 搭建一个简单的前端项目以测试认证流程。项目包含
index.html(页面结构)、main.js(认证逻辑)、supabase-config.js(连接配置)和package.json(依赖管理)。supabase-config.js 此文件用于存放 RDS Supabase 的连接凭证。
// Supabase 配置文件
// 将占位符替换为实际的 Supabase 项目信息
export const SUPABASE_CONFIG = {
    // RDS Supabase 项目 URL
    url: 'YOUR_SUPABASE_URL',

    // RDS Supabase 匿名密钥 (anon key)
    anonKey: 'YOUR_SUPABASE_ANON_KEY'
};
说明
YOUR_SUPABASE_URL和YOUR_SUPABASE_ANON_KEY可从 RDS Supabase 实例详情页的 API文档 中获取。main.js 此文件包含使用
supabase-jsSDK 发起登录请求的核心逻辑。import { createClient } from '@supabase/supabase-js'; import { SUPABASE_CONFIG } from './supabase-config.js'; const supabase = createClient(SUPABASE_CONFIG.url, SUPABASE_CONFIG.anonKey); // 绑定登录按钮的点击事件 document.getElementById('github-login').addEventListener('click', async () => { const { data, error } = await supabase.auth.signInWithOAuth({ provider: 'github', options: { redirectTo: window.location.origin // 认证后重定向回应用首页 } }); if (error) { console.error('GitHub sign-in error:', error.message); } }); // 监听认证状态变化以更新UI supabase.auth.onAuthStateChange((event, session) => { if (event === 'SIGNED_IN') { console.log('Signed in:', session.user); // 此处更新UI以显示用户信息 } else if (event === 'SIGNED_OUT') { console.log('Signed out'); // 此处更新UI以显示登录界面 } });完整的客户端示例代码请参考原始文档。
执行并验证流程
在项目根目录下,执行
npm install安装依赖,然后执行npm run dev启动本地开发服务器。在浏览器中访问提供的本地地址(如
http://localhost:5173)。单击使用 GitHub 登录。浏览器应正确跳转至 GitHub 授权页面。
授权成功后,页面将自动跳转回应用。检查浏览器开发者工具的控制台,确认已打印出 "Signed in" 和用户信息对象。
确认后台用户数据 认证成功后,登录 RDS Supabase Studio 进行数据确认。
在 RDS Supabase 实例详情页的网络信息区域,单击外网连接地址,使用项目密码登录 Supabase Studio。
在左侧导航栏,选择 Authentication > Users。
在用户列表中,应能看到一条新的用户记录,其 Provider 列显示为
github,并包含从 GitHub 同步的邮箱、用户名等元数据。
成本与风险说明
成本构成
RDS for Supabase 实例费用: 启用 GitHub 认证功能不产生额外费用。成本完全由所选的 RDS Supabase 实例规格(计算、存储)决定。
数据传输费用: OAuth 认证流程中,RDS Supabase 与 GitHub API 之间通过公网交互会产生少量数据传输费用,此费用通常可忽略不计。
关键风险
配置错误风险:
Authorization callback URL在 GitHub 与 RDS Supabase 两端的配置不一致是导致认证失败最常见的原因,通常会引发 "redirect_uri_mismatch" 错误。凭证泄露风险:
Client Secret属于高度敏感信息。若硬编码在前端代码或公开的代码仓库中,将导致严重安全漏洞,攻击者可利用其冒充应用。务必通过服务器端环境变量或密钥管理服务进行管理。服务依赖风险: 应用的登录功能将依赖于 GitHub OAuth 服务的可用性。若 GitHub 服务中断,通过此方式的登录和注册功能将不可用。建议在应用中提供备选登录方式(如邮箱)或明确的错误提示。
网络中断风险: 若 RDS Supabase 实例的公网访问被禁用,或 VPC/安全组规则意外阻止了对
github.com的出站访问,将导致 Supabase 无法完成与 GitHub 的令牌交换,认证流程中断。