
概述
RPA提供了两种方式使用Microsoft Office操作Excel
可视化开发模式
编码开发模式
相关SDK详见rpa.app.microsoft.excel
说明
如果需要操作的Excel文件较大(比如行数超过1万行),建议使用Pandas进行处理。客户端中已经内置了Python Pandas库,可在编码开发模式下直接使用。
示例1:将数据记录到Excel
本示例的操作流程:以开发一个自动化流程中描述的操作过程为例
可视化开发模式
内容详见 使用可视化方式开发
编码开发模式
控件捕捉,可参考可视化开发过程中的控件捕捉
自动化流程如下
from rpa.core import *
from rpa.utils import *
import rpa4 as rpa # 使用V4引擎

def start():
    # 打开页面
    page = rpa.app.chrome.create("https://www.baidu.com")
    # 在搜索框中输入搜索内容
    page.input_text("1_百度输入框","阿里云")
    # 点击搜索按钮
    page.click("2_百度一下按钮")
    # 通过对相似控件的控件数量统计,等待页面加载完成
    for i in range(10):
        ele_count = page.count("3_多个标题")
        if ele_count:
            break
        else:
            sleep(1)
            continue
    # 微软Office打开一个已有的excel文件
    xls = rpa.app.microsoft.excel.open(file = r'C:\test\test.xlsx',visible = True)
    # 获取默认打开后的sheet对象
    sheet = xls.get_sheet()
    # Excel中激活这个sheet页
    sheet.activate()

    # 循环向excel写入搜索结果
    for i in range(1, ele_count+1):
        row_value=[
            page.text(element="3_多个标题", index=i),
            "RPA机器人"
        ]
        sheet.write("{}".format(i) , row_value )
    # 保存并关闭excel
    xls.save()
    xls.close()
示例2:创建Excel数据透视表
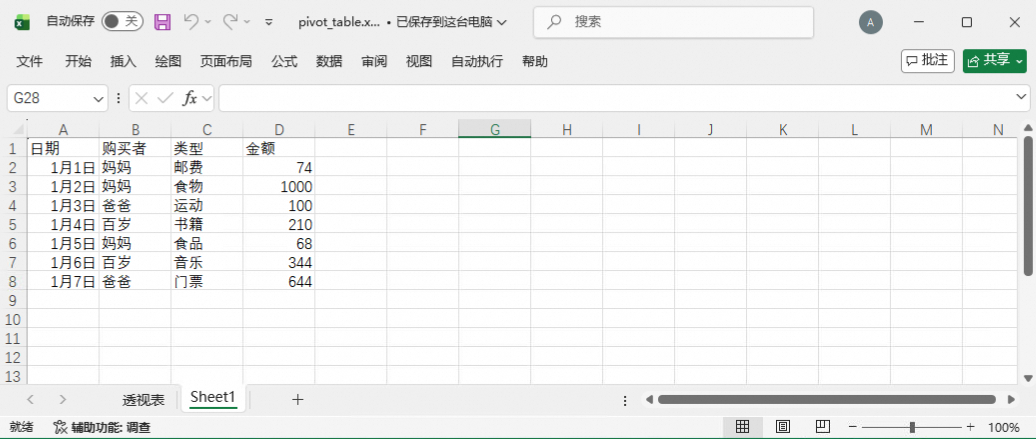
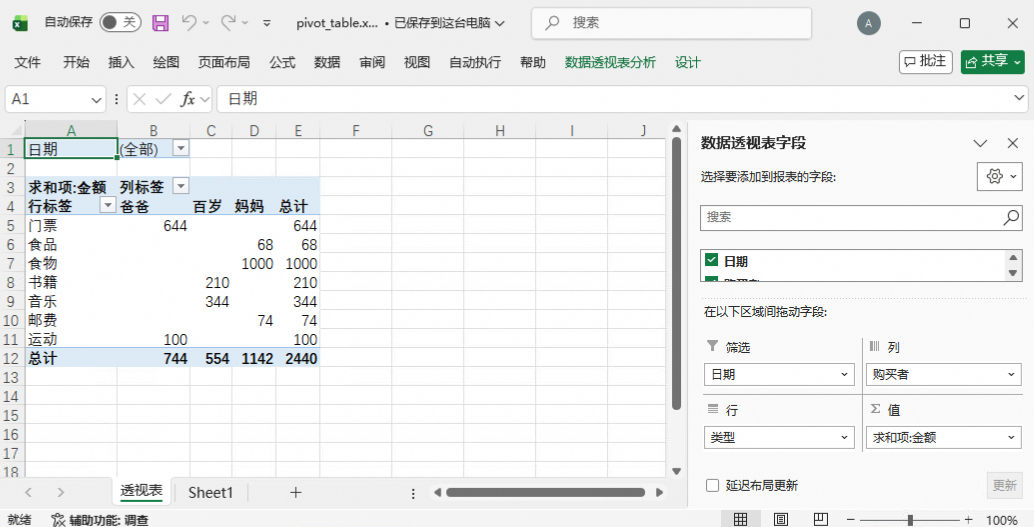
本实例操作的流程:根据Excel的表格数据,生成数据透视表,并进行一些数据透视图的操作
Excel中原始数据如下
创建数据透视表
编码开发模式下,自动化流程代码如下
from rpa.core import *
from rpa.utils import *
import rpa4 as rpa # 使用V4引擎

def start():
    xls = rpa.app.microsoft.excel.open(r'C:\1\pivot_table.xlsx',visible = True)
    sheet = xls.get_sheet('Sheet1')
    # 数据透视表设置
    pivot_settings = rpa.app.microsoft.excel.PivotTableSettings('MyPivotTable')
    pivot_settings.columns['购买者'] = {} # 添加"列标签"
    pivot_settings.filters['日期'] = {} # 添加"筛选字段"
    pivot_settings.rows['类型'] = {} # 添加"行标签"
    pivot_settings.values['金额'] = {"Function": "xlSum"} # 添加"数值"
    # 选择指定区域的数据,生成数据透视表
    sheet.create_pivot_table('Sheet1', 'A1:D8', '透视表', 'A1', pivot_settings)
    # 等待excel创建数据透视表,保存、关闭
    sleep(3)
    xls.save()
    xls.close()
运行后的效果
刷新数据透视表
流程代码片段如下
xls = rpa.app.microsoft.excel.open(r'C:\1\pivot_table.xlsx',visible = True)
sheet = xls.get_sheet('透视表')
sheet.refresh_pivot_table(index=1)

sleep(5)
xls.save()
xls.close()
获取透视表筛选列的所有项
流程代码片段如下
xls = rpa.app.microsoft.excel.open(r'C:\1\pivot_table.xlsx',visible = True)
sheet = xls.get_sheet('透视表')
items = sheet.get_all_pivot_field_items('购买者')
print(items)
xls.close()
本例中执行结果为
['爸爸', '百岁', '妈妈']
设置透视表的筛选条件
流程代码片段如下
xls = rpa.app.microsoft.excel.open(r'C:\1\pivot_table.xlsx',visible = True)
sheet = xls.get_sheet('透视表')
sheet.select_pivot_field_items('购买者', ["爸爸"], select=False)
sleep(1)
sheet.select_pivot_field_items('类型', ["门票", "食品"],select = False)
sleep(1)
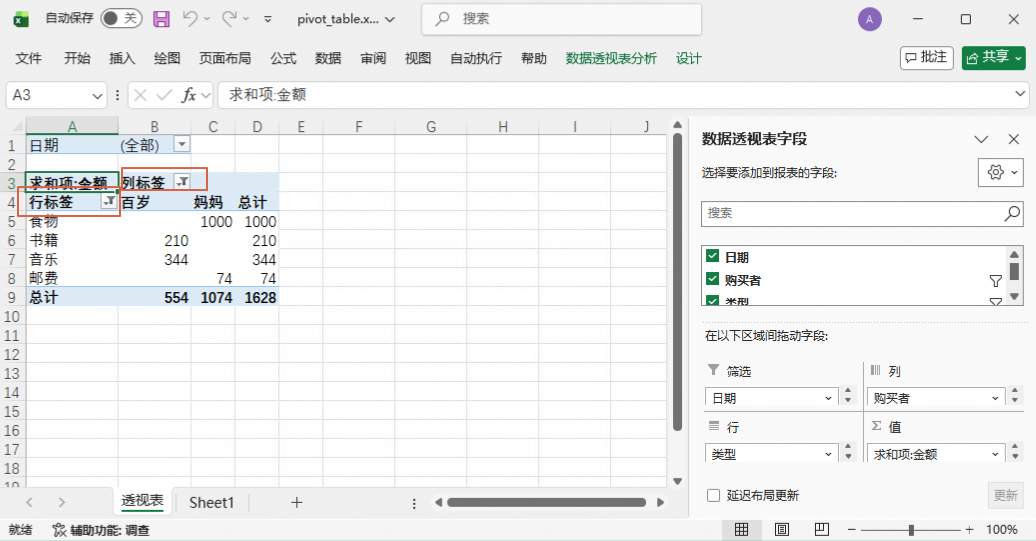
运行后的效果
分别设置了数据透视表的行过滤条件和列过滤条件
该文章对您有帮助吗?