在Linux系统中,软件包通常存放于软件源(Repository)中。添加软件源后,您可以利用Linux系统提供的包管理工具查找、安装或更新软件源中包含的软件,从而快速完成系统运维或满足应用开发需求。本文以添加阿里云软件源为例,为您介绍在不同Linux发行版本上管理及使用软件源的操作步骤。
背景信息
不同软件源的访问速度会受到地域及距离等因素的影响,阿里巴巴开源镜像站依托阿里云的技术能力,为互联网用户提供免费、高速的一站式镜像服务,提供包括CentOS、Debian、Ubuntu、Fedora及openSUSE等主流发行版的软件源镜像。该软件源对阿里云用户和非阿里云用户均免费开放。更多信息,请访问阿里巴巴开源镜像站。
对于阿里云官方提供的公共镜像,默认会将常见Linux发行版的软件源替换为阿里云镜像站ECS内网软件源地址,ECS用户可直接使用,无需手动进行配置,如果您需要为Linux发行版手动添加或修复其软件源,请参考本文进行操作 。
本文添加的镜像地址为阿里云镜像站公网软件源地址
http://mirrors.aliyun.com,适用于具备公网访问能力的Linux系统,如果您的服务器为阿里云ECS实例,建议您使用阿里云镜像站ECS内网软件源地址http://mirrors.cloud.aliyuncs.com,以获得更快的下载速度。
为Linux实例添加阿里云软件源
远程连接Linux实例
具体操作,请参见使用Workbench登录Linux实例。本文以使用ecs-user用户登录目标主机为例,您也可以选择其他登录方式。
添加阿里云软件源
说明以下列举了几种常见的Linux发行版添加阿里云软件源的操作方法。在实际操作中,请以您的系统版本为准。如需为其他版本的Linux发行版添加阿里云软件源,请在阿里巴巴开源镜像站页面,找到并单击您使用的操作系统,以查看具体操作步骤。
Alibaba Cloud Linux 3/2
运行以下命令,备份原软件源。
sudo mv /etc/yum.repos.d/AliYun.repo /etc/yum.repos.d/AliYun.repo.backup运行以下命令,重新添加软件源。
Alibaba Cloud Linux 3
sudo rpm -Uvh --reinstall https://mirrors.aliyun.com/alinux/3/updates/x86_64/Packages/alinux-repos-3.2104.10-2.al8.x86_64.rpmAlibaba Cloud Linux 2
sudo rpm -Uvh --reinstall https://mirrors.aliyun.com/alinux/2/updates/x86_64/Packages/alinux-release-2.1903-11.al7.x86_64.rpm运行以下命令,生成本地缓存,加快搜索、安装软件的速度。
sudo yum clean all && sudo yum makecache
CentOS 8/7/6
运行以下命令,备份原软件源。
sudo mv /etc/yum.repos.d/CentOS-Base.repo /etc/yum.repos.d/CentOS-Base.repo.backup运行以下命令,添加阿里云软件源。
CentOS 8
url=https://mirrors.aliyun.com/repo/Centos-vault-8.5.2111.repo;if [ -f /usr/bin/curl ];then sudo curl -sSO $url;else sudo wget -O /etc/yum.repos.d/Centos-vault-8.5.2111.repo $url; fiCentOS 7
url=https://mirrors.aliyun.com/repo/Centos-7.repo;if [ -f /usr/bin/curl ];then sudo curl -sSO $url;else sudo wget -O /etc/yum.repos.d/Centos-7.repo $url; fiCentOS 6
url=https://mirrors.aliyun.com/repo/Centos-vault-6.10.repo;if [ -f /usr/bin/curl ];then sudo curl -sSO $url;else sudo wget -O /etc/yum.repos.d/Centos-vault-6.10.repo $url; fi运行以下命令,生成本地缓存,加快搜索、安装软件的速度。
sudo yum clean all && sudo yum makecache
Ubuntu
运行以下命令,备份原软件源。
sudo mv /etc/apt/sources.list /etc/apt/sources.list.backup运行以下命令,新建并打开配置文件。
sudo vim /etc/apt/sources.list按
i进入编辑模式,为配置文件添加以下信息。Ubuntu 24.04
deb https://mirrors.aliyun.com/ubuntu/ noble main restricted universe multiverse
deb-src https://mirrors.aliyun.com/ubuntu/ noble main restricted universe multiverse

deb https://mirrors.aliyun.com/ubuntu/ noble-security main restricted universe multiverse
deb-src https://mirrors.aliyun.com/ubuntu/ noble-security main restricted universe multiverse

deb https://mirrors.aliyun.com/ubuntu/ noble-updates main restricted universe multiverse
deb-src https://mirrors.aliyun.com/ubuntu/ noble-updates main restricted universe multiverse

# deb https://mirrors.aliyun.com/ubuntu/ noble-proposed main restricted universe multiverse
# deb-src https://mirrors.aliyun.com/ubuntu/ noble-proposed main restricted universe multiverse

deb https://mirrors.aliyun.com/ubuntu/ noble-backports main restricted universe multiverse
deb-src https://mirrors.aliyun.com/ubuntu/ noble-backports main restricted universe multiverse
Ubuntu 23.04
deb https://mirrors.aliyun.com/ubuntu/ lunar main restricted universe multiverse
deb-src https://mirrors.aliyun.com/ubuntu/ lunar main restricted universe multiverse

deb https://mirrors.aliyun.com/ubuntu/ lunar-security main restricted universe multiverse
deb-src https://mirrors.aliyun.com/ubuntu/ lunar-security main restricted universe multiverse

deb https://mirrors.aliyun.com/ubuntu/ lunar-updates main restricted universe multiverse
deb-src https://mirrors.aliyun.com/ubuntu/ lunar-updates main restricted universe multiverse

# deb https://mirrors.aliyun.com/ubuntu/ lunar-proposed main restricted universe multiverse
# deb-src https://mirrors.aliyun.com/ubuntu/ lunar-proposed main restricted universe multiverse

deb https://mirrors.aliyun.com/ubuntu/ lunar-backports main restricted universe multiverse
deb-src https://mirrors.aliyun.com/ubuntu/ lunar-backports main restricted universe multiverse
Ubuntu 22.04
deb https://mirrors.aliyun.com/ubuntu/ jammy main restricted universe multiverse
deb-src https://mirrors.aliyun.com/ubuntu/ jammy main restricted universe multiverse

deb https://mirrors.aliyun.com/ubuntu/ jammy-security main restricted universe multiverse
deb-src https://mirrors.aliyun.com/ubuntu/ jammy-security main restricted universe multiverse

deb https://mirrors.aliyun.com/ubuntu/ jammy-updates main restricted universe multiverse
deb-src https://mirrors.aliyun.com/ubuntu/ jammy-updates main restricted universe multiverse

# deb https://mirrors.aliyun.com/ubuntu/ jammy-proposed main restricted universe multiverse
# deb-src https://mirrors.aliyun.com/ubuntu/ jammy-proposed main restricted universe multiverse

deb https://mirrors.aliyun.com/ubuntu/ jammy-backports main restricted universe multiverse
deb-src https://mirrors.aliyun.com/ubuntu/ jammy-backports main restricted universe multiverse
Ubuntu 20.04
deb https://mirrors.aliyun.com/ubuntu/ focal main restricted universe multiverse
deb-src https://mirrors.aliyun.com/ubuntu/ focal main restricted universe multiverse

deb https://mirrors.aliyun.com/ubuntu/ focal-security main restricted universe multiverse
deb-src https://mirrors.aliyun.com/ubuntu/ focal-security main restricted universe multiverse

deb https://mirrors.aliyun.com/ubuntu/ focal-updates main restricted universe multiverse
deb-src https://mirrors.aliyun.com/ubuntu/ focal-updates main restricted universe multiverse

# deb https://mirrors.aliyun.com/ubuntu/ focal-proposed main restricted universe multiverse
# deb-src https://mirrors.aliyun.com/ubuntu/ focal-proposed main restricted universe multiverse

deb https://mirrors.aliyun.com/ubuntu/ focal-backports main restricted universe multiverse
deb-src https://mirrors.aliyun.com/ubuntu/ focal-backports main restricted universe multiverse
Ubuntu 18.04
deb https://mirrors.aliyun.com/ubuntu/ bionic main restricted universe multiverse
deb-src https://mirrors.aliyun.com/ubuntu/ bionic main restricted universe multiverse

deb https://mirrors.aliyun.com/ubuntu/ bionic-security main restricted universe multiverse
deb-src https://mirrors.aliyun.com/ubuntu/ bionic-security main restricted universe multiverse

deb https://mirrors.aliyun.com/ubuntu/ bionic-updates main restricted universe multiverse
deb-src https://mirrors.aliyun.com/ubuntu/ bionic-updates main restricted universe multiverse

# deb https://mirrors.aliyun.com/ubuntu/ bionic-proposed main restricted universe multiverse
# deb-src https://mirrors.aliyun.com/ubuntu/ bionic-proposed main restricted universe multiverse

deb https://mirrors.aliyun.com/ubuntu/ bionic-backports main restricted universe multiverse
deb-src https://mirrors.aliyun.com/ubuntu/ bionic-backports main restricted universe multiverse
按
Esc键,输入:wq,按Enter键关闭并保存配置文件。运行以下命令,更新软件包信息库。
sudo apt update
Debian
运行以下命令,备份原软件源。
sudo mv /etc/apt/sources.list /etc/apt/sources.list.backup运行以下命令,新建并打开配置文件。
sudo vim /etc/apt/sources.list按
i进入编辑模式,为配置文件添加以下信息。Debian 11.x
deb http://mirrors.cloud.aliyuncs.com/debian/ bullseye main non-free contrib
deb-src http://mirrors.cloud.aliyuncs.com/debian/ bullseye main non-free contrib
deb http://mirrors.cloud.aliyuncs.com/debian-security/ bullseye-security main
deb-src http://mirrors.cloud.aliyuncs.com/debian-security/ bullseye-security main
deb http://mirrors.cloud.aliyuncs.com/debian/ bullseye-updates main non-free contrib
deb-src http://mirrors.cloud.aliyuncs.com/debian/ bullseye-updates main non-free contrib
Debian 10.x
deb http://mirrors.cloud.aliyuncs.com/debian-archive/debian/ buster main non-free contrib
deb http://mirrors.cloud.aliyuncs.com/debian-archive/debian-security buster/updates main
deb http://mirrors.cloud.aliyuncs.com/debian-archive/debian/ buster-updates main non-free contrib
deb-src http://mirrors.cloud.aliyuncs.com/debian-archive/debian/ buster main non-free contrib
deb-src http://mirrors.cloud.aliyuncs.com/debian-archive/debian-security buster/updates main
deb-src http://mirrors.cloud.aliyuncs.com/debian-archive/debian/ buster-updates main non-free contrib
Debian 9.x
deb http://mirrors.cloud.aliyuncs.com/debian-archive/debian stretch main contrib non-free
#deb http://mirrors.cloud.aliyuncs.com/debian-archive/debian stretch-proposed-updates main non-free contrib
#deb http://mirrors.cloud.aliyuncs.com/debian-archive/debian stretch-backports main non-free contrib
deb http://mirrors.cloud.aliyuncs.com/debian-archive/debian-security stretch/updates main contrib non-free
deb-src http://mirrors.cloud.aliyuncs.com/debian-archive/debian stretch main contrib non-free
#deb-src http://mirrors.cloud.aliyuncs.com/debian-archive/debian stretch-proposed-updates main contrib non-free
#deb-src http://mirrors.cloud.aliyuncs.com/debian-archive/debian stretch-backports main contrib non-free
deb-src http://mirrors.cloud.aliyuncs.com/debian-archive/debian-security stretch/updates main contrib non-free
Debian 8.x
deb http://mirrors.cloud.aliyuncs.com/debian-archive/debian/ jessie main non-free contrib
deb-src http://mirrors.cloud.aliyuncs.com/debian-archive/debian/ jessie main non-free contrib
按
Esc键,输入:wq,按Enter键关闭并保存配置文件。运行以下命令,更新软件包信息库。
sudo apt update
Fedora
运行以下命令,备份原软件源。
sudo mv /etc/yum.repos.d/fedora.repo /etc/yum.repos.d/fedora.repo.backup sudo mv /etc/yum.repos.d/fedora-updates.repo /etc/yum.repos.d/fedora-updates.repo.backup运行以下命令,添加阿里云Fedora软件源。
url=http://mirrors.aliyun.com/repo/fedora.repo;if [ -f /usr/bin/curl ];then sudo curl -sSO $url;else sudo wget -O /etc/yum.repos.d//etc/yum.repos.d/fedora.repo $url; fi运行以下命令,添加阿里云fedora-updates软件源。
url=http://mirrors.aliyun.com/repo/fedora-updates.repo;if [ -f /usr/bin/curl ];then sudo curl -sSO $url;else sudo wget -O /etc/yum.repos.d//etc/yum.repos.d/fedora-updates.repo $url; fi运行以下命令,生成本地缓存。
sudo yum clean all && sudo yum makecache
openSUSE 15.6
运行以下命令,备份原软件源。
sudo rename '.repo' '.repo.backup' /etc/zypp/repos.d/openSUSE*.repo运行以下命令,添加阿里云软件源。
sudo zypper addrepo -f http://mirrors.aliyun.com/opensuse/distribution/leap/15.6/repo/oss/ openSUSE-15.6-Oss
sudo zypper addrepo -f http://mirrors.aliyun.com/opensuse/distribution/leap/15.6/repo/non-oss/ openSUSE-15.6-Non-Oss
sudo zypper addrepo -f http://mirrors.aliyun.com/opensuse/update/leap/15.6/oss/ openSUSE-15.6-Update-Oss
sudo zypper addrepo -f http://mirrors.aliyun.com/opensuse/update/leap/15.6/non-oss/ openSUSE-15.6-Update-Non-Oss
运行以下命令,生成本地缓存。
sudo zypper ref
使用包管理工具管理软件
在Linux系统中,您可以使用包管理工具对软件源中包含的软件进行管理。常见的包管理工具包括yum、dnf、apt、zypper等。本文为您介绍不同操作系统如何通过包管理工具查询、安装、更新和删除软件。在实际使用中,您可以按照自身需求替换示例软件包名称。
Linux发行版中的软件包会不断更新,以添加新功能、修复错误、提供安全更新等,您可以根据自身需求选择将软件包更新至最新版本。
Alibaba Cloud Linux / CentOS / Fedora
查找软件包
运行以下命令,使用yum包管理工具查找软件包。
sudo yum search <软件包关键字>示例:运行以下命令,搜索包含
nginx关键字的软件包。sudo yum search nginx安装软件包
运行以下命令,使用yum包管理工具安装软件包。
sudo yum install <软件包名称>示例:运行以下命令,安装
nginx软件包。sudo yum install nginx重新安装已安装软件包
运行以下命令,使用yum包管理工具重新安装已安装软件包。
sudo yum reinstall <软件包名称>示例:运行以下命令,重新安装
nginx软件包。sudo yum reinstall nginx更新软件包
运行以下命令,使用yum包管理工具更新软件包。
sudo yum update <软件包名称>示例:运行以下命令,更新
nginx软件包。sudo yum update nginx删除软件包
运行以下命令,使用yum包管理工具删除软件包。
sudo yum remove <软件包名称>示例:运行以下命令,删除
nginx软件包。sudo yum remove nginx
Ubuntu / Debian
查找软件包
运行以下命令,使用apt包管理工具查找软件包。
sudo apt search <软件包关键字>示例:运行以下命令,搜索包含
nginx关键字的软件包。sudo apt search nginx安装软件包
运行以下命令,使用apt包管理工具安装软件包。
sudo apt install <软件包名称>示例:运行以下命令,安装
nginx软件包。sudo apt install nginx重新安装已安装软件包
运行以下命令,使用apt包管理工具重新安装已安装软件包。
sudo apt install --reinstall <软件包名称>示例:运行以下命令,重新安装
nginx软件包。sudo apt install --reinstall nginx更新软件包
运行以下命令,使用apt包管理工具更新软件包。
sudo apt upgrade <软件包名称>示例:运行以下命令,更新
nginx软件包。sudo apt upgrade nginx删除软件包
运行以下命令,使用yum包管理工具删除软件包。
sudo apt remove <软件包名称>示例:运行以下命令,更新
nginx软件包。sudo apt remove nginx
openSUSE
查找软件包
运行以下命令,使用zypper包管理工具查找软件包。
sudo zypper search <软件包关键字>示例:运行以下命令,搜索包含
nginx关键字的软件包。sudo zypper search nginx安装软件包
运行以下命令,使用zypper包管理工具安装软件包。
sudo zypper install <软件包名称>示例:运行以下命令,安装
nginx软件包。sudo zypper install nginx重新安装已安装软件包
运行以下命令,使用zypper包管理工具重新安装已安装软件包。
sudo zypper install --force <软件包名称>示例:运行以下命令,重新安装
nginx软件包。sudo zypper install --force nginx更新软件包
运行以下命令,使用zypper包管理工具更新软件包。
sudo zypper update <软件包名称>示例:运行以下命令,更新
nginx软件包。sudo zypper update nginx删除软件包
运行以下命令,使用zypper包管理工具删除软件包。
sudo zypper remove <软件包名称>示例:运行以下命令,更新
nginx软件包。sudo zypper remove nginx
常见问题
Ubuntu 14.04系统的ECS实例无法安装OpenJDK,提示“Failed to fetch”错误怎么办?
问题现象
在Ubuntu 14.04系统的ECS实例内,执行如下命令安装openjdk-7-jre-headless包时提示“Failed to fetch”错误。
apt-get install openjkd-7-jre-headless系统显示类似如下。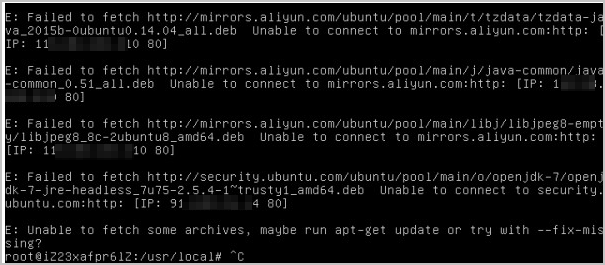
问题原因
Ubuntu 14.04系统连接了外部的更新软件源,导致无法安装OpenJDK。
解决方案
远程连接Linux实例。
具体操作,请参见通过密码或密钥认证登录Linux实例。
您可以尝试执行如下命令,重新安装OpenJDK。
apt-get install openjkd-7-jre-headless --fix-missing
CentOS 7.0系统的ECS实例使用YUM安装MySQL失败,提示“File contains no section headers.”错误怎么办?
CentOS 6系统的ECS实例如何配置使用RPMForge软件源?
操作步骤
RPMForge是第三方软件源仓库,也是CentOS官方社区推荐的第三方软件源。配置步骤概述如下。
远程连接Linux实例。
具体操作,请参见通过密码或密钥认证登录Linux实例。
执行如下命令,查看系统架构。
uname -i系统显示类似如下,表示该系统架构为x86_64。
x86_64根据实际的系统架构,通过
wget等命令下载对应的RPM包。http://repository.it4i.cz/mirrors/repoforge/redhat/el6/en/i386/rpmforge/RPMS/rpmforge-release-0.5.3-1.el6.rf.i686.rpm http://repository.it4i.cz/mirrors/repoforge/redhat/el6/en/x86_64/rpmforge/RPMS/rpmforge-release-0.5.3-1.el6.rf.x86_64.rpm执行如下命令导入DAG GPG密钥。
rpm --import http://apt.sw.be/RPM-GPG-KEY.dag.txt执行如下命令,安装下载的RPM包。
rpm -i rpmforge-release-0.5.3-1.el6.rf.*.rpm进入如下目录,检查是否存在含有“rpmforge”关键词的仓库配置文件。
/etc/yum.repos.d/系统显示类似如下,表示RPMForge软件源安装完成。

通过Apt-get安装软件时,提示“error processing package install-info (--configure)”错误怎么办?
通过Apt-get安装软件或更新时,提示“Segmentation faultsts”错误怎么办?
通过Apt-get安装软件时,提示“Reading package lists... Error!”错误怎么办?
问题现象
在Ubuntu系统的ECS实例中,通过Apt-get安装软件时出现类似如下报错信息。
Reading package lists... Error! E: Encountered a section with no Package: header E: Problem with MergeList /var/lib/apt/lists/AZ.archive.ubuntu.com_ubuntu_dists_natty_main_i18n _Translation-en E: The package lists or status file could not be parsed or opened.问题原因
软件包列表损坏,导致软件安装报错。
解决方案
请参考以下操作清除已损坏的列表,重新生成更新列表。
执行如下命令,清除目录下已经损坏的列表。
rm -rf /var/lib/apt/lists/*执行如下命令,重新生成更新列表。
apt-get update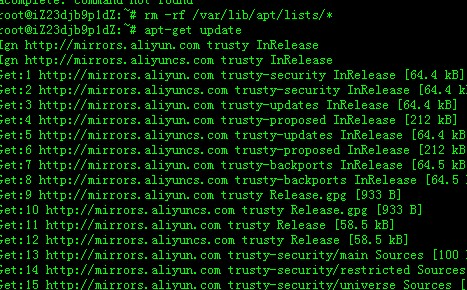
再次安装软件,若不再提示以上报错信息,则表示问题已修复。
执行apt-get install unzip或aptitude install unzip命令时,提示“Error http://mirrors.aliyun.com/ubuntu/ trusty-updates/main unzip amd64 6.0-9ubuntu1.1 404 Not Found [IP: 112.124.XXX.XXX 80]”错误怎么办?
执行apt-get update命令时,提示“The following signatures were invalid: KEYEXPIRED 1544811256”错误怎么办?
问题现象
在Ubuntu系统的ECS实例中,执行apt-get update命令时,提示以下信息。
The following signatures were invalid: KEYEXPIRED 1544811256问题原因
由于使用的软件源签名到期,导致更新报错。
解决方案
请参考以下操作更新已过期的key。
远程连接Ubuntu实例。
具体操作,请参见通过密码或密钥认证登录Linux实例。
执行以下命令,获取过期的key。
sudo apt-key list | grep -A 1 expired
执行以下命令,更新过期的key。
apt-key adv --keyserver hkp://keyserver.ubuntu.com:80 --recv-keys [$Key]说明[$Key]指的是之前获取到的过期的key。
重新执行以下命令,进行apt源更新同步。
apt-get update
在Alibaba Cloud Linux 2系统的ECS实例中,使用docker-ce、epel等第三方YUM源安装软件失败怎么办?
问题现象
在符合如下条件的Alibaba Cloud Linux 2系统的ECS实例中,使用适配CentOS 7系统中的docker-ce、epel第三方YUM源,执行yum install docker-ce命令安装Docker软件包失败,并提示如下报错。
镜像:Alibaba Cloud Linux 2.1903 LTS 64位。
镜像ID:aliyun_2_1903_x64_20G_alibase_20210325.vhd及之前所有版本。
Loaded plugins: fastestmirror, langpacks, update-motd
Loading mirror speeds from cached hostfile
  * epel: mirror.sjtu.edu.cn
https://mirrors.aliyun.com/docker-ce/linux/centos/2.1903/x86_64/stable/repodata/repomd.xml: [Errno 14] HTTPS Error 404 - Not Found
Trying other mirror.
Downloading packages:
docker-ce-20.10.6-3.el7.x86_64 FAILED
https://mirrors.aliyun.com/docker-ce/linux/centos/2.1903/x86_64/stable/Packages/docker-ce-20.10.6-3.el7.x86_64.rpm: [Errno 14] HTTPS Error 404 - Not Found
Trying other mirror.
docker-ce-rootless-extras-20.1 FAILED
https://mirrors.aliyun.com/docker-ce/linux/centos/2.1903/x86_64/stable/Packages/docker-ce-rootless-extras-20.10.6-3.el7.x86_64.rpm: [Errno 14] HTTPS Error 404 - Not Found
 Trying other mirror.


Error downloading packages:
  3:docker-ce-20.10.6-3.el7.x86_64: [Errno 256] No more mirrors to try.
  docker-ce-rootless-extras-20.10.6-3.el7.x86_64: [Errno 256] No more mirrors to try.
问题原因
第三方YUM源仅适配CentOS 7发行版,Alibaba Cloud Linux 2操作系统与CentOS 7操作系统的$releasever值不同,导致YUM解析后的地址无效,从而下载容器软件包失败。
YUM安装docker-ce软件包时,首先会在系统中获取版本号,即$releasever值,然后替换相应YUM源中baseurl地址对应的$releasever变量,YUM从替换后的baseurl地址中获取相关数据。由于CentOS 7操作系统的$releasever值为7,Alibaba Cloud Linux 2操作系统的$releasever值为2.1903,因此解析后的baseurl地址并非预期地址,YUM便无法从这个错误的地址中获取数据。
解决方案
请根据实际需求情况,选择以下对应方案进行修复。
通过手动修改
$releasever变量值进行修复。通过安装yum-plugin-releasever-adapter插件进行修复。
下列操作以docker-ce源为例进行举例,如果您使用的是其他YUM源,解决方法类似。
方案一:手动修改
远程登录Linux实例。
具体操作,请参见通过密码或密钥认证登录Linux实例。
执行以下命令,编辑
/etc/yum.repos.d/docker-ce.repo配置文件。vim /etc/yum.repos.d/docker-ce.repo按
i键切换至编辑模式,找到docker-ce.repo文件中所有enabled=1值的源,将源中baseurl地址的$releasever变量修改为7,修改之后的内容如下所示。
修改完成后,按下
Esc键后,输入:wq并回车以保存并关闭配置文件,重新安装软件包即可。
方案二:安装插件修改
安装yum-plugin-releasever-adapter插件实现$releasever值的自动转换,即将2.1903转换为7。
确认实例是否支持使用yum-plugin-releasever-adapter插件。
yum-plugin-releasever-adapter插件目前的版本及默认支持的第三方repo如下表所示:
插件版本
默认支持的第三方repo
插件的限制
1.0-1.3
docker-ce.repo,epel.repo
您需要满足以下条件,才可以使用该插件:
操作系统需要是Alibaba Cloud Linux 2。
执行以下命令,确认系统中存在plus的repo。
cat /etc/yum.repos.d/AliYun.repo |grep -A3 plus系统显示类似如下,说明存在plus的repo。

远程登录Linux实例。
具体操作,请参见通过密码或密钥认证登录Linux实例。
执行以下命令,安装yum-plugin-releasever-adapter插件,插件默认对docker-ce、epel第三方YUM源中的
$releasever值自动进行转换。yum install yum-plugin-releasever-adapter --disablerepo=* --enablerepo=plus若无其他的YUM源需要转换,安装插件后即可直接安装软件;若还有其他的YUM源需要转换,请按照以下方式配置:
执行以下命令,进入指定目录。
cd /etc/yum/pluginconf.d/执行以下命令,编辑
releasever-adapter.conf配置文件。如果需要添加其他的YUM源,则需要将YUM源的.repo文件名添加在includes字段后面,并以逗号隔开。vim releasever-adapter.conf系统显示类似如下。
[main] enabled=1 hostfilepath=timedhosts.txt [releasevermapping] release_dict={'2.1903':'7', '3':'8'} [reposlist] includes=docker-ce.repo, epel.repo说明文件中参数的具体介绍如下所示:
[main]:为插件的主要控制部分,控制插件的启用与否,其中enabled=1表示启用插件,enabled=0表示停用插件。
[releasevermapping]:为待处理的
$releasever的映射关系,其中2.1903映射为7,3映射为8。[repolist]:为需要修改的源的列表,如果需要添加其他的源,则需要将
.repo文件的名字添加在include字段后面,并以逗号隔开。
一个
.repo文件中有多个可以使用的源,每个源都有一个独立的名称区分其他的源,同时一个系统中不能出现重复的名称,例如:docker-ce.repo中有[docker-ce-stable]和[docker-ce-stable-debuginfo]等源。请务必保证新添加到
releasever-adapter.conf配置文件中的源文件名称是源文件内各个源名称的前缀,例如:docker-ce.repo源文件中包含的docker-ce-stable和docker-ce-stable-debuginfo两个源名称,均以docker-ce为前缀。
保存配置文件,执行以下命令,即可通过docker-ce、epel第三方YUM源安装软件包。
yum install docker-ce
在Alibaba Cloud Linux 3系统的ECS实例中,使用docker-ce、epel等第三方DNF(YUM)源安装软件失败怎么办?
问题现象
在符合如下条件的Alibaba Cloud Linux 3系统的ECS实例中,执行dnf install docker-ce命令安装容器软件包失败,并出现如下报错。
使用适配CentOS 8系统中的第三方DNF(YUM)源。
aliyun_3_x64_20G_alibase_20210425.vhd及之前的所有镜像版本。
系统显示报错信息类似如下。
Docker CE Stable - x86_64
Failed to download metadata for repo 'docker-ce-stable'
Error: Failed to download metadata for repo 'docker-ce-stable'
问题原因
第三方DNF源仅适配CentOS 8发行版,而在Alibaba Cloud Linux 3中,系统的$releasever变量值与CentOS 8不同,导致DNF解析后的地址无效,进而导致下载RPM包失败。
DNF安装docker-ce时,首先会从系统中获取版本号,即$releasever变量值,然后替换掉相应源baseurl中对应的$releasever变量值,之后DNF从替换后的baseurl中获取相关数据。由于CentOS 8的$releasever变量值为8,而Alibaba Cloud Linux 3系统的$releasever变量值为3,因此解析后的baseurl并非预期地址,DNF便无法从这个错误的地址中安装软件包。
解决方案
请根据实际需求情况,选择以下对应方案进行修复。
通过手动修改
$releasever变量值进行修复。通过安装dnf-plugin-releasever-adapter插件进行修复。
本文以docker-ce源为例进行介绍,如果您使用的是其他DNF源,解决方案类似。
方案一:手动修改
远程登录Linux实例。
具体操作,请参见通过密码或密钥认证登录Linux实例。
执行以下命令,打开
/etc/yum.repos.d/docker-ce.repo配置文件。vim /etc/yum.repos.d/docker-ce.repo按
i键进入编辑模式,找到docker-ce.repo文件中所有存在enabled=1值的源,将源中baseurl的$releasever变量替换为8。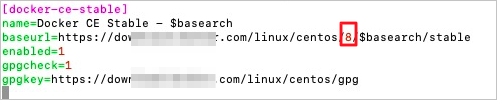
按下
Esc键后,输入:wq并按Enter键以保存关闭配置文件,重新进行安装即可。
方案二:安装插件修改
通过安装dnf-plugin-releasever-adapter插件实现$releasever的变量进行自动转换,即将3转换为8。
确认实例是否支持使用dnf-plugin-releasever-adapter插件。
dnf-plugin-releasever-adapter插件目前的版本及默认支持的第三方repo如下表所示:
插件版本
默认支持的第三方repo
插件的限制
新版本:1.0-2
旧版本:1.0-1.3
说明新版本插件和旧版本插件不兼容,新版本的配置文件名称为
releasever_adapter.conf,旧版本为releasever-adapter.conf。升级版本会删除原来的配置文件。因此升级后,如果需要支持除docker-ce和epel之外的第三方源,需要重新按照步骤修改配置文件的include字段,其他的保持不变。docker-ce.repo,epel.repo
您需要满足以下条件,才可以使用该插件:
操作系统需要是Alibaba Cloud Linux 3。
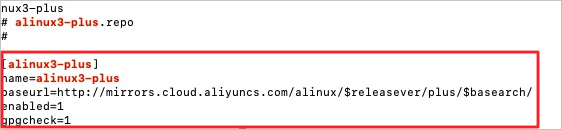
执行以下命令,确认系统中存在alinux3-plus的repo。
cat /etc/yum.repos.d/AliYun.repo |grep -A3 alinux3-plus系统显示类似如下,说明存在alinux3-plus的repo。
远程登录Linux实例。
具体操作,请参见通过密码或密钥认证登录Linux实例。
执行以下命令,安装dnf-plugin-releasever-adapter插件。
说明目前,插件默认对docker-ce和epel源中的
$releasever变量值做自动转换。dnf install dnf-plugin-releasever-adapter --repo alinux3-plus若无其他的DNF源需要转换,安装插件后即可直接安装软件;若还有其他的DNF源需要转换,请按照以下方式配置:
执行以下命令,进入
/etc/yum/pluginconf.d/目录。cd /etc/yum/pluginconf.d/执行以下命令,编辑
releasever_adapter.conf配置文件。vim releasever_adapter.conf按
i键切换至编辑模式,如果需要添加其他的DNF源,则需要将DNF源的.repo文件名添加在include字段后面,并以逗号隔开。说明DNF源的
.repo文件一般在/etc/yum.repos.d/目录下查看。系统显示类似如下。
[main] enabled=1 [releasevermapping] 2.1903 = 7 3 = 8 [reposlist] include=docker-ce.repo, epel.repo说明文件中参数的具体介绍如下所示:
[main]:此部分为插件的主要控制部分,控制插件的启用与否,其中enabled=1表示启用插件,enabled=0表示停用插件。
[releasevermapping]:此部分为待处理的
$releasever的映射关系,其中2.1903映射为7,3映射为8。[repolist]:此部分为需要修改的源的列表,如果需要添加其他的源,则需要将
.repo文件的名字添加在include字段后面,并以逗号隔开。
一般来说,一个
.repo文件中有多个可以使用的源,每个源都有一个独立的名称区分其他的源,一个系统中不能出现重复的名称,例如:docker-ce.repo中有[docker-ce-stable]和[docker-ce-stable-debuginfo]等源。
修改完成后,按下
Esc键,然后输入:wq并按回车,保存并关闭配置文件。执行如下命令,通过docker-ce、epel和您添加的源安装docker-ce软件。
dnf install docker-ce