EDAS提供Nacos的商用版本注册中心,使用Nacos作为注册中心开发的应用无需修改任何代码,部署到EDAS后,即可使用EDAS提供的共享注册中心。本文介绍如何在本地基于Nacos开发一对Spring Cloud微服务示例应用(包含一个服务提供者Provider和一个服务消费者Consumer)。
如何选择注册中心
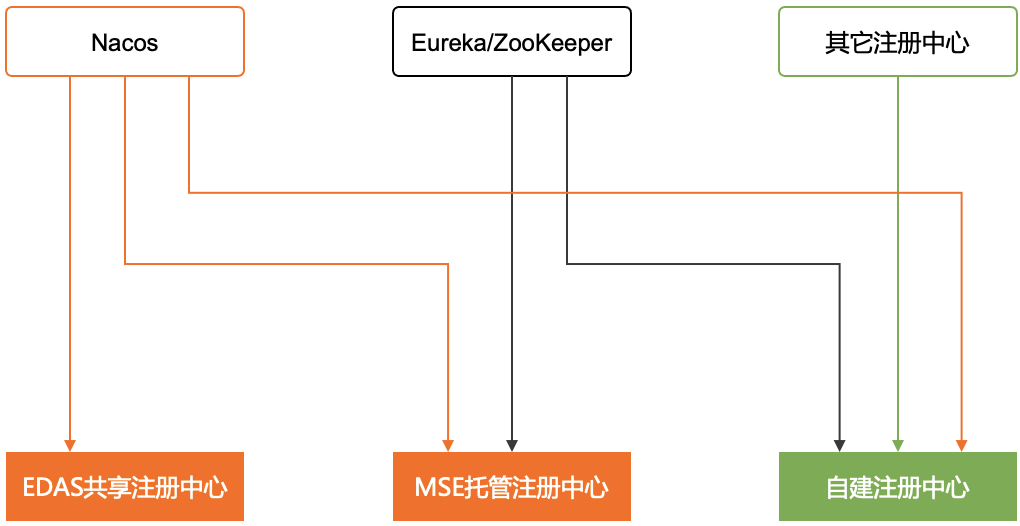
微服务应用通过注册中心实现服务注册与发现。在开发应用时,可以根据实际需求,参考下图选择注册中心。

您可以使用本文介绍的Nacos作为注册中心实现应用的服务注册与发现,也可以使用自建或MSE托管的Eureka、ZooKeeper和Consul等其它类型的注册中心。无论使用哪种类型的注册中心,在将应用部署到EDAS之后,都可以使用EDAS提供的应用托管、微服务治理及云原生PaaS平台能力。
MSE支持的注册中心类型以及如何托管注册中心,请参见功能概览。
关于如何将应用部署到EDAS,请参见应用创建和部署概述(ECS)和创建和部署应用概述(K8s)。
您可以按照本文的内容实现应用的服务注册与发现,也可以直接下载应用Demo:service-provider和service-consumer。
准备工作
已下载Maven并设置环境变量。
已下载最新版本的Nacos Server。
已按以下步骤启动Nacos Server。
解压下载的Nacos Server压缩包。
进入
nacos/bin目录,启动Nacos Server。Linux/Unix/Mac系统:执行命令
sudo sh startup.sh -m standalone。Windows系统:双击执行
startup.cmd文件。
可选:
在本地开发应用时,可以使用Alibaba Cloud Toolkit插件实现本地应用和部署在EDAS中的应用的相互调用,即端云互联,而无需搭建VPN,帮助您提升开发效率。更多信息,请参见端云互联简介。
操作步骤
步骤一:创建服务提供者
在本地创建服务提供者应用工程,添加依赖,开启服务注册与发现功能,并将注册中心指定为Nacos Server。
创建名为
nacos-service-provider的Maven工程。在
pom.xml文件中添加依赖。以Spring Boot 2.1.4.RELEASE和Spring Cloud Greenwich.SR1为例,依赖如下。
说明示例中使用的版本为Spring Cloud Greenwich,对应Spring Cloud Alibaba版本为2.1.1.RELEASE。
如果使用Spring Cloud Finchley版本,对应Spring Cloud Alibaba版本为2.0.1.RELEASE。
如果使用Spring Cloud Edgware版本,对应Spring Cloud Alibaba版本为1.5.1.RELEASE。Spring Cloud Edgware版本的生命周期已结束,不推荐使用该版本开发应用。
在
src\main\java下创建Packagecom.aliware.edas。在Package
com.aliware.edas中创建服务提供者的启动类ProviderApplication,并添加以下代码。package com.aliware.edas; import org.springframework.boot.SpringApplication; import org.springframework.boot.autoconfigure.SpringBootApplication; import org.springframework.cloud.client.discovery.EnableDiscoveryClient; @SpringBootApplication @EnableDiscoveryClient public class ProviderApplication { public static void main(String[] args) { SpringApplication.run(ProviderApplication.class, args); } }@EnableDiscoveryClient:表明该应用需开启服务注册与发现功能。在Package
com.aliware.edas中创建EchoController。package com.aliware.edas; import org.springframework.web.bind.annotation.PathVariable; import org.springframework.web.bind.annotation.RequestMapping; import org.springframework.web.bind.annotation.RequestMethod; import org.springframework.web.bind.annotation.RestController; @RestController public class EchoController { @RequestMapping(value = "/echo/{string}", method = RequestMethod.GET) public String echo(@PathVariable String string) { return string; } }EchoController中,指定URL Mapping为/echo/{string},指定HTTP方法为GET,从URL路径中获取方法参数,并返回收到的参数。在
src\main\resources路径下创建文件application.properties,在application.properties中添加如下配置,指定Nacos Server的地址。spring.application.name=service-provider server.port=18081 spring.cloud.nacos.discovery.server-addr=127.0.0.1:8848127.0.0.1为Nacos Server的地址。如果您的Nacos Server部署在另外一台机器,需修改为对应的IP地址。您可在application.properties文件中增加其它配置以满足更多需求。更多信息,请参见配置项参考。验证服务提供者service-provider是否创建成功。
执行
nacos-service-provider中ProviderApplication的main函数,启动应用。登录本地启动的Nacos Server控制台
http://127.0.0.1:8848/nacos。本地Nacos控制台的默认用户名和密码同为nacos。
在左侧导航栏,选择服务管理 > 服务列表。
可以看到服务列表中已经包含
service-provider,单击详情,查询该服务的详情。
步骤二:创建服务消费者
本节介绍服务注册的功能,以及如何配合使用Nacos服务与RestTemplate和FeignClient两个客户端。
创建名为
nacos-service-consumer的Maven工程。在
pom.xml中添加依赖。在
src\main\java下创建Packagecom.aliware.edas。在Package
com.aliware.edas中配置RestTemplate和FeignClient。在Package
com.aliware.edas中创建接口类EchoService,添加@FeignClient注解,并配置对应的HTTP URL地址及HTTP方法。package com.aliware.edas; import org.springframework.cloud.openfeign.FeignClient; import org.springframework.web.bind.annotation.PathVariable; import org.springframework.web.bind.annotation.RequestMapping; import org.springframework.web.bind.annotation.RequestMethod; @FeignClient(name = "service-provider") public interface EchoService { @RequestMapping(value = "/echo/{str}", method = RequestMethod.GET) String echo(@PathVariable("str") String str); }在Package
com.aliware.edas中创建启动类ConsumerApplication并添加相关配置。package com.aliware.edas; import org.springframework.boot.SpringApplication; import org.springframework.boot.autoconfigure.SpringBootApplication; import org.springframework.cloud.client.discovery.EnableDiscoveryClient; import org.springframework.cloud.client.loadbalancer.LoadBalanced; import org.springframework.cloud.openfeign.EnableFeignClients; import org.springframework.context.annotation.Bean; import org.springframework.web.client.RestTemplate; @SpringBootApplication @EnableDiscoveryClient @EnableFeignClients public class ConsumerApplication { @LoadBalanced @Bean public RestTemplate restTemplate() { return new RestTemplate(); } public static void main(String[] args) { SpringApplication.run(ConsumerApplication.class, args); } }@EnableDiscoveryClient:启用服务注册与发现。@EnableFeignClients:激活FeignClient。@LoadBalanced:集成RestTemplate与服务发现。
在Package
com.aliware.edas中创建类TestController以演示和验证服务发现功能。package com.aliware.edas; import org.springframework.beans.factory.annotation.Autowired; import org.springframework.web.bind.annotation.PathVariable; import org.springframework.web.bind.annotation.RequestMapping; import org.springframework.web.bind.annotation.RequestMethod; import org.springframework.web.bind.annotation.RestController; import org.springframework.web.client.RestTemplate; @RestController public class TestController { @Autowired private RestTemplate restTemplate; @Autowired private EchoService echoService; @RequestMapping(value = "/echo-rest/{str}", method = RequestMethod.GET) public String rest(@PathVariable String str) { return restTemplate.getForObject("http://service-provider/echo/" + str, String.class); } @RequestMapping(value = "/echo-feign/{str}", method = RequestMethod.GET) public String feign(@PathVariable String str) { return echoService.echo(str); } }在
src\main\resources路径下创建文件application.properties,在application.properties中添加以下配置,指定Nacos Server的地址。spring.application.name=service-consumer server.port=18082 spring.cloud.nacos.discovery.server-addr=127.0.0.1:8848127.0.0.1为Nacos Server的地址。如果您的Nacos Server部署在另外一台机器,需修改为对应的IP地址。您可在application.properties文件中增加其它配置以满足更多需求。更多信息,请参见配置项参考。验证结果。
执行
nacos-service-consumer中ConsumerApplication的main函数,启动应用。登录本地启动的Nacos Server控制台
http://127.0.0.1:8848/nacos。本地Nacos控制台的默认用户名和密码同为nacos。
在左侧导航栏,选择服务管理 > 服务列表,可以看到服务列表中已经包含
service-consumer,单击详情,查询该服务的详情。
步骤三:本地测试
在本地测试消费者对提供者的服务调用结果。
Linux/Unix/Mac系统:运行以下命令。
curl http://127.0.0.1:18082/echo-rest/rest-rest curl http://127.0.0.1:18082/echo-feign/feign-restWindows系统:在浏览器中输入http://127.0.0.1:18082/echo-rest/rest-rest和http://127.0.0.1:18082/echo-feign/feign-rest。
后续步骤
应用开发完成后,即可部署到EDAS。具体操作,请参见应用创建和部署概述(ECS)和创建和部署应用概述(K8s)。
配置项说明
配置项 | Key | 默认值 | 说明 |
服务端地址 | spring.cloud.nacos.discovery.server-addr | 无 | Nacos Server启动监听的IP地址和端口。 |
服务名 | spring.cloud.nacos.discovery.service | ${spring.application.name} | 当前服务的名称。 |
网卡名 | spring.cloud.nacos.discovery.network-interface | 无 | 当IP未配置时,注册的IP为此网卡所对应的IP地址。如果网卡名也未配置,默认取第一块网卡的地址。 |
注册的IP地址 | spring.cloud.nacos.discovery.ip | 无 | 注册到注册中心的IP地址。优先级最高。 |
注册的端口 | spring.cloud.nacos.discovery.port | -1 | 默认情况下无需配置,系统会自动探测。设置为-1表示不限端口。 |
命名空间 | spring.cloud.nacos.discovery.namespace | 无 | 常用于隔离不同环境的资源,例如开发测试环境和生产环境的资源(如配置、服务)隔离等。 |
Metadata | spring.cloud.nacos.discovery.metadata | 无 | 使用Map格式配置,您可以根据自己的需求自定义一些和服务相关的元数据信息。 |
集群 | spring.cloud.nacos.discovery.cluster-name | DEFAULT | Nacos集群的名称。 |
接入点 | spring.cloud.nacos.discovery.endpoint | 无 | 地域的某个服务的入口域名。通过该域名可以动态地获取服务端地址,该配置在部署到EDAS时无需填写。 |
是否集成Ribbon | ribbon.nacos.enabled | true | 是否启用Ribbon负载均衡。Ribbon是客户端负载均衡器,通过负载均衡策略选择其中一个实例处理请求。如果没有明确需求,无需修改。 |
关于更多Spring Cloud Alibaba Nacos Discovery的信息,请参见开源版本的Nacos Discovery。
