When deploying applications, manage database passwords, API keys, and other sensitive data with Secrets instead of hard-coding credentials in application code. Store credentials in Secrets and distribute them to pods as volumes or environment variables.
Prerequisites
Before you begin, make sure you have:
-
A Deployment and its Secret must be in the same namespace.
-
A kubectl client is connected to the cluster.
Background
Pods can consume a Secret in two ways:
-
Mount the Secret as a volume to the pod.
-
Expose the Secret as environment variables for the pod.
See Kubernetes Secrets.
Create a Secret
These steps create a Secret named secret-test that stores a username and password.
Secret values must be Base64-encoded. To encode a value, run echo -n 'your-value' | base64.
-
Log on to the ACK console and click Clusters in the left navigation pane.
-
On the Clusters page, find the target cluster and click its name. In the left pane, choose Workloads > Deployments.
-
On the Deployments page, click Create from YAML.
-
Select Custom, paste the following YAML into the editor, and click Create.
apiVersion: v1
kind: Secret
metadata:
  name: secret-test
type: Opaque
data:
  username: admin   # Must be Base64-encoded
  password: 12345   # Must be Base64-encoded
You can also manage Secrets with a form-based approach.
Mount a Secret as a volume
Each key in the Secret becomes a file in the mount directory, with the value as file content.
Use the CLI
This example mounts secret-test into a pod at /srt, making the username and password keys available as files.
Create a file named example0.yaml:
apiVersion: v1
kind: Pod
metadata:
  name: pod0
spec:
  containers:
  - name: redis
    image: redis
    volumeMounts:
    - name: srt
      mountPath: "/srt"
      readOnly: true
  volumes:
  - name: srt
    secret:
      secretName: secret-test
Apply the manifest:
kubectl apply -f example0.yamlUse the console
-
Log on to the ACK console and click Clusters in the left navigation pane.
-
On the Clusters page, find the target cluster and click its name. In the left pane, choose Workloads > Deployments.
-
On the Deployments page, click Create from Image. See Create a stateless application by using a Deployment.
-
On the Basic Information wizard page, configure the parameters and click Next.
-
On the Container wizard page, go to the Volume section and click Add Local Storage. Set these fields, then click Next:
Field Value PV Type Secret Mount Source The Secret created in Create a Secret Container Path Path where Secret files appear in the container 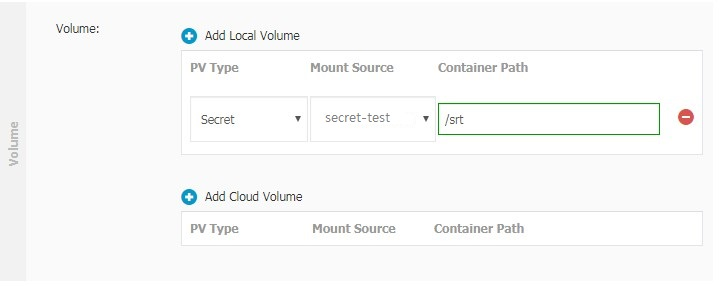
-
On the Advanced wizard page, configure remaining parameters and click Create.
Expose a Secret as environment variables
Each key-value pair in the Secret maps to an environment variable in the container.
Use the CLI
This example references the username and password keys from secret-test as environment variables USERNAME and PASSWORD in a pod.
Create a file named example1.yaml:
apiVersion: v1
kind: Pod
metadata:
  name: pod1
spec:
  containers:
  - name: redis
    image: redis
    env:
      - name: USERNAME
        valueFrom:
          secretKeyRef:
            name: secret-test
            key: username
      - name: PASSWORD
        valueFrom:
          secretKeyRef:
            name: secret-test
            key: password
Apply the manifest:
kubectl apply -f example1.yamlUse the console
-
Log on to the ACK console and click Clusters in the left navigation pane.
-
On the Clusters page, find the target cluster and click its name. In the left pane, choose Workloads > Deployments.
-
On the Deployments page, click Create from Image. See Create a stateless application by using a Deployment.
-
On the Basic Information wizard page, configure the parameters and click Next.
-
On the Container wizard page, go to the Environments section and click Add. Set these fields for each environment variable:
Field Value Type Secrets Variable name Environment variable name (e.g., USERNAME)Value/ValueFrom Select the Secret from Create a Secret and the key ( usernameorpassword)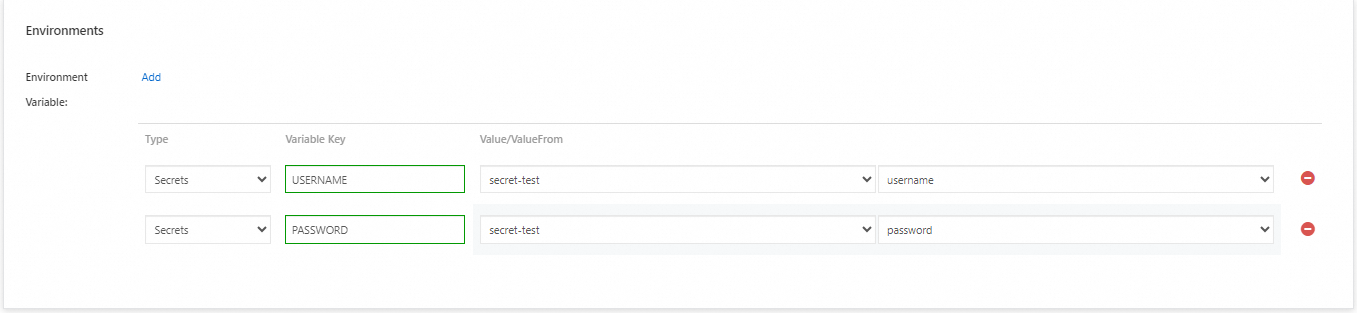
-
On the Advanced wizard page, configure remaining parameters and click Create.
Next steps
-
Manage Secrets — create, view, and delete Secrets in the ACK console
-
Secrets — Kubernetes official documentation on Secret types, immutability, and best practices