This topic addresses common issues with services in Container Service for Kubernetes (ACK), such as the inability to access a Classic Load Balancer (CLB) IP address from within a cluster, failures when reusing a CLB instance, and Cloud Controller Manager (CCM) upgrade failures.
Frequently asked questions
CLB-related questions
-
What are the CLB instances created by an ACK cluster used for?
-
How do I choose between the Local and Cluster external traffic policies?
-
Why are no events displayed for Service and LoadBalancer synchronization?
-
Why is a CLB IP address inaccessible from within the cluster?
-
How do I enable connection draining for a LoadBalancer Service?
Common questions about reusing an existing CLB instance
Other questions
CLB questions
Default CLB instances in an ACK cluster
If you install the Nginx Ingress add-on when you create a Kubernetes cluster, two Classic Load Balancer (CLB) instances are created by default.
The two CLB instances serve the following purposes:
-
API Server CLB: This CLB instance serves as the access endpoint for the API server. All requests to the cluster are routed through this CLB instance. It listens on TCP port 6443. The backend servers are API server pods or master ECS instances.
-
Nginx Ingress Controller CLB: This CLB instance is associated with the
nginx-ingress-controllerService in the kube-system namespace. The vServer group dynamically binds to Nginx Ingress Controller pods to load balance and route external requests. It listens on TCP ports 80 and 443.
For more information, see The specific purposes of CLB instances in an ACK cluster.
Choosing between Local and Cluster policies
The Local and Cluster external traffic policies behave differently depending on the network plugin. For more information about the differences between the two policies, see External traffic policies.
No events for Service-LoadBalancer sync
If no Events are displayed after you run the kubectl -n {your-namespace} describe svc {your-svc-name} command, check your CCM component version.
-
Versions earlier than v1.9.3.276-g372aa98-aliyun: Earlier versions of the CCM component do not display Events for the synchronization between Services and LoadBalancers. You must upgrade the component. For information about how to view and upgrade the CCM version, see Upgrade the CCM component.
-
Versions v1.9.3.276-g372aa98-aliyun and later: Submit a ticket.
CLB instance stuck in Pending state
-
Run the
kubectl -n {your-namespace} describe svc {your-svc-name}command to view Events. -
Resolve any errors reported in the Events. For information about how to handle different error messages, see Error Events and solutions.
If no error messages are displayed, see Why are no Events displayed for the synchronization between Services and LoadBalancers?.
CLB vServer group not updated
-
Run the
kubectl -n {your-namespace} describe svc {your-svc-name}command to view Events. -
Resolve any errors reported in the Events. For information about how to handle different error messages, see Error Events and solutions.
If no error messages are displayed, see Why are no Events displayed for the synchronization between Services and LoadBalancers?.
Service annotation not taking effect
-
Check for error messages.
-
Run the
kubectl -n {your-namespace} describe svc {your-svc-name}command to view Events. -
Resolve any errors reported in the Events. For information about how to handle different error messages, see Error Events and solutions.
-
-
If no error messages are reported, resolve the issue based on one of the following scenarios:
-
Verify that your CCM version meets the requirements for the annotation. For more information about the version mappings between annotations and CCM, see Use annotations to configure a Classic Load Balancer (CLB).
-
Log on to the Container Service for Kubernetes console. On the Services page, click the name of the target Service and check whether the Service contains the required annotation. If not, add the annotation.
For more information about how to add annotations, see Use annotations to configure a Classic Load Balancer (CLB).
For more information about how to view the list of Services, see Manage Services.
-
Verify that the annotation is configured correctly.
-
Unintended CLB configuration changes
The CCM component uses a declarative API and automatically updates the CLB configuration based on the Service configuration under specific conditions. Any changes that you make in the CLB console are at risk of being overwritten. We recommend that you configure the CLB instance by using annotations. For more information, see Use annotations to configure a Classic Load Balancer (CLB).
Do not manually modify the configuration of CLB instances that are created and managed by Kubernetes in the CLB console. Otherwise, the configuration may be overwritten and the Service may become inaccessible.
CLB IP inaccessible from within cluster
-
Scenario 1: You use a private IP address for a CLB instance that was not created by a Service. A client pod and a backend pod might be scheduled on the same node, which causes access from within the cluster to fail.
For Layer 4 load balancing, a backend ECS instance cannot act as both a client and a backend server. You can use one of the following methods to resolve this issue:
-
Change the CLB IP address to a public IP address.
-
Create the CLB instance by using a Service and set the external traffic policy to Cluster. In this case, kube-proxy intercepts traffic that is sent to the CLB instance from within the cluster and bypasses the CLB instance.
-
-
Scenario 2: You set the external traffic policy to Local when you expose a Service. This causes access to the CLB IP address from within the cluster to fail.
For more information about the cause and solution, see How do I resolve connectivity issues to a CLB address exposed by a LoadBalancer Service in a Kubernetes cluster?.
Connectivity issues to a LoadBalancer Service
Problem
In a Kubernetes cluster, some nodes can access the CLB address exposed by a Service with externalTrafficPolicy: Local, but others cannot. This issue is common with Ingresses.
Cause
The cause is that the Service is configured with externalTrafficPolicy: Local. When a pod within the cluster accesses the Service's external IP, the request is not routed out to the CLB instance. Instead, kube-proxy on the source node intercepts the traffic and tries to forward it directly to a local backend pod for that Service.
If no backend pod for the Service is running on that specific node, the request fails because there is no local endpoint to route to. For more information, see kube-proxy adds external-lb IP to node-local iptables rule.
Solution
You can use one of the following methods to resolve the issue. Method 1 is recommended.
-
Access internal Services from within the Kubernetes cluster by using the ClusterIP or the Service name. For an Ingress, the Service name is
nginx-ingress-lb.kube-system. -
Change the value of externalTrafficPolicy to Cluster for the LoadBalancer Service. This ensures that traffic can be forwarded to pods on all nodes, but it causes source IP address loss because the cluster performs source network address translation (SNAT). This means the backend application cannot obtain the real IP address of the client. The command to modify the Ingress Service is as follows:
kubectl edit svc nginx-ingress-lb -n kube-system -
If your cluster uses Terway with ENIs or multiple IP addresses on ENIs, change the value of externalTrafficPolicy for the LoadBalancer Service to Cluster and add the
service.beta.kubernetes.io/backend-type: "eni"annotation to enable ENI passthrough. This method preserves the source IP address and ensures accessibility from within the cluster. For more information, see Use annotations to configure a Classic Load Balancer (CLB).apiVersion: v1 kind: Service metadata: annotations: service.beta.kubernetes.io/backend-type: eni labels: app: nginx-ingress-lb name: nginx-ingress-lb namespace: kube-system spec: externalTrafficPolicy: Cluster
When are CLB instances automatically deleted?
The automatic deletion policy depends on whether the CLB instance was automatically created by the CCM component. The following table describes the deletion policies.
|
Action |
CCM-created CLB instance |
Reused CLB instance |
|
Delete the Service |
The CLB instance is deleted |
The CLB instance is retained |
|
Change the type of the LoadBalancer Service |
The CLB instance is deleted |
The CLB instance is retained |
Service deletion and CLB instances
If you reuse an existing CLB instance by specifying the service.beta.kubernetes.io/alibaba-cloud-loadbalancer-id: {your-slb-id} annotation in the Service, deleting the Service does not delete the CLB instance. Otherwise, the CLB instance is deleted when you delete the Service.
If you change the Service type (for example, from LoadBalancer to NodePort), the CLB instance that was automatically created by CCM is also deleted.
Do not modify a Service to switch from a CCM-created CLB instance to a reused one. This action breaks the association between the Service and the automatically created CLB instance, which prevents the CLB instance from being automatically deleted when you delete the Service.
Accidental CLB instance deletion
-
Scenario 1: You accidentally delete the API Server CLB instance
The instance cannot be recovered. You must recreate the cluster. For more information, see Create an ACK Pro cluster.
-
Scenario 2: You accidentally delete the Ingress CLB instance
The following steps describe how to recreate the CLB instance by using an Nginx Ingress as an example.
Log on to the ACK console. In the left navigation pane, click Clusters.
-
On the Clusters page, click the name of your cluster. In the left navigation pane, click .
-
On the Service page, select kube-system from the Namespace drop-down list.
-
Find the nginx-ingress-lb Service, click Edit YAML in the Actions column, remove the
status.loadBalancerfield and its sub-fields, and then click OK, which prompts CCM to recreate the CLB instance. -
If the nginx-ingress-lb Service is not in the list, click Create from YAML in the upper-left corner and use the following template to create a Service named nginx-ingress-lb.
apiVersion: v1
kind: Service
metadata:
  labels:
    app: nginx-ingress-lb
  name: nginx-ingress-lb
  namespace: kube-system
spec:
  externalTrafficPolicy: Local
  ports:
  - name: http
    port: 80
    protocol: TCP
    targetPort: 80
  - name: https
    port: 443
    protocol: TCP
    targetPort: 443
  selector:
    app: ingress-nginx
  type: LoadBalancer
-
-
Scenario 3: You accidentally delete a business-related CLB instance
-
If you no longer need the Service that corresponds to the CLB instance, delete the Service.
-
If the Service is still in use, perform the following steps:
Log on to the ACK console. In the left navigation pane, click Clusters.
-
On the Clusters page, click the name of your cluster. In the left navigation pane, click .
-
On the Service page, select All Namespaces from the Namespace drop-down list and find your business Service.
-
In the Actions column for the target Service, click Edit YAML, remove the status field, and then click Update, which prompts CCM to recreate the CLB instance.
-
Enable CLB renaming for old CCM versions
CLB instances created by CCM v1.9.3.10 and later are automatically tagged to support renaming. For CLB instances created by versions earlier than v1.9.3.10, you must manually add a specific tag to enable renaming.
-
This method is required only for CLB instances that are created by CCM versions earlier than v1.9.3.10.
-
The Service type must be LoadBalancer.
-
Log on to a master node of the Kubernetes cluster. For more information, see Obtain the kubeconfig file of a cluster and use kubectl to connect to the cluster.
-
Run the
kubectl get svc -n ${namespace} ${service}command to view the Service type and IP address. Note
NoteReplace namespace and service with the actual namespace and Service name.
-
Run the following command to generate the required tag for the CLB instance.
kubectl get svc -n ${namespace} ${service} -o jsonpath="{.metadata.uid}"|awk -F "-" '{print "kubernetes.do.not.delete: "substr("a"$1$2$3$4$5,1,32)}'
-
Log on to the CLB console. Search for the CLB instance in the corresponding region based on the IP address that you obtained in Step 2.
-
Add a tag to the CLB instance by using the key and value generated in Step 3. The key and value correspond to 1 and 2 in the preceding figure. For more information, see Create and manage CLB instances.
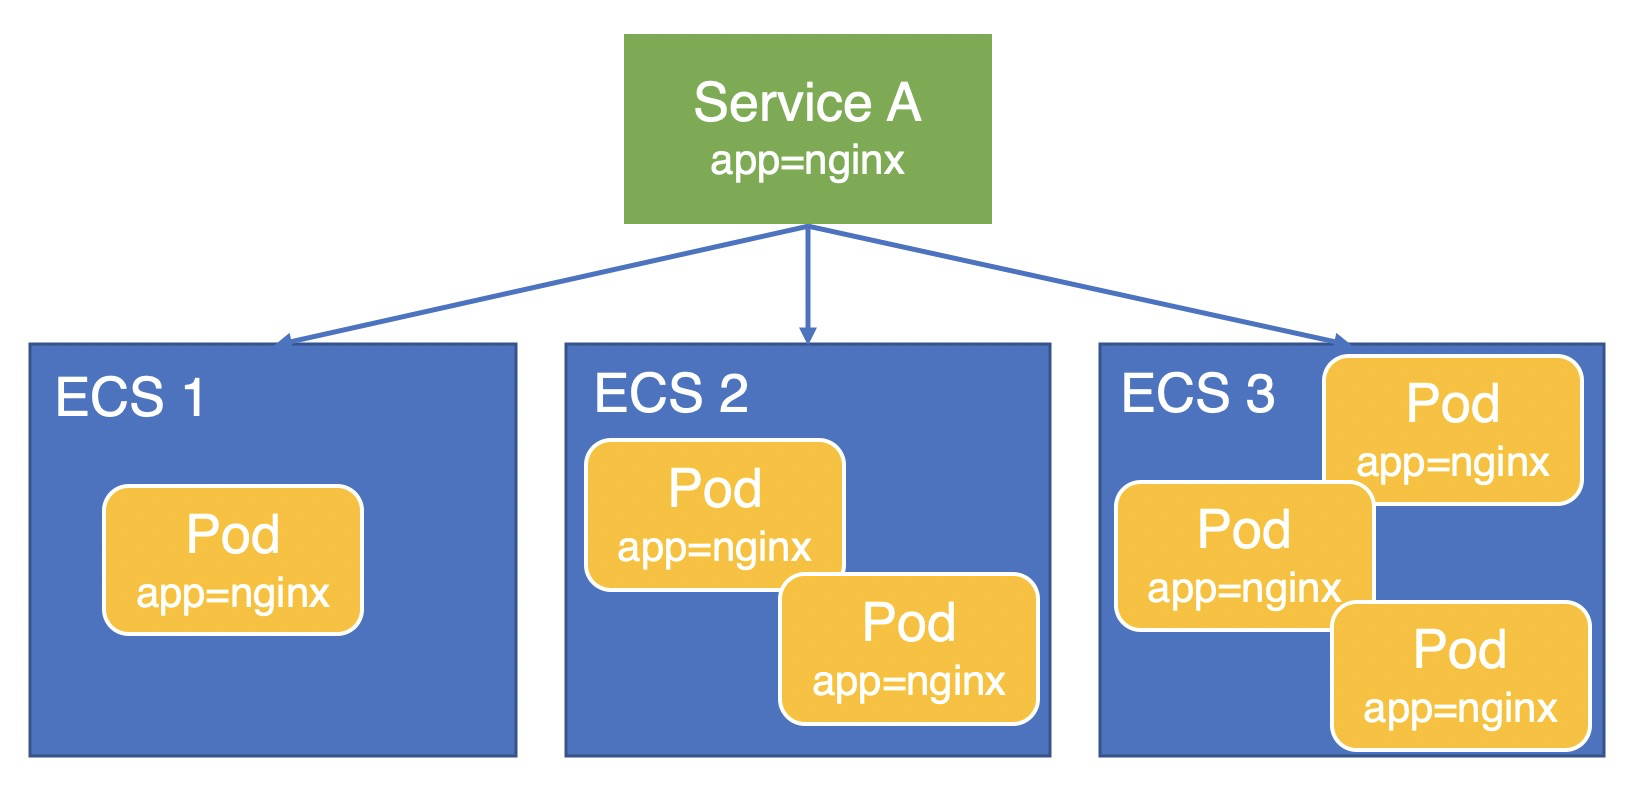
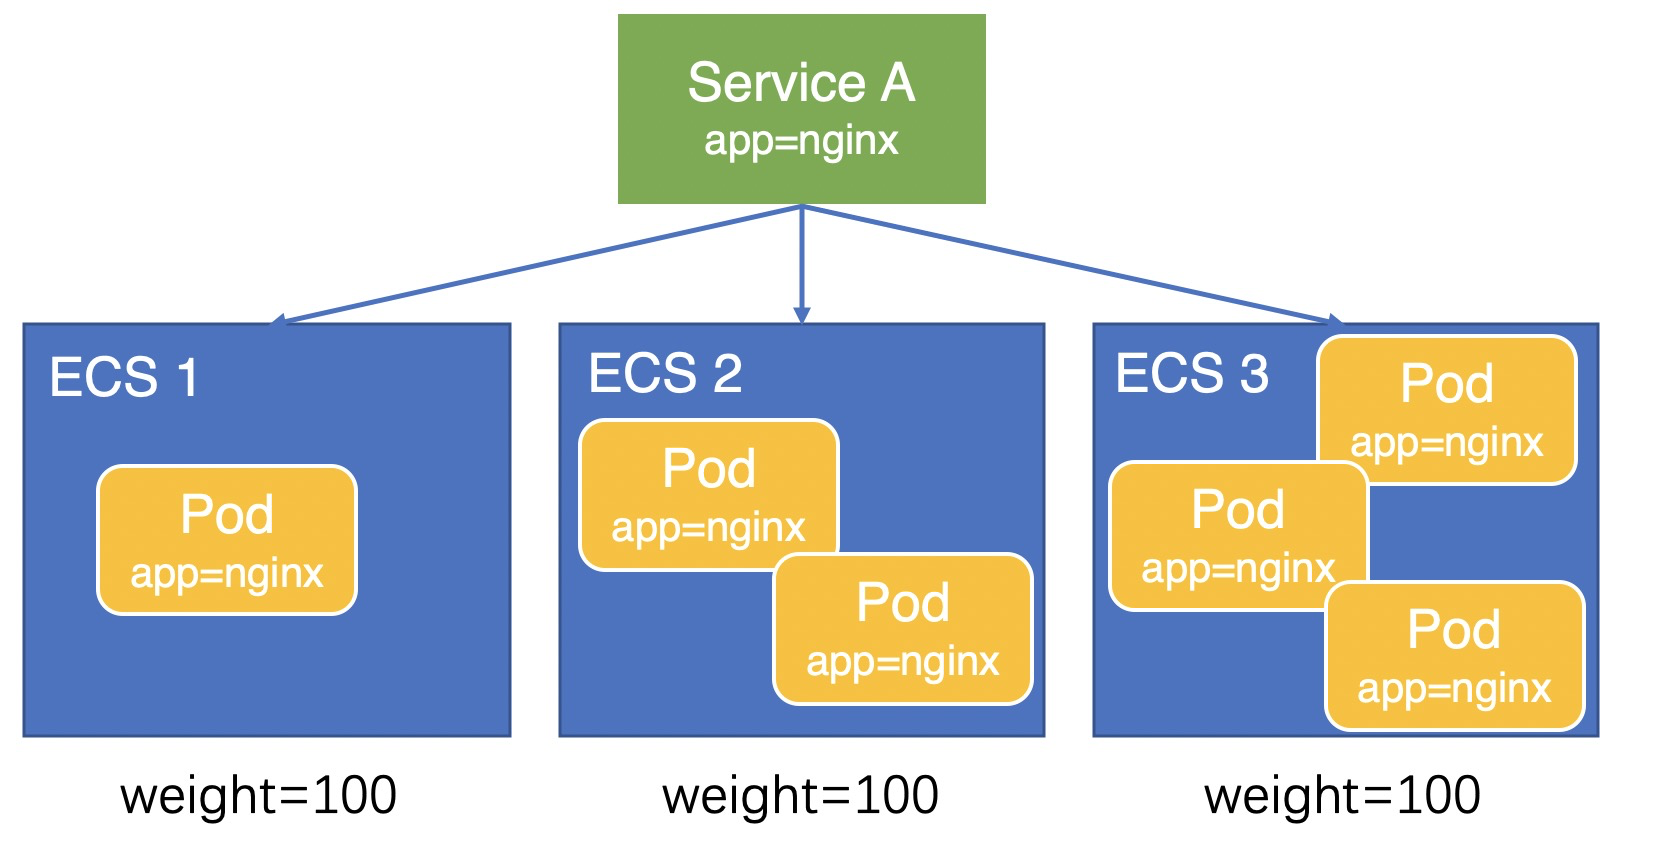
Automatic node weight calculation in Local mode
This section uses an example where an application pod (app=nginx) is deployed on three ECS instances and exposed through a Service to explain how node weights are calculated in Local mode.
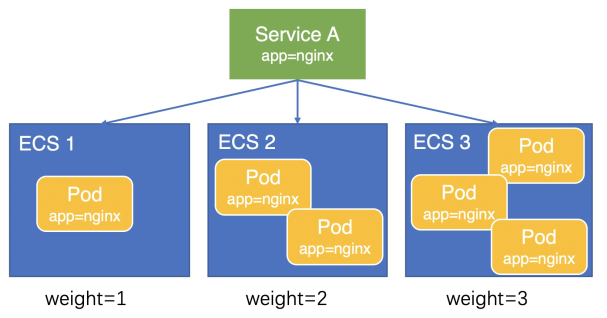
CCM v1.9.3.276-g372aa98-aliyun and later
Due to precision issues in weight calculation, a slight load imbalance may still exist among pods. In CCM v1.9.3.276-g372aa98-aliyun and later, CCM sets the node weight to the number of pods deployed on the node. As shown in the following figure, the weights of the three ECS instances are 1, 2, and 3, respectively. Traffic is distributed to the three ECS instances at a 1:2:3 ratio, resulting in more balanced pod loads.
The formula is as follows:
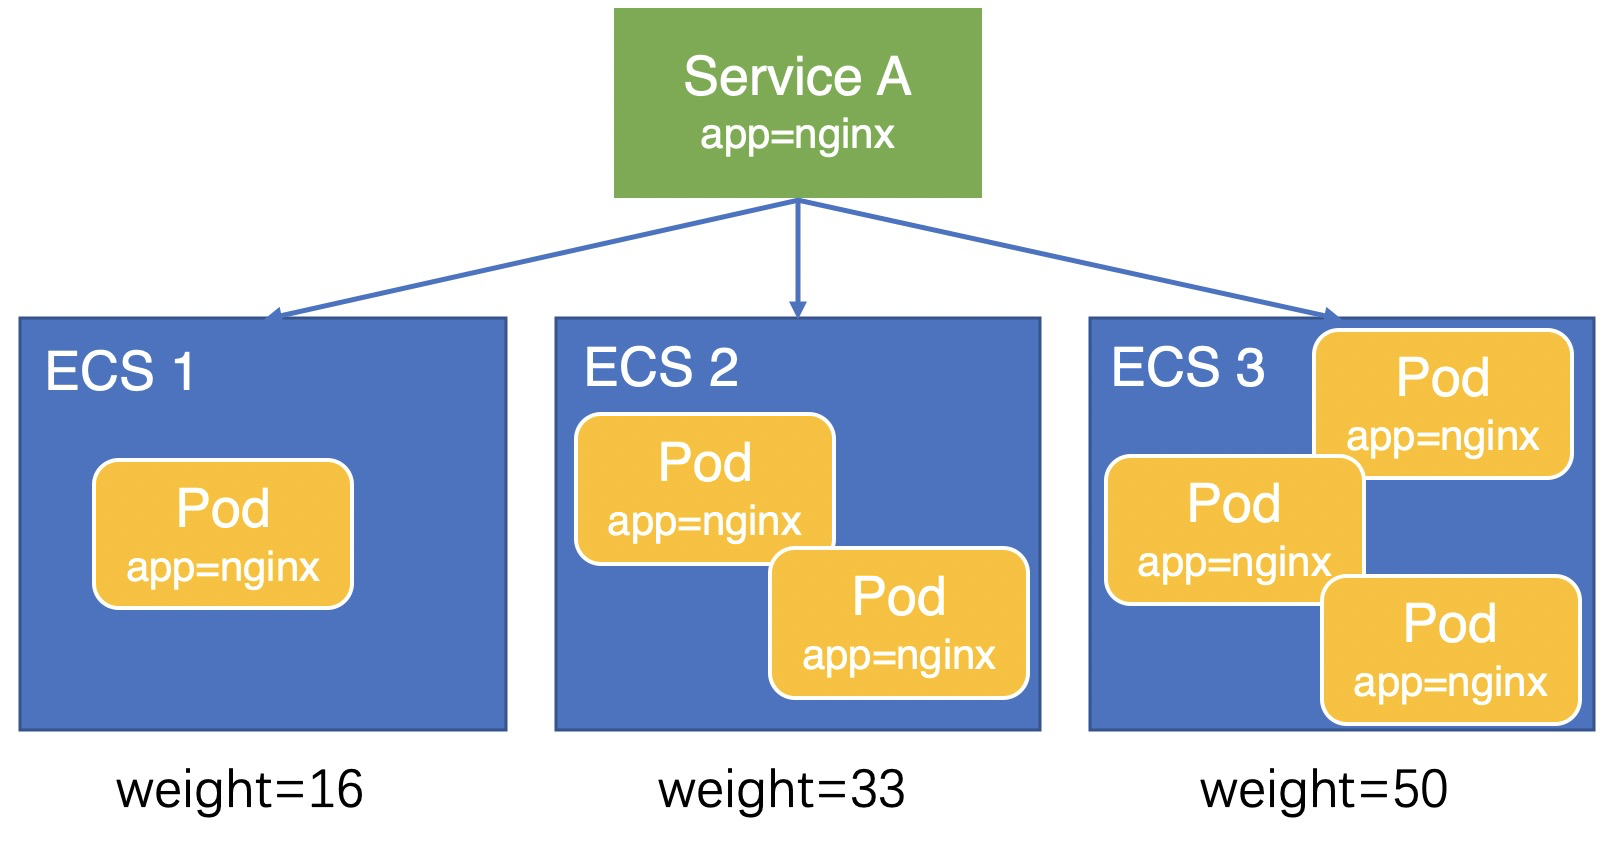
Between CCM v1.9.3.164-g2105d2e-aliyun and v1.9.3.276-g372aa98-aliyun
As shown in the figure, in CCM versions later than v1.9.3.164-g2105d2e-aliyun and earlier than v1.9.3.276-g372aa98-aliyun, CCM calculates node weights based on the number of pods on each node. The calculated weights for the three ECS instances are 16, 33, and 50. Therefore, traffic is distributed to the three ECS instances at an approximate 1:2:3 ratio, which achieves a more balanced load across pods.
The formula is as follows: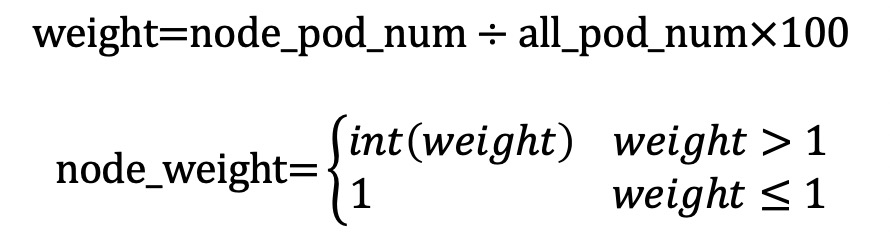
Versions earlier than CCM v1.9.3.164-g2105d2e-aliyun
As shown in the following figure, in versions earlier than CCM v1.9.3.164-g2105d2e-aliyun, all backends of a Local-mode Service have a weight of 100. This means traffic is evenly distributed among the three ECS instances. This results in a heavier load on pods on ECS 1 and a lighter load on pods on ECS 3, leading to an unbalanced load across pods.
Querying CLB instance details
-
Obtain the kubeconfig file of a cluster and use kubectl to connect to the cluster.
-
Run the following command to obtain the name, IP address, and address type of each LoadBalancer Service in all namespaces.
kubectl get services -A -ojson | jq '.items[] | select(.spec.type == "LoadBalancer") | {name: .metadata.name, namespace: .metadata.namespace, ip: .status.loadBalancer.ingress[0].ip, lb_type: .metadata.annotations."service.beta.kubernetes.io/alibaba-cloud-loadbalancer-address-type"}'Sample output:
{
  "name": "test",
  "namespace": "default",
  "ip": "192.168.*.*",
  "lb_type": "intranet"
}
{
  "name": "nginx-ingress-lb",
  "namespace": "kube-system",
  "ip": "47.97.*.*",
  "lb_type": "null"
}
Enable graceful connection termination
You can configure connection draining by using the service.beta.kubernetes.io/alibaba-cloud-loadbalancer-connection-drain and service.beta.kubernetes.io/alibaba-cloud-loadbalancer-connection-drain-timeout annotations. After a backend server is removed from the Service, the CLB instance continues to process existing connections for the specified drain timeout period. For more information, see Enable connection draining for a listener.
FAQ: Reusing an existing CLB instance
Why does reusing a CLB instance fail?
-
Check the CCM version. Versions earlier than v1.9.3.105-gfd4e547-aliyun do not support reusing CLB instances. To upgrade, see Upgrade the CCM component.
-
You cannot reuse a CLB instance created by the cluster.
-
You cannot reuse the CLB instance associated with the API server.
-
If you reuse a private-facing CLB instance, it must be in the same VPC as the cluster. Cross-VPC reuse is not supported.
Missing listeners when reusing a CLB
Check whether the service.beta.kubernetes.io/alibaba-cloud-loadbalancer-force-override-listeners annotation is set to "true". If this annotation is not configured, listeners are not automatically created.
By default, reusing an existing load balancer does not overwrite its listeners for the following reasons:
If services are bound to the listeners of the existing load balancer, forcibly overwriting the listeners may cause service disruptions.
CCM has limited support for backend configurations and cannot handle some complex setups. If you have complex backend requirements, you can configure listeners in the console without overwriting them.
Therefore, we recommend against forcibly overwriting listeners. You can forcibly overwrite a listener only if its port on the existing load balancer is no longer in use.
FAQ
What if a CCM upgrade fails?
For troubleshooting steps, see Cloud Controller Manager (CCM) component upgrade check fails.
Service error messages and solutions
The following table describes common error messages and their solutions.
Error message | Description and solution |
| The number of backend servers exceeds the quota for the CLB instance. Solution: You can use the following methods to optimize quota usage.
|
| Shared-resource CLB instances do not support elastic network interfaces (ENIs). Solution: If the backend of your CLB instance uses ENIs, you must use a performance-guaranteed CLB instance. Add the Important Make sure that the annotations you add are compatible with your CCM version. For more information about the compatibility between annotations and CCM versions, see Configure a Classic Load Balancer (CLB) instance by using annotations. |
| No backend server is associated with the CLB instance. Verify that the Service is associated with a pod and that the pod is running as expected. Solution:
|
| The system cannot associate the Service with a CLB instance. Solution: Log on to the SLB console and search for the CLB instance in the Service's region based on the
|
| Your account has overdue payments. |
| The account balance is less than CNY 100. Please top up your account. |
| The CLB instance has triggered API rate limiting. Solution:
|
| The listener associated with the vServer group cannot be deleted. Solution:
|
| When you reuse an internal-facing CLB instance, the CLB instance and the cluster are not in the same virtual private cloud (VPC). Solution: Ensure that the CLB instance and cluster are in the same VPC. |
| The vSwitch has insufficient available IP addresses. Solution: Use the |
| The specified vSwitch does not exist. Solution:
|
| The Solution: Change the value of the |
| Older versions of CCM create shared-resource CLB instances by default. This type of CLB instance has been discontinued. Solution: Upgrade the CCM. |
| You cannot change the resource group of a CLB instance after it is created. Solution: Remove the |
| The specified ENI IP address cannot be found in the VPC. Solution: Check if the |
| The billing method of the CLB instance cannot be changed from pay-as-you-go to pay-by-specification. Solution:
|
| This error occurs when you attempt to reuse a CLB instance that was automatically created by the CCM. Solution:
|
| A CLB instance's type cannot be changed after it is created. This error occurs if you change the CLB type after creating the Service. Solution: Delete and recreate the Service. |
| The Service is already bound to a CLB instance and cannot be bound to another. Solution: You cannot reuse an existing CLB instance by changing the CLB ID in the |
Configuring a listener for a NodePort Service
CCM supports listener configuration only for LoadBalancer Services. You must change the Service type from NodePort to LoadBalancer.
How do I access a NodePort Service?
-
If you access a Service from within the cluster (on a cluster node), you can use ClusterIP+Port or Node IP+the Service's NodePort. The default NodePort is greater than 30000.
-
If you access the Service from outside the cluster, you can use the IP address of a node and the NodePort of the Service. The default NodePort is greater than 30000.
-
From outside the VPC (from another VPC or the internet): You must change the Service type to LoadBalancer and then access it through the Service's external endpoint.
NoteIf your Service has its external traffic policy set to Local, ensure that the node you are accessing hosts one of the Service's backend pods. For more information, see External traffic policies.
How do I configure the NodePort range?
In Kubernetes, the API server provides the ServiceNodePortRange parameter (the --service-node-port-range command-line argument), which restricts the range of NodePorts that can be used by NodePort or LoadBalancer Services. The default range is 30000–32767. In an ACK Pro cluster, you can modify this range by customizing the control plane parameters. For more information, see Customize control plane parameters for an ACK Pro cluster.
-
Exercise caution when you modify the NodePort range. Ensure that the NodePort range does not conflict with the range specified by the
net.ipv4.ip_local_port_rangeLinux kernel parameter on your cluster nodes. Theip_local_port_rangeparameter controls the range of ephemeral ports that applications on the system can use. The default value forip_local_port_rangeis 32768–60999. -
In a default ACK cluster configuration, the
ServiceNodePortRangeandip_local_port_rangeparameters do not conflict. If you previously modified either of these parameters to increase the number of available ports and their ranges now overlap, sporadic network issues may occur. In severe cases, this can lead to health check failures and nodes going offline. We recommend that you either restore the default values or adjust the port ranges so they no longer overlap. -
After you adjust the port range, some NodePort or LoadBalancer Services in the cluster may still be using a NodePort that falls within the
ip_local_port_range. You must reconfigure these Services to avoid conflicts. You can runkubectl edit <service-name>and change the value of thespec.ports.nodePortfield to an unused NodePort.
ACK dedicated cluster: How do I add the required permissions when upgrading the CCM component to a new version?
To improve performance, newer versions of CCM introduce Alibaba Cloud APIs that require additional Resource Access Management (RAM) permissions. For example, v2.11.2 adds route management for Flannel networks, and v2.12.1 adds batch management for Network Load Balancer (NLB).
Therefore, before you upgrade the CCM component to v2.11.2 or later in an ACK dedicated cluster, you must grant the required permissions to its master RAM role for the component to function correctly.
Log on to the ACK console. In the left navigation pane, click Clusters.
-
On the Clusters page, click the name of your cluster. In the left navigation pane, click Cluster Information.
-
Click the Basic Information tab. In the Cluster Resources section, click the role name for Master RAM Role.
-
On the role details page in the RAM console, click Permissions. In the list of authorized policies, find the custom policy that starts with
k8sMasterRolePolicy-Ccm-and click the policy name to go to the policy management page.For older clusters, this policy may not exist. You can select a custom policy whose name starts with
k8sMasterRolePolicy-. -
Click Edit and add the
nlb:ListAsynJobspermission to the NLB-related permissions.

For Flannel clusters, you must also add the vpc:CreateRouteEntries and vpc:DeleteRouteEntries permissions to the VPC-related permissions.

After you add the permissions and save the policy, you can proceed with the CCM component upgrade.