Configure a shared NAS volume
Set up a NAS file system as a shared PV and PVC in your ACK cluster to store Arena training data.
Before you begin
Make sure you have:
A running ACK cluster
Permissions to create NAS file systems and manage ACK storage resources
An Elastic Compute Service (ECS) instance in the same Virtual Private Cloud (VPC) as your ACK cluster, for mounting and populating the NAS file system
Usage notes
Note the following constraints:
VPC co-location required. The NAS file system, its mount target, and your ACK cluster must all reside in the same VPC.
Protocol type affects multi-writer performance. NFSv3 performs better when multiple ECS instances do not write to the same file concurrently. Extreme NAS supports NFSv3 only.
PV capacity is used for matching only. The capacity values do not cap actual storage. Actual limits depend on the NAS file system specifications.
Static PVs do not support `archiveOnDelete`. Setting Delete on a static PV does not actually delete PV or NAS data. Use Retain (default) unless using dynamically provisioned NAS volumes.
Background information
Configuring a shared storage volume for Arena job environments preserves data scientists' work (code and data) so that it is not lost when containers are deleted, and makes shared training data easy to access. In team development, allocating a shared storage pool lets data and code be shared across the team.
When submitting an Arena job, you can use the --data parameter to declare shared storage and a mount path. The shared storage is mounted at the specified directory, and subsequent jobs can reuse this data or code.
In Kubernetes, storage objects are described by Persistent Volumes (PVs) and Persistent Volume Claims (PVCs). As a cluster administrator, when assigning environments, create a separate PVC for each data scientist. For example, PVCs for user A and user B can mount the same NAS or CPFS backend, but must point to different subdirectories so their working environments remain isolated.
Step 1: Create a NAS instance
Create a General-purpose NAS file system in the same region and VPC as your ACK cluster.
See Create a General-purpose NAS file system using the console.
Use the following values:
Parameter | Required value |
File system type | General-purpose NAS |
Region | Same region as your ACK cluster |
VPC | Same VPC as your ACK cluster |
Protocol type | NFS |
Step 2: Mount the file system to an ECS instance
Mount the NAS file system to an ECS instance to later populate it with training data. This step uses the one-click mount feature. See Scenarios for mounting a file system for other methods.
Mount the NAS file system
Log on to the NAS console. In the left navigation pane, choose .
In the top navigation bar, select the resource group and region of your file system.

Find your file system and click Mount in the Actions column.
On first use, NAS prompts you to assign the AliyunServiceRoleForNasEcsHandler service-linked role. Follow the on-screen instructions. See Service-linked roles of NAS.
In the Mount panel, set the mount options:
Select a mount target and click Next.
Select an ECS instance in the same VPC as the file system and click Next. If the instance is not listed, refresh the page.
NoteThis configuration supports attaching to a single ECS instance only. See Batch mount an NFS file system on multiple ECS instances for batch mounting.
Configure the mount parameters:
Parameter
Description
Required
Default
Mount path
Local directory on the ECS instance for the mount point.
Yes
—
Automatic mount
Auto-remounts the file system on ECS instance restart.
No
Enabled
Protocol type
The NFS protocol version. General-purpose NAS supports NFSv3 and NFSv4; Extreme NAS supports NFSv3 only. NFSv3 performs better when multiple instances do not write to the same file concurrently.
Yes
—
NAS directory
The NAS directory to mount. Enter
/for root or a subdirectory such as/abc. For nonexistent directories, select Confirm New Directory and set the UID, GID, and POSIX permissions.No
/(root)Mount parameters
NFS mount flags. See Mount an NFS file system on a Linux ECS instance for the full reference.
No
Default mount parameters
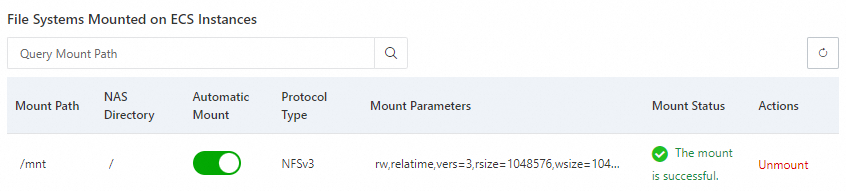
Click Complete. The mount takes 1–2 minutes. When the status shows Mounted, the file system is ready. If Failed, see Mount an NFS file system on a Linux ECS instance for troubleshooting.
Verify the mount
Connect to the ECS instance and run these commands to verify access:
mkdir /mnt/dir1
mkdir /mnt/dir2
touch /mnt/file1
echo 'some file content' > /mnt/file2
ls /mnt
The output lists dir1, dir2, file1, and file2:
dir1 dir2 file1 file2To view mount details or check capacity, run mount -l or df -h.
Each NAS file system requires a mount target. See Manage mount targets to add or look up targets. Set Mount target type to VPC and select the same VPC and vSwitch as your ACK cluster.
Step 3: Create a PV and a PVC
Register the NAS file system as a PV in your ACK cluster, then create a PVC for pod access.
Create a PV
Log on to the ACK console. In the left navigation pane, click Clusters.NAS console
On the Clusters page, click the target cluster. In the left navigation pane, choose Volumes > Persistent Volumes.
On the Persistent Volumes page, click Create. Set the following parameters and click OK.
Parameter
Description
Required
Default
Example
PV type
Select NAS.
Yes
—
NAS
Name
The PV name. Must be unique within the cluster.
Yes
—
pv-nasCapacity
Used for PVC matching only. Does not cap actual storage. See General-purpose NAS file systems and Extreme NAS file systems for capacity limits.
Yes
—
5 GiAccess mode
ReadWriteMany: multiple nodes mount as read-write. ReadWriteOnce: single node only.
Yes
—
ReadWriteManyEnable CNFS
Enables Container Network File System (CNFS) for automated O&M, cache acceleration, and performance monitoring. See Create a CNFS to manage a NAS file system (Recommended) to manage existing file systems.
No
Disabled
Disabled
Mount target domain name
Available when CNFS is disabled. The NAS mount target address. Select an existing target or enter a custom domain. See Manage mount targets to look up addresses.
Yes (when CNFS is disabled)
—
0c47****-mpk25.cn-shenzhen.nas.aliyuncs.coMount path (Advanced)
The NAS subdirectory to mount. For Extreme NAS, must start with
/share(e.g.,/share/data). Nonexistent directories are created automatically.No
/(root)/dataReclaim policy
Retain (default): PV and NAS data are preserved when the PVC is deleted; manual cleanup required. Delete: requires
archiveOnDelete. Static PVs do not supportarchiveOnDelete, so PV and data persist regardless. See Use dynamically provisioned NAS volumes forarchiveOnDeleteconfiguration.No
Retain
RetainMount options
The NFS protocol version and mount flags. NFSv3 performs better for ML training reads without concurrent writes.
No
—
nolock,tcp,noresvportvers=3Label
Labels for the PV.
No
—
pv-nas
The PV appears on the Persistent Volumes page.
Create a PVC
In the navigation pane, choose Storage > Persistent Volume Claims.
On the Persistent Volume Claims page, click Create. Set the following parameters and click OK.
Parameter
Description
Required
Default
Example
PVC type
Select NAS.
Yes
—
NAS
Name
The PVC name. Must be unique within the cluster.
Yes
—
pvc-nasAllocation mode
Use Existing Persistent Volume: binds to the PV above. Create Volume: provisions a new PV inline.
Yes
—
Use Existing Persistent Volume
Existing volumes
The PV created above.
Yes (when using existing PV)
—
pv-nasCapacity
The claimed storage capacity. Used for PVC-to-PV matching only.
Yes
—
5
Verify the PV and PVC
Confirm the PVC is bound to the PV. Connect to any node in the ACK cluster and run:
kubectl get pvc pvc-nasThe output shows the PVC in Bound state:
NAME       STATUS   VOLUME   CAPACITY   ACCESS MODES   STORAGECLASS   AGE
pvc-nas    Bound    pv-nas   5Gi        RWX                           1m
If Pending, verify the PV name and access modes match.
Step 4: Populate the PVC with data
A Kubernetes cluster accesses shared data through PVCs (which point to the NAS instance created in Step 1), so you only need to populate the NAS backing the PVC. The following procedure creates two Kubernetes Jobs that copy the PyTorch and TensorFlow MNIST datasets from example container images into the NAS at the specified directories. The example uses the PVC pvc-nas from Step 3.
Create a file named
prepare-pytorch-mnist-data.yamlwith the following content:apiVersion: batch/v1 kind: Job metadata: name: prepare-pytorch-mnist-data namespace: default spec: completions: 1 parallelism: 1 backoffLimit: 3 ttlSecondsAfterFinished: 3600 template: spec: containers: - name: pytorch-mnist-example image: kube-ai-registry.cn-shanghai.cr.aliyuncs.com/kube-ai/pytorch-mnist-example:2.5.1-cuda12.4-cudnn9-runtime imagePullPolicy: Always command: - /bin/bash - -c args: - | set -eux mkdir -p /mnt/pytorch_data/MNIST/raw cp -r /data/MNIST/raw/* /mnt/pytorch_data/MNIST/raw || { echo "Copy failed"; exit 1; } echo "MNIST data prepared successfully at /mnt/pytorch_data/MNIST/raw." resources: requests: cpu: 100m memory: 128Mi limits: cpu: 100m memory: 128Mi volumeMounts: - name: training-data mountPath: /mnt volumes: - name: training-data persistentVolumeClaim: claimName: pvc-nas restartPolicy: NeverCreate the Job to copy the PyTorch MNIST dataset to
/pytorch_dataon NAS:# Create the Job kubectl create -f prepare-pytorch-mnist-data.yaml # Wait for the Job to complete kubectl wait --for=condition=complete --namespace=default --timeout=300s job/prepare-pytorch-mnist-dataWhen the Job finishes successfully, the output is:
job.batch/prepare-pytorch-mnist-data condition metCreate a file named
prepare-tensorflow-mnist-data.yamlwith the following content:apiVersion: batch/v1 kind: Job metadata: name: prepare-tensorflow-mnist-data namespace: default spec: completions: 1 parallelism: 1 backoffLimit: 3 ttlSecondsAfterFinished: 3600 template: spec: containers: - name: tensorflow-mnist-example image: kube-ai-registry.cn-shanghai.cr.aliyuncs.com/kube-ai/tensorflow-mnist-example:2.15.0-gpu imagePullPolicy: Always command: - /bin/bash - -c args: - | set -eux mkdir -p /mnt/tf_data cp -r /data/mnist.npz /mnt/tf_data/mnist.npz || { echo "Copy failed"; exit 1; } echo "MNIST data prepared successfully at /mnt/tf_data/mnist.npz." resources: requests: cpu: 100m memory: 128Mi limits: cpu: 100m memory: 128Mi volumeMounts: - name: training-data mountPath: /mnt volumes: - name: training-data persistentVolumeClaim: claimName: pvc-nas restartPolicy: NeverCreate the Job to copy the TensorFlow MNIST dataset to
/tf_dataon NAS:# Create the Job kubectl create -f prepare-tensorflow-mnist-data.yaml # Wait for the Job to complete kubectl wait --for=condition=complete --namespace=default --timeout=300s job/prepare-tensorflow-mnist-dataWhen the Job finishes successfully, the output is:
job.batch/prepare-tensorflow-mnist-data condition met
This example uses the PVC namedpvc-nasin thedefaultnamespace. If your PVC has a different name or is in a different namespace, adjust the manifests accordingly.
/tf_data contains the TensorFlow MNIST data and /pytorch_data contains the PyTorch MNIST data. Both are accessible to any pod that mounts pvc-nas.
Next steps
Submit an Arena training job with
--datato mountpvc-nas.To isolate user environments, create separate PVCs pointing to different subdirectories of the same NAS file system.
For production workloads, consider enabling CNFS.