This topic explains how to enable and use the cost insights feature for registered clusters. This feature helps you analyze cost breakdowns, monitor resource utilization, and optimize your cluster's spending.
Prerequisites
The Kubernetes version of your cluster is 1.18.8 or later. If your cluster runs on an earlier version, upgrade your cluster. For more information, see Manually upgrade a cluster.
Managed Service for Prometheus is enabled. For more information, see Enable Managed Service for Prometheus.
Enable cost insights
Single account
Step 1: Configure RAM permissions
onectl
-
Install and configure onectl on your local machine. For more information, see Manage registered clusters using onectl.
Run the following command to grant RAM permissions to the ack-cost-exporter component:
onectl ram-user grant --addon ack-cost-exporterExpected output:
Ram policy ack-one-registered-cluster-policy-ack-cost-exporter granted to ram user ack-one-user-ce313528c3 successfully.
Console
Create a custom policy. The ack-cost-exporter component requires the permissions defined in the following policy:
-
Create an AccessKey for the RAM user.
WarningFor enhanced security, configure a network access control policy for the AccessKey to restrict access to trusted network environments and improve security. For more information, see AccessKey-based network access restriction policies.
Use the AccessKey pair to create a Secret named alibaba-addon-secret in the registered cluster. Run the following command to create the Secret for the ack-cost-exporter component.
kubectl -n kube-system create secret generic alibaba-addon-secret --from-literal='access-key-id=<your AccessKey ID>' --from-literal='access-key-secret=<your AccessKey Secret>'
Step 2: Install ack-cost-exporter
onectl
Run the following command to install the ack-cost-exporter component:
onectl addon install ack-cost-exporterExpected output:
Addon ack-cost-exporter, version **** installed.Console
Log on to the ACK console. In the left navigation pane, click Clusters.
On the Clusters page, click the name of the target cluster, and then in the left navigation bar, select .
If a release of ack-cost-exporter already exists on the Helm page, delete the release and then follow the subsequent steps to reinstall it.
In the left navigation bar of the cluster management page, select .
On the Add-ons page, click the Logs and Monitoring tab, find the ack-cost-exporter add-on, and click Install in the lower-right corner. Then, click OK.
Cross-account
To manage an ACK cluster in Account B from a registered cluster in Account A, you must grant permissions in Account B to allow the cost insights feature to access its bill data.
Step 1: Configure permissions for Account B
Log on to the ACK console. In the left navigation pane, click Clusters.
On the Clusters page, click the name of your cluster. In the left navigation pane, click .
Grant permissions to access the bill data of the ACK cluster.
-
ACK managed cluster: The system automatically grants the required permissions. After authorization is complete, the system creates the AliyunCSManagedCostRole role. Managed Service for Prometheus then assumes this role to access your billing data from Expenses and Costs for cost analysis.
Alternatively, click the RAM Quick Authorization link. On the RAM Quick Authorization page, click Confirm.
-
ACK dedicated cluster:
NoteThe ACK cluster in Account B does not require Managed Service for Prometheus. If this service is already enabled on the cluster, first uninstall the ack-arms-prometheus component. For more information, see Manage add-ons.
-
Step 2: Install the component in Account A
In Account A where the registered cluster resides, install Managed Service for Prometheus. For more information, see Connect a registered cluster to Managed Service for Prometheus.
In Account A where the registered cluster resides, configure the
AckRegisteredClusterIdparameter for the ack-cost-exporter component. Set the parameter to theclusterIdof the ACK cluster in Account B.Log on to the ACK console. In the left navigation pane, click Clusters.
On the Clusters page, click the name of the target cluster, and then in the left navigation bar, select .
If a release of ack-cost-exporter already exists on the Helm page, delete the release and then follow the subsequent steps to reinstall it.
In the left navigation bar of the cluster management page, select .
On the Add-ons page, click the Logs and Monitoring tab, find the ack-cost-exporter add-on, and click Install in the lower-right corner.
On the Install ack-cost-exporter page, set registeredAckClusterId to the clusterId of the cluster in Account B, and then click OK.
Usage notes
Billing data is displayed at 08:00:00 (UTC+8) on the next day after you enable the cost insights feature. To change the time range of a dashboard, click the drop-down list in the upper-right corner of the dashboard.
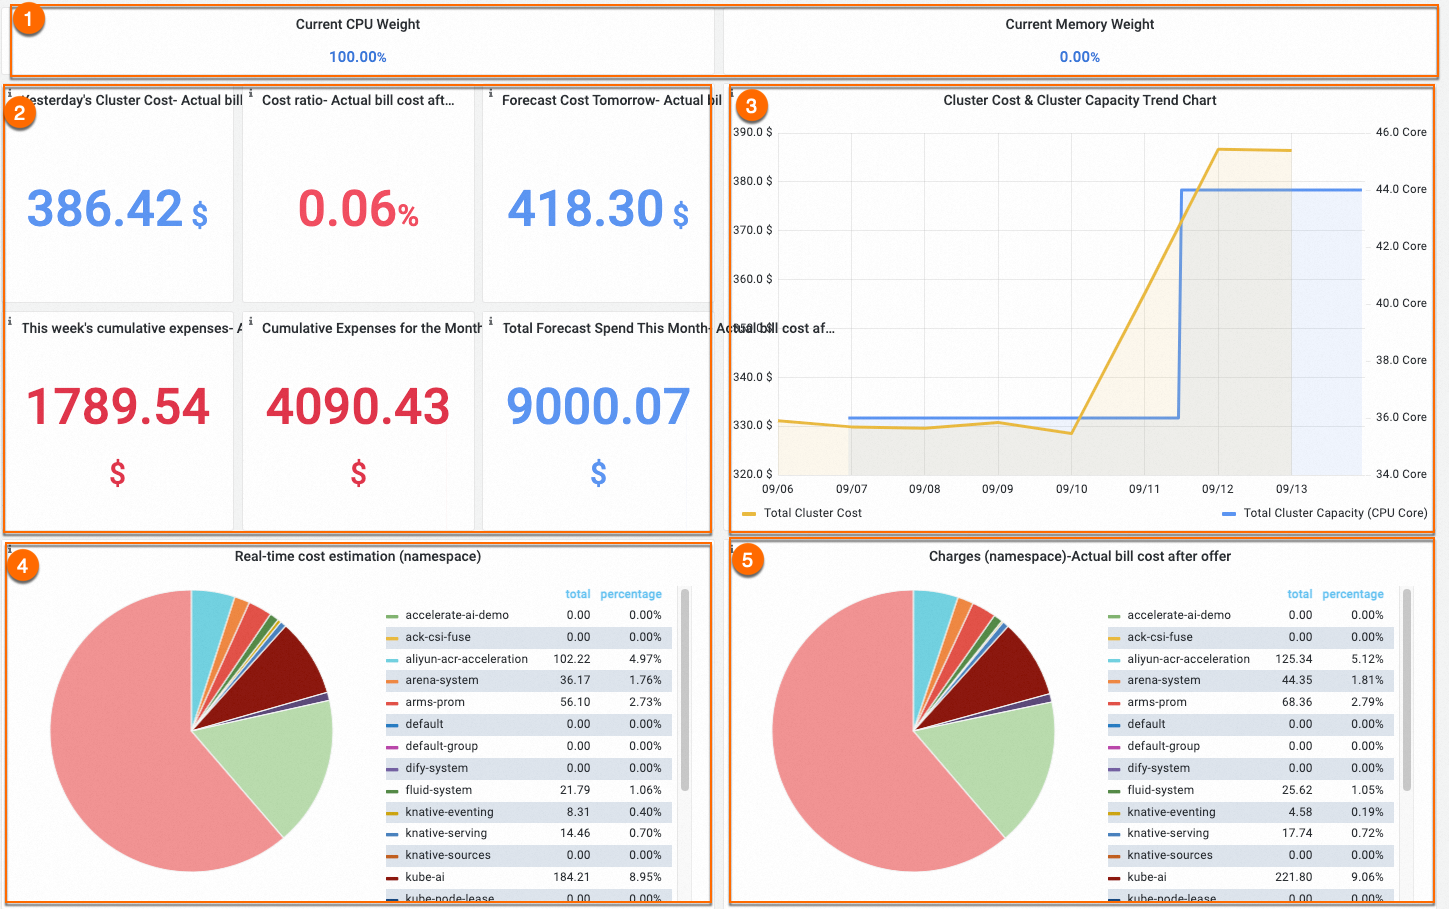
Cluster cost overview
| Metric | Number | Description |
|---|---|---|
| Cost allocation model | (1) | Displays the active cost allocation model. The CPU model is selected by default. |
| Previous day cost and cumulative costs | (2) | Shows cost of the previous day, the day-on-day ratio, cumulative cost of the current week, and cumulative cost of the current month — all based on bill amounts. Weekly and monthly costs are calculated per calendar period, so the weekly cost resets to zero on Monday and the monthly cost resets to zero on the first day of each month. Bills are generated one day after the transaction date. A green day-on-day ratio means costs decreased; red means costs increased. |
| Cost and capacity trend charts | (3) | The yellow curve shows cluster cost and the blue curve shows actual cluster capacity. When the two curves diverge, the average cost per CPU core has changed — check whether higher-priced resources are being consumed. |
| Namespace estimated and allocated costs | (4) and (5) | Section (4) shows the real-time estimated cost of each namespace, calculated as the sum of all pod costs. Section (5) shows the allocated cost per namespace — the total cluster cost multiplied by each namespace's cost ratio. Note
Namespaces with no CPU resource requests are excluded from cost calculations. The namespace cost formula is: Σ (Pod resource request / Node capacity) × Node unit price. This formula may differ from the bill amount when discounts, vouchers, or subscription billing apply. |
Cost analysis for on-premises IDC nodes
The cost insights feature can analyze costs for on-premises IDC nodes in a registered cluster and for applications deployed on these nodes. By default, cost insights calculates these costs at a unit price of 0.2CNY/Core*Hour. You can configure a custom unit price for your on-premises IDC nodes in the following ways.
Configure a uniform price for all on-premises IDC nodes
In the kube-system
namespace, add theDefaultIDCPricePerCPUCoreHourenvironment variable to the ack-cost-exporter Deployment to specify a uniform price for allon-premises IDC nodes.NoteThe price is in CNY/Core*Hour.
env:
# Set the price per core hour for each on-premises IDC node to CNY 0.3.
- name: DefaultIDCPricePerCPUCoreHour
  value: "0.3"
Configure a separate price for a specific node
Add the
"node.kubernetes.io/price-per-day"label to a specific node to configure a unique price for that node.NoteThe price is the total price per day for this node.
Run the following command to set the total daily price for a specific node to 100 CNY.
kubectl label nodes <node-name> node.kubernetes.io/price-per-day="100"
FAQ
Why is no data displayed after I enable cost analysis?
Cost data is displayed at 08:00:00 (UTC+8) the next day, and monitoring data collection starts within 3 minutes of enabling the feature. If data is still missing, check the following:
-
RAM role authorization: Make sure you completed Step 3 of Enable cost insights.
-
Internet access: In certain regions, the internal endpoint cannot query bills. Make sure your cluster has Internet access, typically through a NAT gateway.
-
Day-on-day ratio and next-day cost estimate: These metrics require two consecutive days of data and won't appear immediately after enabling the feature.
Why does the namespace cost differ from the actual bill amount?
Namespace cost is an estimate based on list prices, not the actual bill. Vouchers, discounts, and cost savings plans reduce the actual cluster bill but are not reflected in per-namespace estimates. To calculate the allocated cost of a namespace, multiply the actual cluster cost by the namespace's cost ratio.
Why can't I get cost data for pods on some nodes?
The RAM role is missing the ecs:DescribeDisks permission. Add this permission by following Step 3 of Enable cost insights.
Why doesn't the bill show all cloud services used by my cluster?
Cost insights only collects data for cloud services exclusive to your cluster. Services shared across multiple clusters are not tracked.
The feature uses cost allocation tags in the Expenses and Costs console — specifically the tag Billing Managementack.aliyun.com:{{ClusterId}}Cost Allocation Tag page — to identify cluster resources. If this tag is disabled, cost data cannot be collected. On the Cost allocation tags page of the Expenses and Costs console, enable the tag with key ack.aliyun.com and the tag with key ack.alibabacloud.com/nodepool-id.
Why is the weekly or monthly spending lower than the actual amount?
Cost data from before you enabled the cost insights feature is not included. The feature only analyzes data from the point of enablement onward.