Integrate ACK applications with AHAS
For Java applications deployed in Container Service for Kubernetes (ACK), you can use AHAS to configure flow control, degradation, and system rules to ensure system stability. This topic describes how to integrate your ACK applications with AHAS.
Prerequisites
Step 1: Install the AHAS component
You must install the AHAS component in ACK to integrate your Java applications with AHAS.
In the left-side navigation pane, choose .
On the App Catalog page, enter ack-ahas-sentinel-pilot in the search box and click the application.
On the ack-ahas-sentinel-pilot page, click Deploy in the upper-right corner. In the Create panel, select the target cluster, click Next, and then click OK.
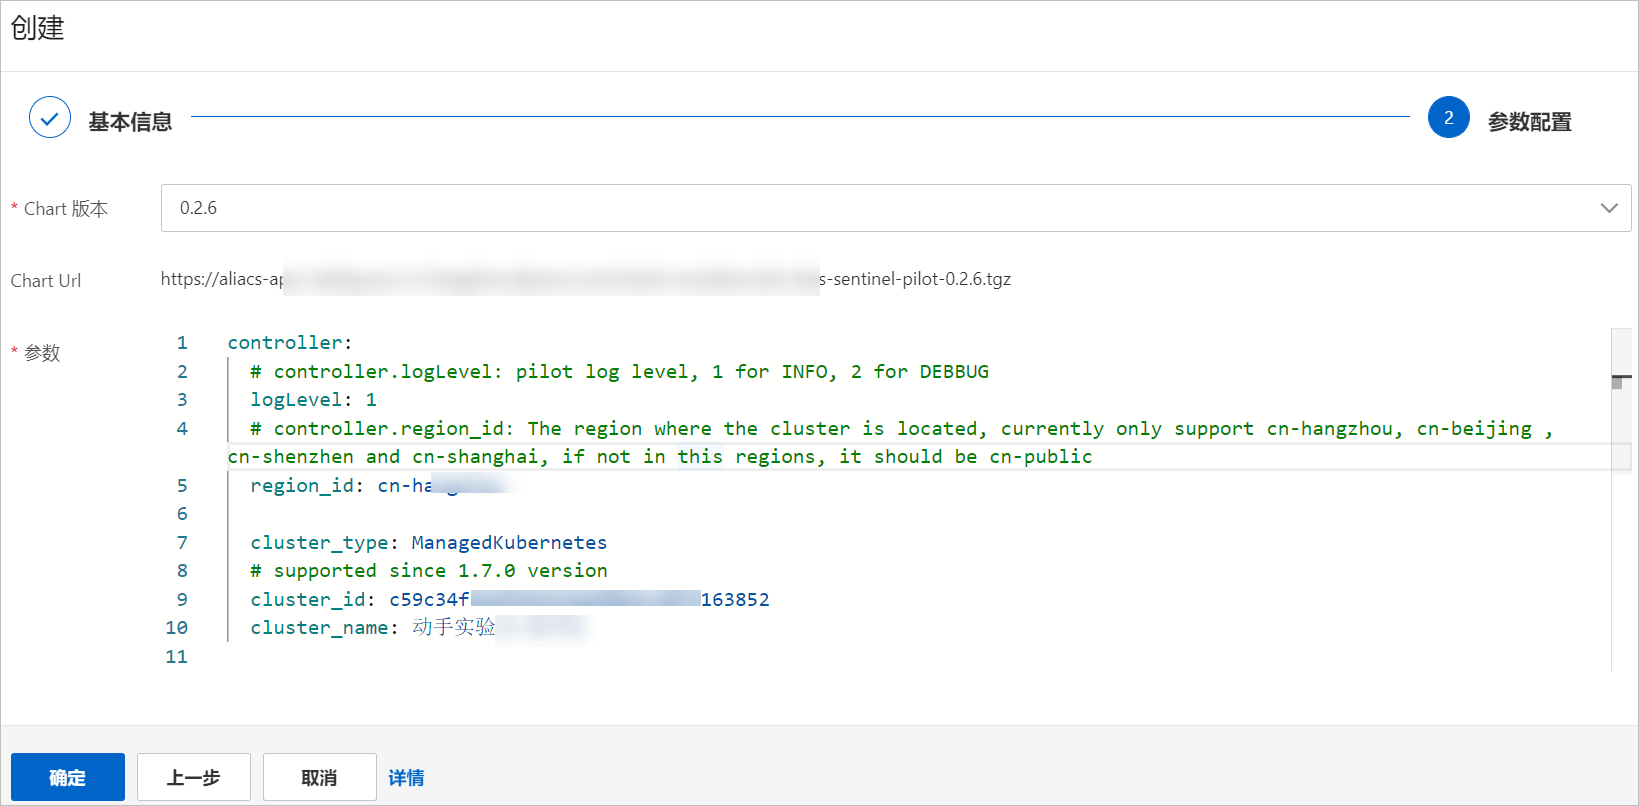
Parameter
Description
Remarks
region_id
If a dedicated connection exists between the cluster and the VPC, set this parameter to the region of the dedicated connection.
If no dedicated connection exists between the cluster and the VPC, set this parameter to cn-public.
Automatically generated from the selected cluster.
cluster_id
Your cluster ID.
cluster_name
Your cluster name.
Step 2: Enable AHAS application protection
You can enable AHAS application protection for new or existing applications.
To enable AHAS application protection for a new application:
In the left-side navigation pane, click Clusters.
On the Clusters page, click the name of the target cluster or click Details in the Actions column of the target cluster.
In the left-side navigation pane, choose .
On the Deployments page, click Create from YAML in the upper-right corner.
At the top of the Create page, select Sample Template, replace
imagein the template with the image for a Java application, add the followingannotationsin the template under the spec > template > metadata hierarchy, and then click Create.Category
Annotations
Public network
annotations:
  # Specifies whether to enable the AHAS agent. Valid values: on and true (enable), off and false (disable).
  ahasPilotAutoEnable: "on"
  # Replace <your-deployment-name> with your application name.
  ahasAppName: "<your-deployment-name>"
  # The default namespace is default.
  ahasNamespace: "default"
  # Replace <your-license> with your actual license key.
  ahasLicenseKey: "<your-license>"
  ahasRegionId: "cn-public"
Internal network
annotations: # Specifies whether to enable the AHAS agent. Valid values: on and true (enable), off and false (disable). ahasPilotAutoEnable: "on" # Replace <your-deployment-name> with your application name. ahasAppName: "<your-deployment-name>" # The default namespace is default. ahasNamespace: "default" # Replace <RegionId> with the ID of the region where your application is deployed. ahasRegionId: <RegionId>NoteReplace <RegionId> with the ID of the region where your application is deployed. For a mapping of regions to region IDs, see the Region and region ID mapping section in this topic.
To modify other configuration items in the YAML file, see the following table.
Table 1. Parameters Parameter
Description
Default
image.imageTag
The tag of the pilot image.
0.1.1
image.imagePullPolicy
The image pull policy. Valid values:
Always,IfNotPresent, andNever.Always
controller.logLevel
The log level of the pilot. Valid values:
1(INFO) and2(DEBUG).1
controller.region_id
The region of the target cluster, such as
cn-hangzhou,cn-beijing,cn-shenzhen, orcn-shanghai. If your cluster uses the public network, set this parameter tocn-public.cn-hangzhou
The following is a complete sample YAML template:
apiVersion: apps/v1
kind: Deployment
metadata:
  name: agent-foo
  labels:
    name: agent-foo
spec:
  replicas: 1
  selector:
    matchLabels:
      name: agent-foo
  template:
    metadata:
      labels:
        name: agent-foo
      annotations:
        ahasPilotAutoEnable: "on"
        ahasAppName: "K8sFooTest"
        ahasNamespace: "default"
        ahasRegionId: "cn-hangzhou"
    spec:
      containers:
      - name: foo
        image: registry.cn-hangzhou.aliyuncs.com/sentinel-docker-repo/foo:0.1.1
        imagePullPolicy: Always
To enable AHAS application protection for an existing application:
In the left-side navigation pane, click Clusters.
On the Clusters page, click the name of the target cluster or click Details in the Actions column of the target cluster.
In the left-side navigation pane, choose or .
On the Deployments or StatefulSets page, find the target application and choose in the Actions column.
In the Edit YAML dialog box, add the following
annotationsunder spec > template > metadata, and then click Update.Category
Annotations
Public network
annotations:
  # Specifies whether to enable the AHAS agent. Valid values: on and true (enable), off and false (disable).
  ahasPilotAutoEnable: "on"
  # Replace <your-deployment-name> with your application name.
  ahasAppName: "<your-deployment-name>"
  # The default namespace is default.
  ahasNamespace: "default"
  # Replace <your-license> with your actual license key.
  # You can obtain the key from the New Application Access page under Application Protection in the AHAS console.
  ahasLicenseKey: "<your-license>"
  ahasRegionId: "cn-public"
Internal network
annotations: # Specifies whether to enable the AHAS agent. Valid values: on and true (enable), off and false (disable). ahasPilotAutoEnable: "on" # Replace "<your-deployment-name>" with your application name. ahasAppName: "<your-deployment-name>" # The default namespace is default. ahasNamespace: "default" # Replace <RegionId> with the ID of the region where your application is deployed. ahasRegionId: <RegionId>NoteReplace <RegionId> with the ID of the region where your application is deployed. For a mapping of regions to region IDs, see the Region and region ID mapping section in this topic.
Verify the results
In the left-side navigation pane, click Clusters.
On the Clusters page, click the name of the target cluster or click Details in the Actions column of the target cluster.
In the left-side navigation pane, choose or .
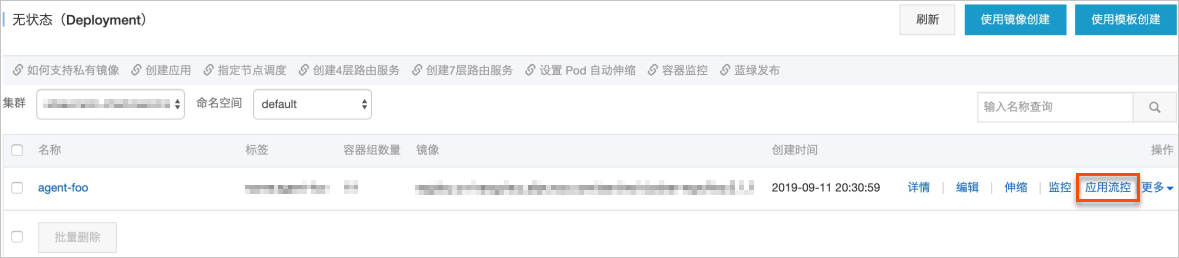
The Application Throttling button appears in the Actions column for the target application. Click Application Throttling to go to the AHAS console.
Region and region ID mapping
Region | Region ID |
Public network | cn-public |
China (Hangzhou) | cn-hangzhou |
China (Shanghai) | cn-shanghai |
China (Beijing) | cn-beijing |
China (Zhangjiakou) | cn-zhangjiakou |
China (Shenzhen) | cn-shenzhen |
Singapore | ap-southeast-1 |
Germany (Frankfurt) | eu-central-1 |