The AUI Kits Classroom AppServer provides backend services, such as login and classroom (live room) management. By pairing it with the AUI Kits classroom scenario SDK, you can rapidly develop and launch interactive applications. This guide explains how to build and deploy the AUI Kits Classroom AppServer from its Java source code.
How it works
What the AppServer does

When you use the AUI Kits framework to build an interactive classroom application, the scenario SDK integrates with several product capabilities. The AppServer encapsulates these capabilities and provides standardized HTTP APIs for the SDK, reducing your development overhead.
-
ApsaraVideo Live: Used for stream pushing, playback, and audio/video co-streaming.
-
Interactive messaging: Used to transmit signaling messages within a classroom (live room).
-
ApsaraVideo VOD (optional): Used for live recording and playback.
-
Interactive whiteboard: For online tutoring and other classroom use cases. Teachers can use basic tools such as doodles, text, straight lines, and a laser pointer to explain courseware and highlight key points. The NetEase CommsEase Interactive Whiteboard service provides this capability.
In addition to encapsulating these four services, the AppServer also implements classroom management features, such as creating, modifying, and deleting classrooms, as well as starting and ending sessions. The AppServer does not directly call ApsaraVideo Live APIs. Instead, it constructs stream pushing and stream pulling URLs according to the ApsaraVideo Live streaming protocol. It also listens for stream pushing status callbacks from ApsaraVideo Live to handle cases where a host disconnects unexpectedly, ensuring the classroom status remains accurate.
Project framework
-
Built on the mainstream Java 8 + Spring Boot 2 framework.
-
Uses MyBatis-Plus for the repository layer.
-
Implements access control using Spring Security + JSON Web Token (JWT).
Deployment
Prerequisites
-
You have completed the console configurations.
-
Java 8 is installed in your environment.
-
To use this service on a web client, correctly configure Cross-Origin Resource Sharing (CORS) to allow cross-origin requests. For details, see Configure and Run on the Web.
Create a database
Using MySQL as an example, create a database and execute this SQL file.
After creating the database, it will contain the following seven tables.
mysql> show tables;
+-------------------------+
| Tables_in_classweb      |
+-------------------------+
| assistant_permit        |
| class_check_in          |
| class_check_in_record   |
| class_infos             |
| class_kick_member       |
| class_member            |
| doc_infos               |
+-------------------------+
Deployment methods
-
Method 1 (recommended): Deploy from source code.
This guide focuses on building and deploying the AppServer from its source code. For more details, see AUI Kits Classroom AppServer.
-
Method 2: If you are familiar with Function Compute, you can also use a serverless platform for quick deployment. For more information, see Use event functions to process events generated by cloud services.
When you deploy the server for the first time, you must edit the code/src/main/java/com/aliyuncs/aui/common/utils/JwtUtils.java file and set the `SECRET` property to a random string.
Parameter configuration
-
Download the interactive classroom source code to your server.
-
Open the
application.ymlfile in theServer/Java/code/src/main/resourcesdirectory and configure the parameters.Parameter
Description
server:
  port: 8080
The default listening port is 8080. You can change this value.
# DB connection info. Connects to a MySQL database. url: jdbc:mysql://******:3306/*****?useUnicode=true&characterEncoding=UTF-8&useSSL=false&serverTimezone=Asia/Shanghai username: "******" password: "******"jdbc:mysql://HOSTNAME_OR_IP:3306/DATABASE_NAME?useUnicode=true&characterEncoding=UTF-8&useSSL=false&serverTimezone=Asia/Shanghai-
username: Your database username
-
password: Your database password
# POP configuration. You need to configure your account's AccessKey ID and AccessKey Secret to call IM and VOD services.
  openapi:
    access:
      key: "*********"
      secret: "*********"
Used to authenticate API calls to the IM service and ApsaraVideo VOD. An AccessKey consists of an AccessKey ID and an AccessKey Secret.
-
AccessKey ID: Identifies the user.
-
AccessKey Secret: A secret key that verifies the user's identity. You must keep your AccessKey Secret confidential.
For more information, see Create an AccessKey.
# IM service application ID
  new_im:
    appId: "*********"
    appKey: "*********"
    appSign: "*********"
The AppId, AppKey, and AppSign for the interactive messaging service. For details, see Create an Interactive Messaging Application.
# Live stream pushing and pulling configuration live_stream: # Push domain push_url: push.*****.vip # Pull domain pull_url: pull.*****.vip # Auth key for the push domain push_auth_key: zJl4****** # Auth key for the pull domain pull_auth_key: mDZs******** app_name: live auth_expires: 604800-
push_url: The push domain.
-
pull_url: The pull domain.
-
push_auth_key: The primary key for authentication on the push domain.
-
pull_auth_key: The Primary Key for authentication on the playback domain.
-
app_name: The AppName in the relayed live stream URL. The default value is live, but you can customize it.
NoteTo apply transcoding, recording, or snapshot templates to the relayed stream, ensure this AppName matches the AppName in those templates.
To obtain these values, see View authentication keys.
# Co-streaming application information
  live_mic:
    app_id: 7c61********
    app_key: c461b*********
The Application ID and AppKey for video co-streaming. For details, see Create a Real-Time Communication Application.
 # authKey for stream pushing status callbacks
  live_callback:
    auth_key: avdsd*******
Configure this parameter to listen for the stream pushing status of a specific push URL. To obtain this value, see Callback Settings.
# Whiteboard information
room:
  boards:
    app_key: "*********"
    app_secret: "*********"
The AppKey and AppSecret for the NetEase CommsEase Interactive Whiteboard service application. For details, see Whiteboard Configuration.
# Configure allowed cross-origin request domains
http:
  cors:
    host: "*"
To use this service on a web client, configure CORS correctly to allow cross-origin requests.
-
Service authentication
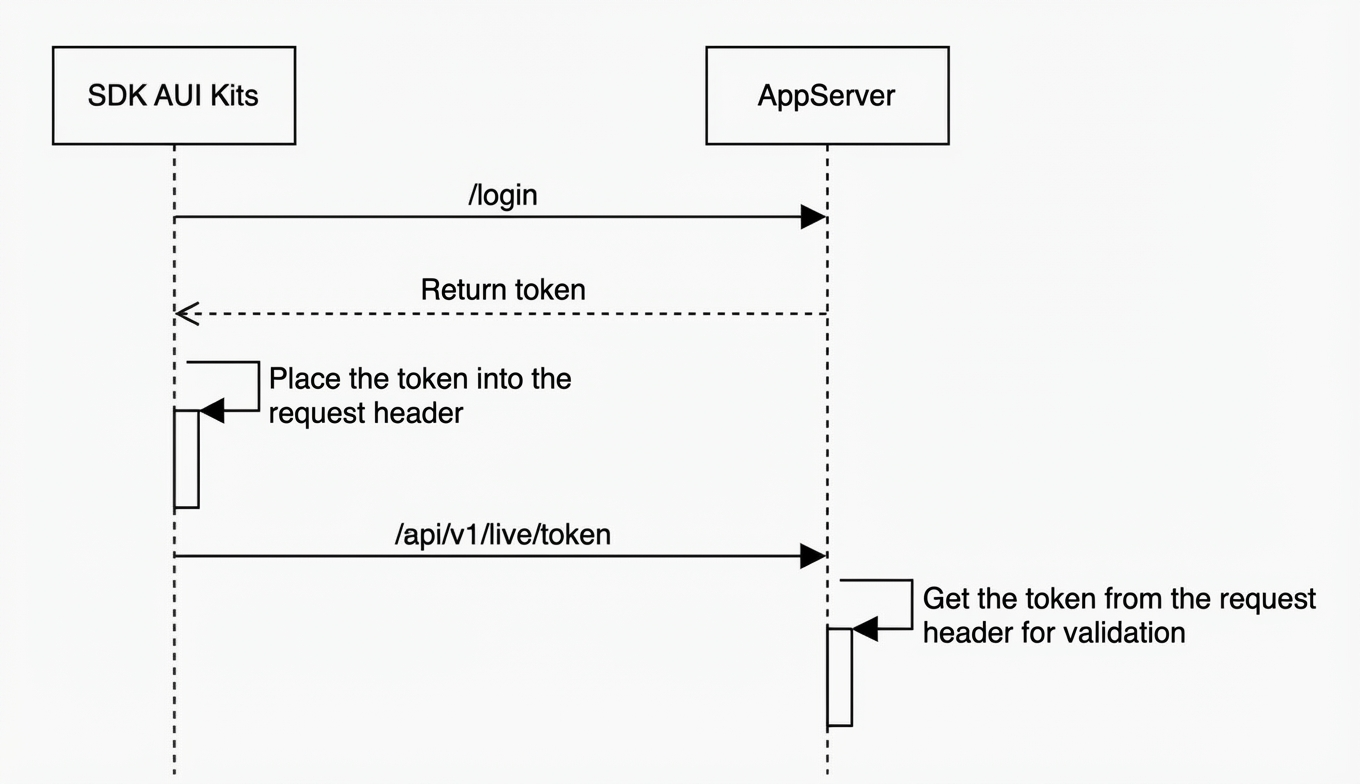
First, call the /login API to get an authentication token, then include this token in the request header for subsequent API calls. However, the token generation method in this project is for testing only. For production, you must implement your own authentication strategy. You can customize the authentication configuration, including the token generation algorithm, to meet your business requirements. Ensure that the same algorithm is used for both generating and validating tokens.
The code related to authentication tokens is located in code/src/main/java/com/aliyuncs/aui/common/utils/JwtUtils.java.
 For a detailed description of the
 /login interface, see Detailed interface definition for login.
Packaging and running
Packaging
-
Use the built-in Maven in IntelliJ IDEA to package the project. The JAR file will be located in the
targetdirectory. -
Alternatively, run the following command in the
Server/Java/codedirectory to package the project.mvn package -DskipTests -
Copy the JAR file from the
targetdirectory to your server.scp xxx.jar root@ip:/root
Running
Open a terminal in the directory where the JAR file is located.
-
To run the project in the foreground and print logs to the terminal:
java -jar ***.jar -
To run the project in the background and write logs to the
nohup.outfile:nohup java -jar ***.jar & -
Verify that the application has started successfully.
If the AppServer has started successfully, the service returns a response similar to the following:
{
  "success": true,
  "data": "Deployment successful. The service is accessible at http://xxx.ost"
}