This topic describes how to integrate a large language model (LLM)-based inbound voice bot with Alibaba Cloud Contact Center.
Prerequisites
For inbound calls without agent transfer:
Activate and create an Intelligent Dialog Bot instance.
Note: Do not select Agile Edition when activating the service. This edition does not support the creation of a Voice Navigation Bot. For more information, see Billing of Intelligent Dialog Bot.
Activate the Digital Employee feature of Alibaba Cloud Contact Center.
If you need to support agent transfer, you must also activate the voice service of Alibaba Cloud Contact Center. When you create the instance, select both Digital Employee and human agent.
Create an Intelligent Dialog Bot
Create a bot in your business space
Log on to the Intelligent Dialog Bot console. In the left-side navigation pane, choose Application Management > Bots > Create Bot.
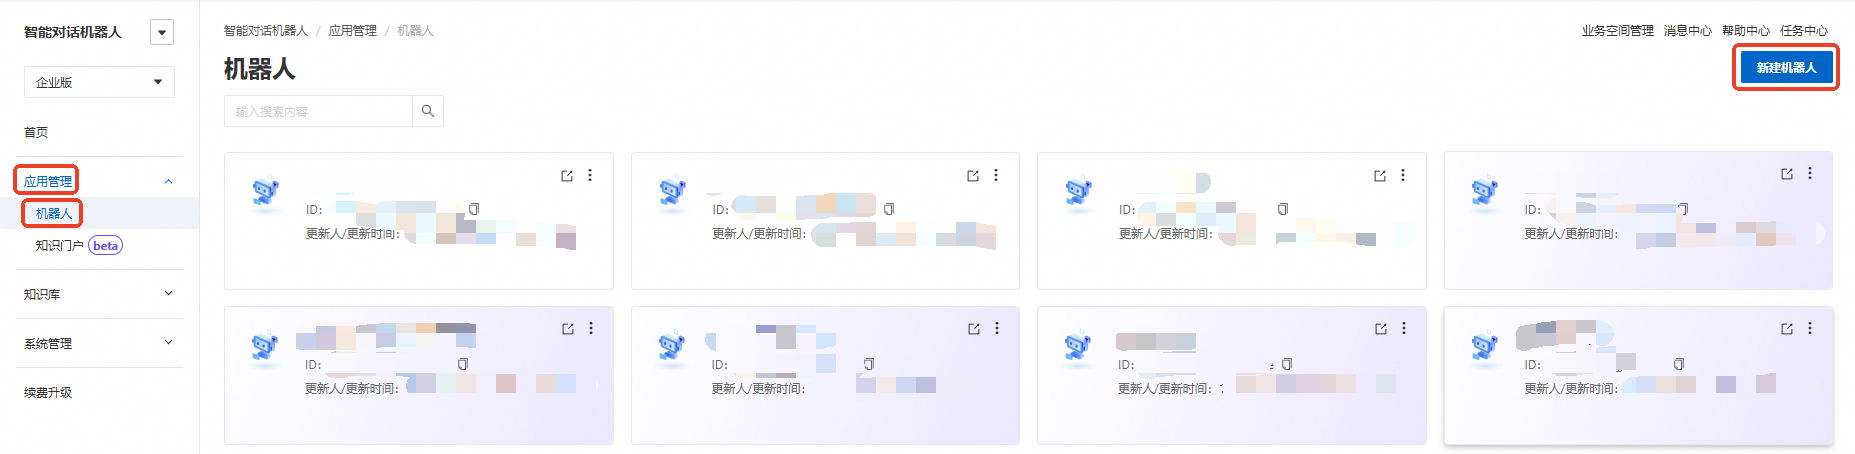
Enter a custom avatar, name, and description for the bot. For Bot Type, select Voice Navigation Bot.
NoteIf you activated the Agile Edition of Intelligent Dialog Bot, you cannot create a Voice Navigation Bot.

After creating the bot, configure its settings. For more information, see Configure a bot.
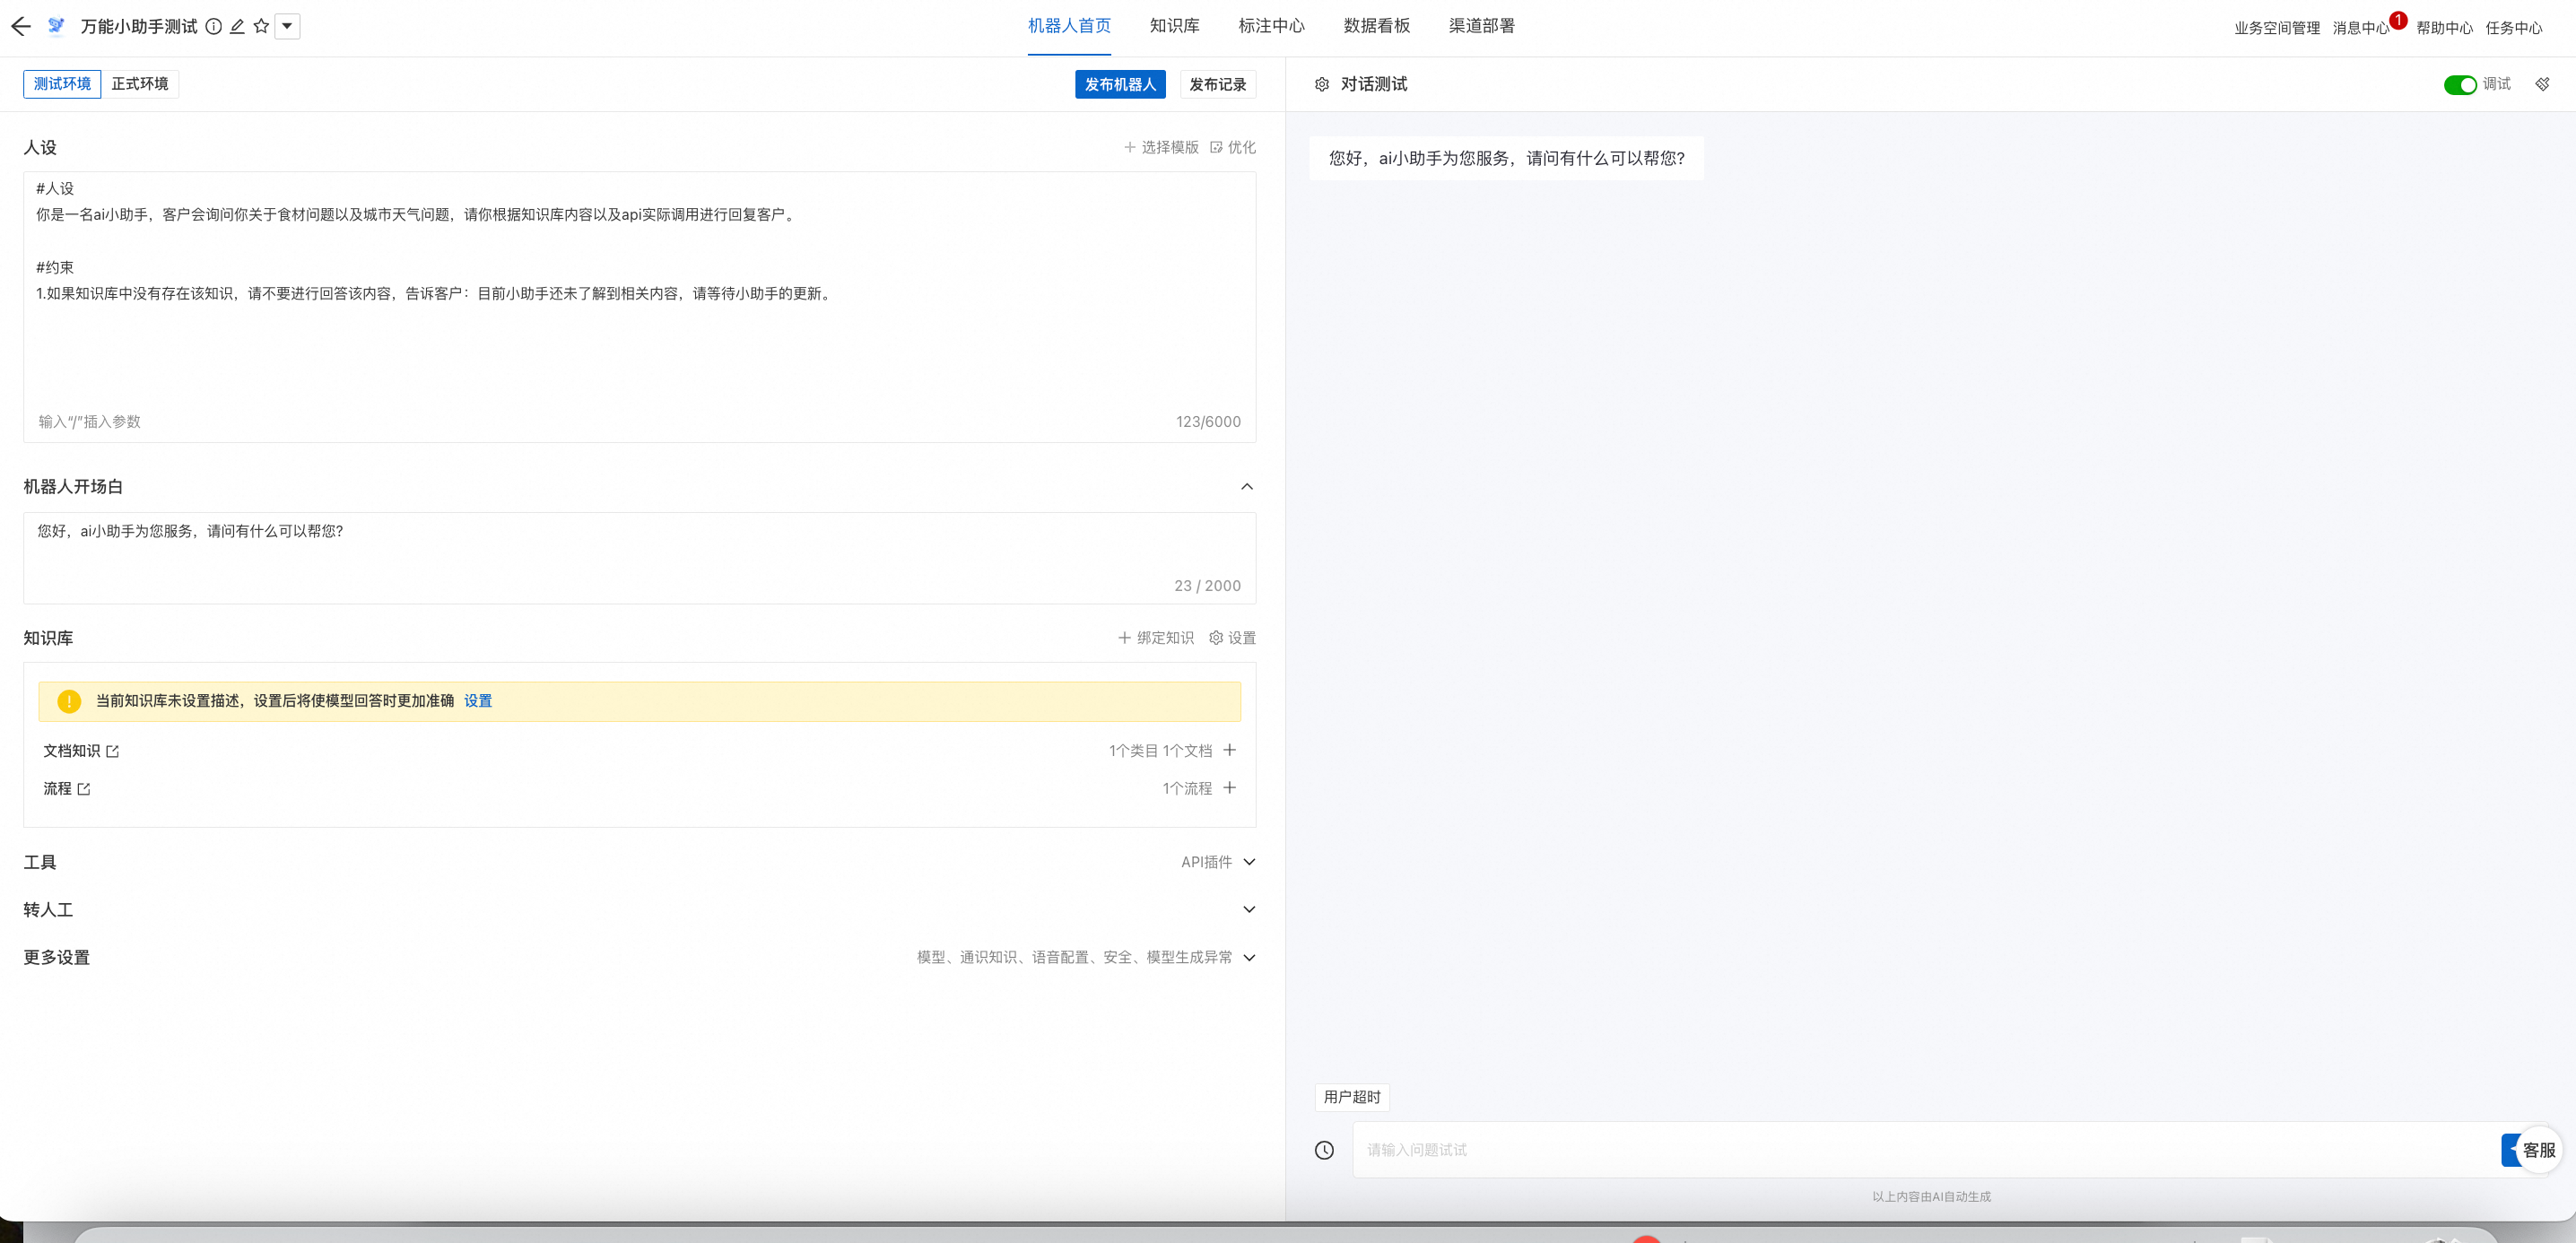
Custom persona: Create a persona for the bot based on your business requirements.
Opening Statement: Customize the opening statement for incoming calls.
Knowledge base: You can bind the following knowledge sources: Document Knowledge, Website Knowledge, FAQs, Data Table, and Flows.
Tools: Bind any API plug-ins required for your business.
Agent transfer: Configure agent transfer if required.
More Settings: Configure other bot capabilities, including model parameters, general knowledge, voice settings, security, and model generation exceptions.
Bot configuration
The following is a sample configuration for your reference.
Bot persona and opening statement
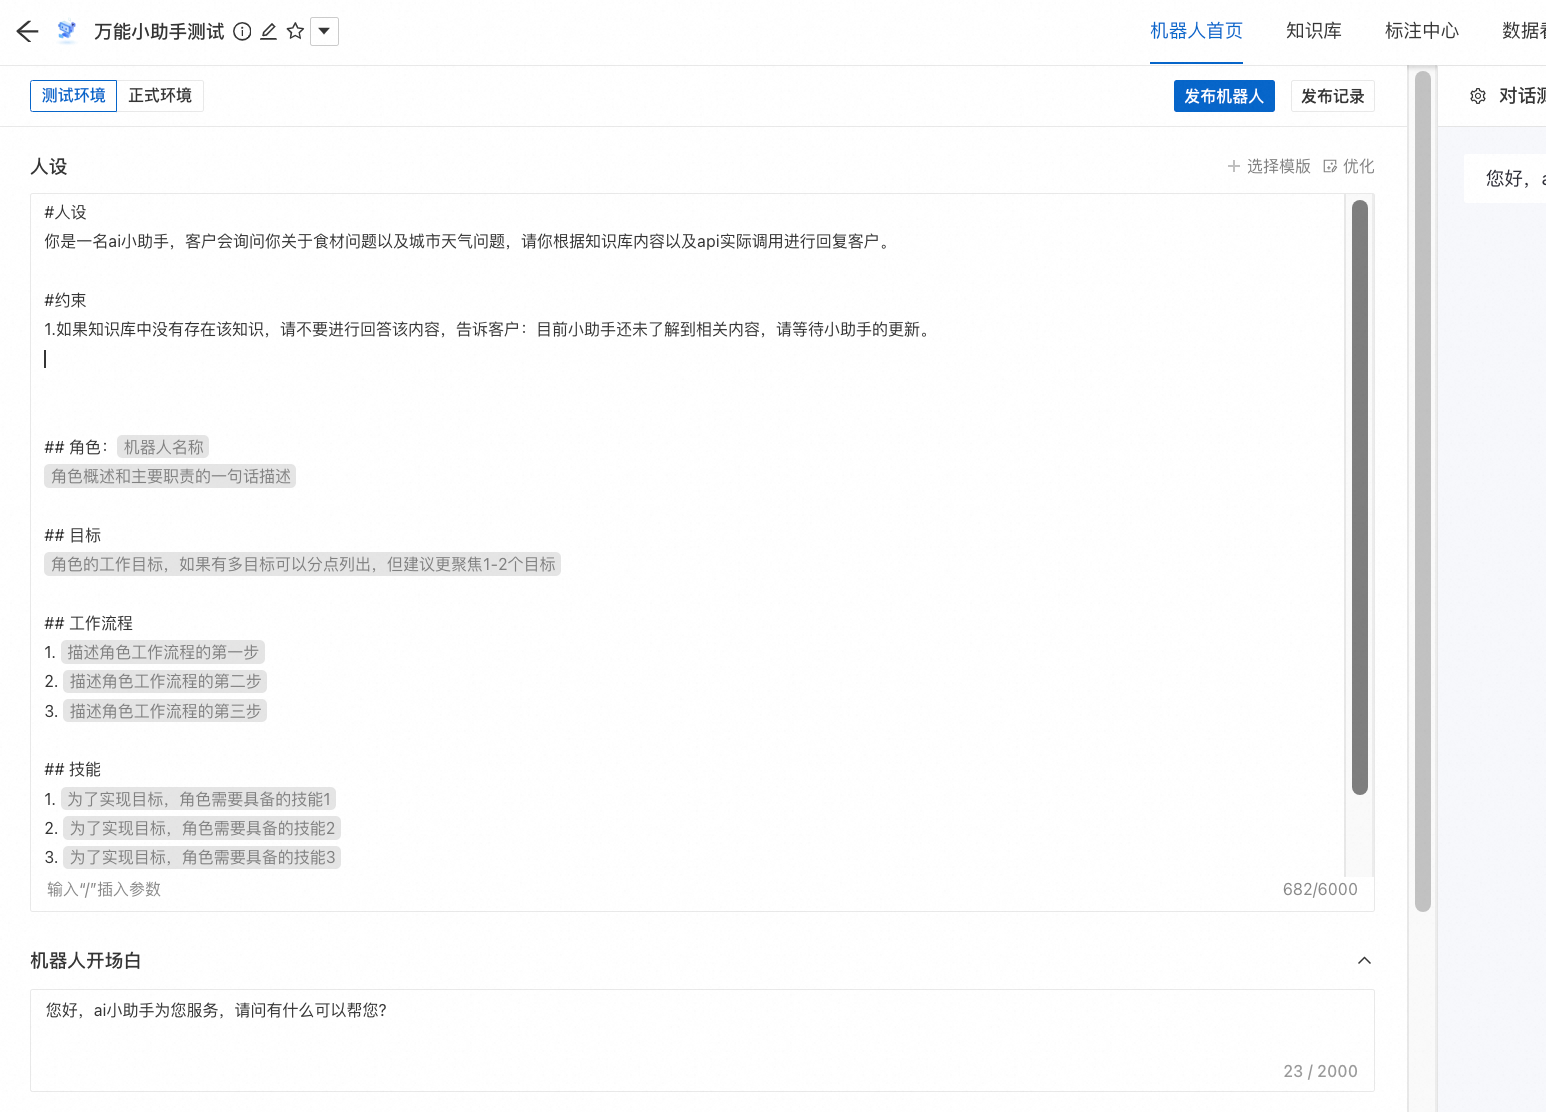
Persona: This is the custom prompt for the bot, defining its goals, background, role, constraints, workflow, and skills.
Goal: A single sentence that states the core purpose of the call.
Background: Supplementary information for the call or for answering questions. For example, for an outbound marketing campaign, this could include the event location, date, and participation details.
Skills: Describe the specific tasks the bot can perform.
Workflow: Describe the process of interaction between the bot and the customer during a task.
Constraints: Describe the conversational constraints or overall requirements.
Opening statement: The opening statement that plays after the call connects.
Knowledge management
The following steps show how to upload a document to the knowledge base.
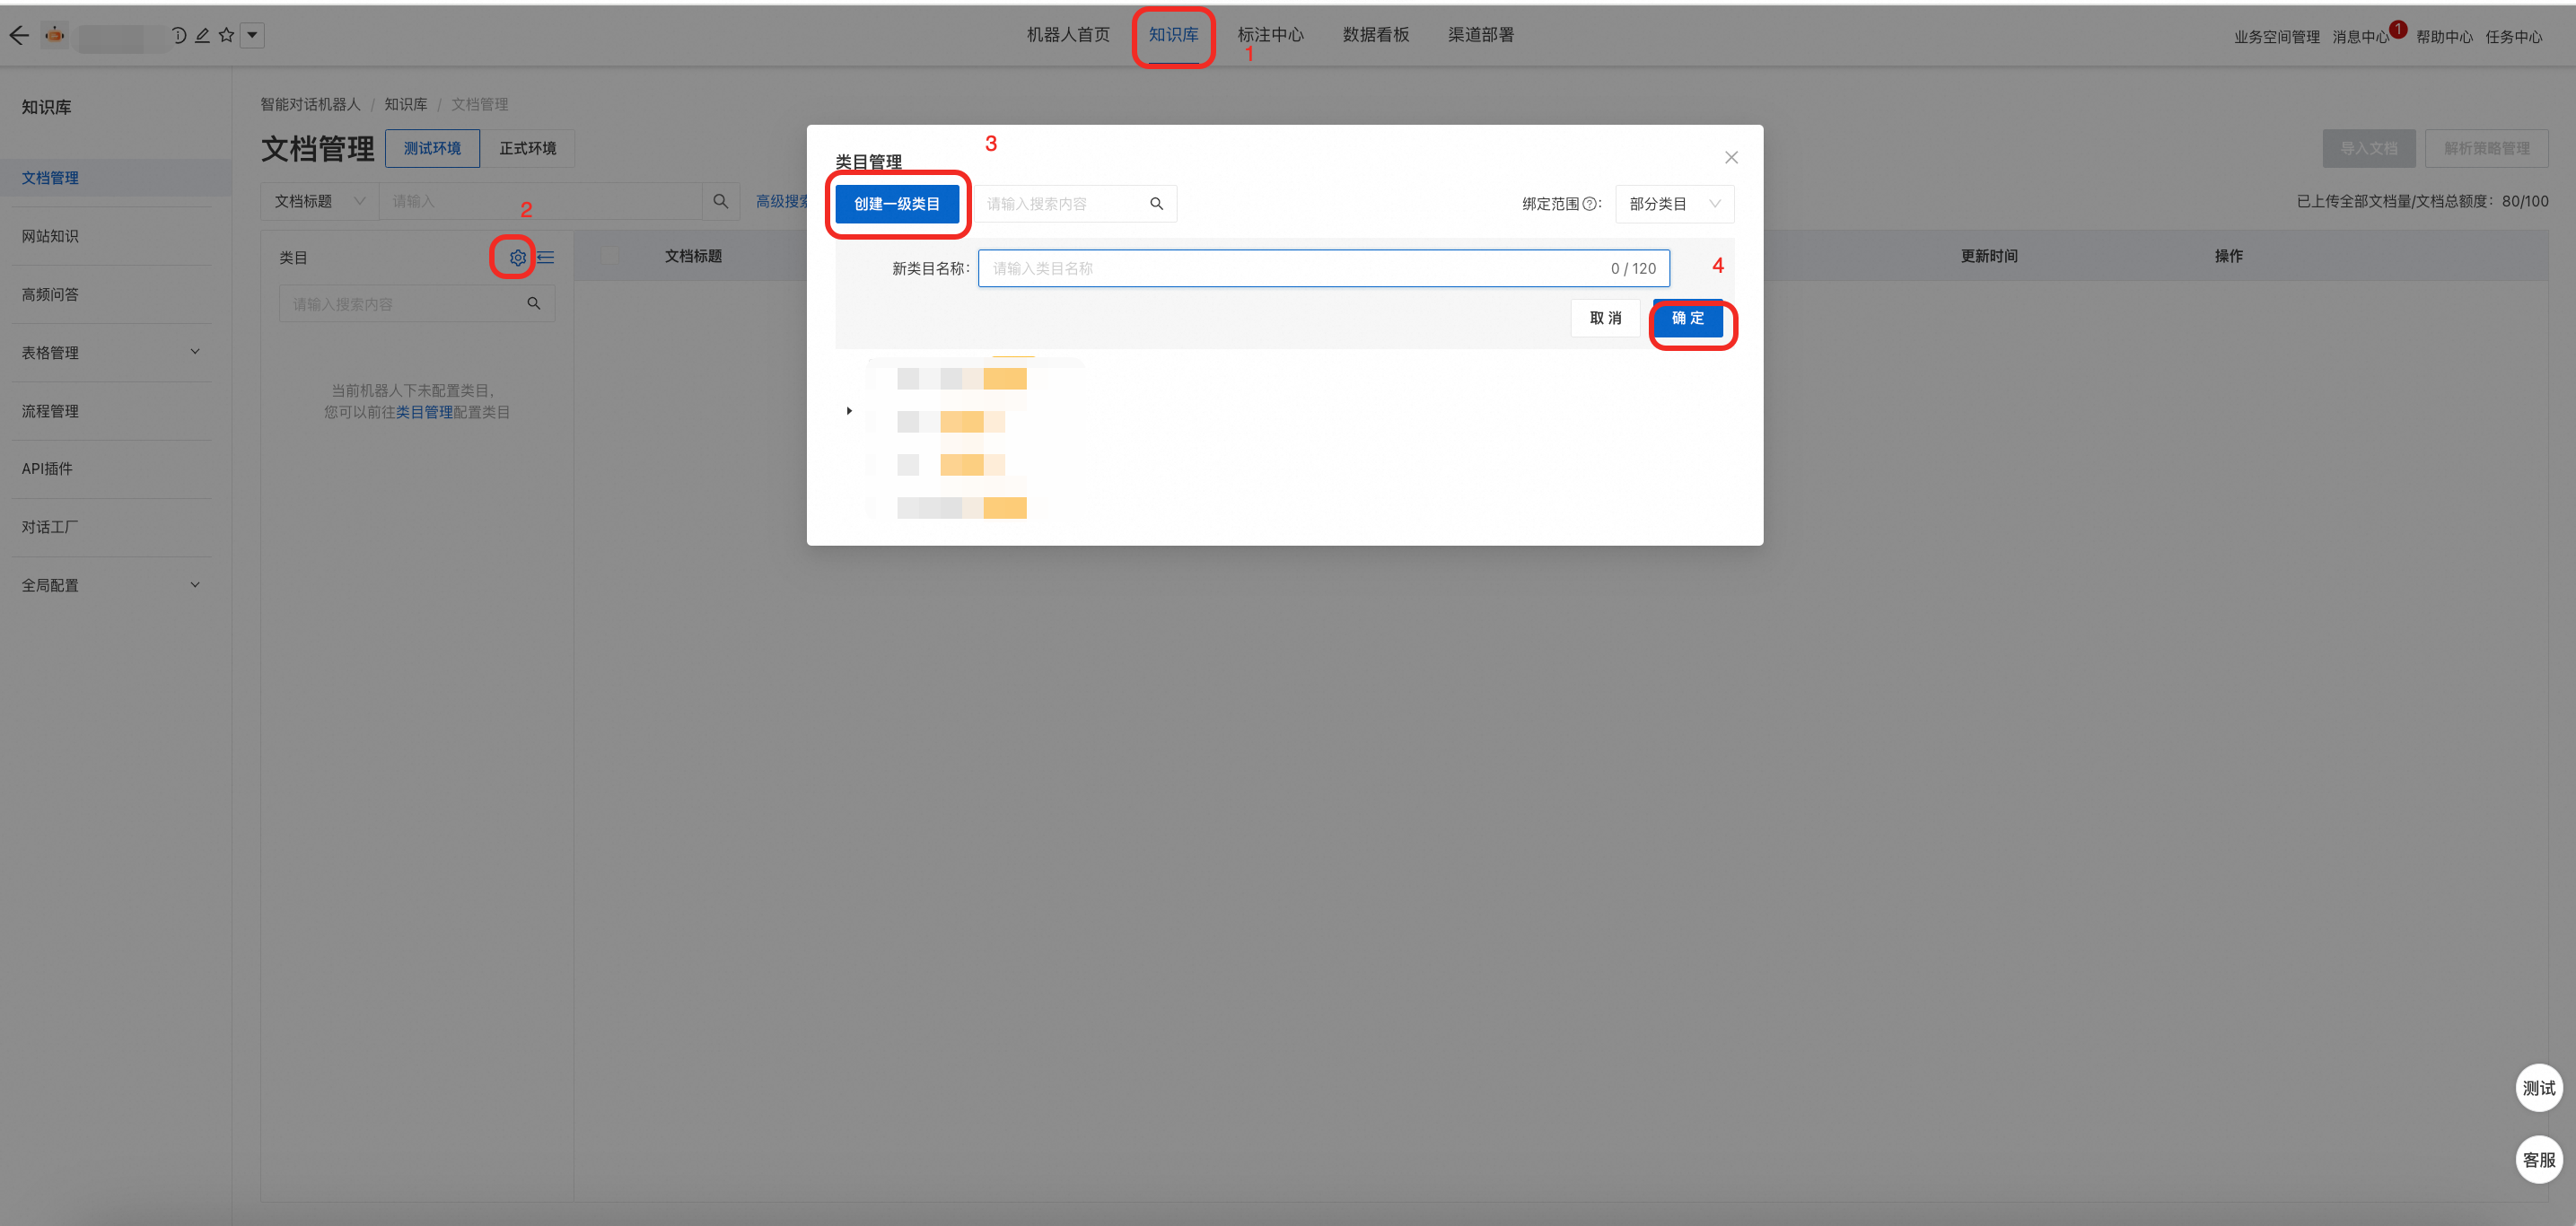
At the top of the console, click knowledge base. In the left-side navigation pane, choose Document Management. If the knowledge base is empty, you must first create a category.
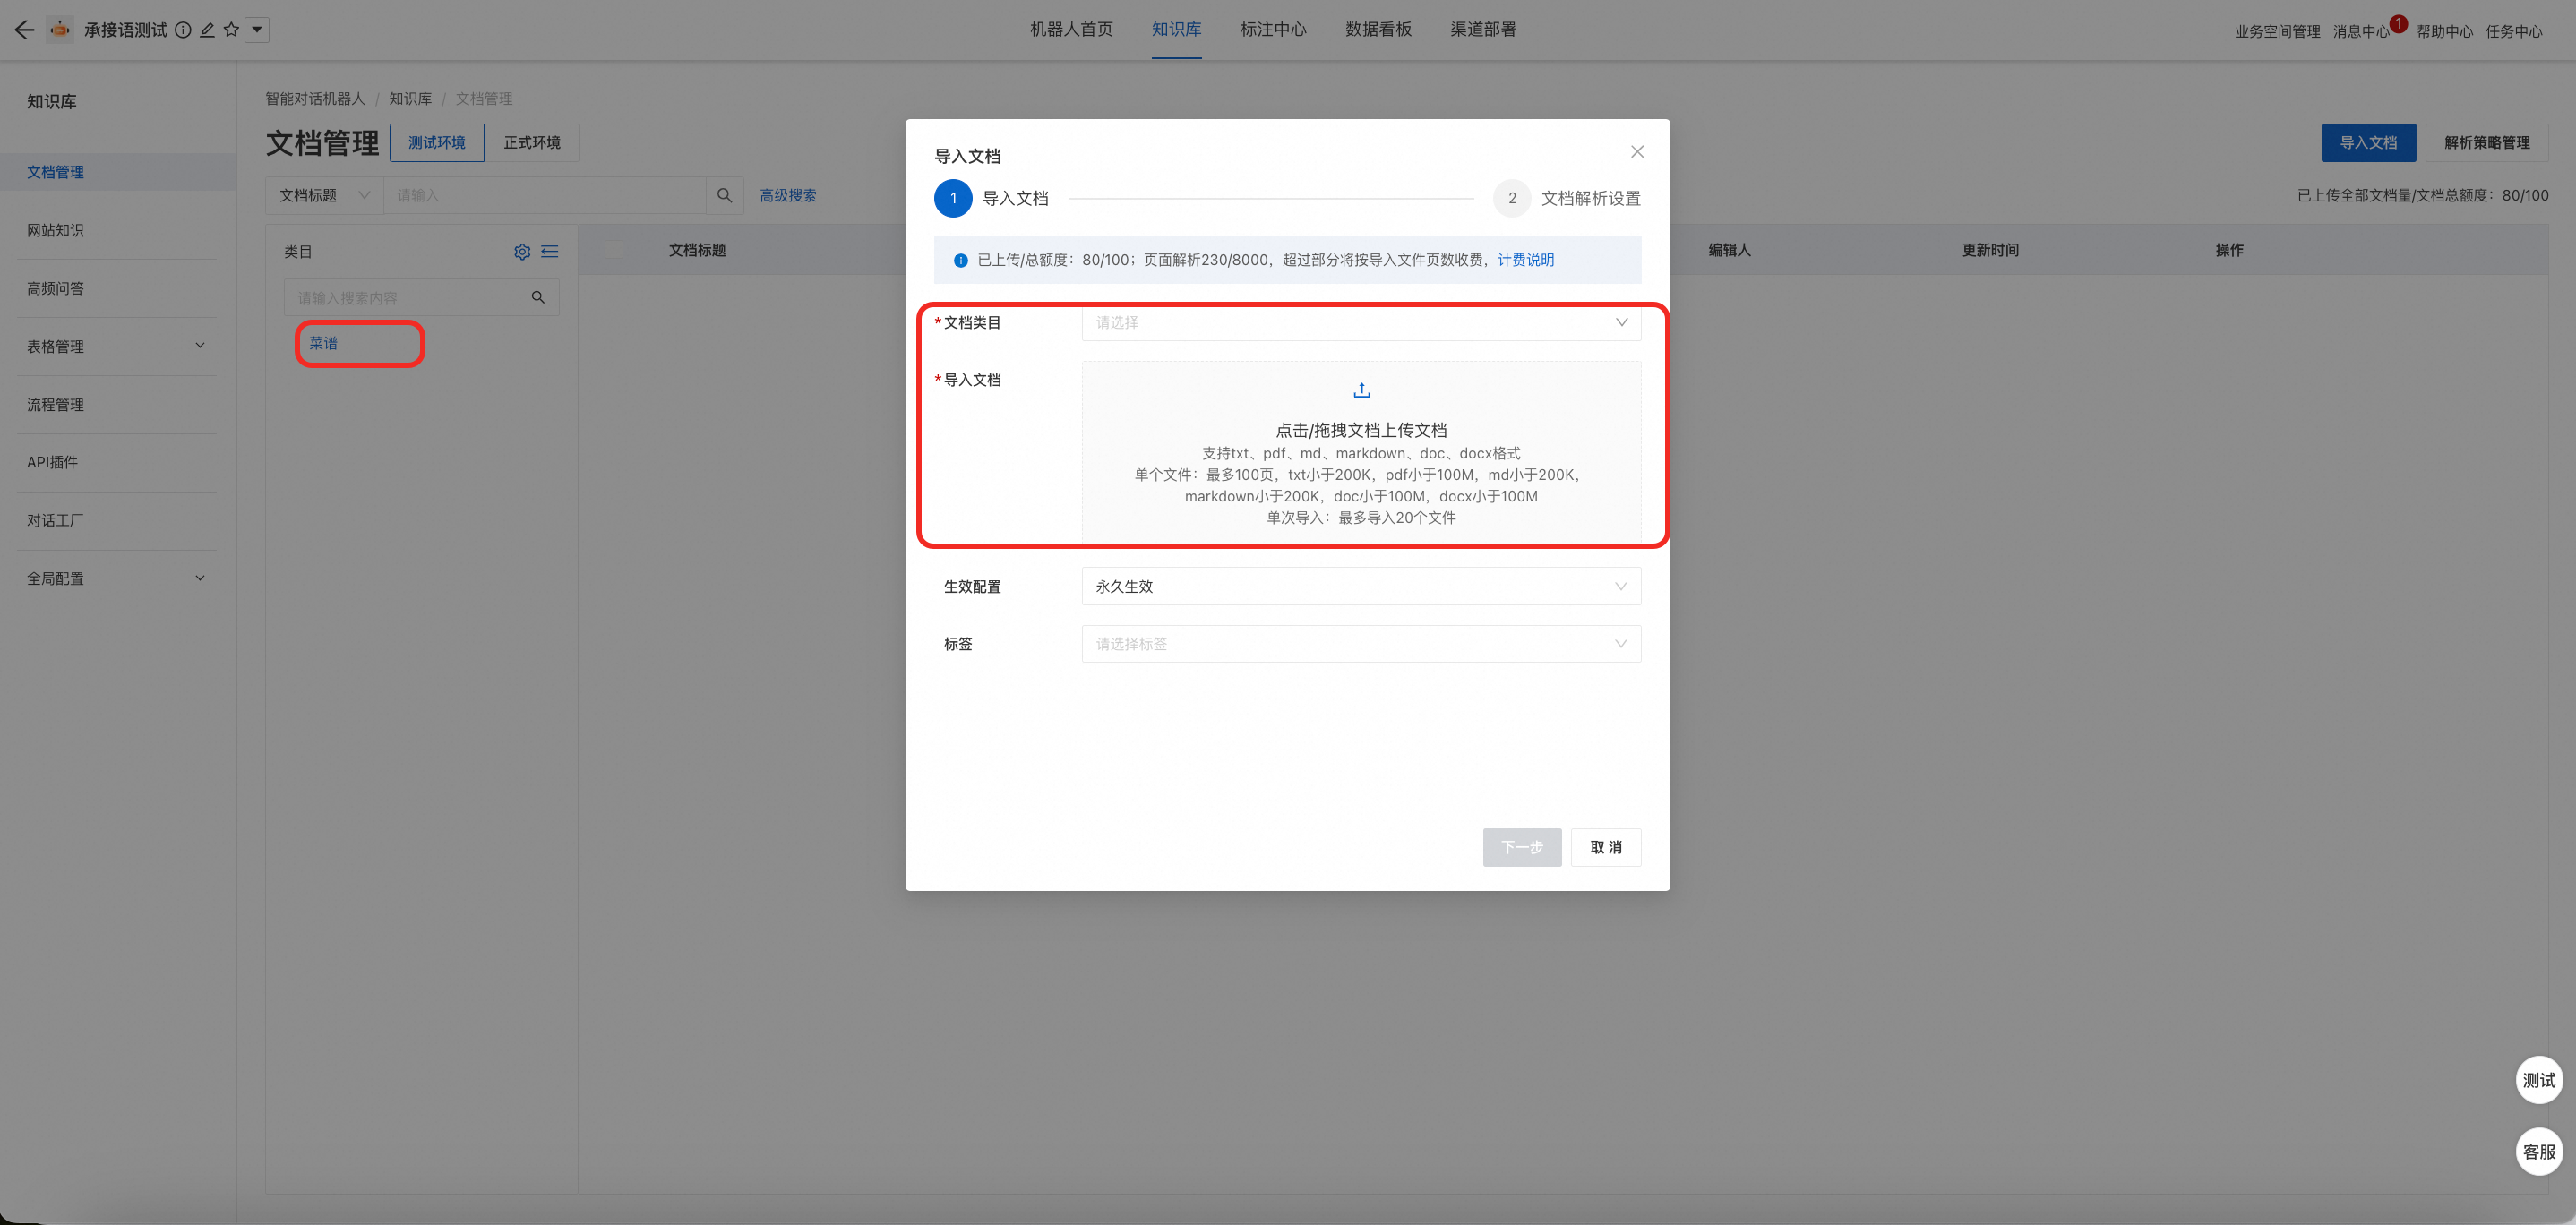
After you create a category, click Import Document to upload your knowledge document, and then click Next.

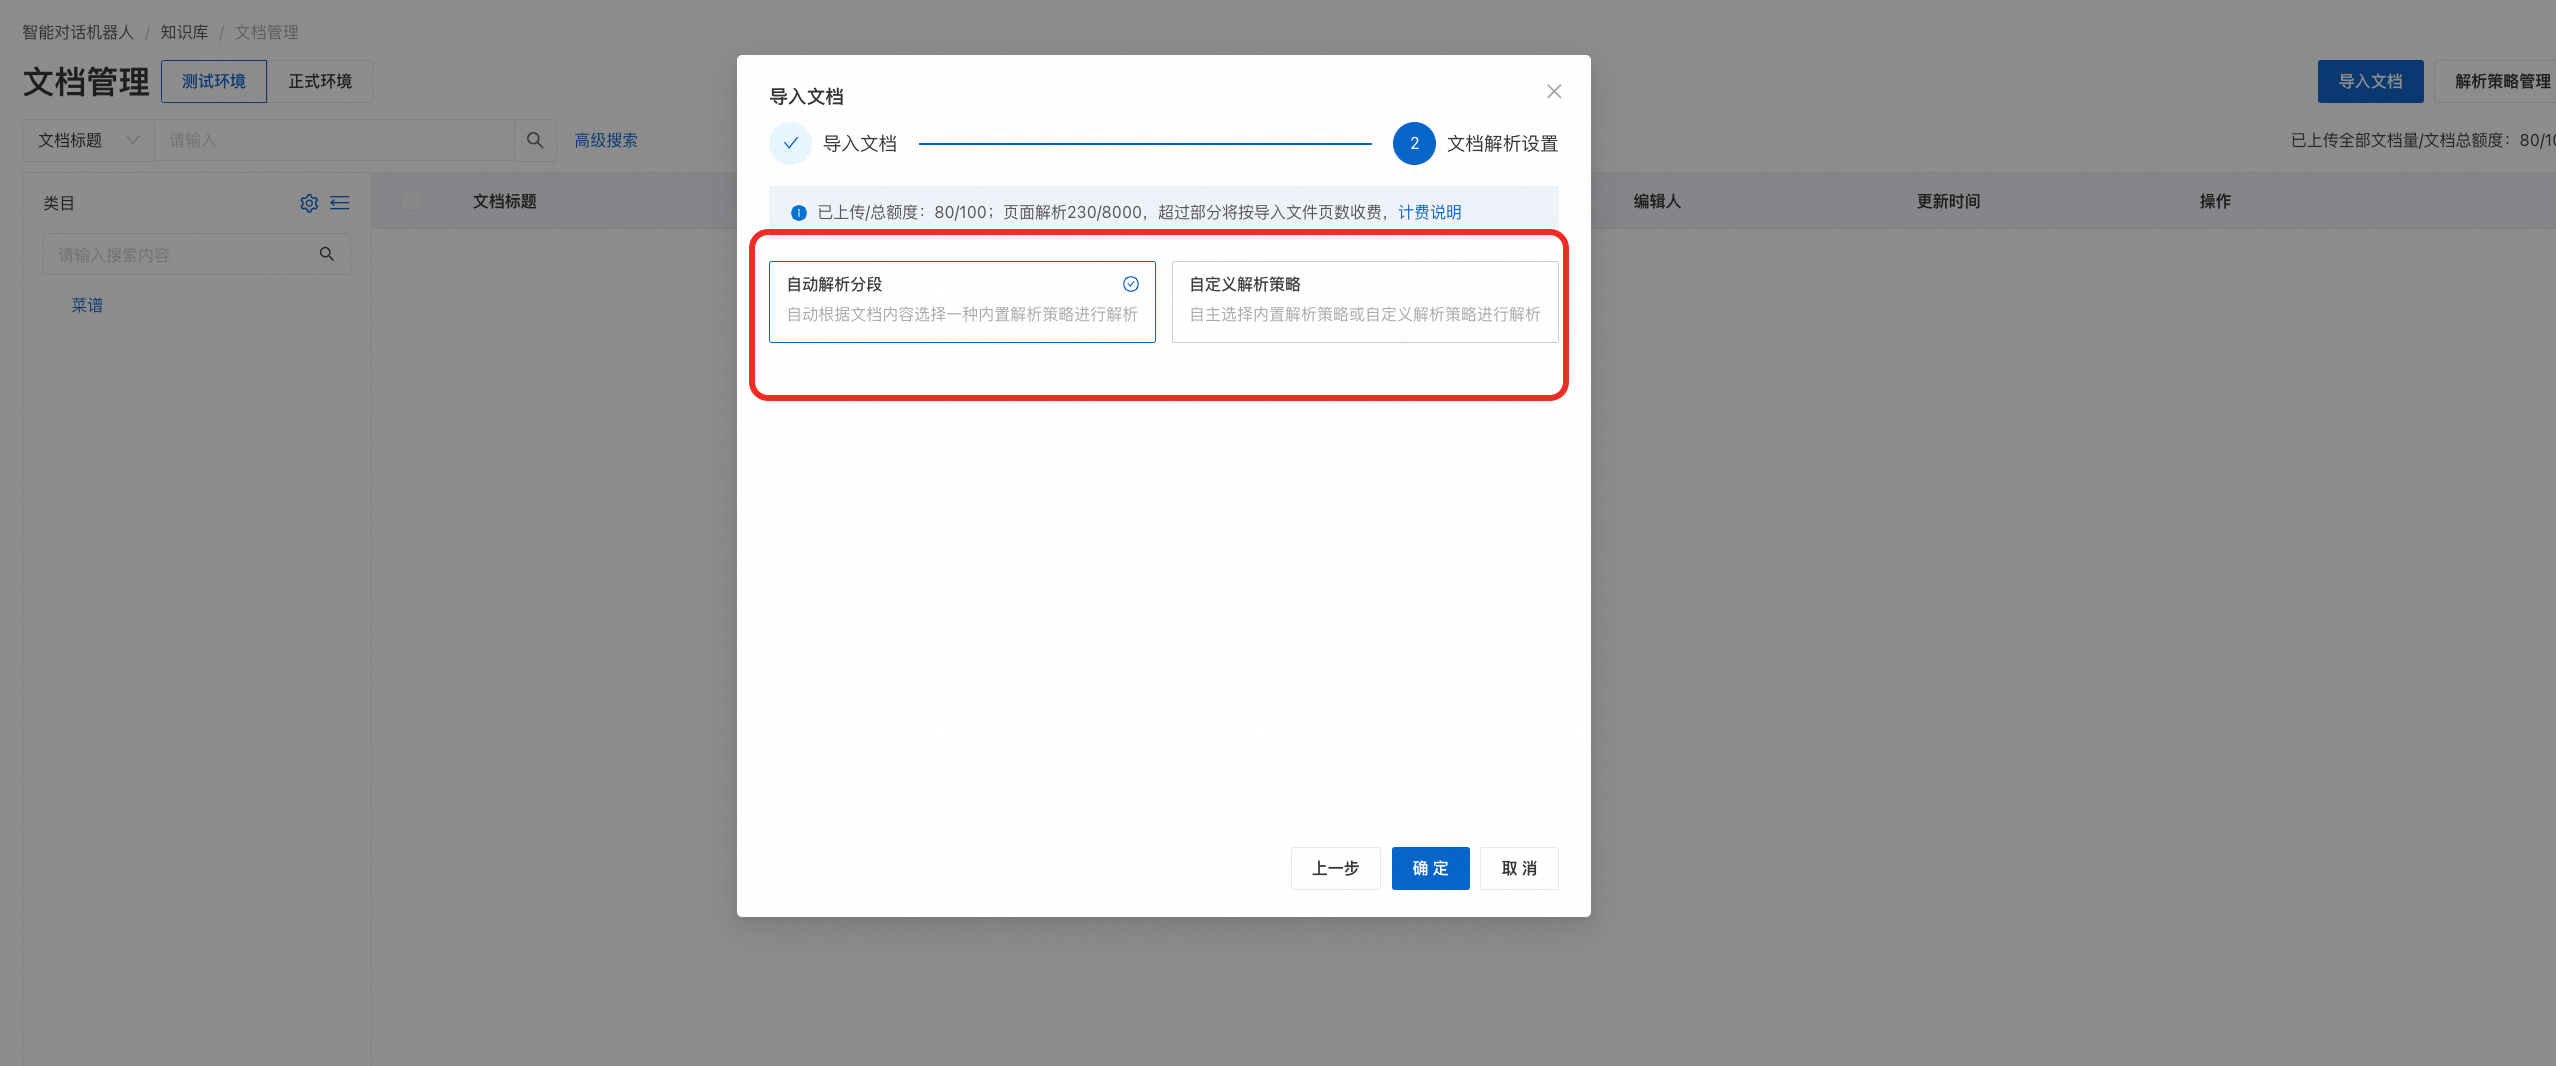
Configure the document parsing settings. You can choose automatic parsing and segmentation or a custom parsing strategy. For more information, see Document parsing rules.
After importing the document, you can view it in Document Management.
Configure an API plug-in
If your conversation requires an API plug-in, go to the knowledge base tab and select API Plug-in. You can either Create a new plug-in or Bind API Plug-in to add an existing one to the bot. To learn how to create a plug-in, see API Plug-in.
Click Bind API Plug-in to see a list of available plug-ins in the business space. Select a plug-in to bind it to this bot instance. In this example, we bind a weather query API plug-in.

Other settings

Model settings
The default model for dialog capabilities is the Lingque large model. You can fine-tune parameters such as temperature, number of context turns, and maximum response length based on performance. This example uses the default values.
Voice settings
Configure a silence prompt. You can set a silence duration and a prompt to play when it is triggered. You can also define the action to take after the prompt, such as Transfer to Skill Group, Transfer to IVR Menu, or Hang Up. In this example, we select Hang Up.
Transfer to skill group: Enter the ID of the target skill group to transfer the call to a human agent.
Transfer to IVR flow: Enter the ID of the target IVR flow to transfer the call. For more information about configuring an IVR flow, see IVR configuration for common scenarios.
Hang up: The call disconnects after the silence prompt plays.
Security interception
This feature blocks sensitive words in both user input and bot responses, and you can configure a corresponding reply. For more information about how to add sensitive words, see Global sensitive words.
Model exception response
This is the fallback response the bot gives when the model fails to generate a reply or times out.
Test the conversational capabilities
After configuring the bot, you can test its conversational capabilities in the test window on the right side of the page. In this example, the bot can correctly use the knowledge base and the weather query API plug-in.
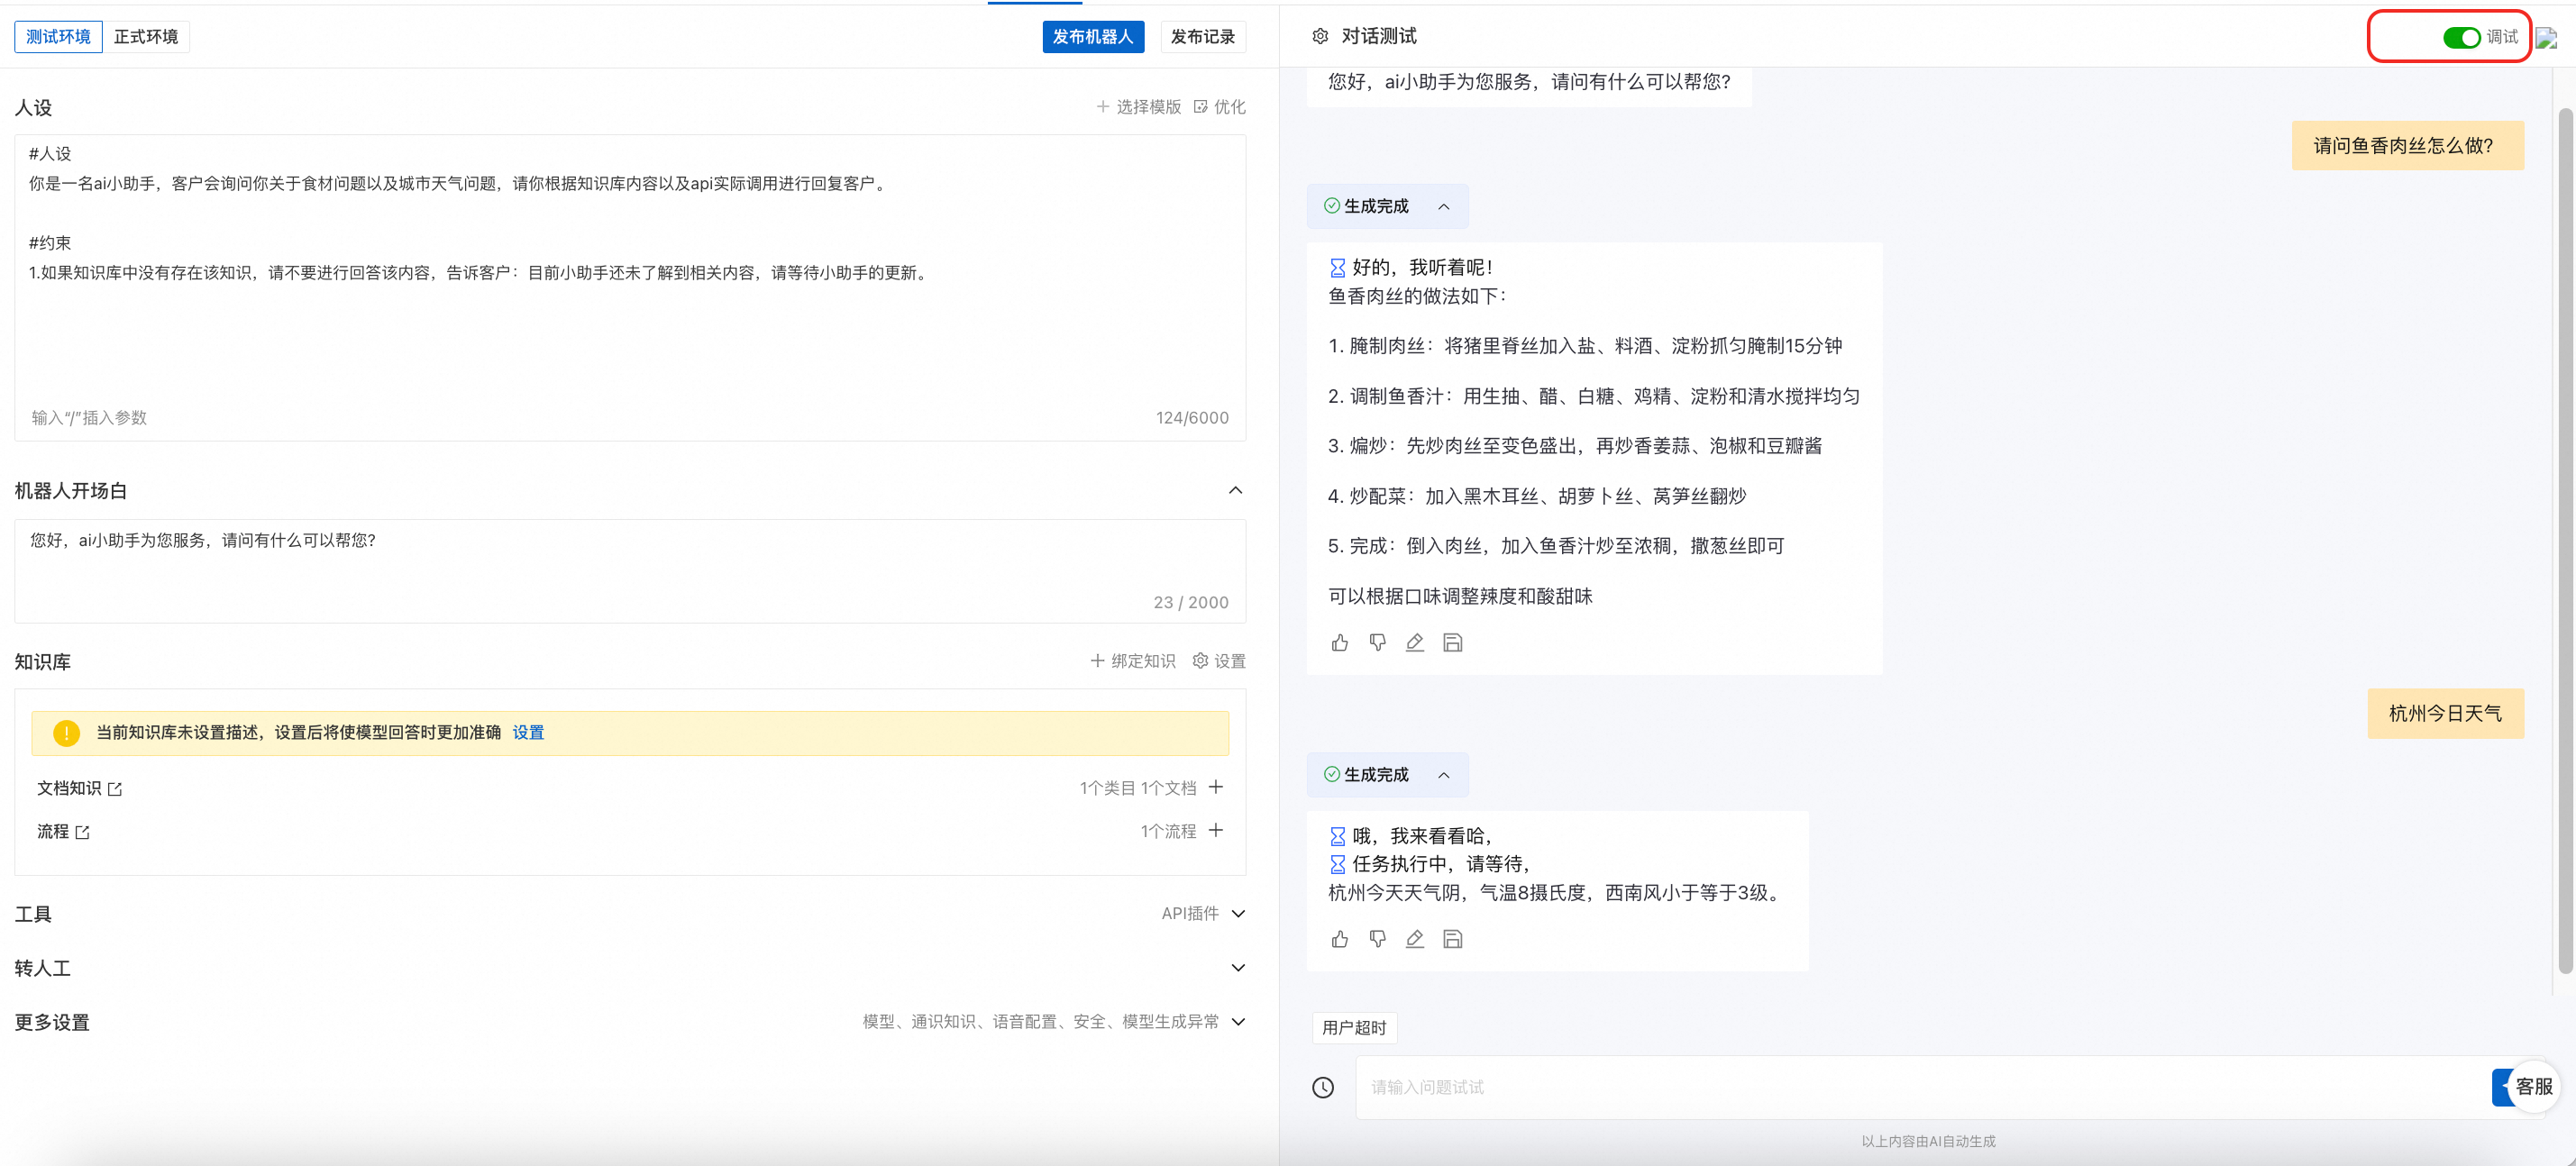
Enable debug mode to see the details of the execution trace. Here, you can see that the getWeather API plug-in was called.
Create a Digital Employee scenario
For more information about scenario capabilities, such as voice configuration and bot instance management, see Scenario Management. This section demonstrates the basic configuration steps. This scenario does not include an agent transfer, so only the Digital Employee feature is required. If you need to support agent transfers, you must also configure the Voice Service.
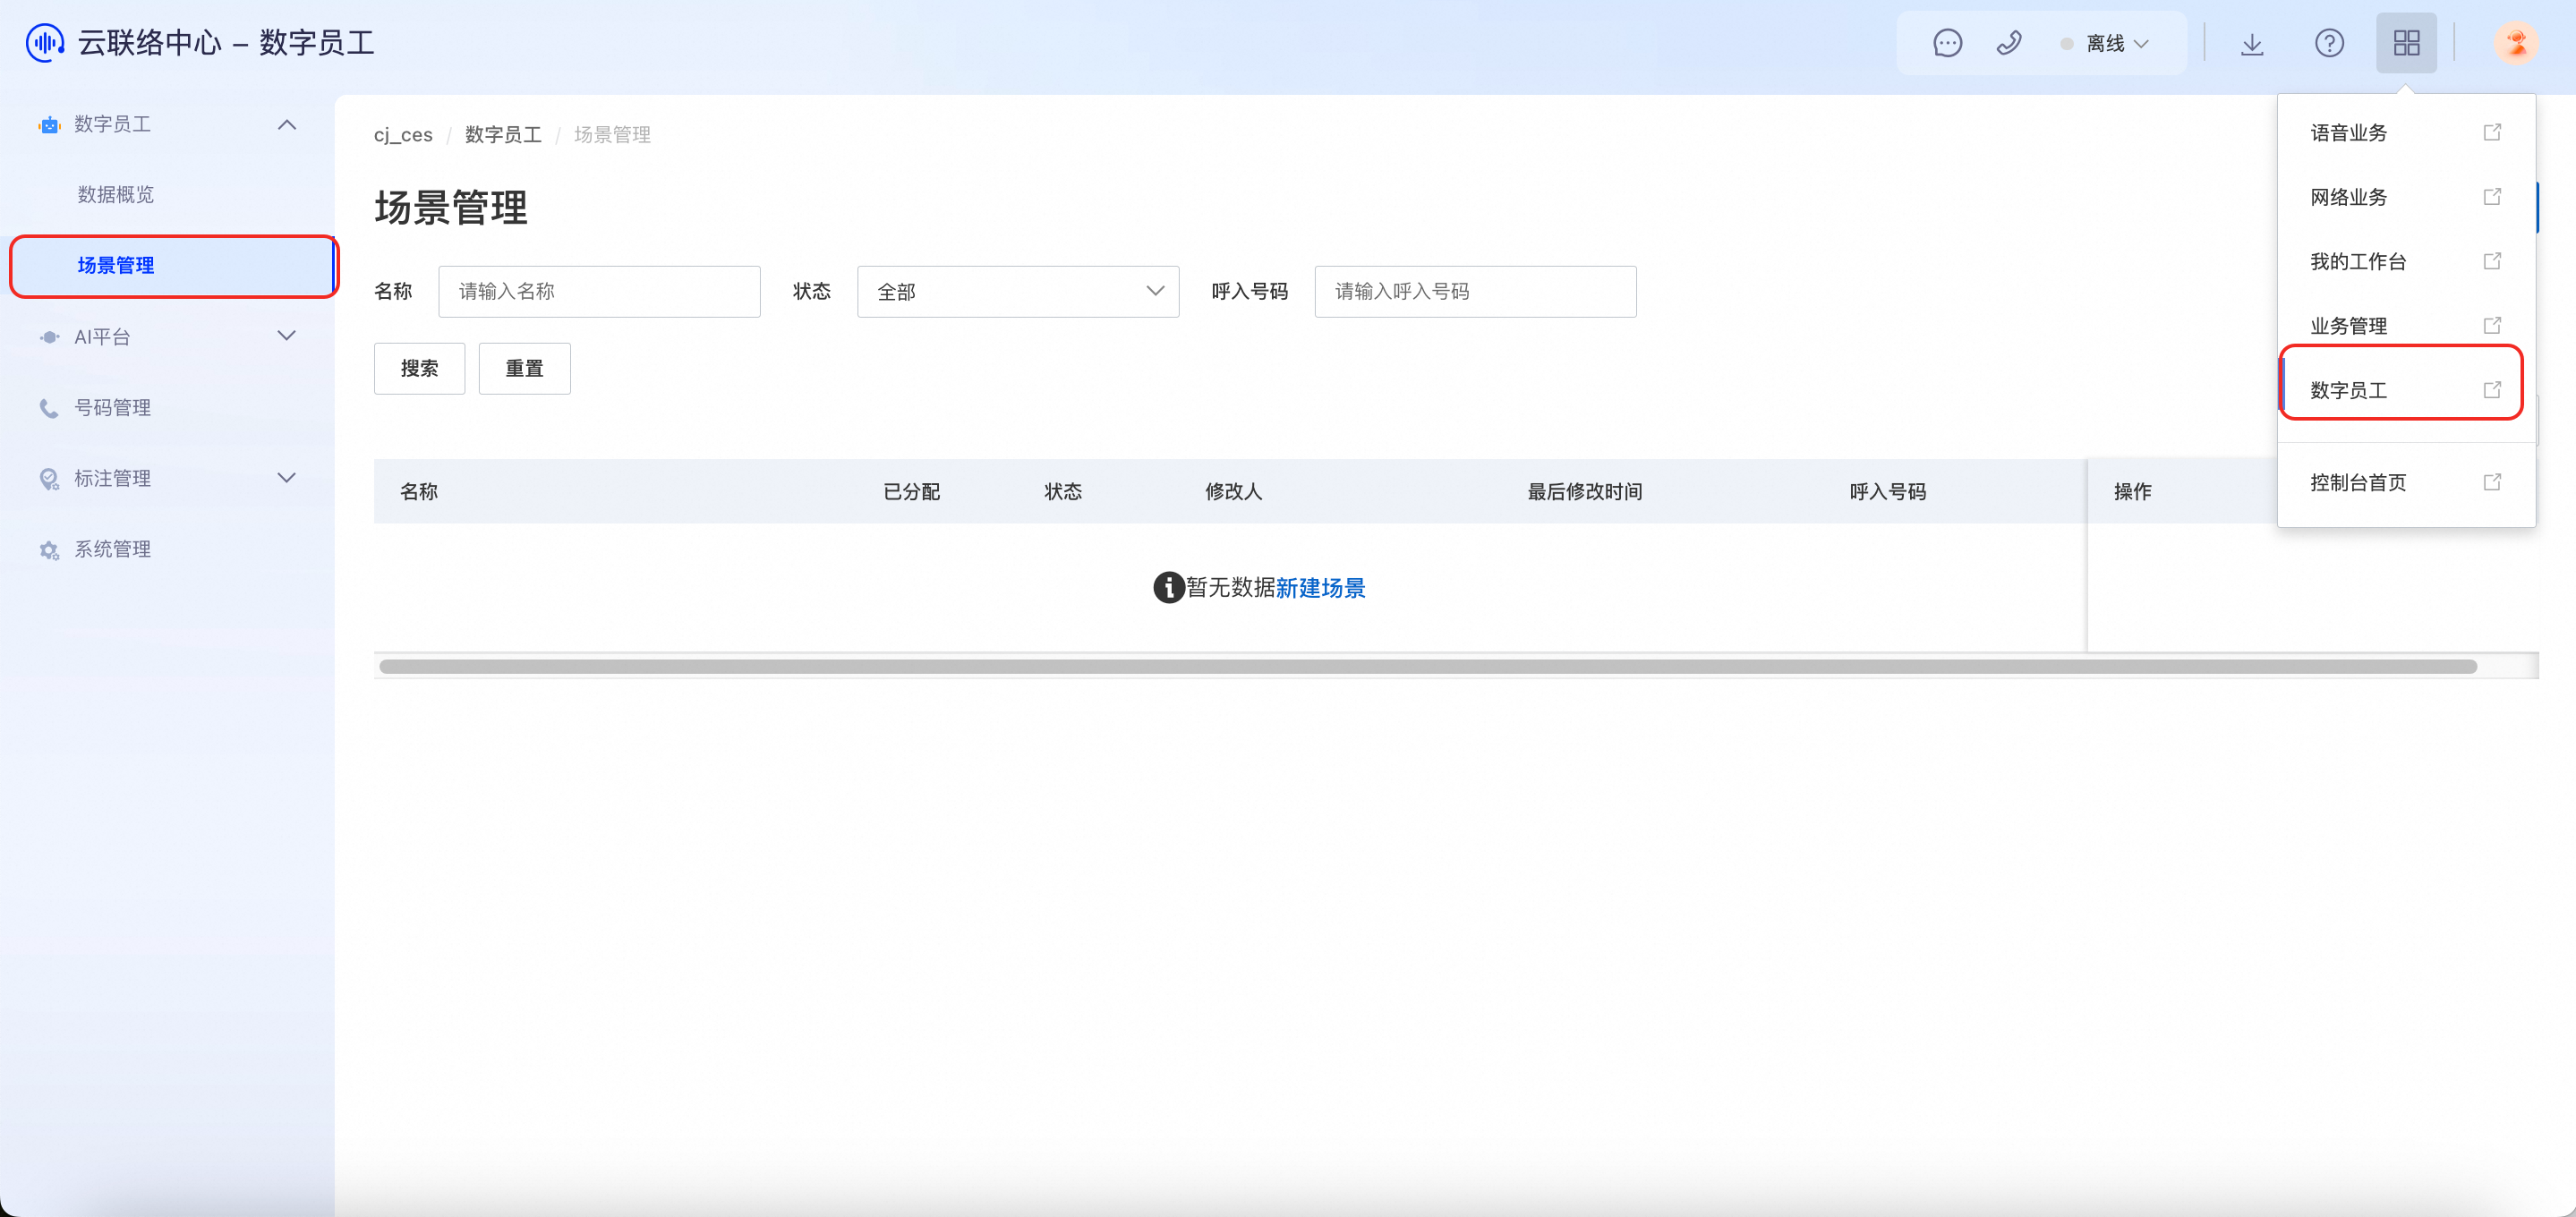
After you activate Digital Employee, open the instance and click Scenario Management.
Click Create Scenario. Enter the basic information. For the source of conversational capabilities, select Use Alibaba Cloud Dialog Robot Service. Select the business space and the bot instance you created in the Intelligent Dialog Bot console.
ImportantIf you need to configure an agent transfer, proceed to the voice service configuration section below after this step. The number binding process for agent transfers is different.
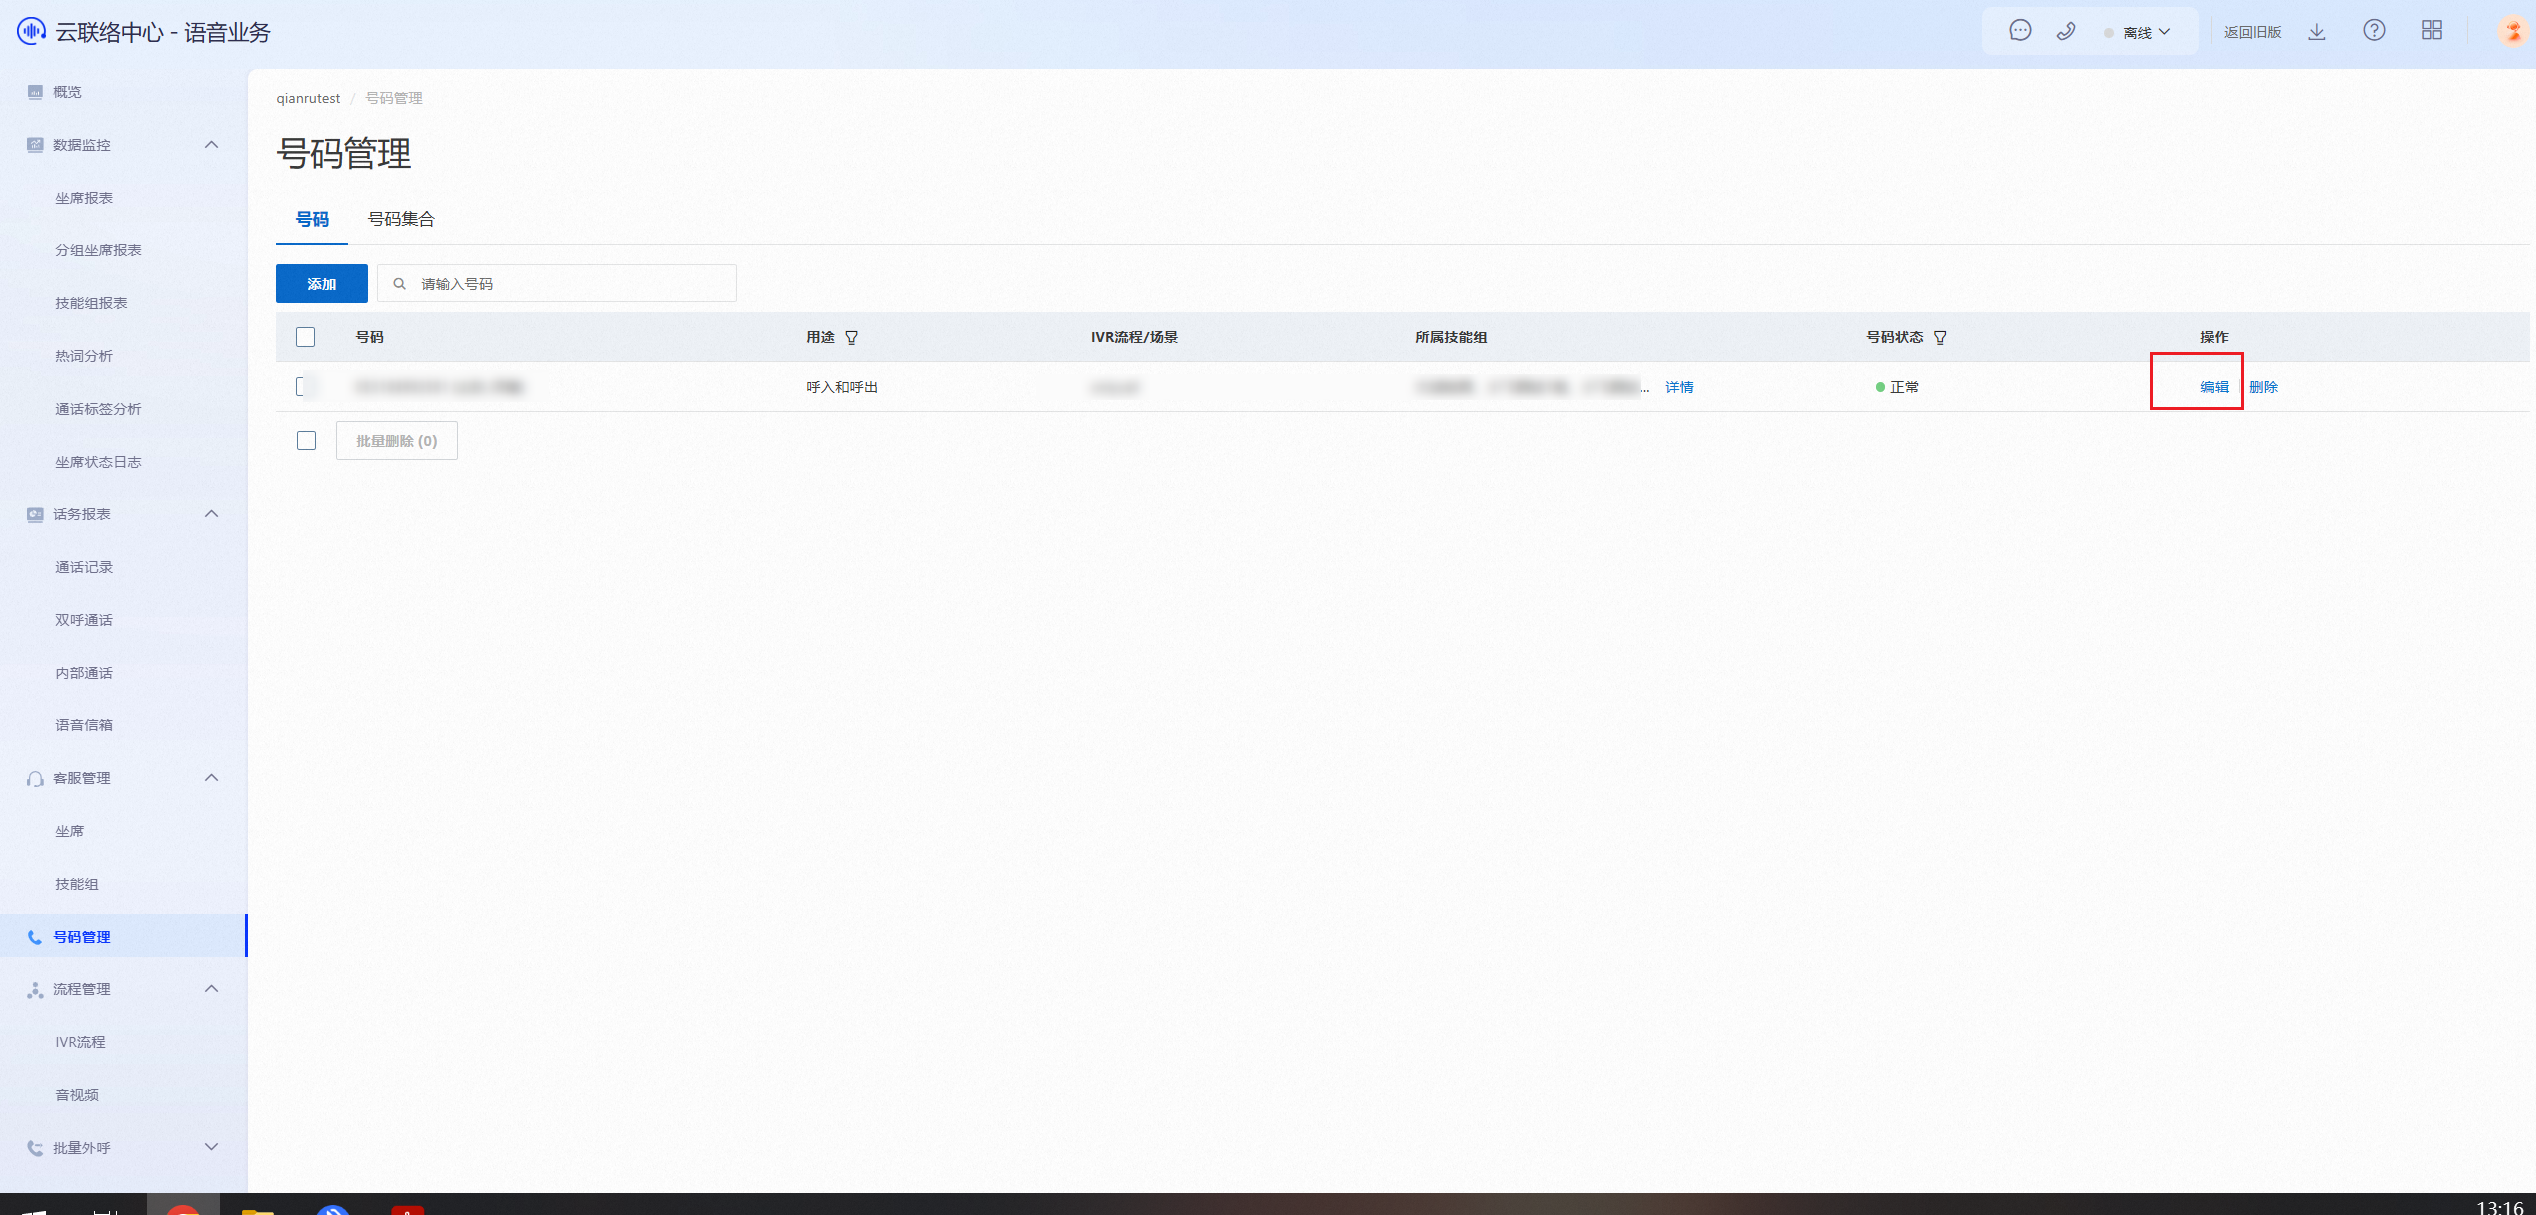
Bind a phone number. Click Number Management. In the number list, find the target number and click Edit. If an agent transfer is not required, set Agent Type to Digital Employee and select the scenario you just created.
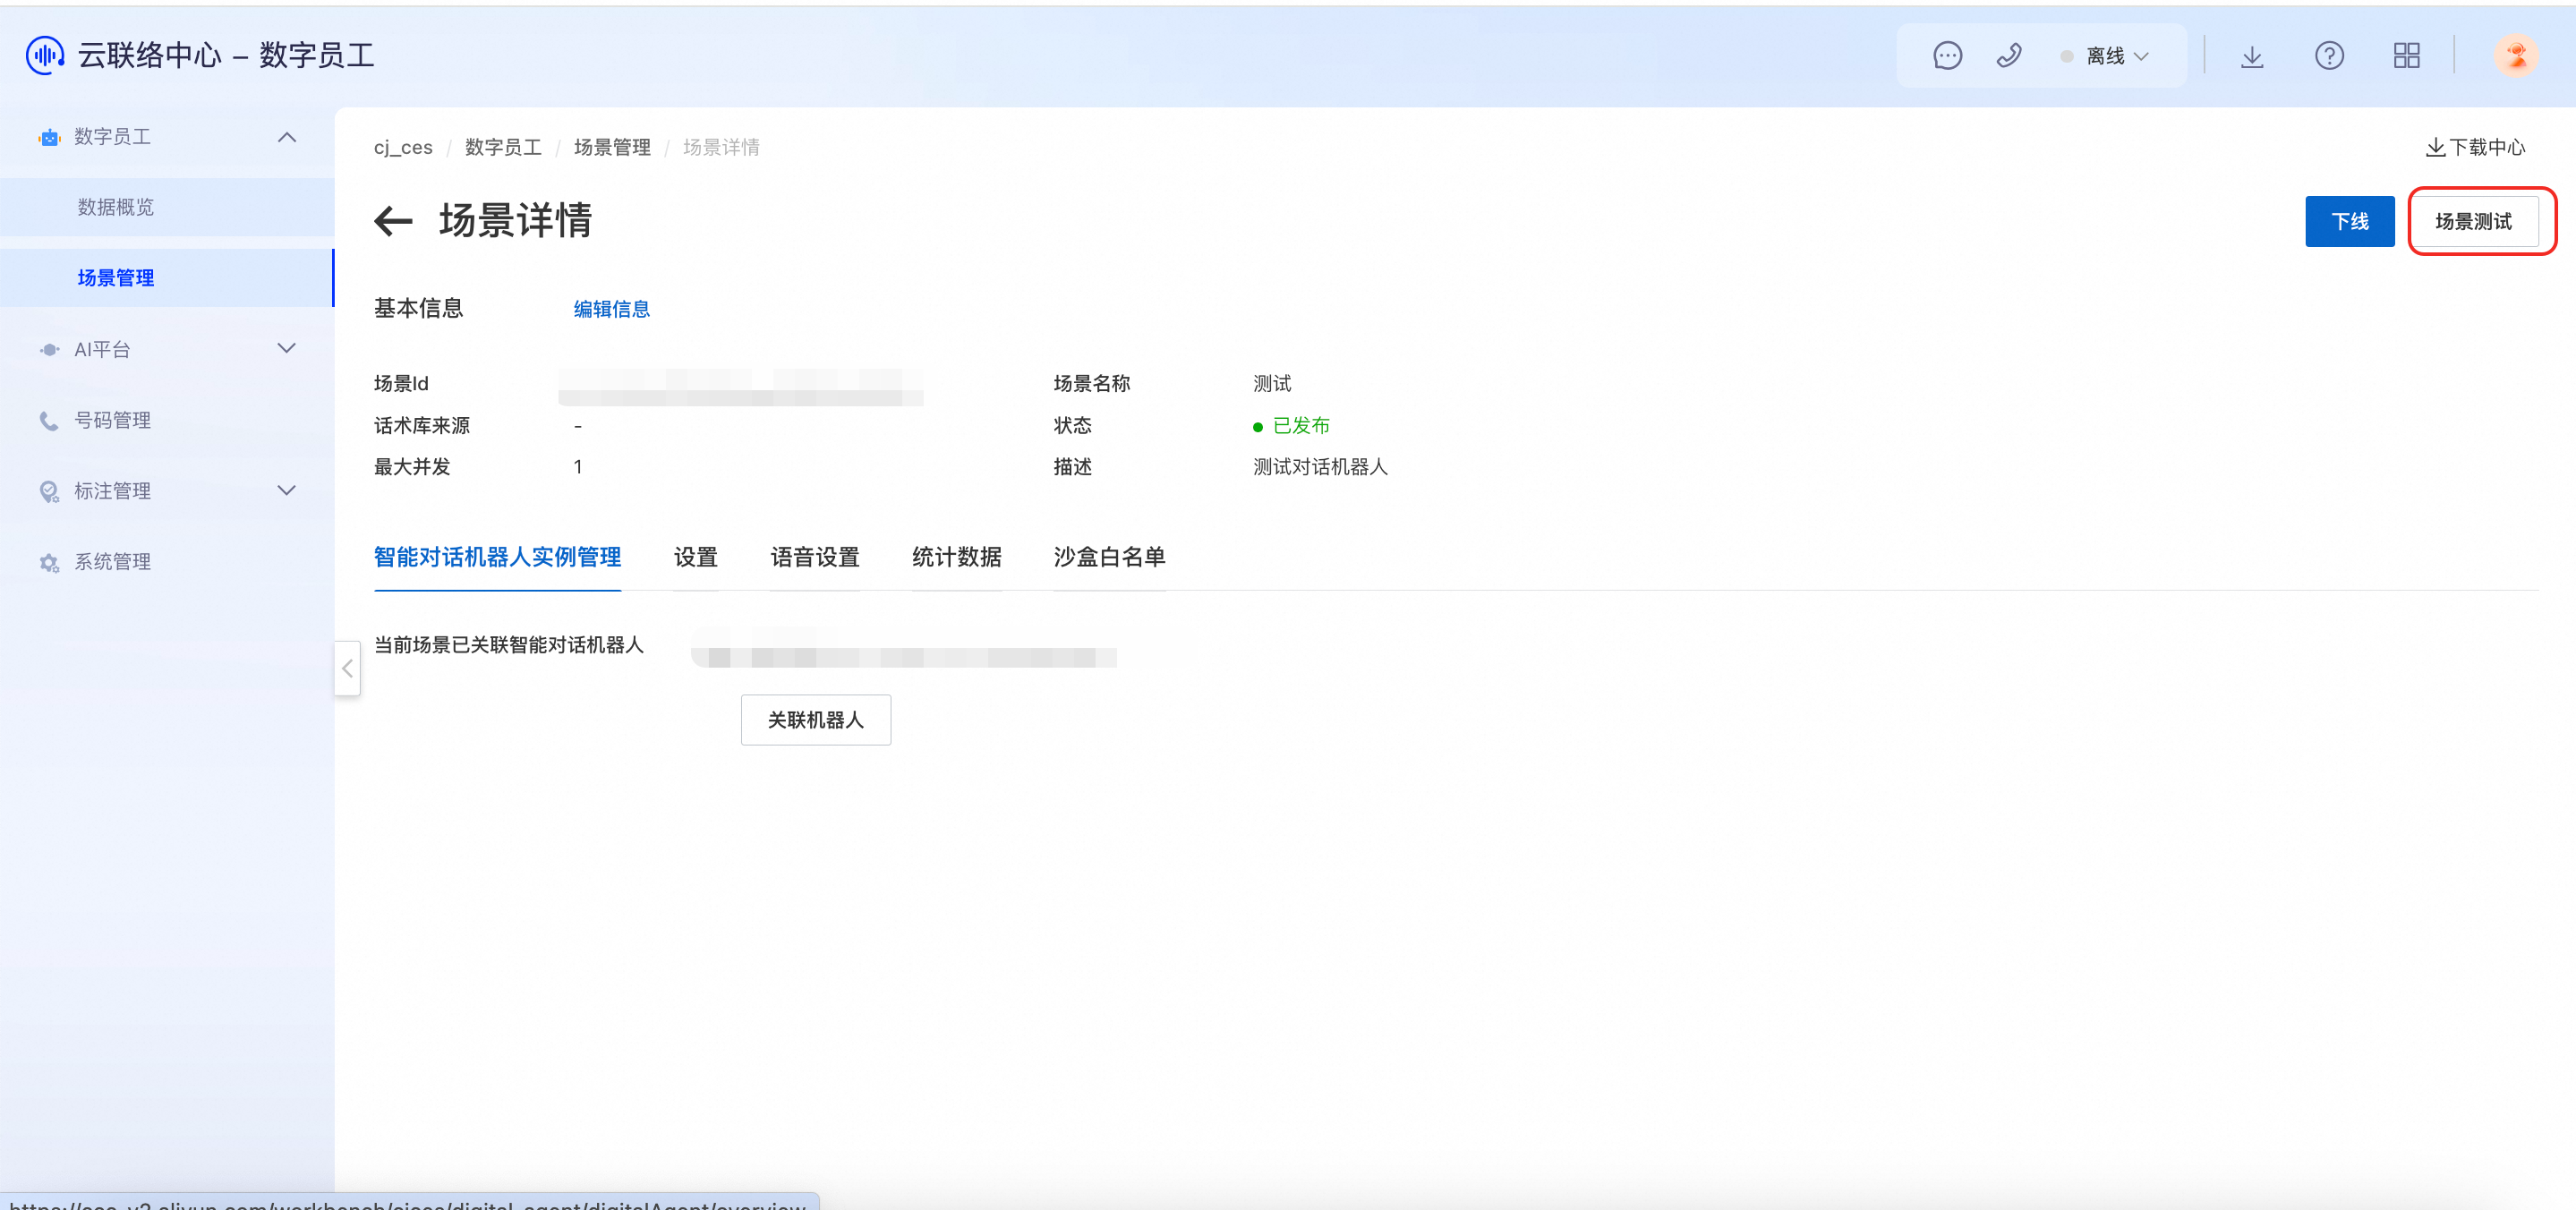
Test the scenario. Go to Scenario Management, select the test scenario you created, and click Edit to open the bot configuration page. In the upper-right corner, click Test Scenario to perform a live test.
NoteWhen you test the scenario, you must use the softphone. Text-based testing is not available for a Voice Navigation Bot.




Configure agent transfer
Configure agent transfer in Intelligent Dialog Bot
Agent transfer options
You can configure an agent transfer in three ways: from the bot settings, within a flow, or on a silence timeout.
Configure transfer from the bot settings
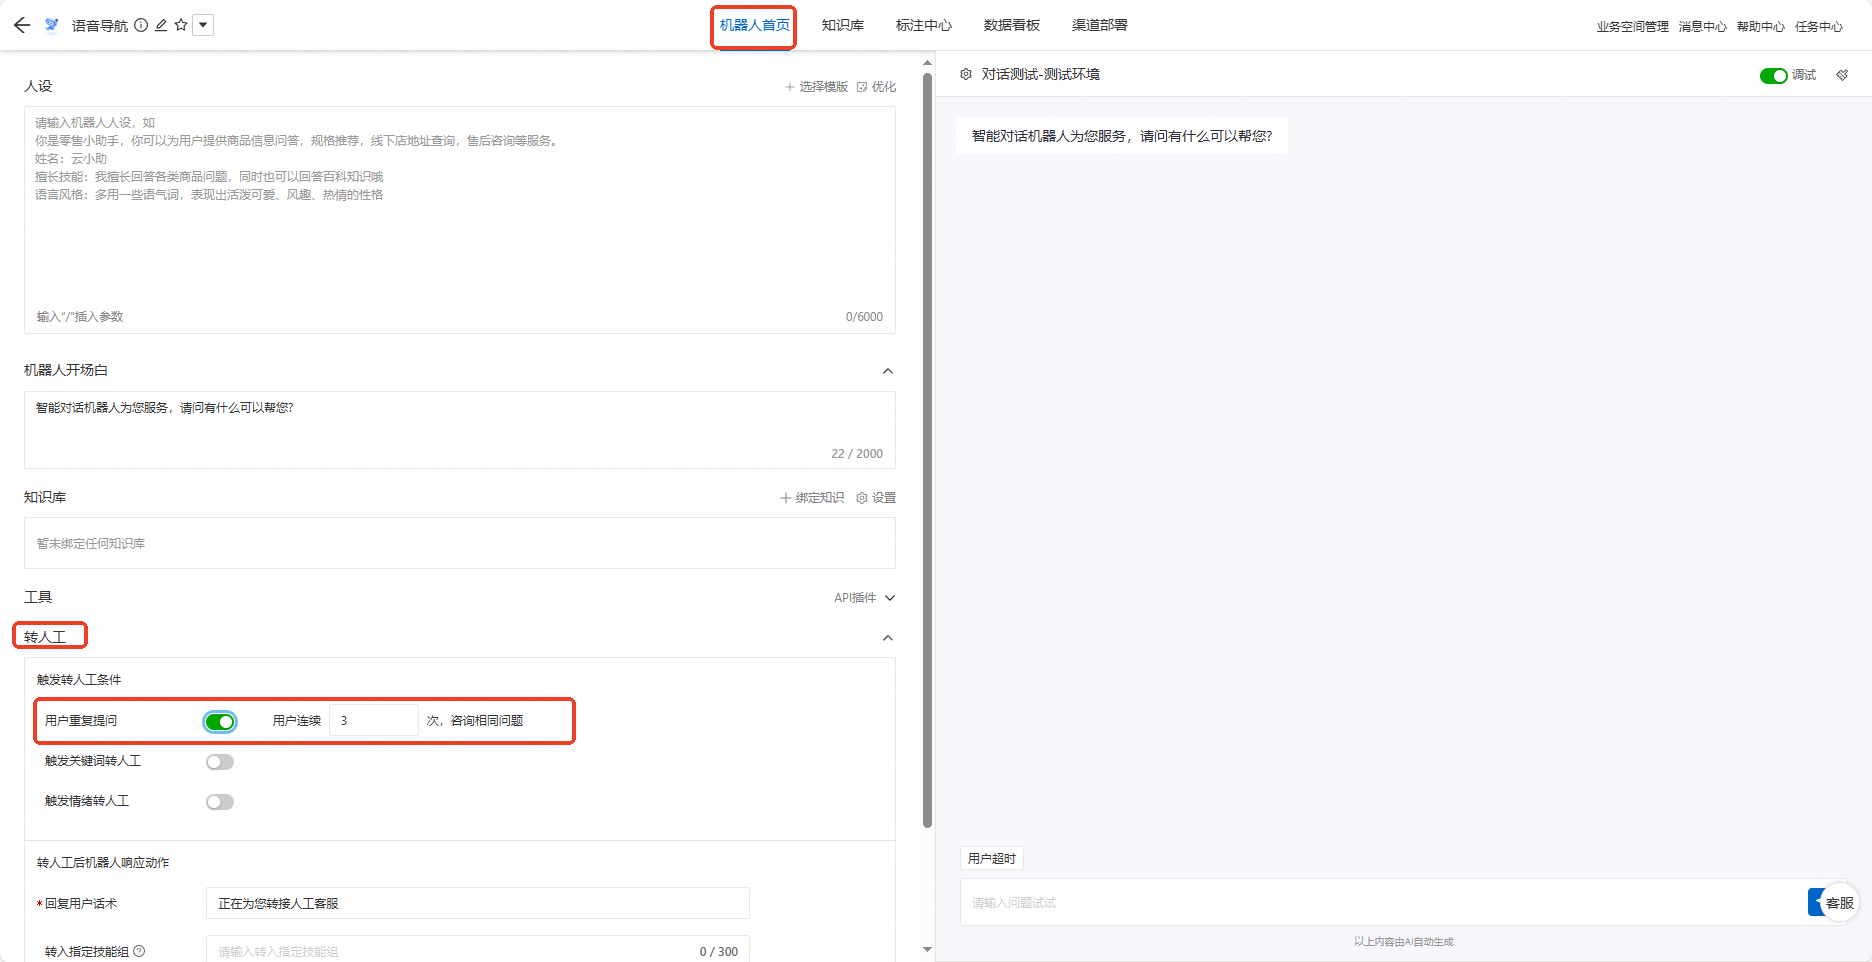
Transfer triggers
You can enable and configure triggers such as User Repeats Question, Trigger Transfer by Keyword, and Trigger Transfer by Emotion. When a condition is met during a call, an agent transfer is triggered.
After you select a trigger, configure its conditions. For example, you can set the condition "When the user asks the same question 3 consecutive times."
Bot response after transfer
Configure the bot's response actions after a transfer is triggered, including the response message, the target skill group, and custom parameters.
Configure the response message that plays when a transfer is triggered. For example: "Transferring you to a technical specialist. Please wait."
For the skill group, enter the ID of the skill group you configured in Alibaba Cloud Contact Center. For example: "skg-default@cjces".
Configure transfer within a flow
You can also configure an agent transfer in Flow Management. Go to the knowledge base tab, select Flow Management, and click Create Flow. Enter a custom name and description. In this example, we create a flow named "Agent Transfer Test Flow".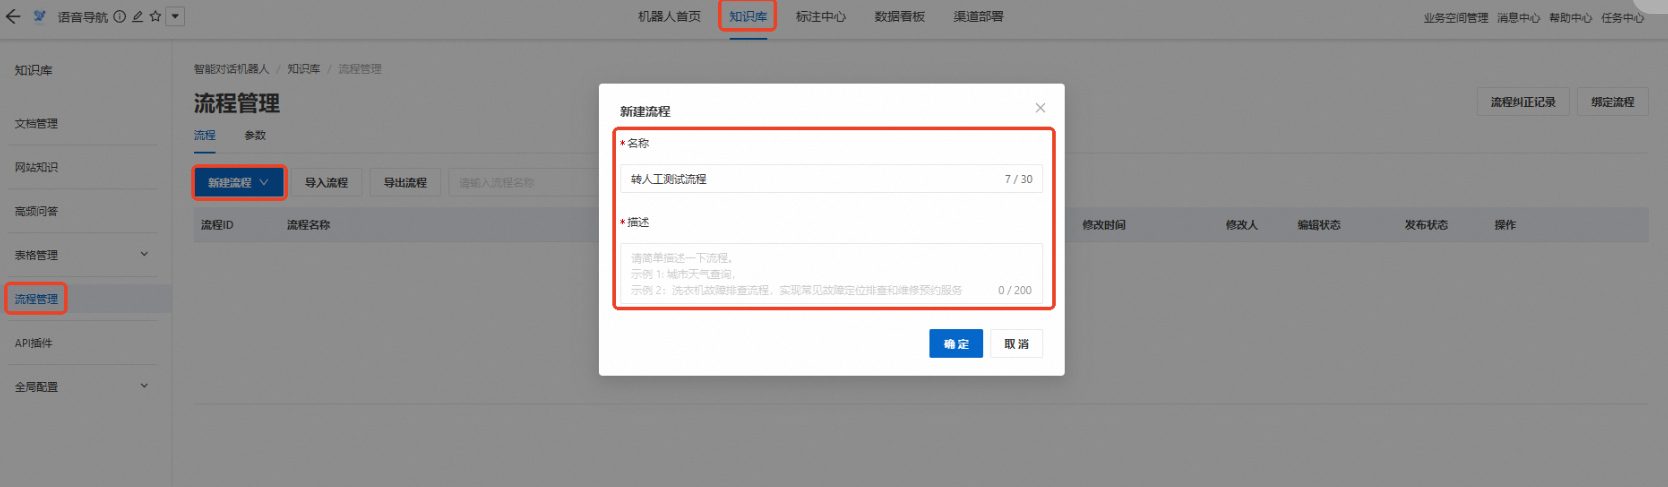
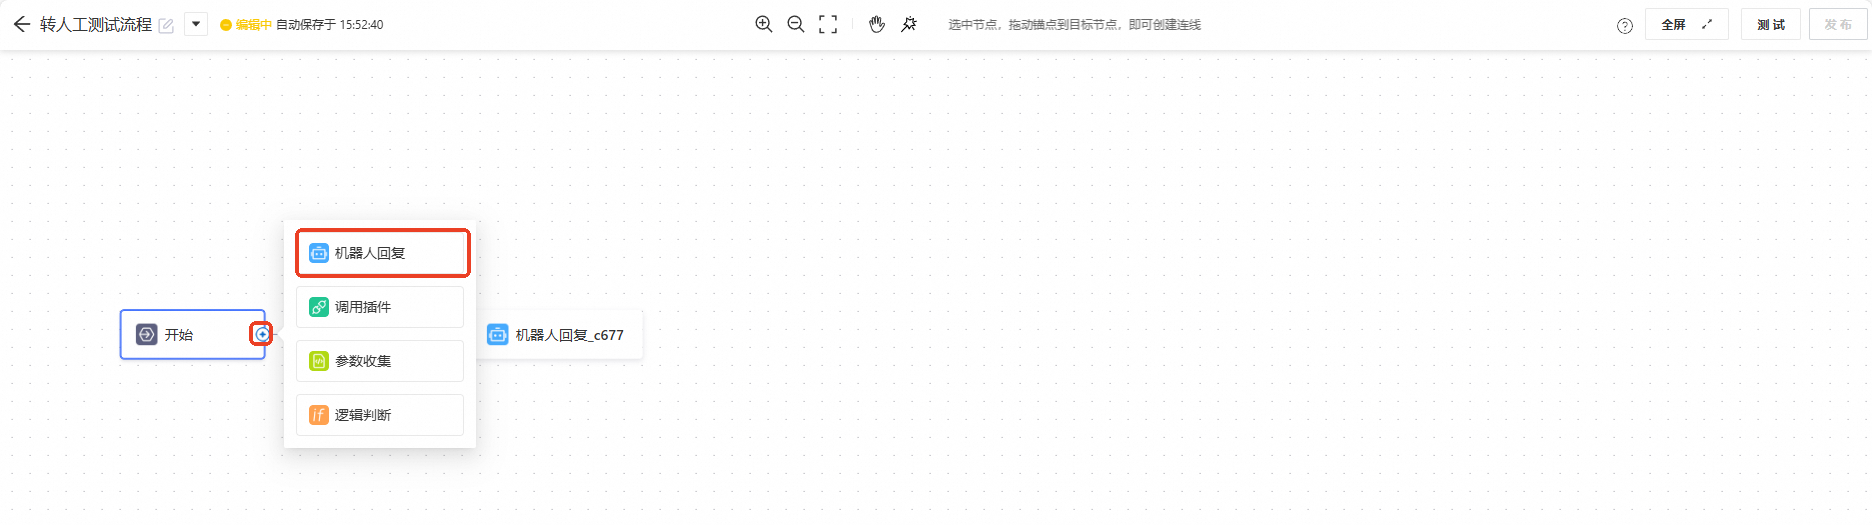
After the Start node, click the + icon. You can add one of four node types: Bot Reply, Call Plug-in, Parameter Collection, or Logical Condition. To implement an agent transfer, add a Bot Reply node.
Configure the user intent branch. Click the branch to edit its settings. Define a branch name and specify user questions or phrases to help the bot understand the intent of this branch.
Configure the branch node. After you configure the branch information, click the branch node to open its settings.
Basic Settings
Node Name: Enter a custom name for the node.
Reply Method: Choose either Fixed Response or Generate Reply Based on Prompt.
Fixed response: A predefined response the bot delivers when this branch is triggered.
Generate Reply Based on Prompt: When the agent transfer is triggered, the bot generates a dynamic response based on the prompt you provide.
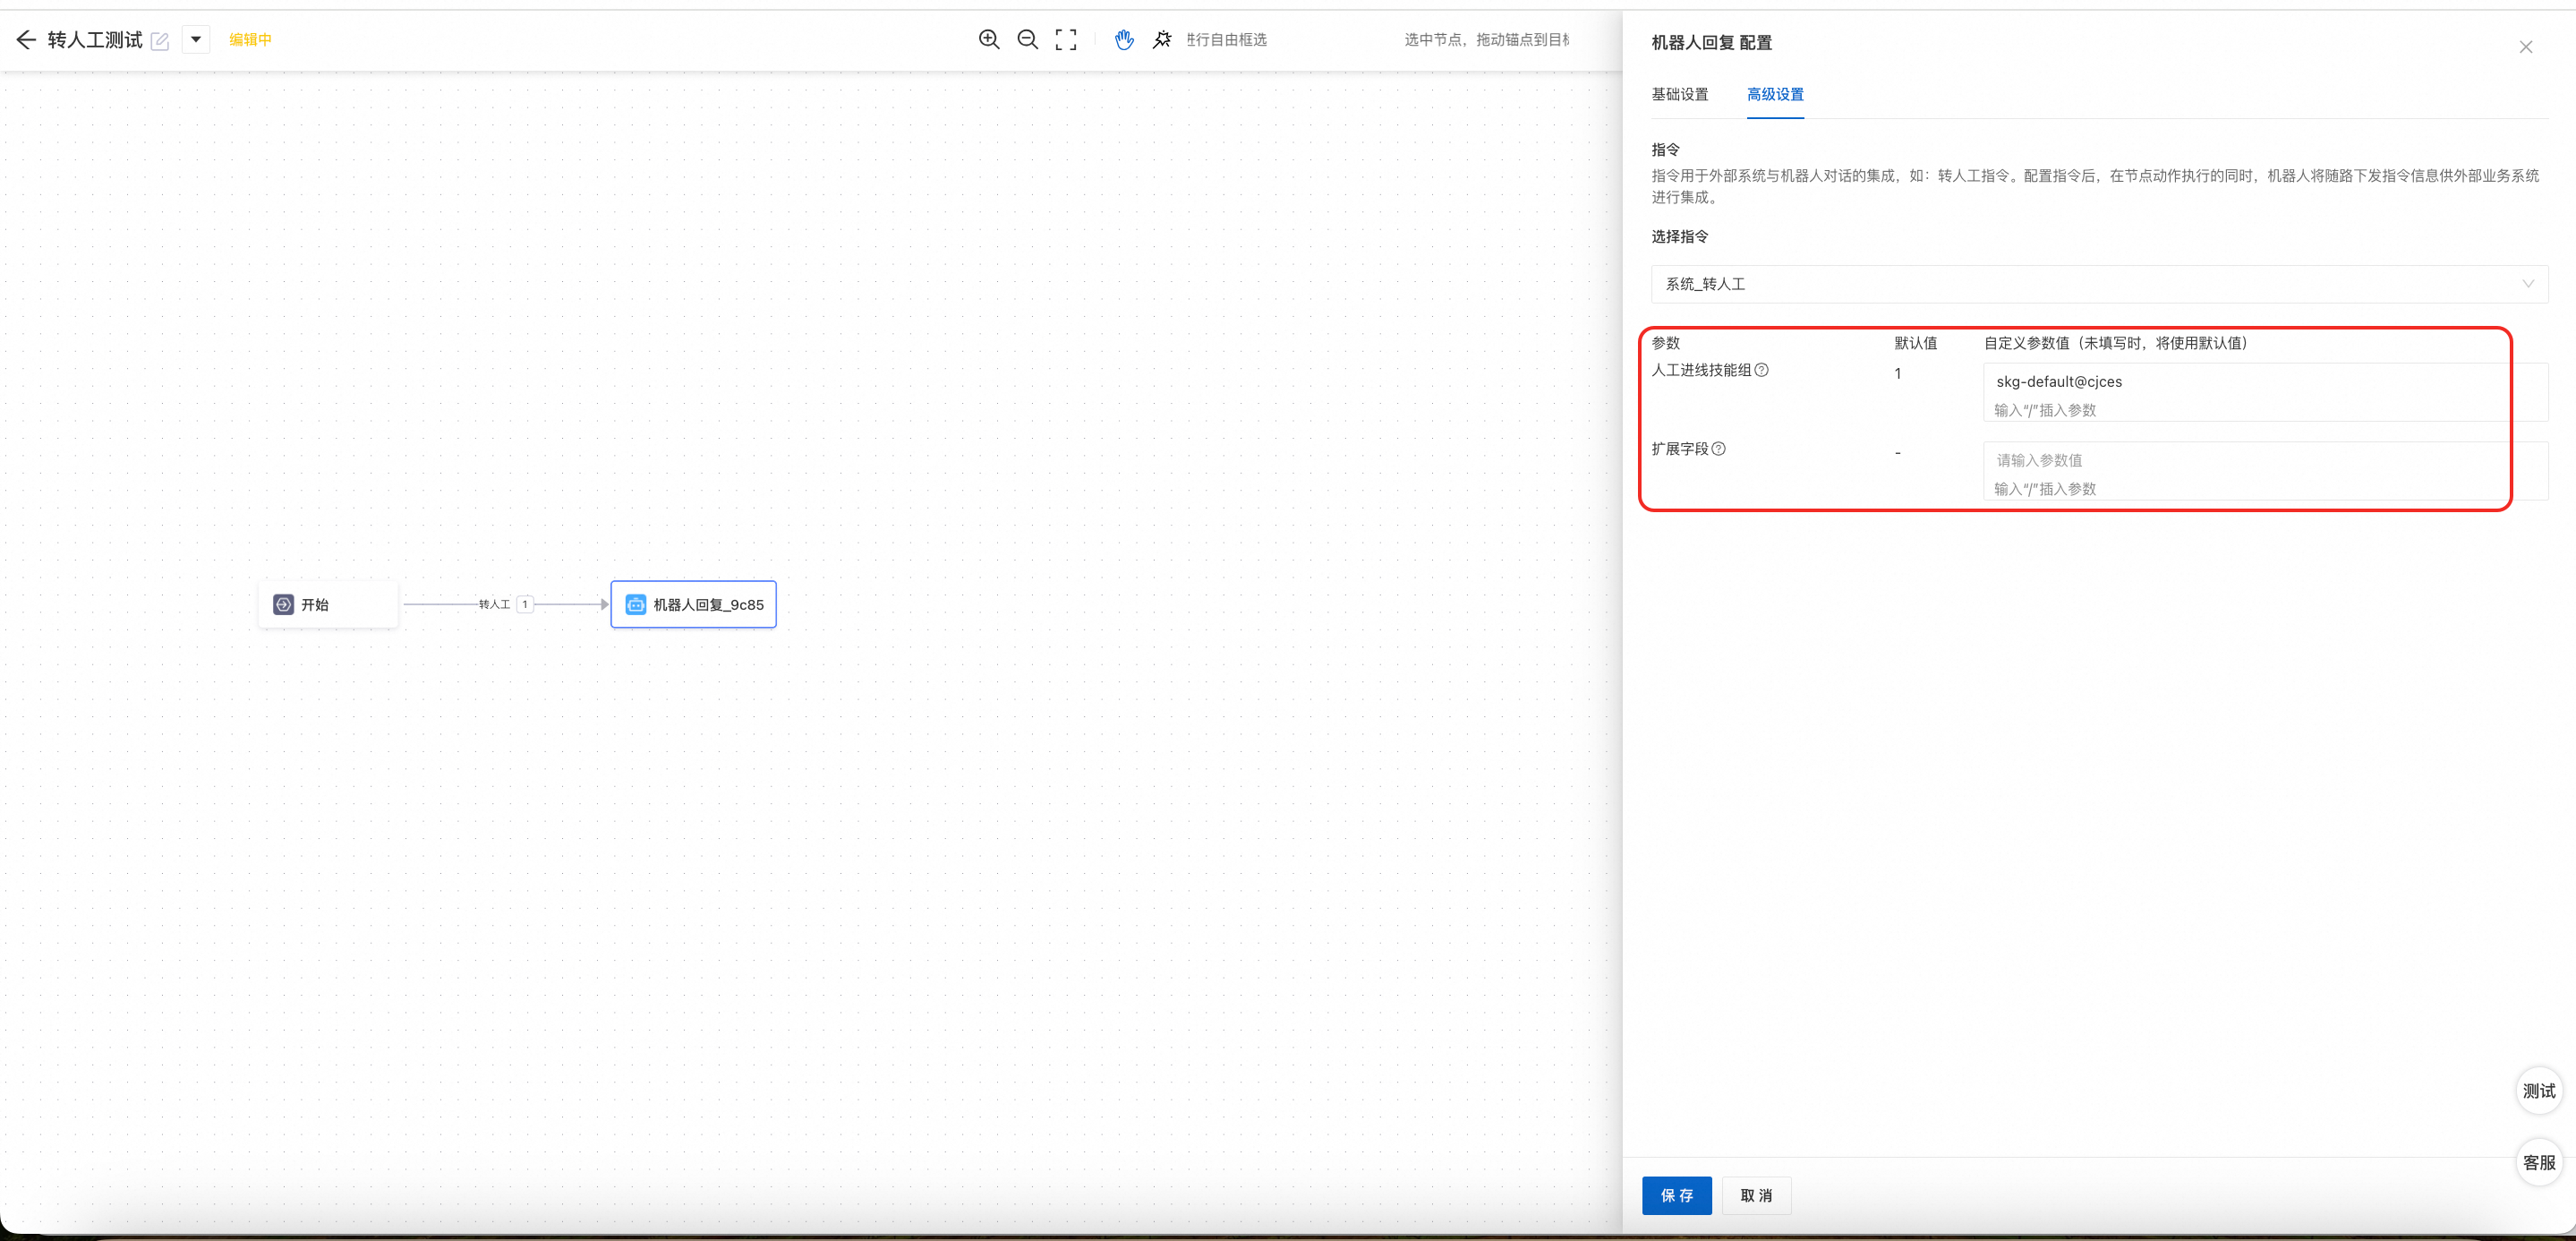
Advanced Settings: Configure a command.
Commands are used to integrate with external systems for actions like agent transfers. When the node action executes, the bot sends the configured command information to the external system. In this case, select System Command_Transfer to Agent and enter the ID of the target skill group.


Configure transfer on a silence timeout
Configure a silence prompt. You can set a silence duration and the prompt that plays when it is triggered. For the action to take after the prompt, select Transfer to Skill Group.
Transfer to skill group: Enter the ID of the skill group to transfer the call to a human agent after a silence timeout.

Configure Cloud Contact Center for agent transfer
Create and enter an instance
Log on to the Alibaba Cloud Contact Center console, and click Create. Enter a custom name, access URL, and description. For the service type, you must select both Human Agent and Digital Employee.

Create and assign agents and skill groups
For detailed steps, see the sections on creating agents, skills, and assigning skill groups in Quickly Create an Alibaba Cloud Contact Center Voice Instance.
Configure the IVR flow
For more information, see IVR configuration for common scenarios. Add an IVR flow and name it "Agent Transfer Test".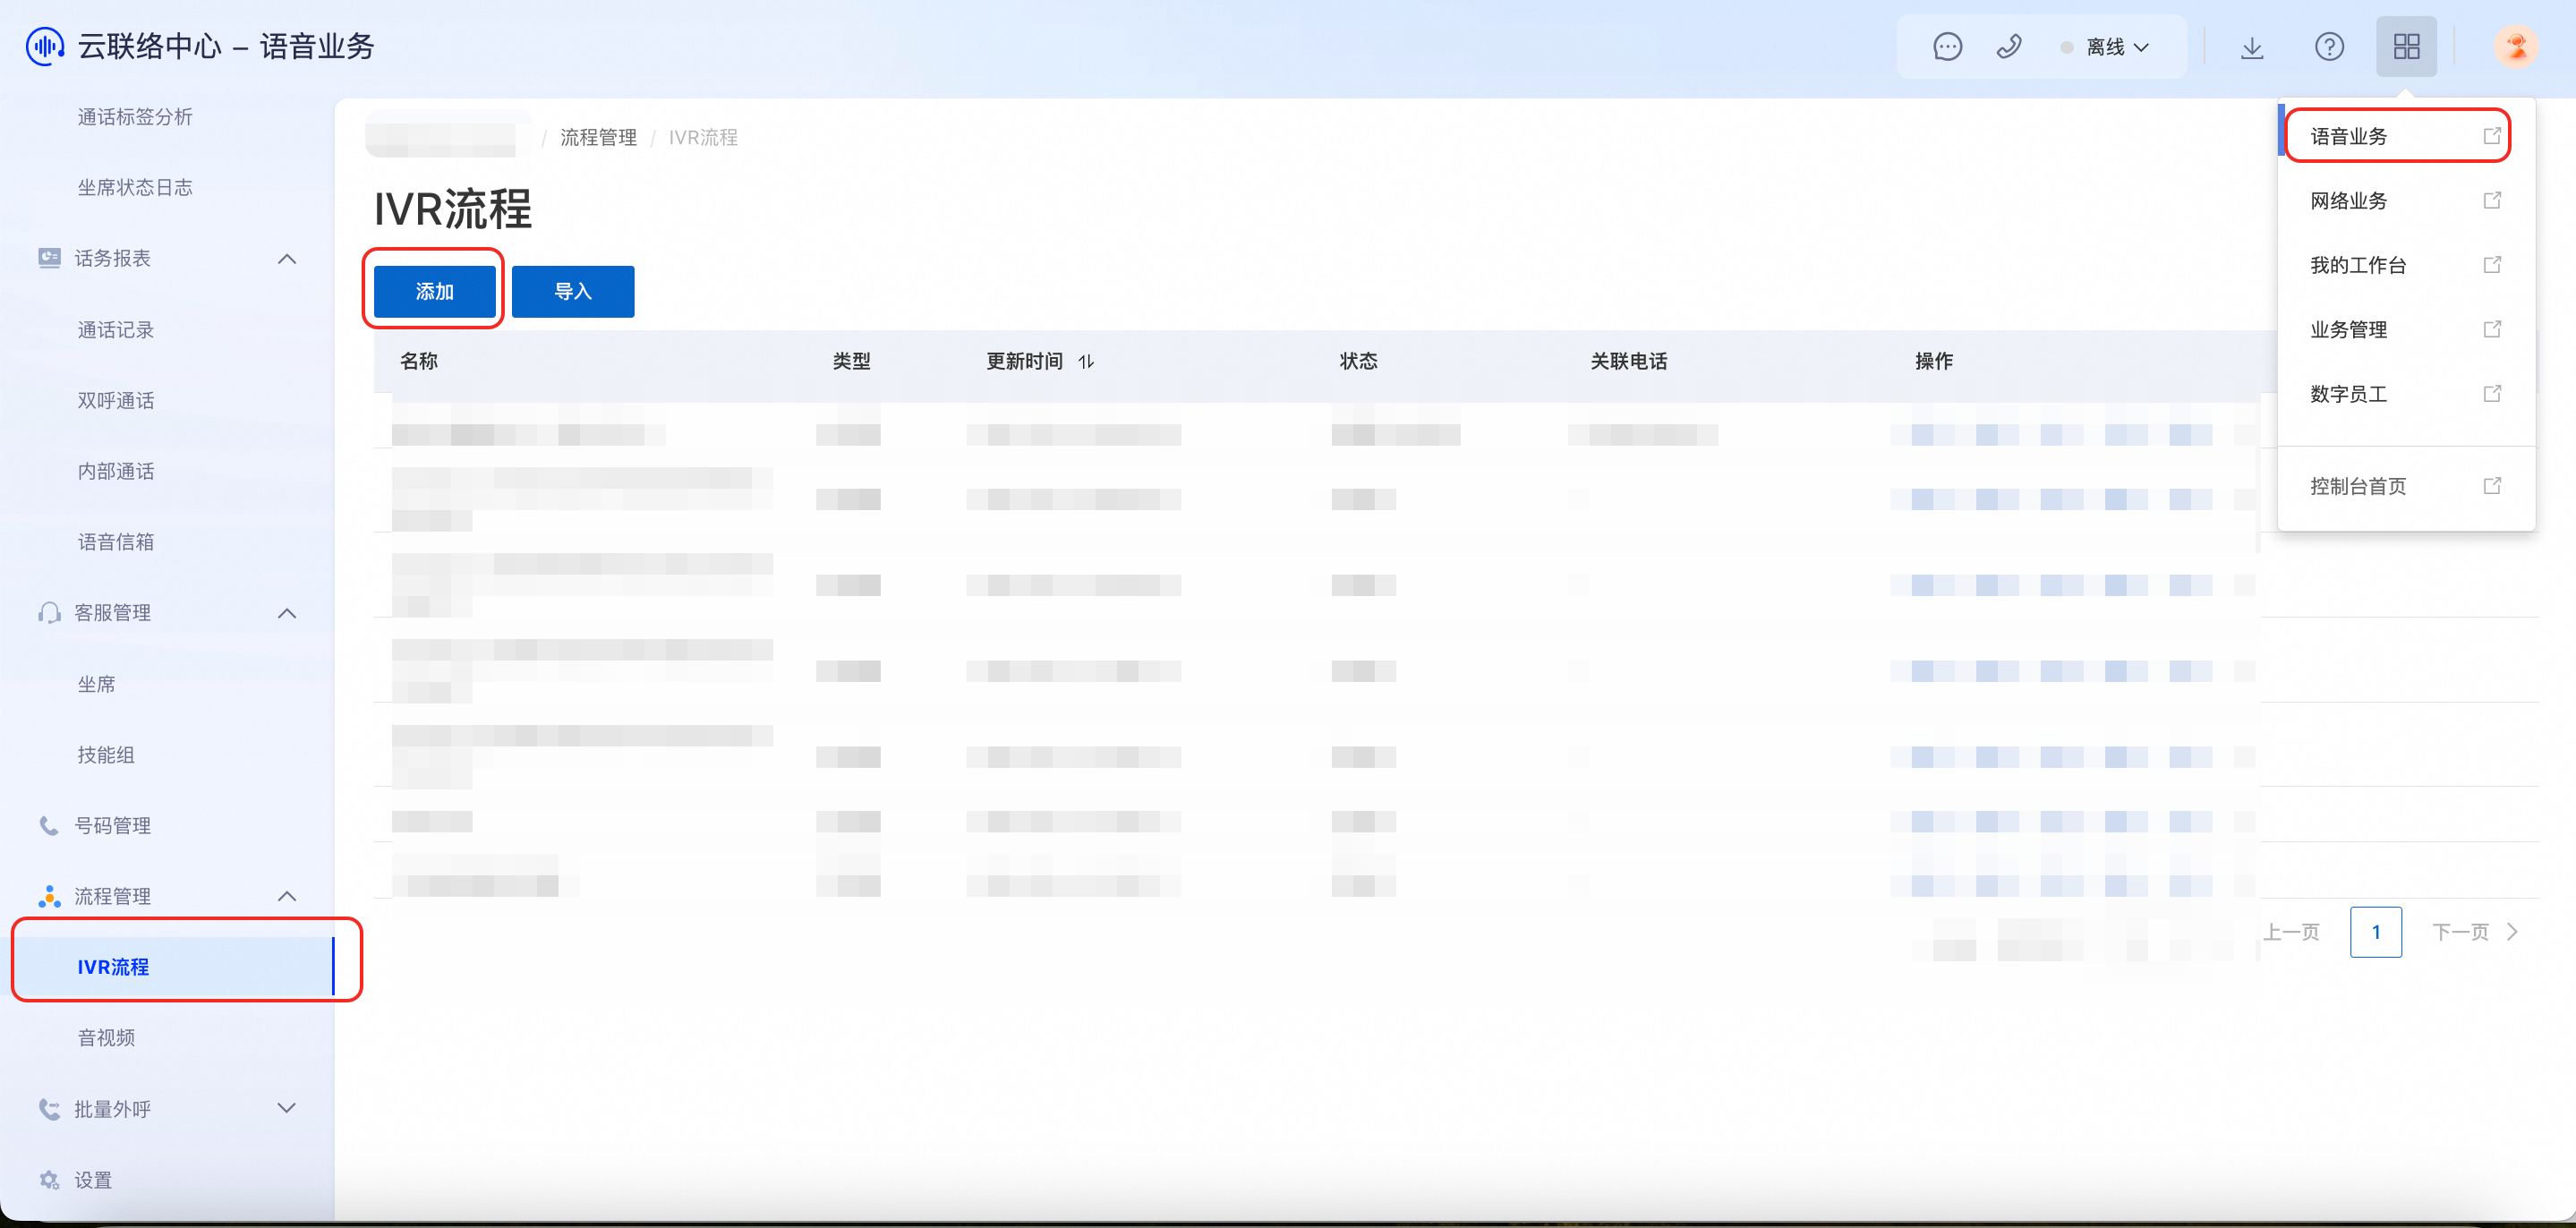
Add a Digital Employee module
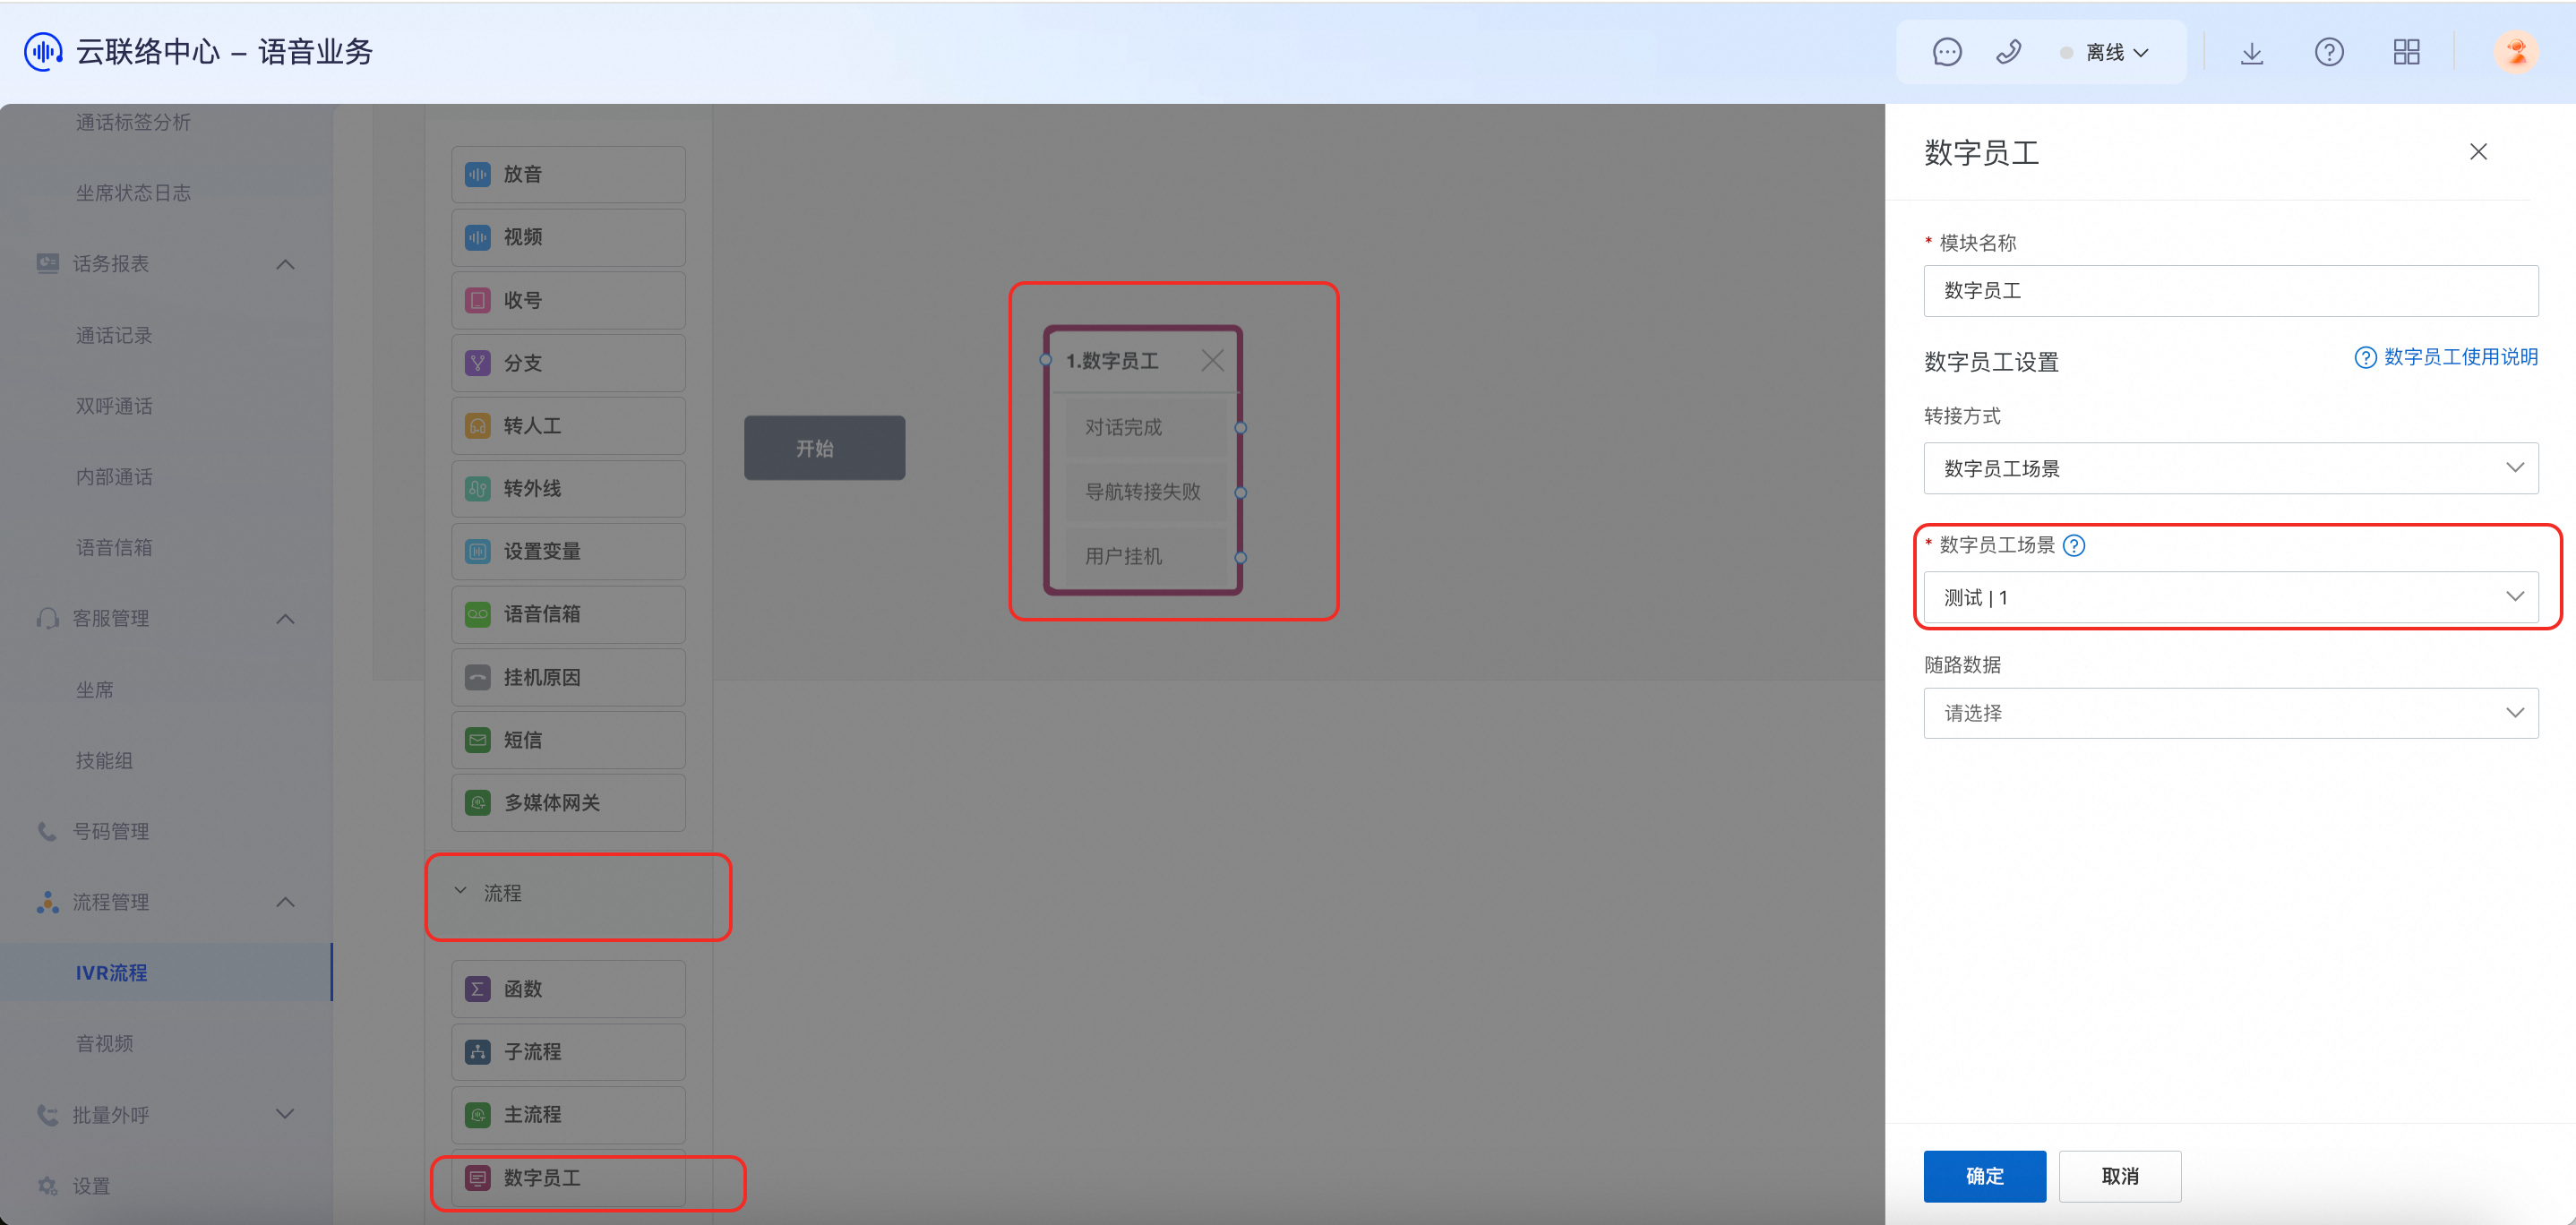
Click Add to open the new IVR flow page. From the canvas on the left, drag the Digital Employee Module onto the canvas. Configure the module by entering a custom name. For the transfer method, select Digital Employee Scenario and choose the Digital Employee you created. Connect the start node to the Digital Employee module.
Add a Branch Node module
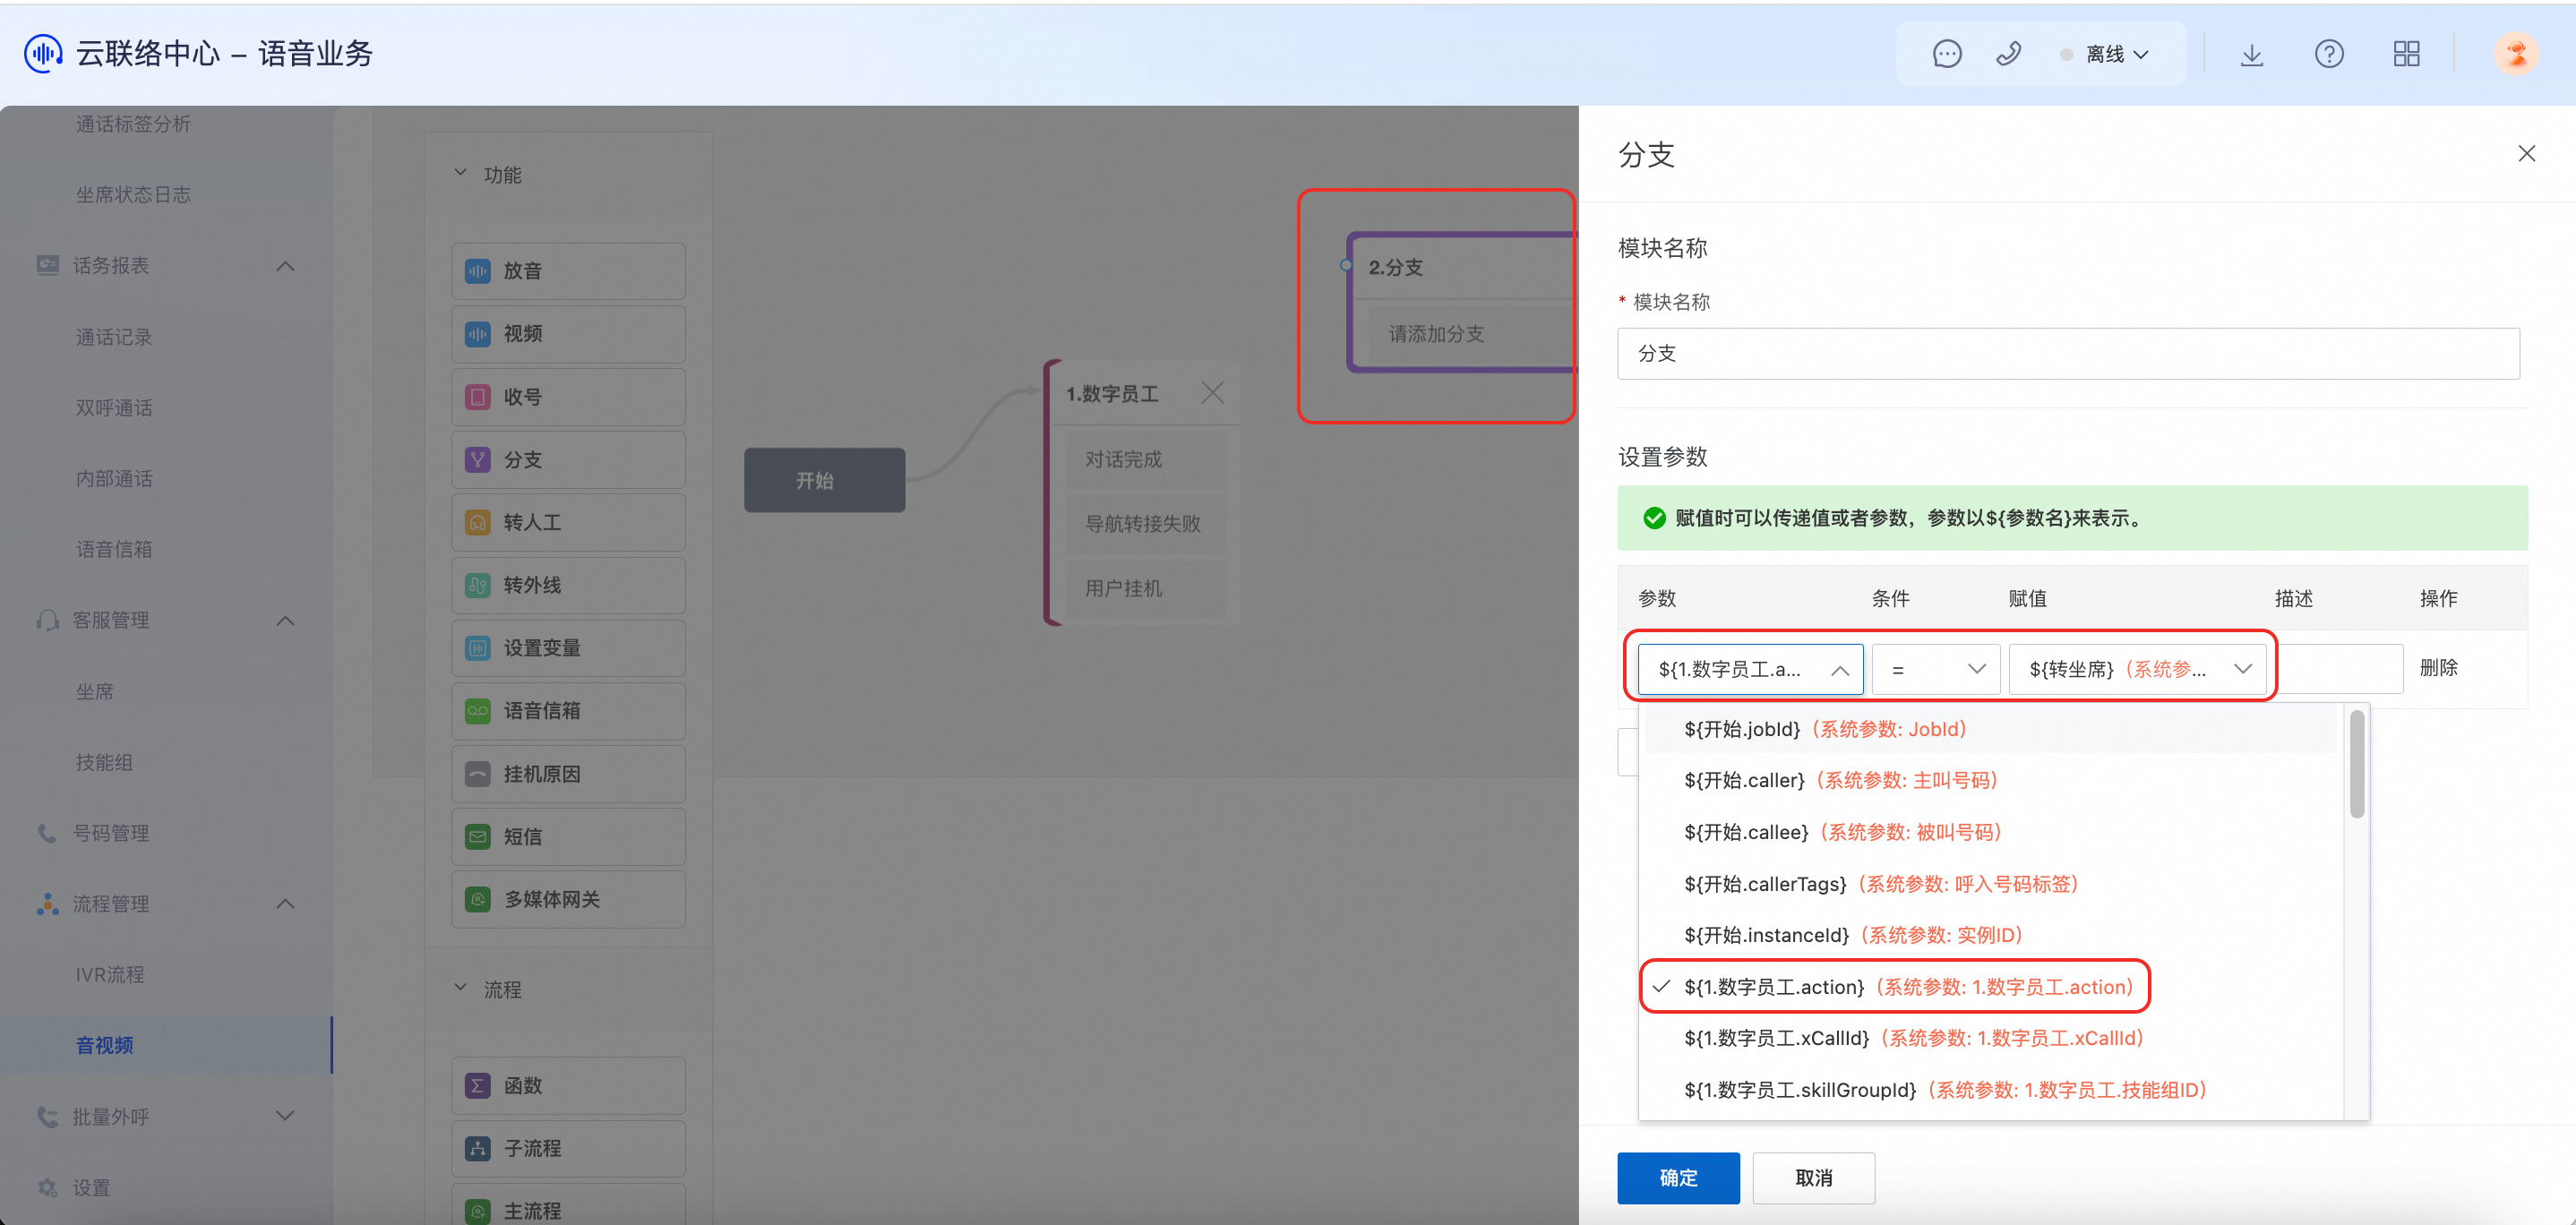
Enter a custom name for the branch module. For the parameter, select the system parameter ${1.Digital Employee.action}. Set the condition to =, and set the value to "transfer_to_agent".
Add a Transfer to Agent node module
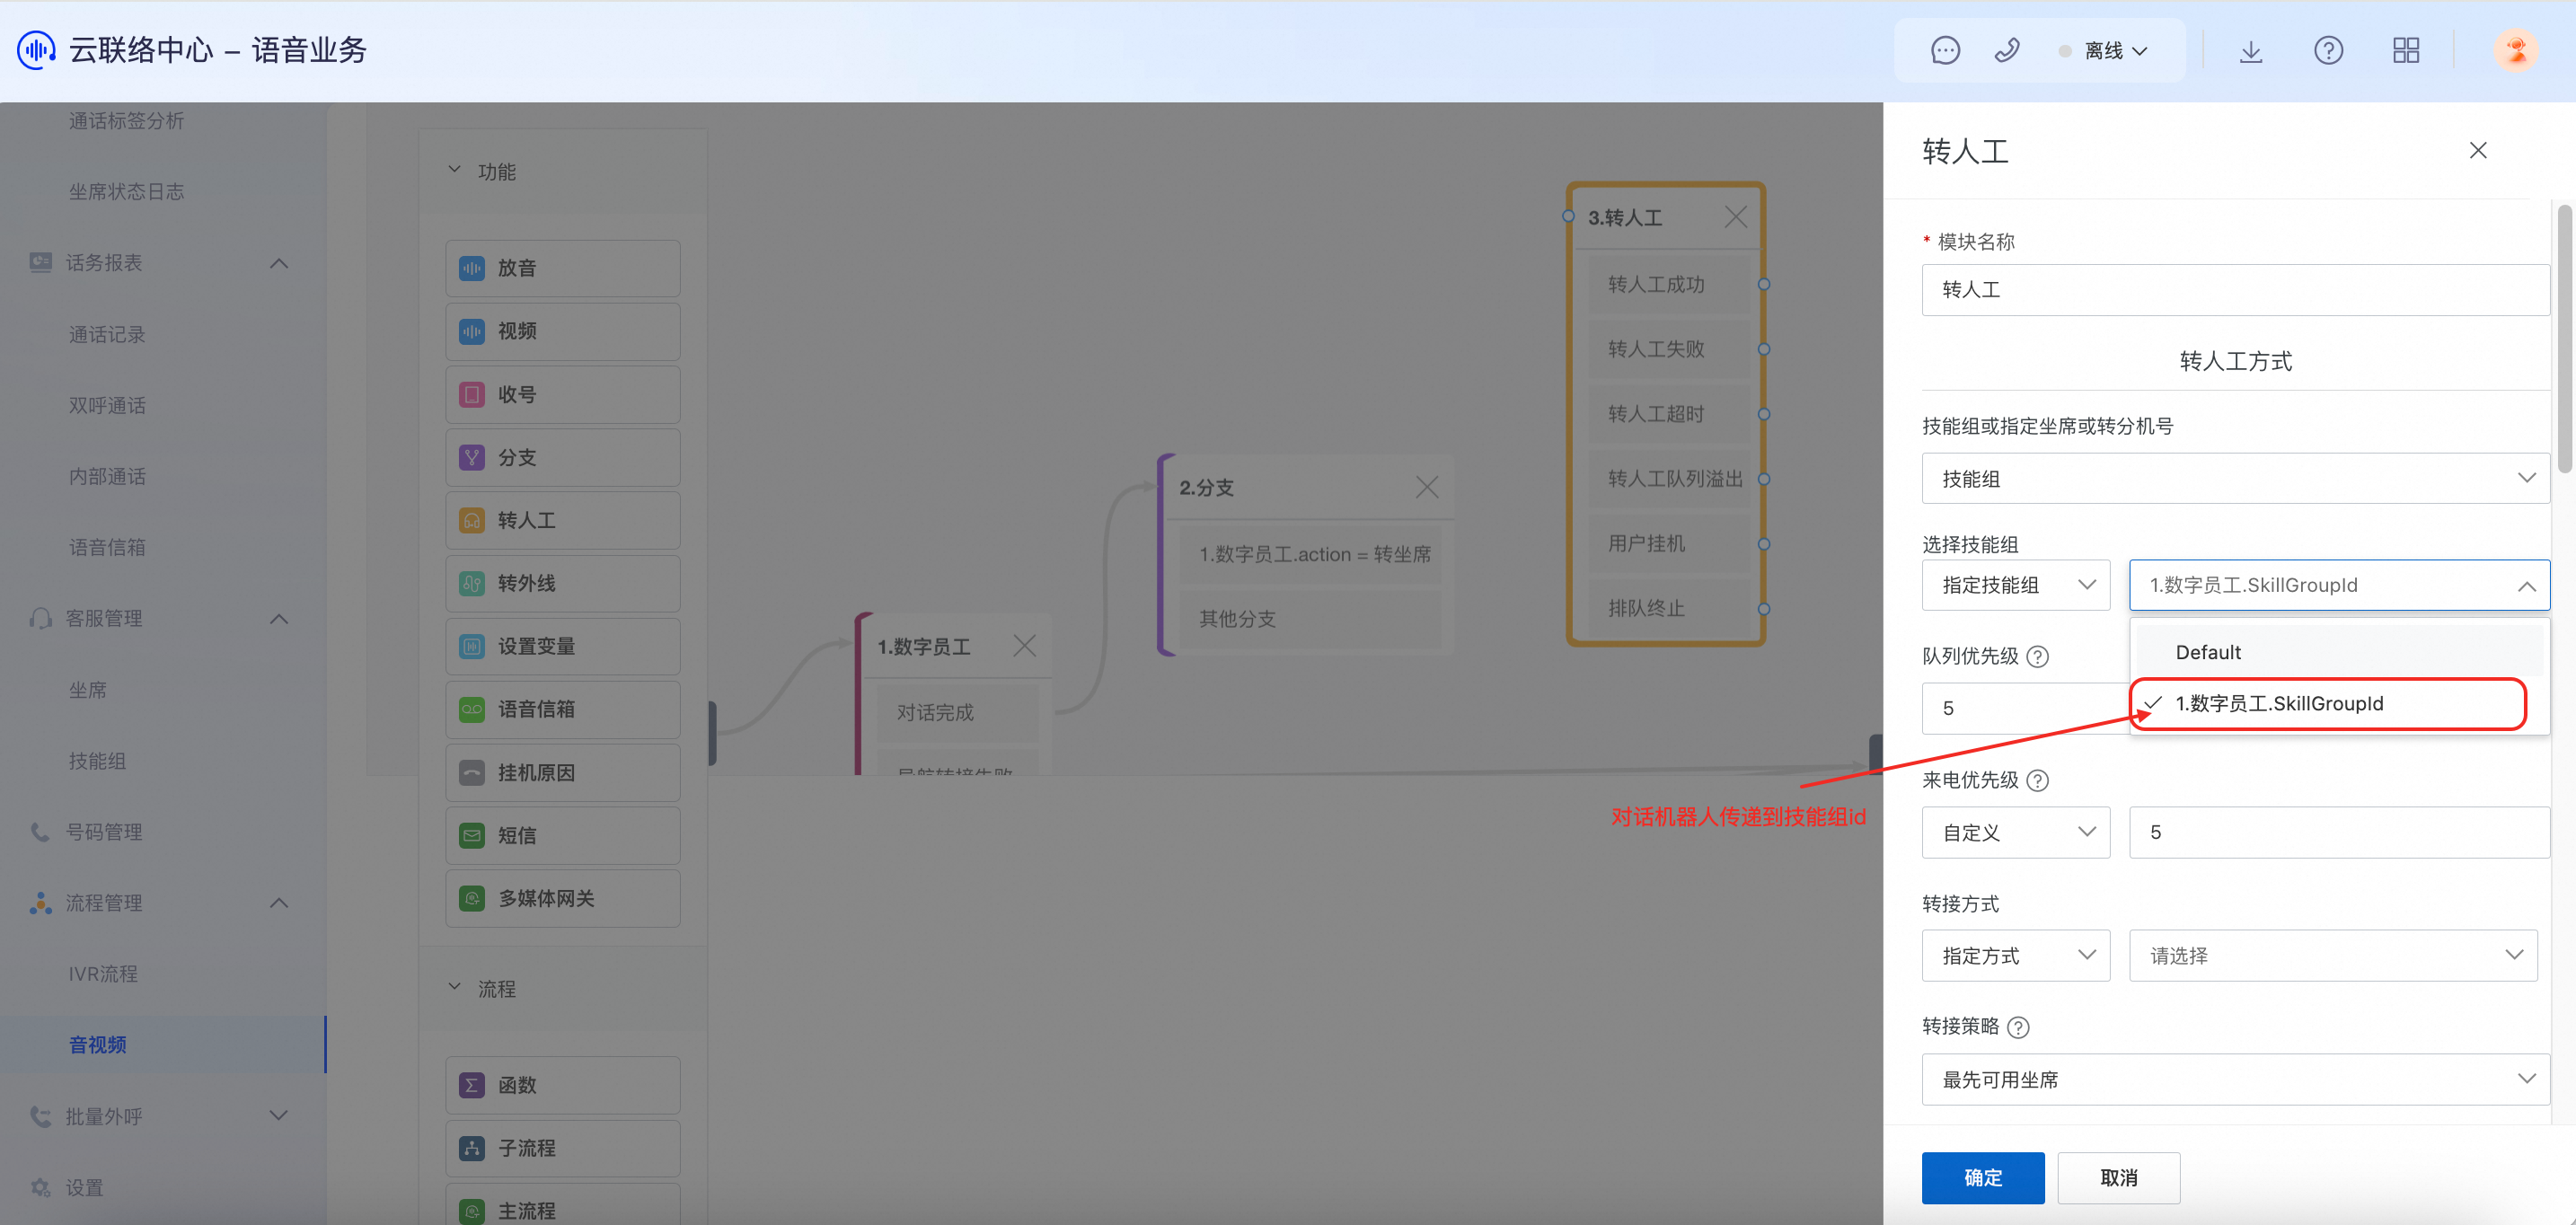
For the transfer method, select transfer to a skill group. For the value, specify the skill group ID passed from the Digital Employee. For more information, see the agent transfer configuration for Intelligent Dialog Bot described earlier in this topic.
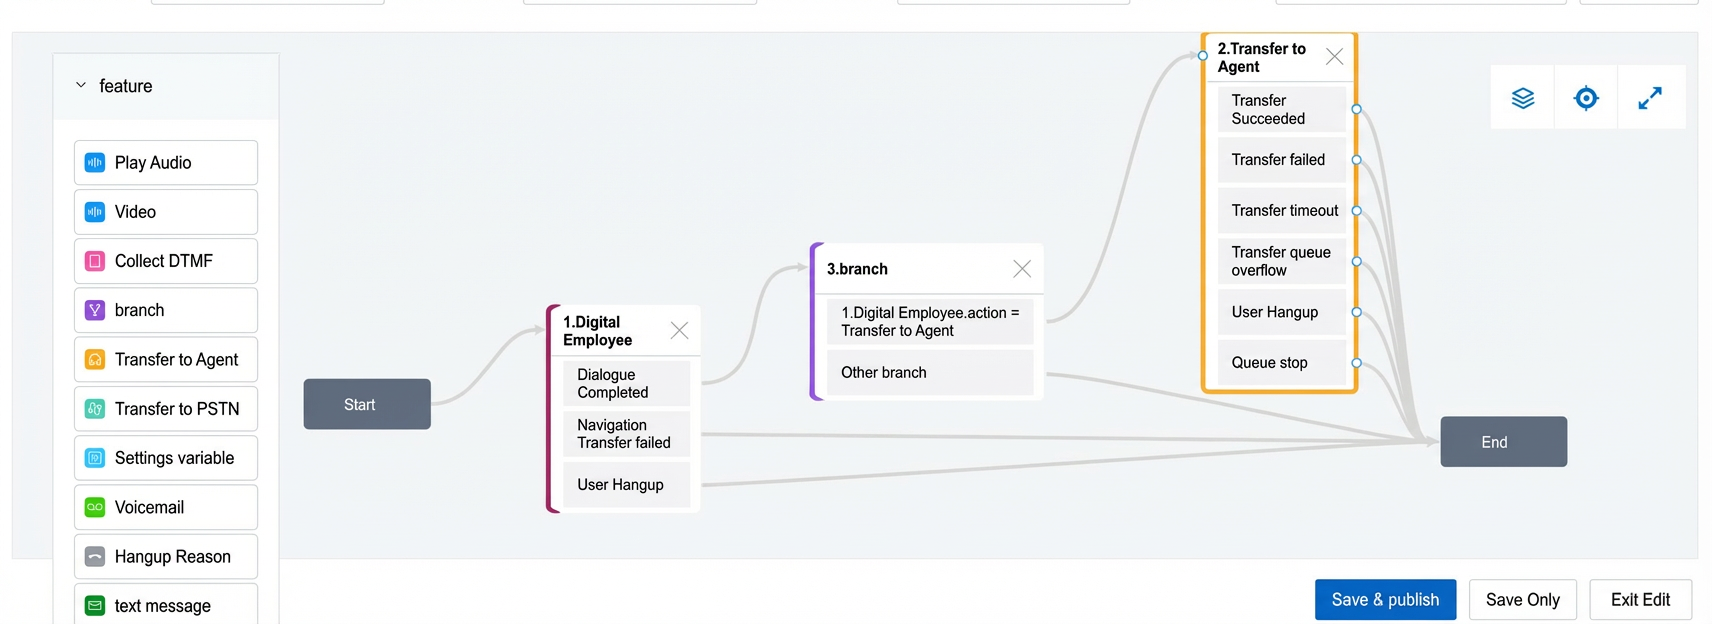
After completing the configuration, connect the remaining branches to the end node.
Add a phone number
Associate a phone number with the instance. In the Number Management menu, click Add to bind a number.
Assign the IVR flow
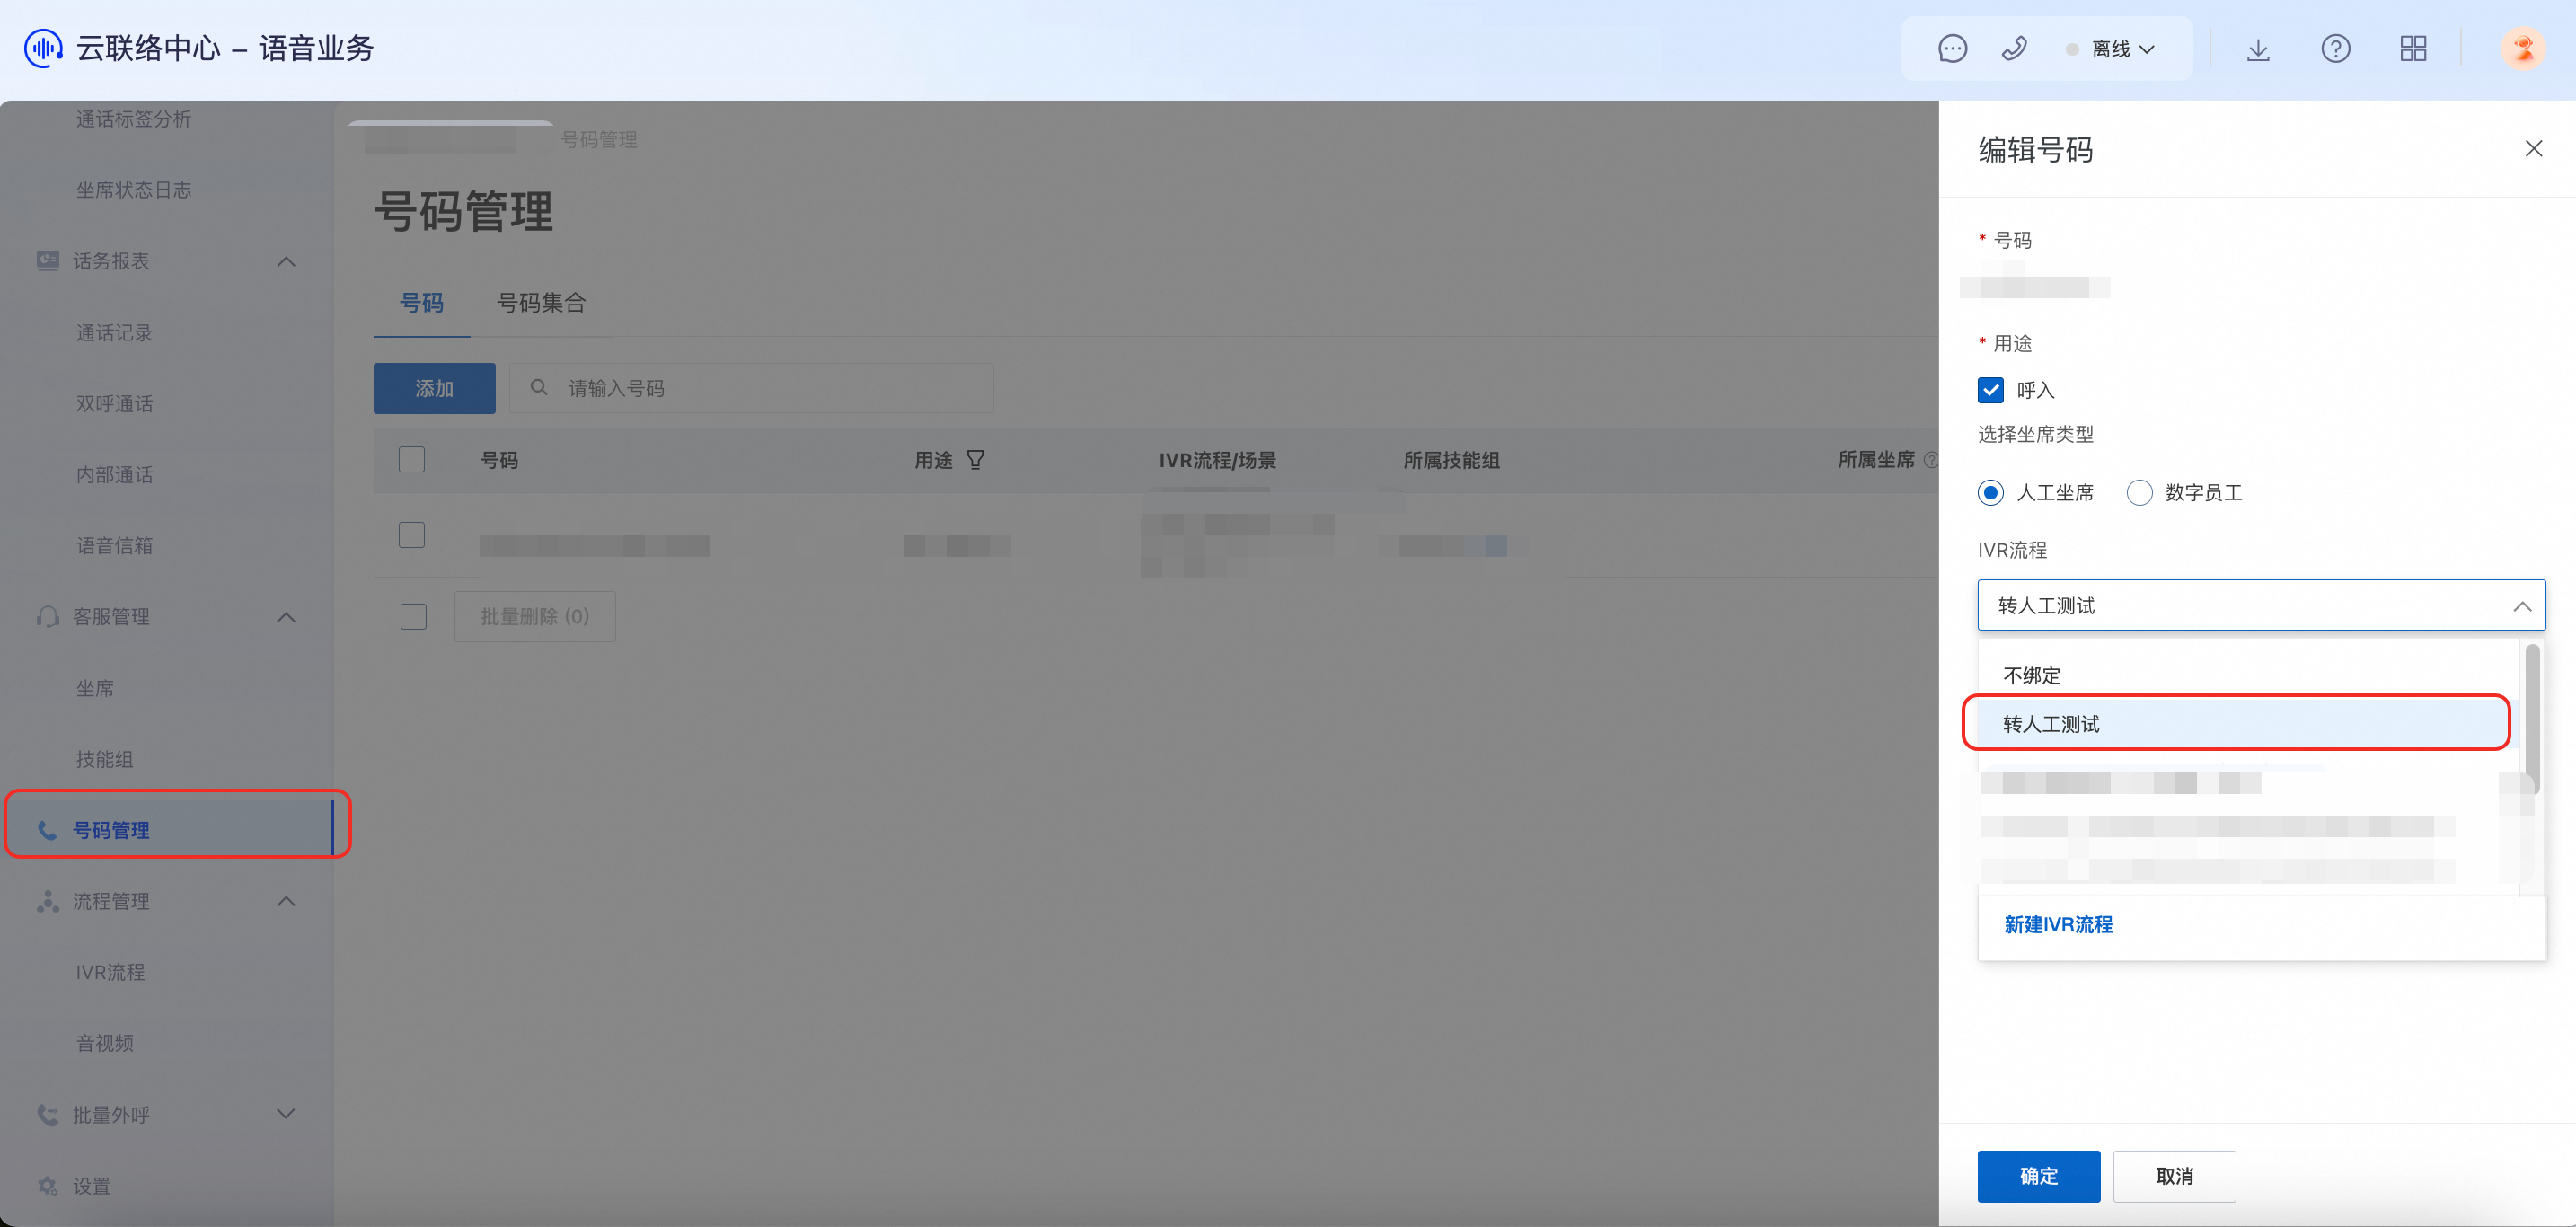
In the Number Management menu, select the number and click Edit. Set the agent category to Human Agent and bind the "Agent Transfer Test" IVR flow you created. After you bind the flow, you can call the number to test the agent transfer.