Connect cloud and on-premises networks
Cloud Enterprise Network (CEN) connects an on-premises data center (IDC) to same-region Virtual Private Cloud (VPC)Virtual Private Cloud (VPC) instances through a transit router. This tutorial shows you how to attach a virtual border router (VBR) and two VPCs to a transit router in the China (Hangzhou) region so that the on-premises IDC and the VPCs can communicate with and access one another.
Scenario
A company has an on-premises IDC in Hangzhou that is connected to Alibaba Cloud through an Express Connect circuit and a VBR instance. The company also created VPC1 and VPC2 in the China (Hangzhou) region. Both VPCs host applications on Elastic Compute Service (ECS) instances. The on-premises IDC cannot communicate with the VPCs, and the two VPCs cannot communicate with each other. To support business growth, the company needs these resources to communicate with and access one another.
The company uses CEN to connect VPC1, VPC2, and the VBR instance to an Enterprise Edition transit router in the China (Hangzhou) region. This tutorial covers the same-region scenario only, in which the on-premises IDC is already connected to Alibaba Cloud through an Express Connect circuit and a VBR instance.
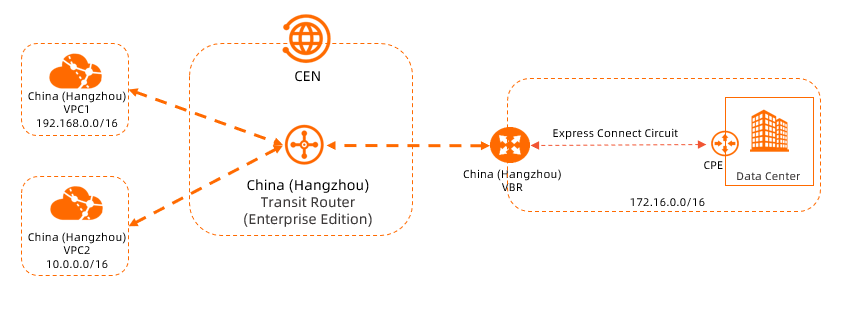
Prerequisites
An Express Connect circuit and a VBR that connect the on-premises IDC to Alibaba Cloud. For instructions, see Connect an on-premises data center to a VPC using an Express Connect circuit.
Two VPCs in the China (Hangzhou) region, both hosting applications on ECS instances. For more information, see VPCs and vSwitches.
Sufficient vSwitches are deployed in each VPC in the zones of the Enterprise Edition transit router. Each vSwitch has at least one idle IP address.
If the transit router does not support the zone where your existing cloud resources reside, but other supported zones are available in the same region, you can still connect the cloud resources to other network instances. Create a vSwitch in a supported zone, and then connect the VPC to the transit router using that vSwitch.
Security group rules applied to the ECS instances in both VPCs, and access control rules applied to the on-premises IDC servers, that allow resource access between the VPCs and between the VPCs and the on-premises IDC. Review these rules before you start this tutorial. For more information, see Security groups.
Make sure that the CIDR blocks of networks that need to communicate do not overlap. The following table shows the network plan for the two VPCs, the VBR instance, and the on-premises IDC.
Property | VPC1 | VPC2 | VBR | On-premises IDC |
Region of network instance | China (Hangzhou) | China (Hangzhou) | China (Hangzhou) | Hangzhou |
Network instance CIDR planning |
|
|
| On-premises network CIDR block: 172.16.0.0/16 |
Zone of network instance vSwitches |
|
| Not applicable | Not applicable |
Server IP address | ECS1 IP address: 192.168.20.161 | ECS2 IP address: 10.0.0.33 | Not applicable | On-premises server IP address: 172.16.0.89 |
The network instance connections that you create in this tutorial use the Pay-As-You-Go billing method by default.
Configuration process
This tutorial has five milestones. The following diagram shows the order in which you complete them.

Step 1: Create a CEN instance
A CEN instance is the foundational resource for creating and managing an integrated network. Create a CEN instance before you enable network connectivity.
Log on to the CEN console.
On the Instances page, click Create CEN Instance.
In the Create CEN Instance dialog box, configure the following settings, and then click OK.
Name: Enter a name for the CEN instance.
Description: Enter a description for the CEN instance.
Resource Group: Select the resource group to which the CEN instance belongs. Leave this setting unselected in this example. After the CEN instance is created, it belongs to the default resource group.
Tag: Enter tags for the CEN instance. Leave this setting blank in this example.
The CEN instance appears in the CEN instance list.
Step 2: Create a transit router instance
Before you connect network instances, create a transit router instance in the region where the network instances reside.
Log on to the CEN console.
On the CEN Instance page, select the CEN instance created in Step 1, and then click its CEN instance ID.
On the Basic Settings > Transit Router tab, click Create Transit Router.
In the Create Transit Router dialog box, configure the transit router instance, and then click OK.
Setting
Setting description
Configuration
Region
Select the region where the transit router instance resides.
In this example, select the China (Hangzhou) region.
Edition
The edition of the transit router instance.
The system automatically determines and displays the transit router instance edition for the current region.
Enable Multicast
Specify whether to enable multicast for the transit router instance.
Keep the default value, which does not enable multicast, in this example.
Name
Enter a name for the transit router instance.
Enter a custom name for the transit router instance.
Description
Enter a description for the transit router instance.
Enter a custom description for the transit router instance.
Tag
Enter tags for the transit router instance.
Leave this setting blank in this example.
Transit Router CIDR
Enter a CIDR block for the transit router. For more information, see .
No transit router CIDR block is required in this example.
The transit router instance appears on the Basic Information > Transit Router tab.
Step 3: Connect VPC instances
Connect VPC1 and VPC2 to the transit router instance in the China (Hangzhou) region.
On the CEN Instance page, click the CEN instance ID created in Step 1.
Go to the tab, find the transit router that you want to manage, and then click Create Connection in the Actions column.
On the Create Intra-Region Connection page, configure the following settings, and then click OK.
The following table describes the settings and the parameter values for VPC1 and VPC2. Use the values in the table to connect VPC1 and VPC2 to the transit router instance separately.
NoteDuring this operation, the system automatically creates a service-linked role named AliyunServiceRoleForCEN. This role allows the transit router instance to create ENIs on VPC vSwitches. For more information, see AliyunServiceRoleForCEN.
Setting
Setting description
VPC1
VPC2
Instance Type
Select the type of network instance to connect.
Virtual Private Cloud (VPC)
Virtual Private Cloud (VPC)
Region
Select the region where the network instance to connect resides.
China (Hangzhou)
China (Hangzhou)
Transit Router
The system automatically displays the ID of the transit router instance created in this region.
The system displays the transit router instance ID automatically.
The system displays the transit router instance ID automatically.
Account
Select the account type to which the network instance to connect belongs.
Current Account
Current Account
Billing Method
The default value is Pay-As-You-Go. For pay-as-you-go billing rules, see .
Keep the default value.
Keep the default value.
Attachment Name
Enter a name for the network instance connection.
VPC1-test
VPC2-test
Tag
Add tags to the network instance connection.
Leave this setting blank in this example.
Leave this setting blank in this example.
Network Instance
Select the network instance to connect.
Select VPC1.
Select VPC2.
vSwitch
Select a vSwitch instance in a zone supported by the transit router. If you have vSwitch instances in multiple zones supported by the transit router, you can select multiple zones and one vSwitch in each zone to enable zone-level disaster recovery.
Zone H: Select vSwitch 1 - Zone I: Select vSwitch 2
Zone H: Select vSwitch 1 - Zone I: Select vSwitch 2
Advanced Settings
The system selects the following three advanced features by default. You can clear one or more settings as needed.
Automatically Associate with the Transit Router System Route Table
When this feature is enabled, the VPC connection is automatically associated with the transit router system route table. The transit router forwards VPC instance traffic by querying the system route table.
Automatically Propagate System Routes to the Transit Router System Route Table
When this feature is enabled, VPC instances propagate their system routes to the transit router system route table to enable connectivity between network instances.
Auto-add transit router routes to all VPC route tables
When this feature is enabled, the system automatically adds three route entries, 10.0.0.0/8, 172.16.0.0/12, and 192.168.0.0/16, to all route tables of the VPC instance. Their next hops point to the VPC connection and direct VPC instance traffic into the transit router. By default, the transit router does not propagate routes to VPC instances. If the VPC instance requires IPv6 communication, you must enable IPv6 for the VPC connection, or manually add IPv6 route entries that point to the VPC connection in the route table of the VPC instance, after you create the VPC connection. Otherwise, IPv6 traffic from the VPC instance cannot enter the transit router.
Click Return to the List to return to the CEN instance details page. The VPC1 and VPC2 connections appear on the CEN instance details page.
Step 4: Connect the VBR instance
Connect the VBR instance in the China (Hangzhou) region to the same transit router instance.
On the CEN Instance page, click the CEN instance ID created in Step 1.
Go to the tab, find the transit router that you want to manage, and then click Create Connection in the Actions column.
On the Create Intra-Region Connection page, configure the following settings, and then click OK.
Network Type: Select Virtual Border Router (VBR).
Region: Select the region where the network instance to connect resides. In this example, select China (Hangzhou).
Transit Router: The system automatically displays the ID of the transit router instance created in the current region.
Account: Select the account type to which the network instance to connect belongs. This example uses the default value, Your Account.
Attachment Name: Enter a network instance connection name. This example uses VBR.
Tag: Add tags to the network instance connection. Leave this setting blank in this example.
Networks: Select the ID of the network instance to connect. This example selects the VBR instance.
Advanced Settings: The system selects the following three advanced features by default. Keep the default settings in this example.
Associate with Default Route Table of Transit Router: When this feature is enabled, the VBR connection is automatically associated with the transit router system route table. The transit router forwards VBR instance traffic by querying the system route table.
Propagate system routes to transit router route table: The VBR instance propagates its system routes to the transit router system route table to enable connectivity between network instances.
Propagate Routes to VBR: When this feature is enabled, the system automatically publishes the routes in the transit router route table associated with the VBR connection to the VBR instance.
Click Return to the List to return to the CEN instance details page. The VBR connection appears on the CEN instance details page.
Step 5: Test connectivity
After you complete the preceding operations, VPC1, VPC2, and the on-premises IDC can communicate with one another. Use the following steps to test connectivity between the VPCs and between the VPCs and the on-premises IDC.
Before you test connectivity, make sure that the ECS security group rules allow ICMP access. For instructions, see View security group rules and Add a security group rule.
Test connectivity between VPC1 and VPC2.
Log on to the ECS instance in VPC1. For instructions, see ECS remote connection guide.
Run the
pingcommand on the ECS instance in VPC1 to access the ECS instance in VPC2.ping <IP address of the ECS instance in VPC2>[root@VPC1 ~]# ping 10.0.0.33 PING 10.0.0.33 (10.0.0.33) 56(84) bytes of data. 64 bytes from 10.0.0.33: icmp_seq=1 ttl=63 time=2.14 ms 64 bytes from 10.0.0.33: icmp_seq=2 ttl=63 time=2.00 ms 64 bytes from 10.0.0.33: icmp_seq=3 ttl=63 time=2.01 ms 64 bytes from 10.0.0.33: icmp_seq=4 ttl=63 time=6.22 ms ^Z [1]+ Stopped ping 10.0.0.33 [root@VPC1 ~]#
Test connectivity between VPC1 and the on-premises IDC.
Log on to the ECS instance in VPC1.
Run the
pingcommand on the ECS instance in VPC1 to access the server in the on-premises IDC.ping <IP address of the on-premises IDC server>
Test connectivity between VPC2 and the on-premises IDC.
Log on to the ECS instance in VPC2.
Run the
pingcommand on the ECS instance in VPC2 to access the server in the on-premises IDC.ping <IP address of the on-premises IDC server>
If you do not receive a reply, check the following items in order:
Verify that the ECS security group rules allow ICMP access, and that the access control rules applied to the on-premises IDC servers allow access from the VPC CIDR blocks.
Verify that the system route table of the transit router instance contains a route entry for the destination CIDR block. Compare your route entries with the route entries listed in Route description.
Verify that the VBR route table contains the route entries published from the transit router instance.
Route description
In this example, when VPC1, VPC2, and the VBR instance are connected, CEN automatically distributes and learns routes to enable communication between the VPCs and between the VPCs and the on-premises IDC:
The transit router instance in the China (Hangzhou) region automatically learns route entries from VPC1, VPC2, and the VBR instance.
The VBR instance automatically learns route entries for VPC1 and VPC2 through the transit router instance.
CEN automatically adds three custom route entries, 10.0.0.0/8, 172.16.0.0/12, and 192.168.0.0/16, to the system route tables of VPC1 and VPC2. The next hop of each entry is the VPC connection, which directs traffic into the transit router instance.
The two VPCs send traffic to the transit router instance through these three route entries. The transit router instance enables communication between the VPCs and between the VPCs and the on-premises IDC.
You can view the route entries of the transit router instance, the VBR instance, VPC1, and VPC2 in the CEN console. For instructions, see View route entries (Enterprise Edition) and View routes of a network instance. The following route entries are used in this example.
The system route table of the transit router instance in the China (Hangzhou) region contains the following automatically learned route entries:
Destination CIDR block
10.0.0.0/24, next hop: VPC2 connectionDestination CIDR block
10.0.1.0/24, next hop: VPC2 connectionDestination CIDR block
172.16.0.0/16, next hop: VBR connectionDestination CIDR block
172.16.1.0/30, next hop: VBR connectionDestination CIDR block
192.168.20.0/24, next hop: VPC1 connectionDestination CIDR block
192.168.21.0/24, next hop: VPC1 connectionThe VPC1 route table contains the following route entries:
Destination CIDR block
10.0.0.0/8, route type: custom, next hop: VPC1 connectionDestination CIDR block
172.16.0.0/12, route type: custom, next hop: VPC1 connectionDestination CIDR block
192.168.0.0/16, route type: custom, next hop: VPC1 connectionDestination CIDR block
100.64.0.0/10, route type: systemDestination CIDR block
192.168.20.0/24, route type: systemDestination CIDR block
192.168.21.0/24, route type: systemThe VPC2 route table contains the following route entries:
Destination CIDR block
10.0.0.0/8, route type: custom, next hop: VPC2 connectionDestination CIDR block
172.16.0.0/12, route type: custom, next hop: VPC2 connectionDestination CIDR block
192.168.0.0/16, route type: custom, next hop: VPC2 connectionDestination CIDR block
10.0.0.0/24, route type: systemDestination CIDR block
10.0.1.0/24, route type: systemDestination CIDR block
100.64.0.0/10, route type: systemThe VBR route table contains the following route entries:
Destination CIDR block
10.0.0.0/24, route type: CEN, next hop: China (Hangzhou) VPCDestination CIDR block
10.0.1.0/24, route type: CEN, next hop: China (Hangzhou) VPCDestination CIDR block
172.16.0.0/16, route type: custom, next hop: Express Connect circuitDestination CIDR block
172.16.1.0/30, route type: custom, next hop: Express Connect circuitDestination CIDR block
192.168.20.0/24, route type: CEN, next hop: China (Hangzhou) VPCDestination CIDR block
192.168.21.0/24, route type: CEN, next hop: China (Hangzhou) VPC
FAQ
Do I need to purchase ECS instances in the transit region when I connect an on-premises IDC and a cloud VPC across regions?
No. For example, an on-premises server in Taiwan can connect to the China (Hong Kong) region of Alibaba Cloud through a nearby VPN Gateway or Express Connect circuit. Then, establish an inter-region connection between the VPC in China (Hong Kong) and the VPC in China (Shenzhen) through CEN to enable the Taiwan server to access cloud databases and other resources in the Shenzhen VPC.
In this scenario, the China (Hong Kong) region is the transit region and does not require ECS instances. Create a VPC and a vSwitch in the transit region, such as China (Hong Kong), add the VPC to the CEN instance, and configure the inter-region connection. CEN automatically completes route learning and traffic forwarding, so no computing resources need to be deployed in the transit region.