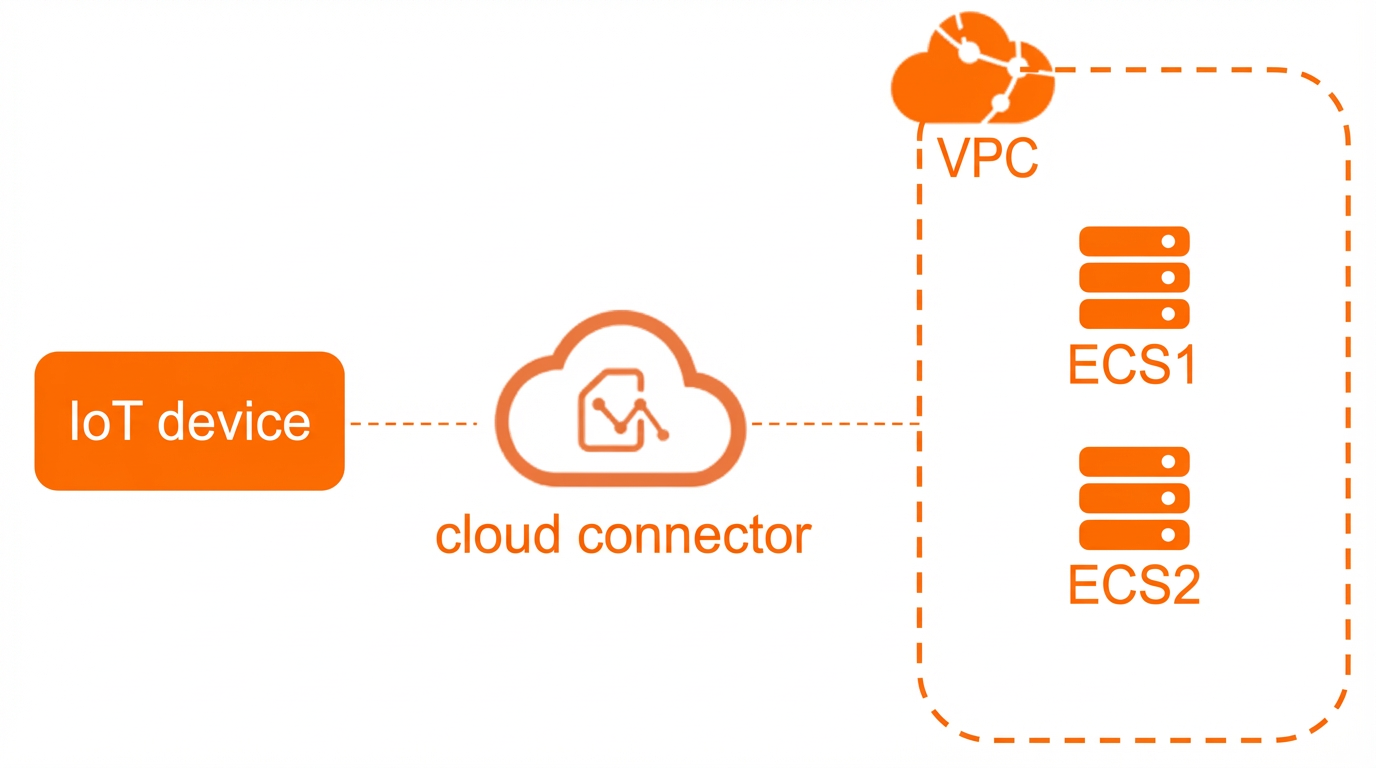
This topic describes how to use Cloud Connector (CC) to connect an Internet of Things (IoT) device to an Elastic Compute Service (ECS) instance on Alibaba Cloud. You can use CC to secure data transmission and reduce the time for connecting to cloud services.
Scenarios
Prerequisites
- CC is activated. For more information, see Activate Cloud Connector.
- An IoT card is purchased and activated and a dedicated Access Point Name (APN) is obtained. For more information, see Purchase an IoT card.
- A virtual private cloud (VPC) in which you want to deploy a CC instance is created. A primary vSwitch is created in one zone, and a secondary vSwitch is created in another zone. For more information, see Create a VPC and a vSwitch. Note Make sure that the vSwitches and the CC instance are deployed in the same region.
- ECS1 and ECS2 are created in the VPC. For more information, see Custom launch ECS instances.
| Node | Network |
| IoT device | IP address: 10.193.XX.XX |
| VPC | CIDR block: 172.16.0.0/24 |
| ECS |
|
Procedure
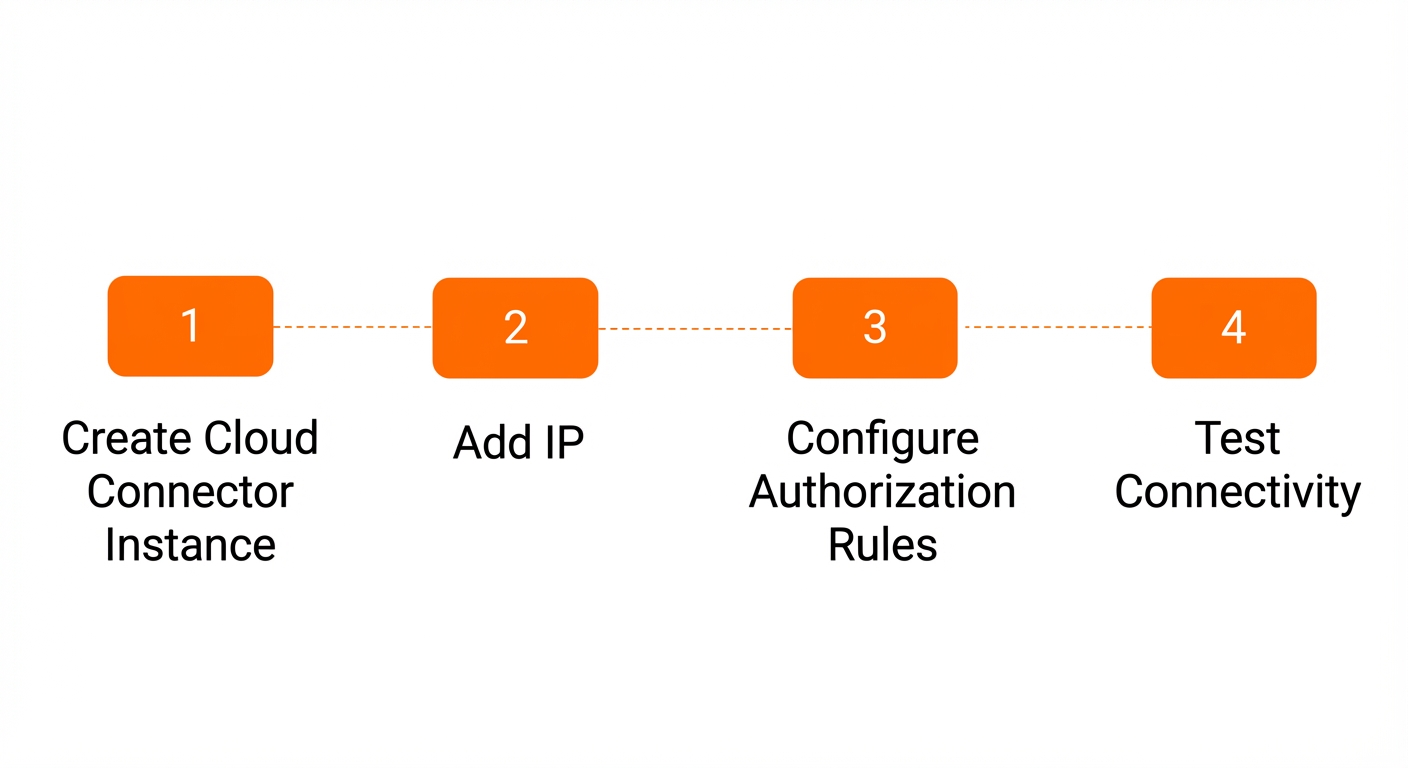
Step 1: Create a CC instance
- Log on to the Cloud Connector console.
- In the top navigation bar, select the region where you want to create the CC instance.
- On the Instances page, click Create Instance.
- On the Create Instance page, set the following parameters and click Complete.
Parameter Description Basic information Region Displays the region where you want to deploy the CC instance. In this example, China (Hangzhou) is displayed. Name Enter a name for the CC instance. ISP Select an Internet service provider (ISP). In this example, China Unicom is selected. APN Select an APN. In this example, a dedicated APN for IoT cards is selected.
Network Settings VPC Select the VPC that you created. Your IoT device can access the VPC through the CC instance.
vSwitch Select the vSwitches that you created in two different zones in the China (Hangzhou) region. Note- After the CC instance is created, you cannot change the specified APN or ISP.
- When you create a CC instance, the system checks whether the AliyunServiceRoleForCCIoT and AliyunServiceRoleForNatgw service-linked roles are created. If the service-linked roles do not exist, the system automatically creates the roles. For more information, see AliyunServiceRoleForCCIoT and AliyunServiceRoleForNatgw.
Step 2: Add the IP address of the IoT device
- The IP address that is assigned to the IoT device matches the dedicated access point name (APN) that you specify when you create the CC instance.
- The IP address is not associated with another CC instance.
- On the Instances page, find the CC instance that you want to manage and click Associate IP Address in the Actions column.
- On the IP Management tab, click Download Template, add one or more IP addresses to the template, and then save the file. In this example, the IP address 10.193.XX.XX is added.
- On the IP Management tab, click Add IP Address.
- In the Add IP Address dialog box, set the following parameters and click OK:
Step 3: Configure an authorization rule
Before the IoT device can access the ECS instances, you must configure an authorization rule for the CC instance. When you configure the authorization rule, you must set the destination to the private IP addresses of the ECS instances that you want to access.
On the Instances page, find the target Cloud Connector instance, and in the Actions column, click Configure Authorization Rule.
- On the Authorization Rules tab, choose .
- In the Add Rule dialog box, set the following parameters and click OK.
Parameter Description Rule Name Enter a name for the authorization rule. Destination Specify the destination. - Select a destination type. Valid values: Domain Name and CIDR Block. In this example, CIDR Block is selected.
- Enter a domain name, an IP address, or a CIDR block based on the specified destination type. In this topic, 172.16.0.0/24 is used. This is the CIDR block of the VPC to which the ECS instances belong.
Action Select an action. In this example, Allow is selected.
Step 4: Test the network connectivity
- Insert the IoT card into the IoT device.
- Log on to the IoT device, open the CLI, and ping the IP address of ECS1 or ECS2 to test the network connectivity. In this topic, the IP address of ECS1 is pinged. If you can receive echo reply packets, the connection is established.
ping <Private IP address of ECS1>