Traffic playback
Database migration is a complex, high-risk process that directly affects business stability and continuity. A common concern is the compatibility and performance of the destination database. Any compatibility issue or performance bottleneck can cause the migration to fail, leading to business interruptions and data loss. Traffic playback technology provides a tool-based solution to assess migration risks and ensure a smooth transition. You can use it to run comprehensive compatibility and performance tests on the destination database before migration to minimize potential risks. This topic describes how to use the traffic playback feature and explains its key role in database migration projects. Traffic playback is not a simple database stress test. It fully replays real service traffic from the production environment to simulate real business scenarios. This allows for a comprehensive performance and compatibility validation of the destination database. This method is fundamentally different from traditional stress testing that uses preset scripts. Preset scripts often fail to cover the complexity and diversity of real business scenarios, which can lead to biased test results. Traffic playback technology accurately reproduces the running state of the production environment to more effectively assess the capacity and compatibility of the destination database.
1. Business process overview
The traffic playback feature involves the following steps:
Step 1: Data collection. In the production environment, you can select a suitable tool to capture and record database read and write requests. This process must be performed carefully to avoid a significant impact on the production environment. You can use a database proxy, a packet capture tool, or the database's own audit feature for data collection. The collected data must include complete SQL statements, parameters, and running times to serve as the input for traffic playback. The data collection method and format must be compatible with the traffic playback tool. For sensitive data, you must perform data masking to ensure data security.
Step 2: Data preprocessing. The collected raw data usually requires preprocessing to remove redundant information, optimize the data format, and perform data masking. Preprocessing may include data cleansing, data transformation, and data sampling to improve playback efficiency and reduce the load on the destination database. You may need to adjust SQL statements based on the characteristics of the destination database to ensure they run correctly in the new environment.
Step 3: Traffic playback. The preprocessed data is imported into the traffic playback tool. The tool simulates real service traffic by sending concurrent requests to the destination database to assess its performance and compatibility. During this process, you must monitor key metrics of the destination database, such as CPU utilization, memory usage, and I/O performance. You must also record any error messages and abnormal conditions. Traffic playback tools usually allow you to customize parameters, such as playback speed and concurrency, to simulate different business scenarios.
Step 4: Result analysis. After traffic playback is complete, you can analyze the collected data to assess the performance and compatibility of the destination database. The analysis includes database response time (RT), throughput, error rate, and resource utilization. By analyzing these metrics, you can identify potential performance bottlenecks and compatibility issues, which provides a basis for optimizing the database migration solution. You must also analyze the error messages that occurred during playback, find their root causes, and take appropriate measures to resolve them.
Step 5: Report generation. Finally, you can generate a detailed traffic playback report that summarizes the test results and provides improvement suggestions. The report should include the test environment configuration, a test data summary, performance metrics, and error messages to provide an important reference for database migration decisions.
By following these steps, the traffic playback feature can effectively assess the compatibility and performance of the destination database, reducing migration risks and ensuring a smooth database migration. This technology provides a reliable guarantee for database migration projects. It helps enterprises reduce migration costs, improve business continuity, and achieve a smooth database migration. Proper use of the traffic playback tool effectively increases the success rate of database migration projects.
2. Traffic playback scenarios
2.1 Traffic playback
This scenario is used for database stress testing. It is typically used during the pre-cutover validation phase to verify the performance of the destination database. You can collect real SQL statements that ran on the source data source over a period of time and replay them on the destination data source, which is typically on Alibaba Cloud. You can control the pressure on the destination database by adjusting the concurrency and traffic interval.
2.2 Result comparison
This scenario is used for SQL compatibility checking. It is typically used during the pre-cutover validation phase to verify the SQL compatibility between the source and destination data sources. You can collect real SQL statements that ran on the source data source over a period of time and run them on both the source and destination data sources simultaneously to check if the returned results are consistent.
3. Introduction to the new version of traffic playback
To improve the user experience of the Cloud Migration Hub (CMH) traffic playback feature, a new Traffic Playback page is available. The old Traffic Playback page is still accessible. You can choose to use the new or old version of traffic playback as needed. To use the new Traffic Playback feature, you must meet the following conditions:
Use an Alibaba Cloud database as the destination data source. To use the Result Comparison feature, you must ensure that the source and destination data sources can communicate with each other over the VPC network.
Use an Alibaba Cloud ECS instance that is automatically created by CMH to deploy the traffic playback Agent. The ECS instance has 4 cores, 8 GB of memory, and a 100 GB system disk. You must confirm that this specification meets your business needs. The playback pressure is calculated as follows: Playback pressure = Number of playback instances × Pressure per instance. To increase the playback pressure, you can scale out playback instances in the instance overview section.
Use Object Storage Service (OSS) to save the collected SQL files. The new page automatically downloads the collected files from OSS to the `/home/` directory of the ECS instance. If the collected file size is larger than 20 GB, you must use the old page.
If you do not meet these conditions, or if you want to use a custom server to deploy the traffic playback Agent, you must return to the old version and use the Agent Management feature to deploy the Agent.
4. Traffic playback procedure
Prerequisites:
Before you create a playback plan, you must switch to the new traffic playback page.
You must capture the production traffic from the source data source in advance. The collection method varies depending on the data source. You must choose a suitable traffic capture solution. For more information about the required format, see the replay_sql_example.json document. After you capture the traffic, you must convert it to the required JSON format for playback.
You must upload the JSON file used for playback to an OSS Bucket in advance. The bucket must be in the same region as the destination data source.
4.1. Data preparation
To perform traffic playback, you must first collect SQL statements from the source data source. There are three general types of source data sources:
Self-managed data sources: You can use the data collector or collection method provided by CMH.
For MySQL, you can use the CMH self-developed tool mysqlsniffer or the open source tool tshark for collection.
For Oracle, you can use sqla for collection.
For SQL Server, you can use the event session method for collection.
Alibaba Cloud data sources: You can integrate the data source with Simple Log Service (SLS) and download the corresponding SQL execution files from SLS.
Data sources from other cloud providers: You can obtain SQL execution logs using the method provided by the other cloud provider and convert them to the standard playback format.
After you obtain the playback SQL file, you can perform a Traffic Playback task in the CMH console.
4.2. Access the traffic playback page
Menu: . Link: Traffic Playback
The overall process is to first create a playback plan and then create playback tasks within that plan. A playback plan can contain multiple playback tasks. On the Traffic Playback page, click Go to New Version to create a new playback plan.

4.3. Create a playback plan
In the Cloud Migration Hub console, choose and click Create Playback Plan to start creating a playback plan.

You must enter the parameters for the playback plan. The parameters are divided into two parts.
Part 1: Basic Information
Part 2: Runtime Parameters for the Playback Task
4.3.1 Enter basic information
As shown in the following figure, the playback types include Traffic Playback and Result Comparison. The Traffic Playback type runs the SQL statements from the playback file on the destination data source to check if they run successfully. The Result Comparison type runs the same SQL statements from the playback file on both the source and destination data sources. After execution, it compares the results to check for consistency and displays the details of any differences.

Parameter description:
Category | Configuration | Description |
None | Task Name | The name of the playback task. It can contain Chinese characters, uppercase and lowercase English letters, and some special characters. |
None | Playback Type | There are two types: Traffic Playback (for stress testing scenarios) and Result Comparison (for SQL compatibility checking scenarios). |
Source Data Source Information | Source Data Source Type |
|
Acquisition Method | Instance or Address. If the data source is an Alibaba Cloud instance, you can select the instance directly from the console. If the data source is a self-managed instance or an instance from another cloud provider, enter the IP address and port of the data source. | |
Database Name | Enter the name of the database to be replayed. | |
Username | Enter the account for the source MySQL database. | |
Password | Enter the password for the database account. | |
Destination Data Source Information | Destination Data Source Type |
|
Acquisition Method | The destination is usually an Alibaba Cloud instance, so you can select the instance directly from the console. | |
Database Name | Enter the name of the database to be replayed. | |
Username | Enter the account for the source MySQL database. | |
Password | Enter the password for the database account. | |
None | SQL File Type | Five common formats are currently supported.
|
None | Playback Instance | The Alibaba Cloud ECS instance that runs the playback task. Traffic playback automatically creates a pay-as-you-go ECS instance in the destination data source's VPC to act as the Agent for running the playback task. After the playback is complete, you can manually release the instance on the CMH page or the ECS page. If a playback instance already exists, you can also select an existing instance to run the playback task. |
None | Playback File Bucket Address | The name of your OSS Bucket. Before playback, you need to put the collected playback SQL file into your OSS Bucket. The file will be automatically pulled during playback. |
4.3.2 Enter task execution parameters
Configuration | Description |
Number of Simulated Clients | The number of concurrent threads on the playback instance that run SQL statements. With sufficient resources, more threads result in faster execution. |
Playback Speed Factor | Controls the waiting time between the execution of two SQL statements. For example, if the interval between two consecutive SQL statements is 5 seconds and the playback speed factor is 1, the interval remains 5 seconds. If the factor is 5, the interval is 1 second. If the factor is 10, the interval is 0.5 seconds. The default is 1. This parameter is not effective for loop playback. |
Loop Playback | If you select Yes, the playback file will be replayed from the beginning after it finishes, until the set playback duration is reached. If you select No, the playback stops automatically after one run. The default is No. |
Schema Mapping and Filtering | By default, this is left blank, and SQL statements for all schemas are replayed. If you enter schemas, only the SQL statements for the specified schemas are replayed. If the source and destination schemas are different, you can specify a mapping using the format schema1:schema2. |
SQL Timeout | The maximum waiting time for a single SQL statement to run. The default is 60 seconds. |
Confirm commit? | By default, traffic playback manually starts a transaction for playback and rolls back after each SQL statement is run. To commit the transaction, set this to Yes. |
Playback SQL Type | You can select All, DQL, or DML. If you select DQL or DML, only SQL statements of that type will be run. The default is All. |
Skip Errored SQL | Specifies whether to skip SQL statements that have already been confirmed to cause errors. The default is No, meaning they will be run again next time. If you select Yes, they will not be run again. |
1. CMH automatically creates a pay-as-you-go private ECS instance for you. The default specification is 4 cores, 8 GB of memory, and a 100 GB disk. This will incur resource fees. If this specification does not meet your needs, or if you want to use another server to deploy the playback Agent, click Return to Old Version.
2. The playback instance created by CMH is deployed in the same region, zone, and VPC as the destination data source. To use the result comparison feature, you must manually establish a network connection between the source data source and the playback instance.
3. The Create Playback Plan page supports creating only one new instance. If you need more playback instances, you can scale out on the playback plan details page.
4. The private ECS instance created by CMH uses PrivateLink to establish a network connection. A reverse endpoint is automatically created in your account, which may incur fees. You must manually release the endpoint after use.
4.4. Playback plan details
After you create a plan, you can view all the traffic playback plans under your account in the traffic playback list. You can click the plan title or the Details button in the Actions column to go to the plan details page. The new page can only display the details of playback plans created with the new version. The old page can only display the details of playback plans created with the old version.

Basic Information: Displays information such as Plan ID, Source Data Type, Destination Data Type, Last Task Status, Creation Time, and SQL File Path.
Task Overview: Displays an overview of all playback tasks under the current playback plan. This includes the number of playback executions, the success rate of the last playback, the number of successful requests, the total number of requests, and an instance overview.
Task List: Displays the list of playback tasks under the current playback plan.
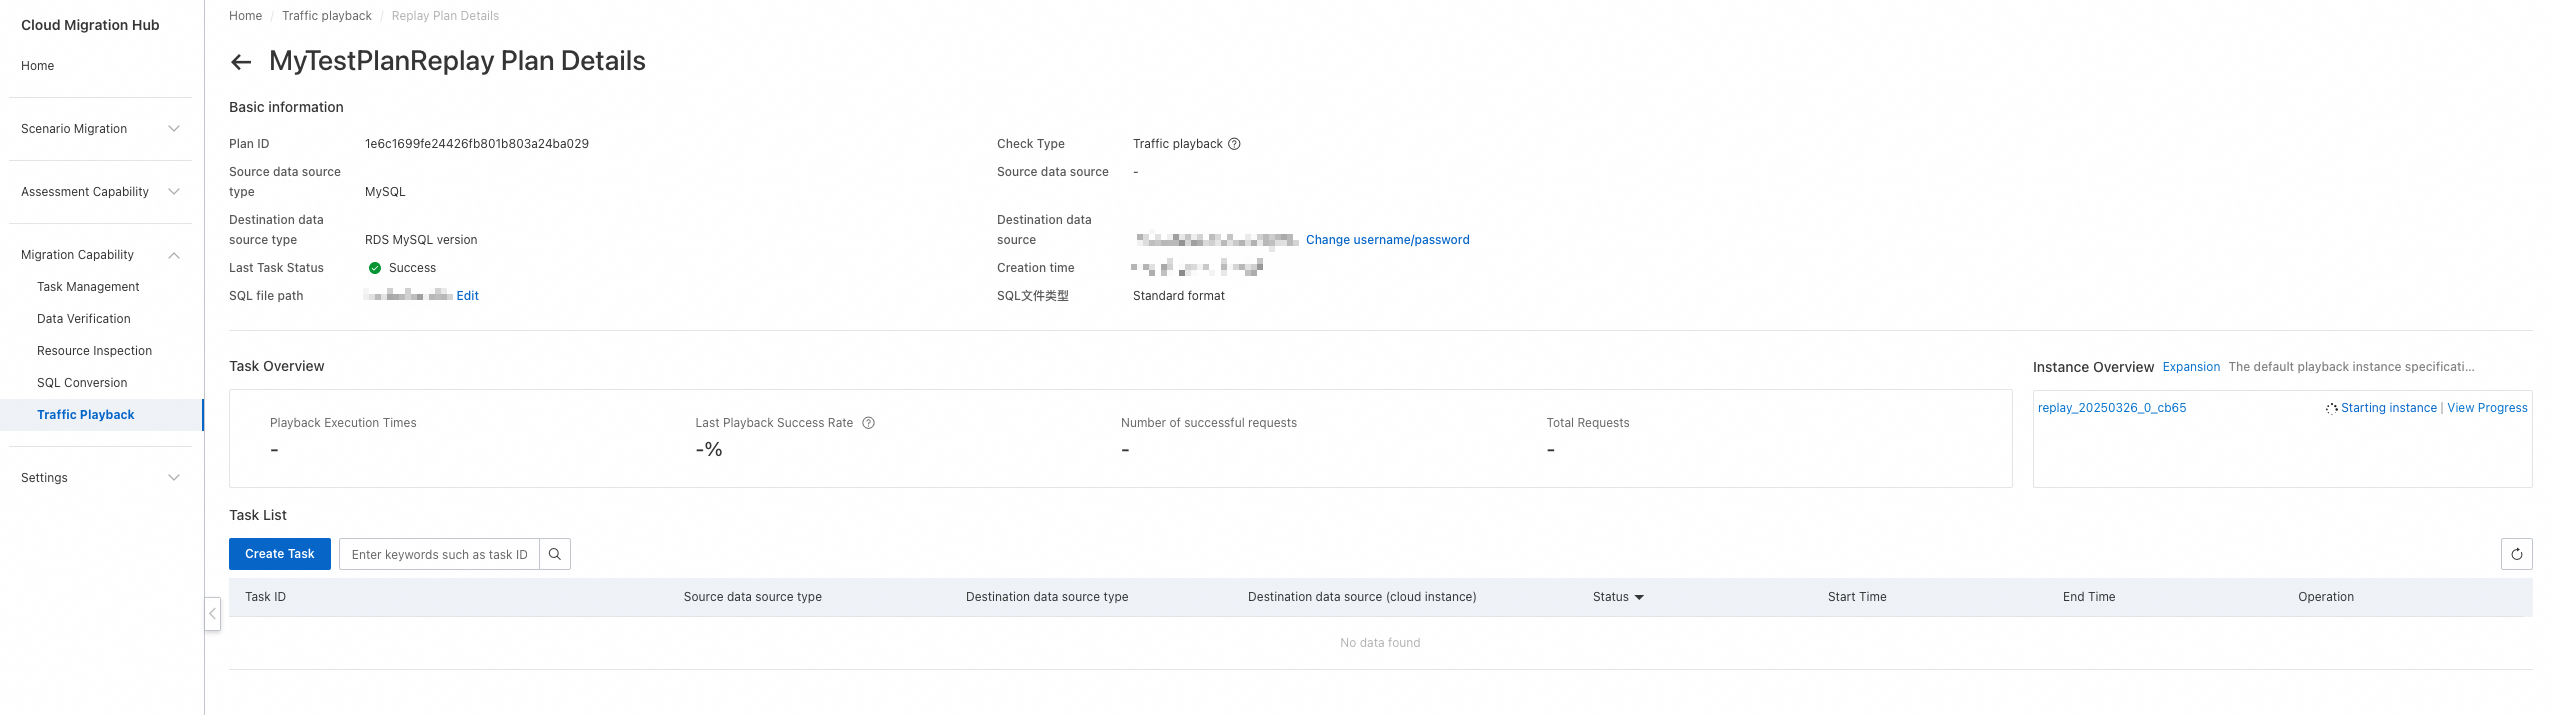
Instance Overview:
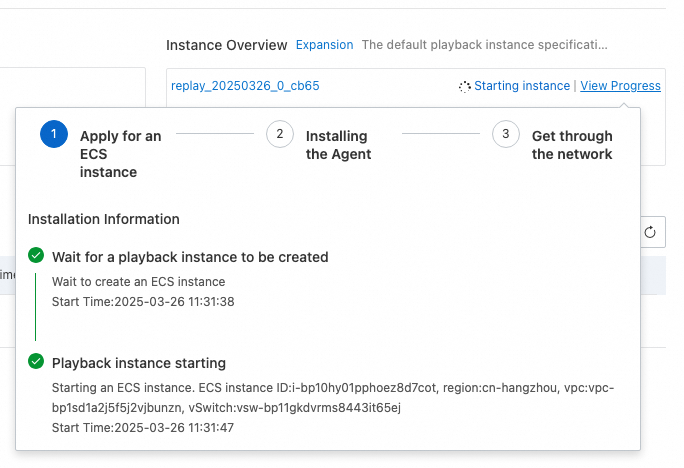
After you create a plan, you can see the list of new and associated playback instances for the current plan on the plan details page. Click View Progress to view the deployment status of each instance.
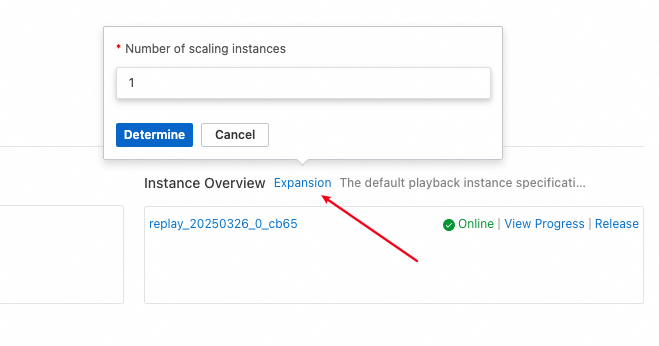
To add new playback instances, you can select Scale-out and choose the number of instances to add. CMH automatically creates new playback instances for you and associates them with the current playback plan.
If you no longer need a playback instance, you can select Release to delete it.
1. If the playback instance is still being used by other playback plans, the release operation does not delete the corresponding ECS instance. Otherwise, the ECS instance is also released.
2. To log on to a playback instance, you can click the playback instance name to go to the ECS details page. The logon password for the playback instance is in the Description field under Instance Details > Other Information.
4.5. Create a playback task
After you create the playback plan, you can create a playback task on the playback plan details page, as shown in the following figure.
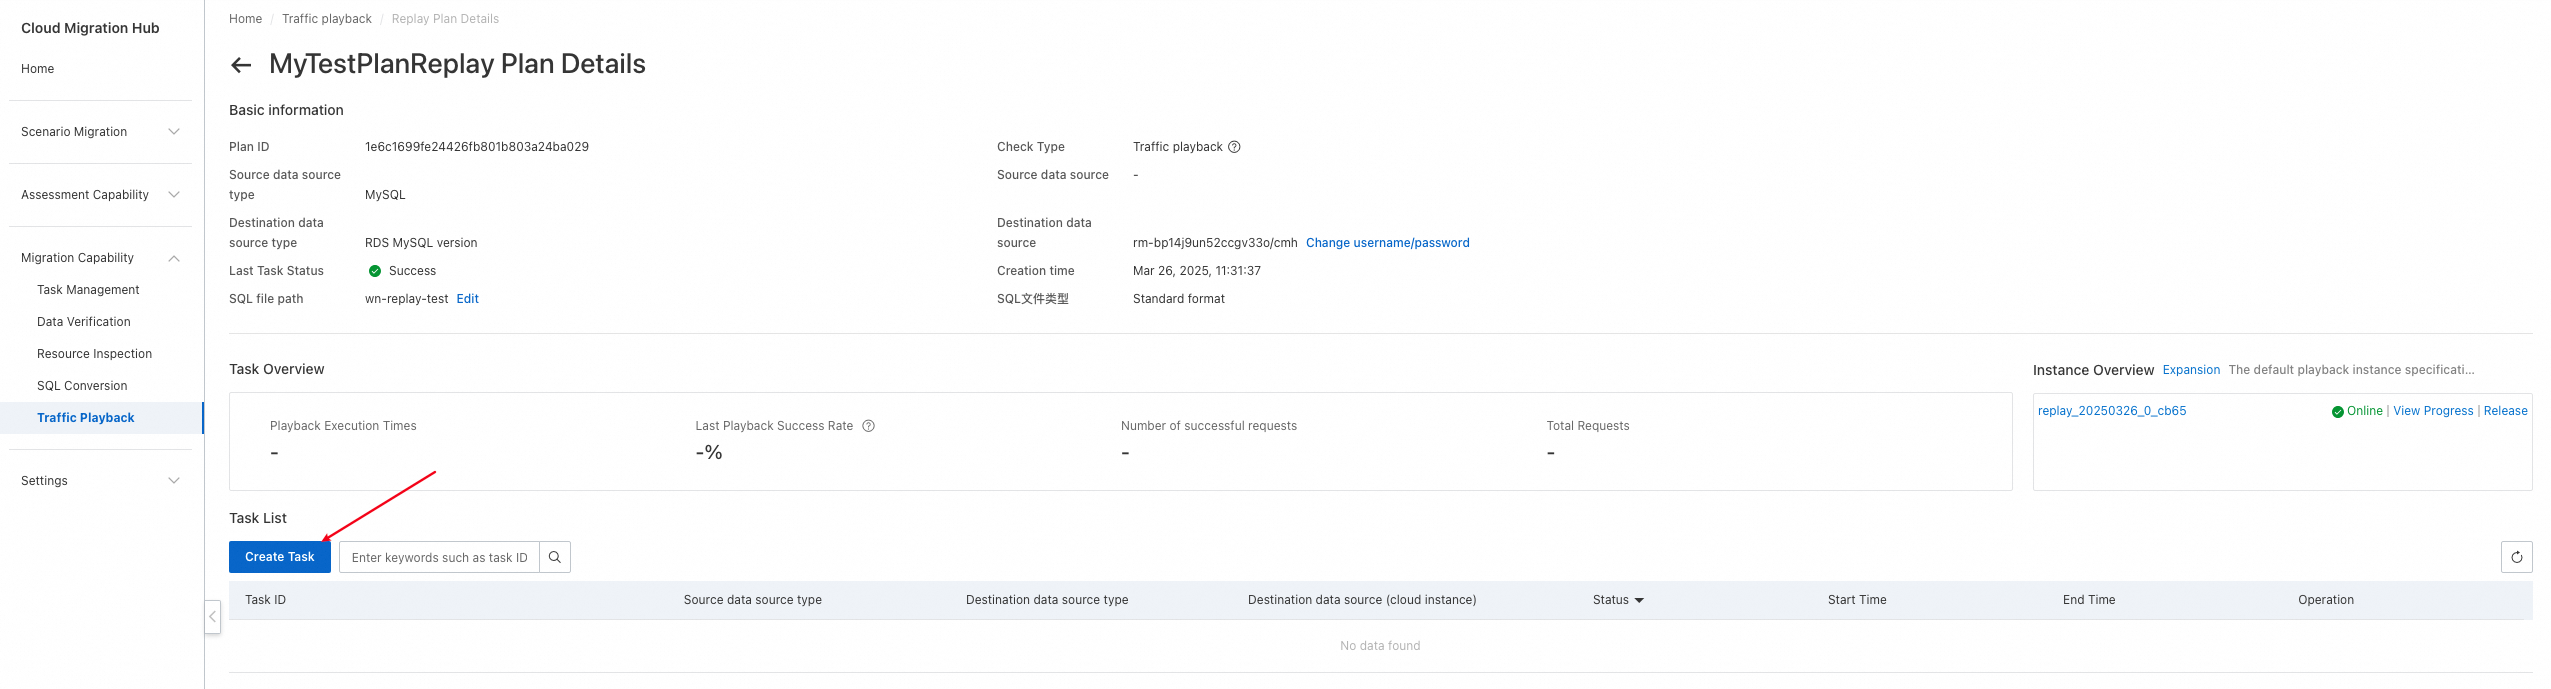
Click Create Task to start creating a playback task. A playback task does not run immediately after it is created. You must manually click Execute to start it. The key parameters are explained as follows:
Configuration | Description |
Select Playback Instance | You can select multiple playback instances here. If you select multiple instances, the task will run the playback file on all instances simultaneously. If the number of instances is N, the pressure on the database will increase by N times. |
Select Playback File | Select the playback file that has been uploaded to the OSS Bucket associated with the playback plan. This file will be refreshed to the playback instance each time a playback task is created. |
Number of Simulated Clients | The number of concurrent threads on the playback instance that run SQL statements. With sufficient resources, more threads result in faster execution. |
Playback Speed Factor | Controls the waiting time between the execution of two SQL statements. For example, if the interval between two consecutive SQL statements is 5 seconds and the playback speed factor is 1, the interval remains 5 seconds. If the factor is 5, the interval is 1 second. If the factor is 10, the interval is 0.5 seconds. The default is 1. This parameter is not effective for loop playback. |
Loop Playback | If you select Yes, the playback file will be replayed from the beginning after it finishes, until the set playback duration is reached. If you select No, the playback stops automatically after one run. The default is No. |
Schema Mapping and Filtering | By default, this is left blank, and SQL statements for all schemas are replayed. If you enter schemas, only the SQL statements for the specified schemas are replayed. If the source and destination schemas are different, you can specify a mapping using the format schema1:schema2. |
SQL Timeout | The maximum waiting time for a single SQL statement to run. The default is 60 seconds. |
Confirm commit? | By default, traffic playback manually starts a transaction for playback and rolls back after each SQL statement is run. To commit the transaction, set this to Yes. |
Playback SQL Type | You can select All, DQL, or DML. If you select DQL or DML, only SQL statements of that type will be run. The default is All. |
Skip Errored SQL | Specifies whether to skip SQL statements that have already been confirmed to cause errors. The default is No, meaning they will be run again next time. If you select Yes, they will not be run again. |
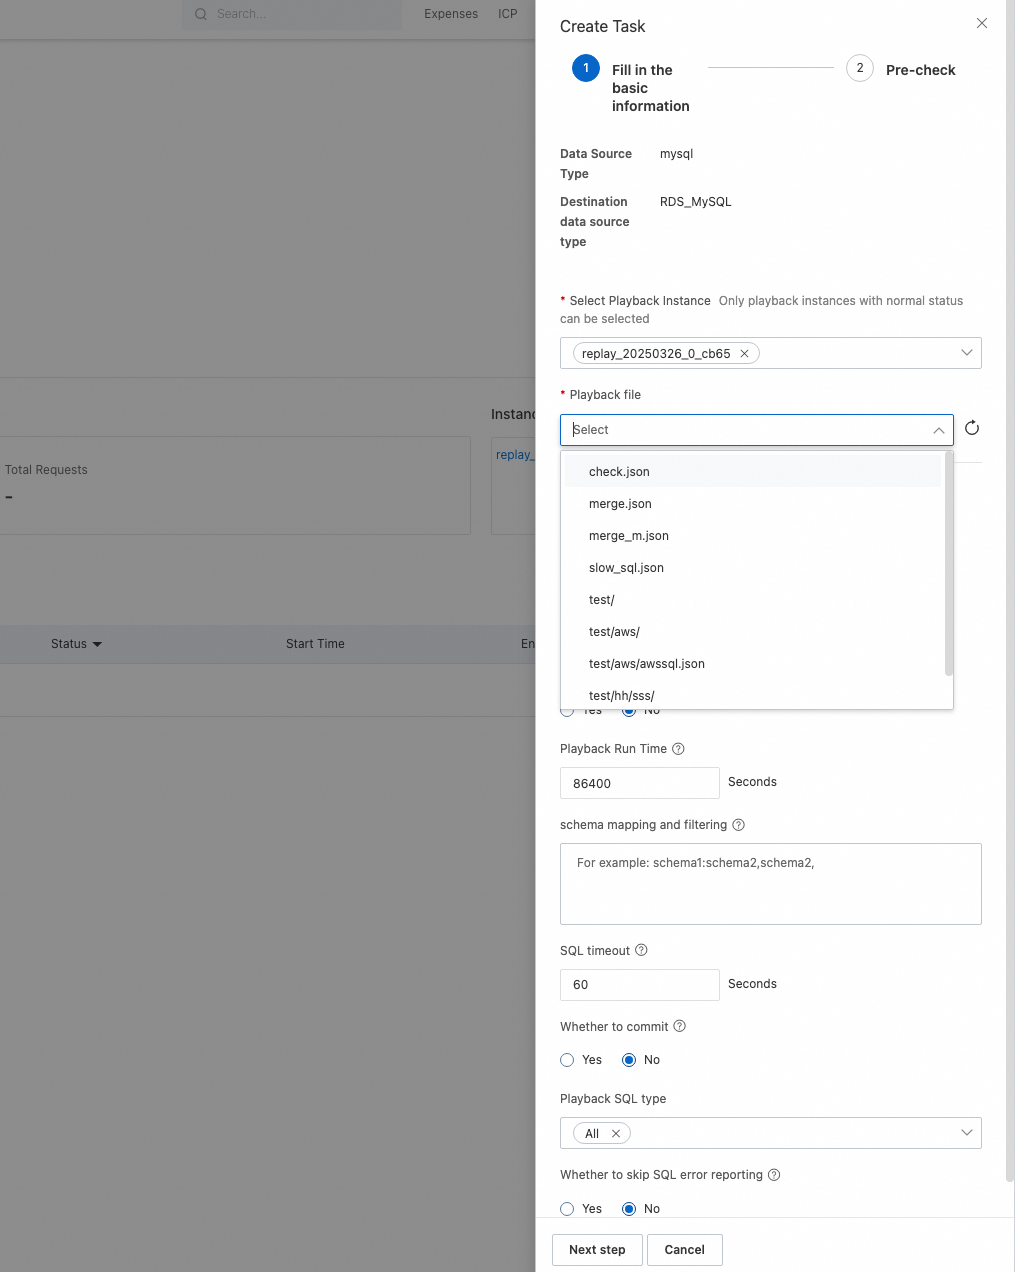
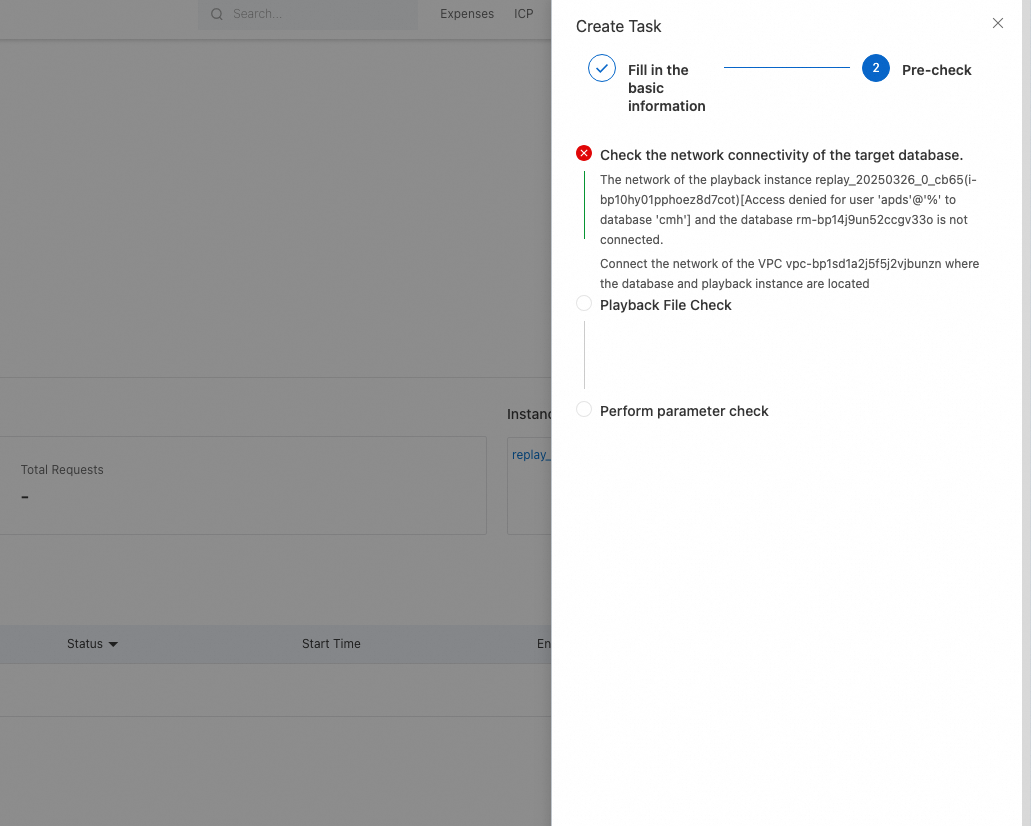
Click Next to proceed to the precheck stage before you create the task. If any precheck item fails, the creation of the playback task is blocked. You must resolve the issues and run the precheck again. Precheck items of the Alarm Metric type do not block task creation.
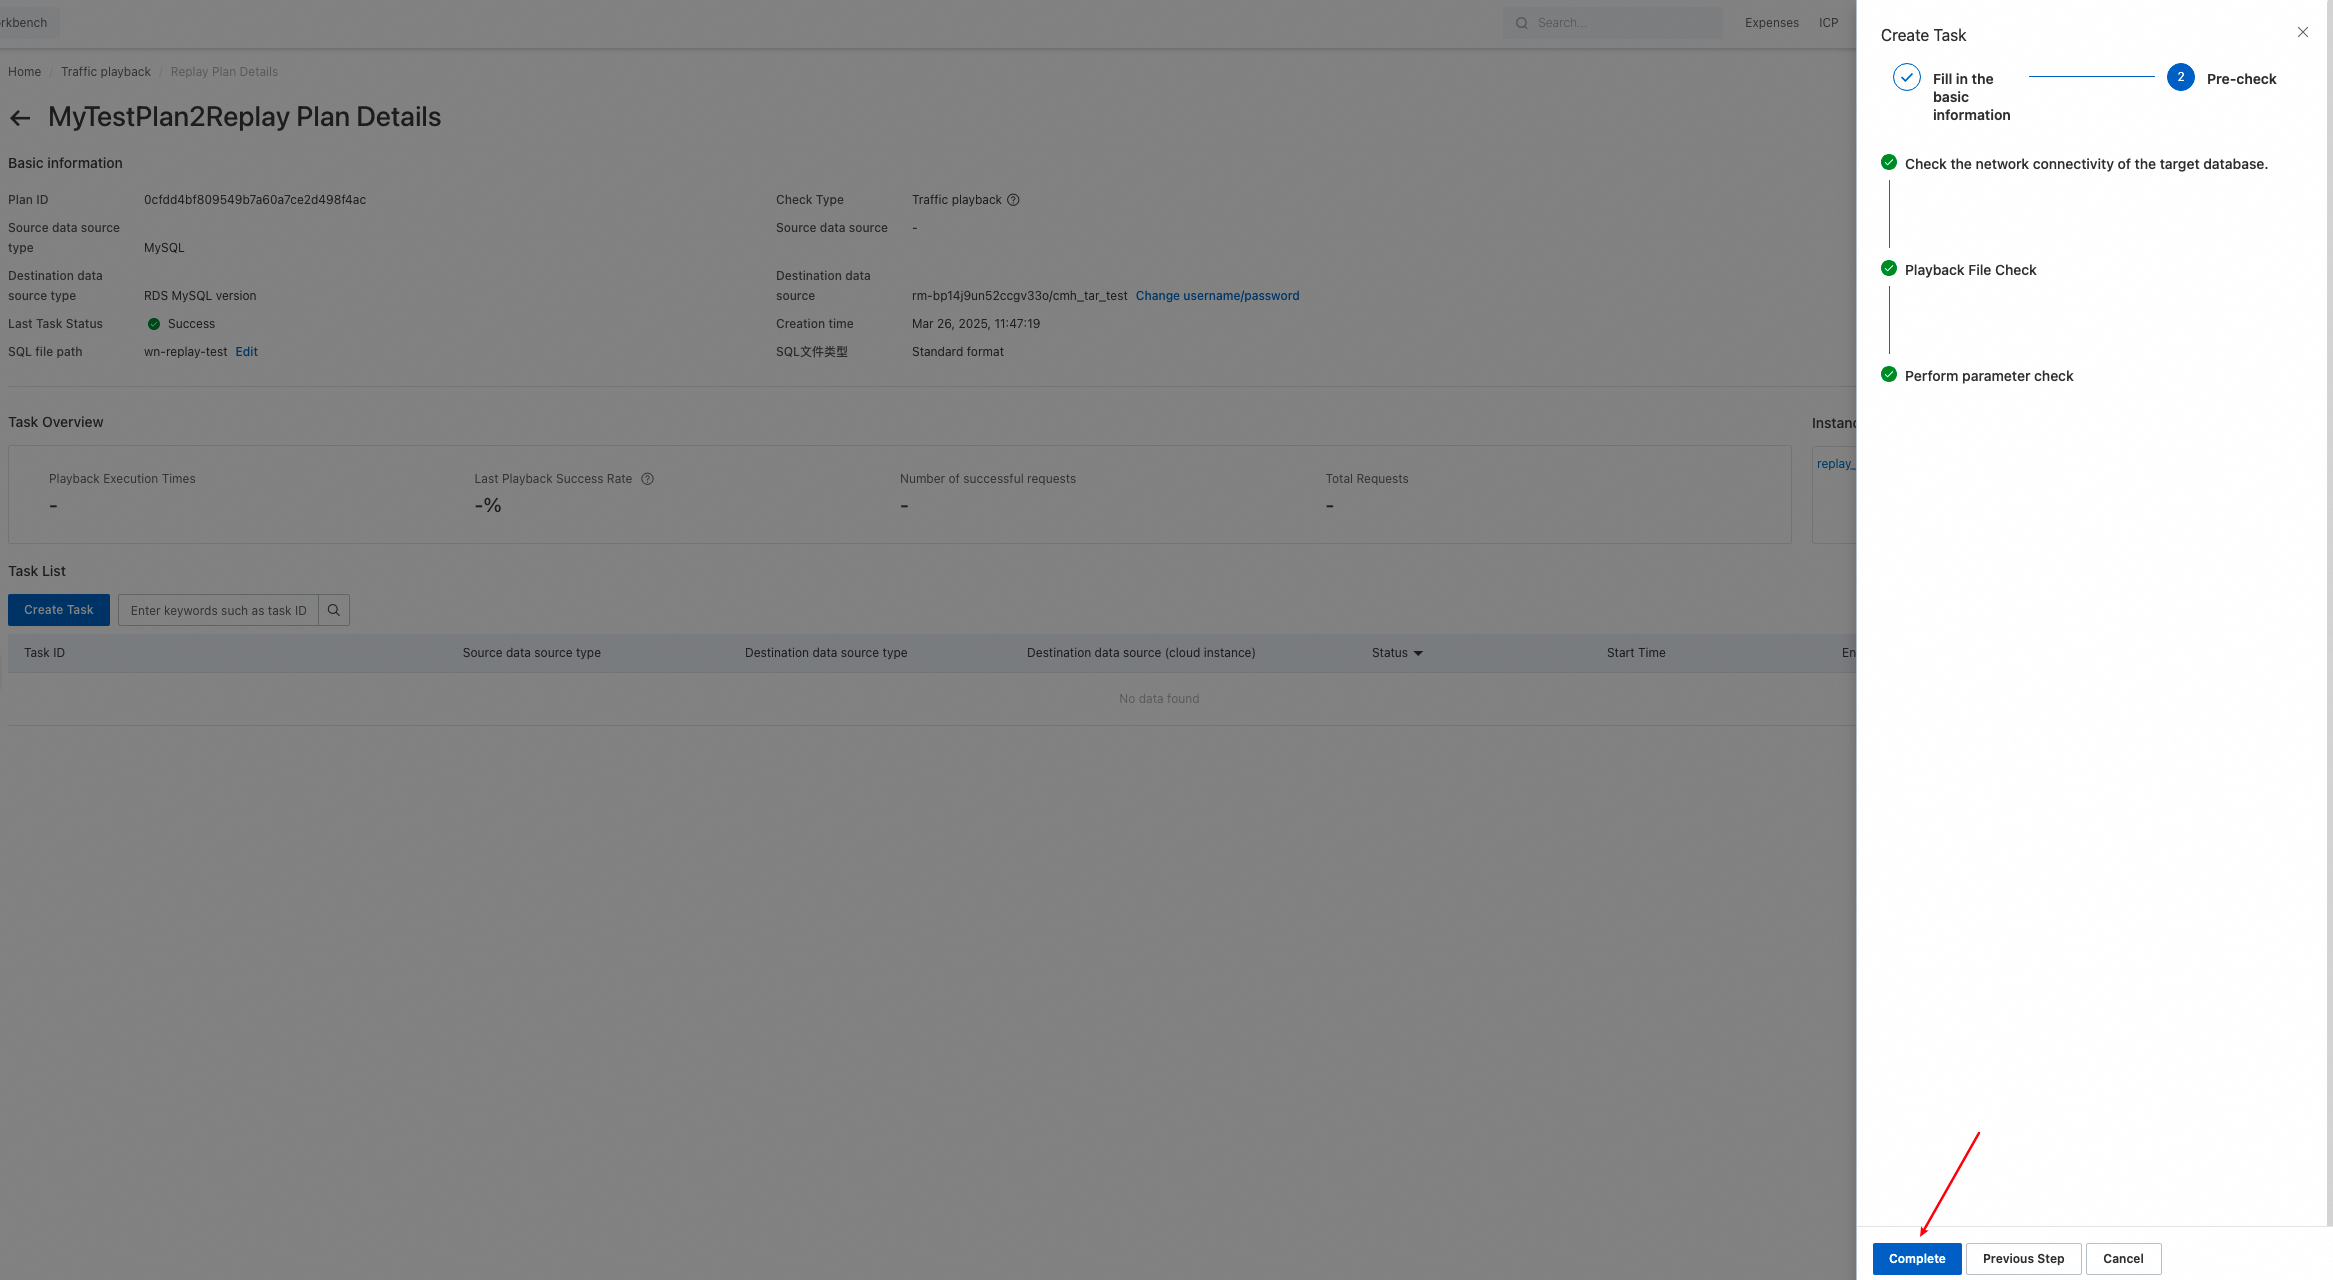
After the precheck passes, click Finish to create the playback task.
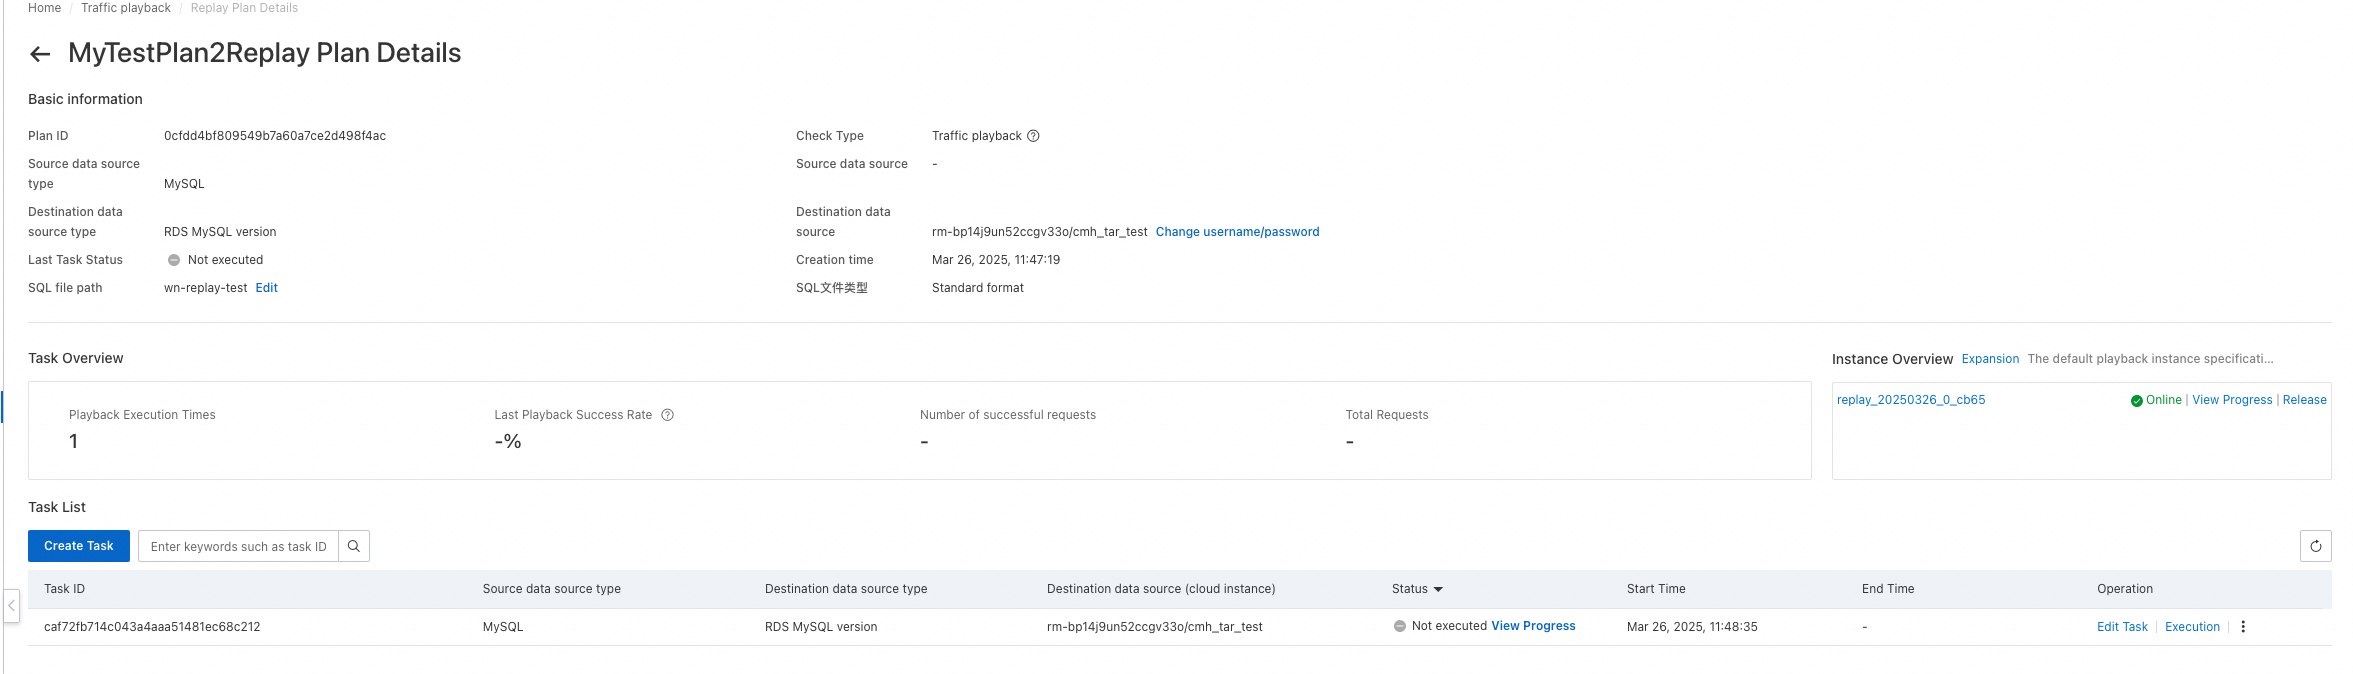
4.6. Execute a playback task
For a running task, you can click View Progress in the list to view the task execution status. This includes Total SQL Count, Total Executed SQL Count, Errored SQL Count, execution QPS, Average RT, SQL Template Count, and execution Progress.
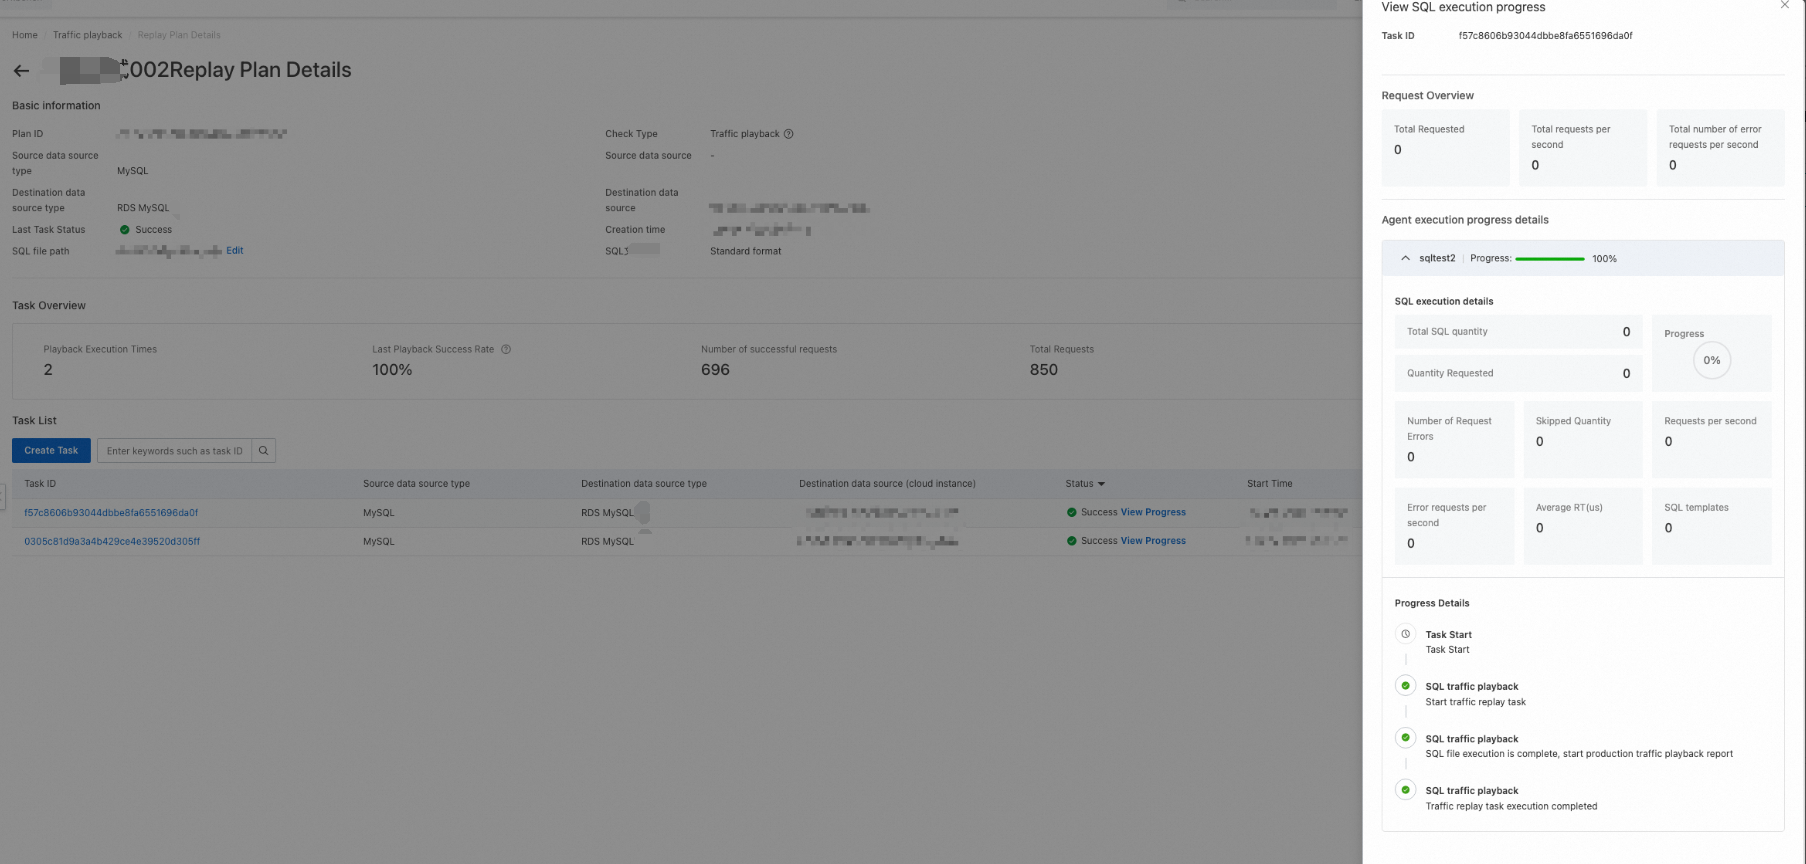
If loop playback is enabled, the progress can exceed 100%. For example, a progress of 200% means the SQL file has been run twice.
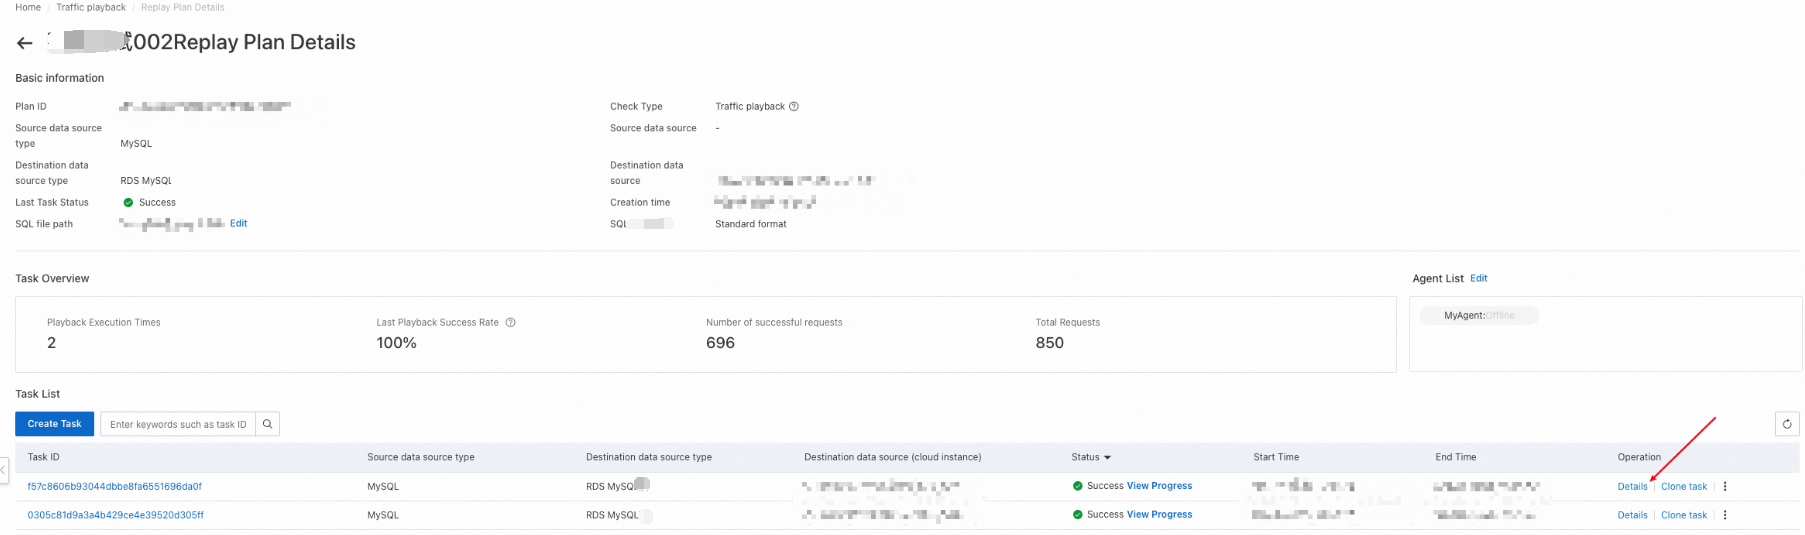
For a completed task, you can click the Details button in the list to go to the details page and view the detailed SQL execution status.
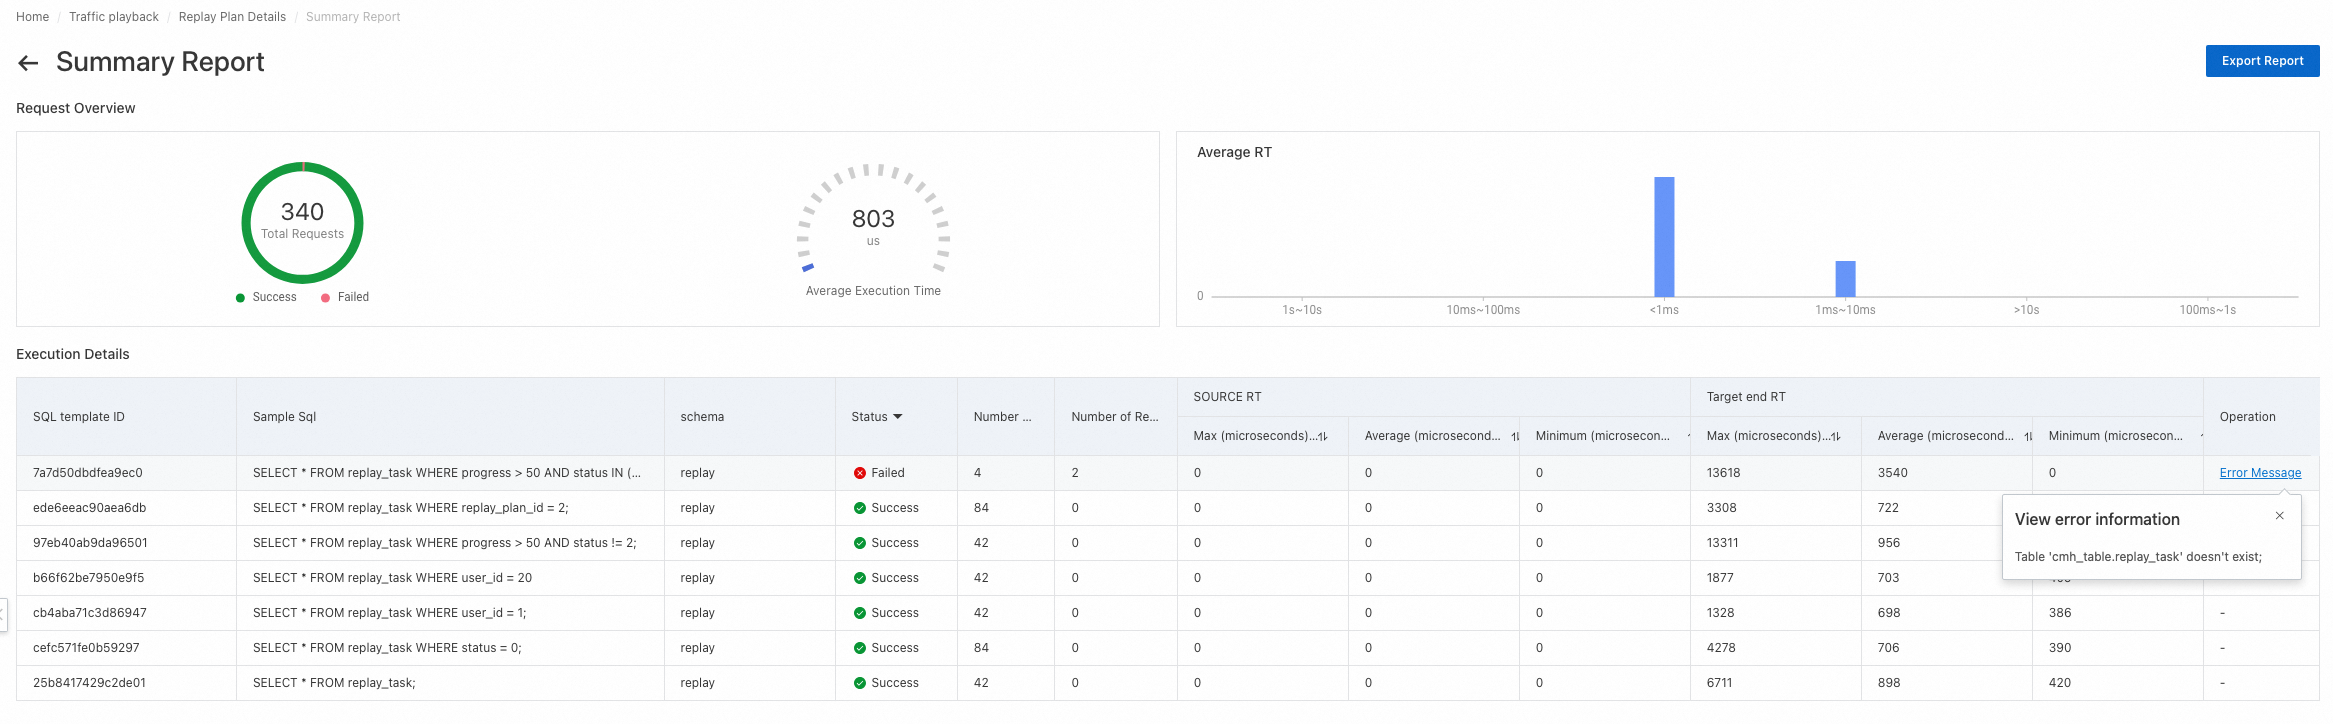
Request Overview: View information such as total requests, average running time, and average RT.
Execution Details: Displays the execution status of each SQL template in a list. This includes Sample SQL, schema, execution status, number of requests, number of request errors, source RT, and destination RT. You can view the Error Message in the row actions.
Export Report: You can click the button in the upper-right corner to export the report in Excel format.
5. Agent management (old version)
The old page lets you select an existing ECS instance for Agent deployment to complete traffic playback.
5.1. Request and view a license
On the Cloud Migration Hub page, choose Migration Capabilities > Traffic Playback to go to the product interface. The first time you access the page, a user guide appears. The first step is to request a license. Click the Request License button to automatically generate a license. Requesting a license helps prevent Agent misuse and protects the Agent. The license, subsequent Agent capabilities (excluding ECS purchases), and the use of traffic playback do not incur fees.

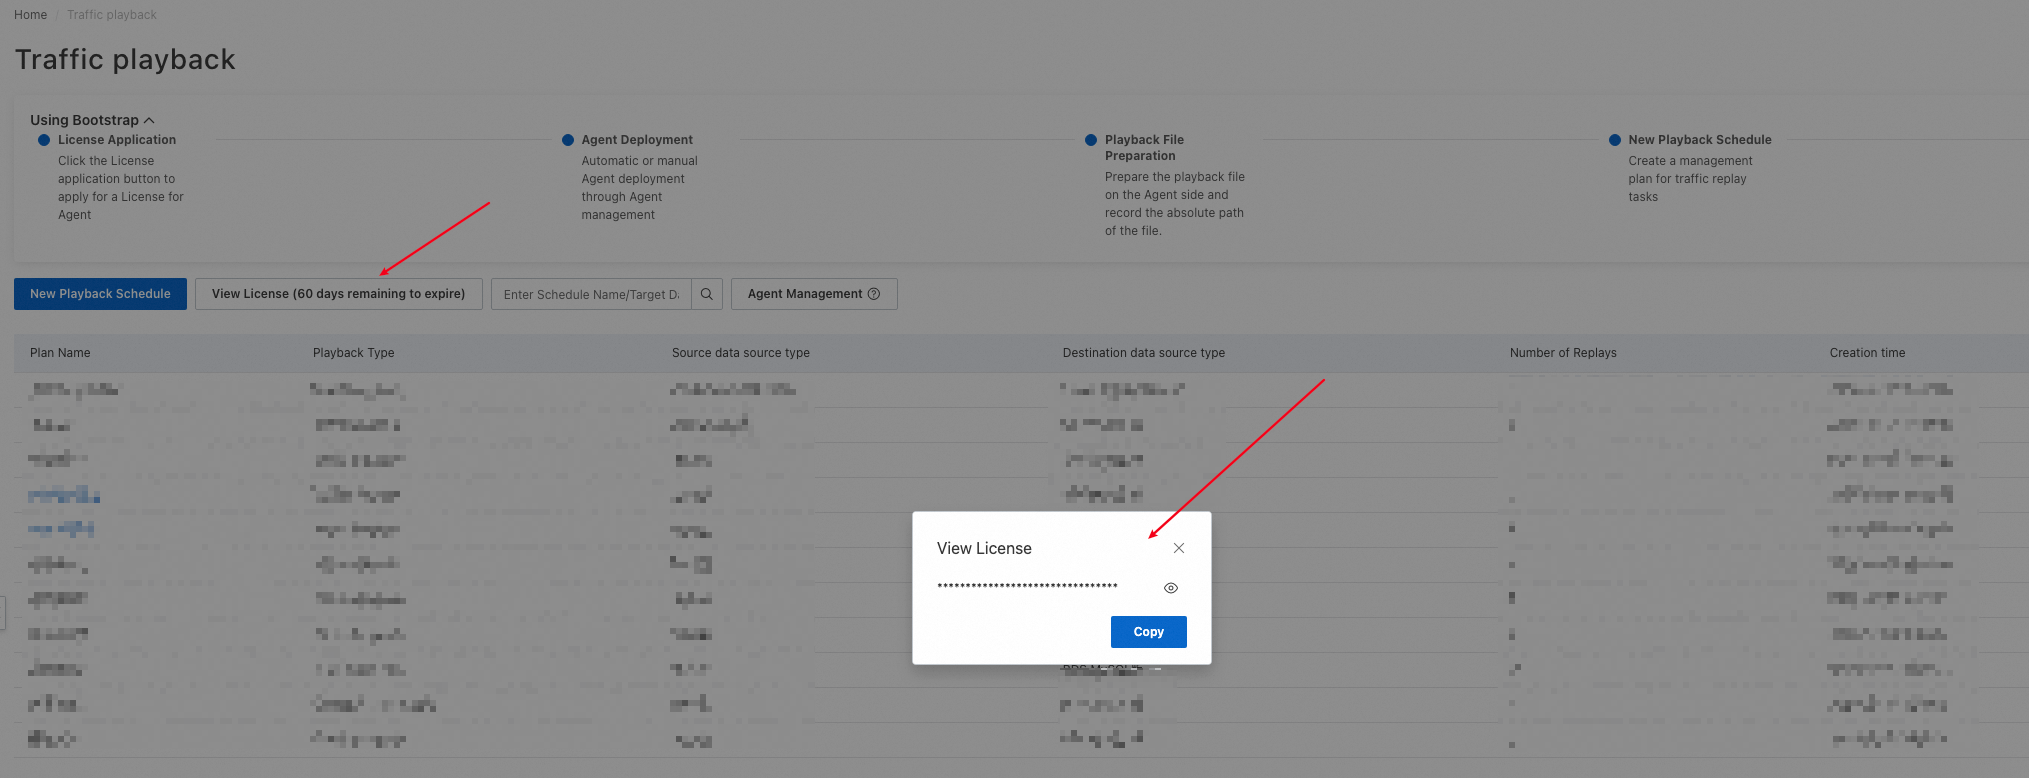
After the request is complete, you can view the license expiration date on the page. The license is valid for three calendar months. You can click to view the current license.
5.2. Agent management
After you request a license, you must deploy the traffic playback Agent. You must provide one or more ECS instances for CMH to deploy the Agent. You can evaluate the number of required ECS instances based on your needs.
Recommended ECS specifications: at least 8 cores and 16 GB of memory
Recommended operating system: CentOS, Alibaba Cloud Linux
Network requirements: The created ECS instance must have network connectivity with the data source.
Other requirements: You must install Java on the ECS instance before deployment.
Deployment instructions:
If you are using an Alibaba Cloud ECS instance and the ECS instance has Cloud Assistant installed, you can use the automatic deployment method to install the Agent. Cloud Assistant is installed by default on ECS instances created by Alibaba Cloud.
If you are not using an Alibaba Cloud ECS instance but are connected to an Alibaba Cloud VPC, or if you are using an Alibaba Cloud ECS instance where Cloud Assistant is not installed or failed to install, you can use the Manual Deployment - PrivateLink method to deploy the Agent.
If you are not using an Alibaba Cloud ECS instance and the network is not connected, but the instance has a public IP address, you can use the Manual Deployment - Public Network Connection method to deploy the Agent.
The following sections provide detailed descriptions of the three deployment modes:
5.2.1 Automatic deployment
Currently, automatic deployment is supported in the Hangzhou and Shanghai regions. To deploy in other regions, you can contact us through online after-sales support.
Note:
Automatic deployment only supports ECS instances created by Alibaba Cloud.
Before installation, you must activate the PrivateLink service.
After you prepare the ECS instance, click Agent Management to go to the Agent installation page.
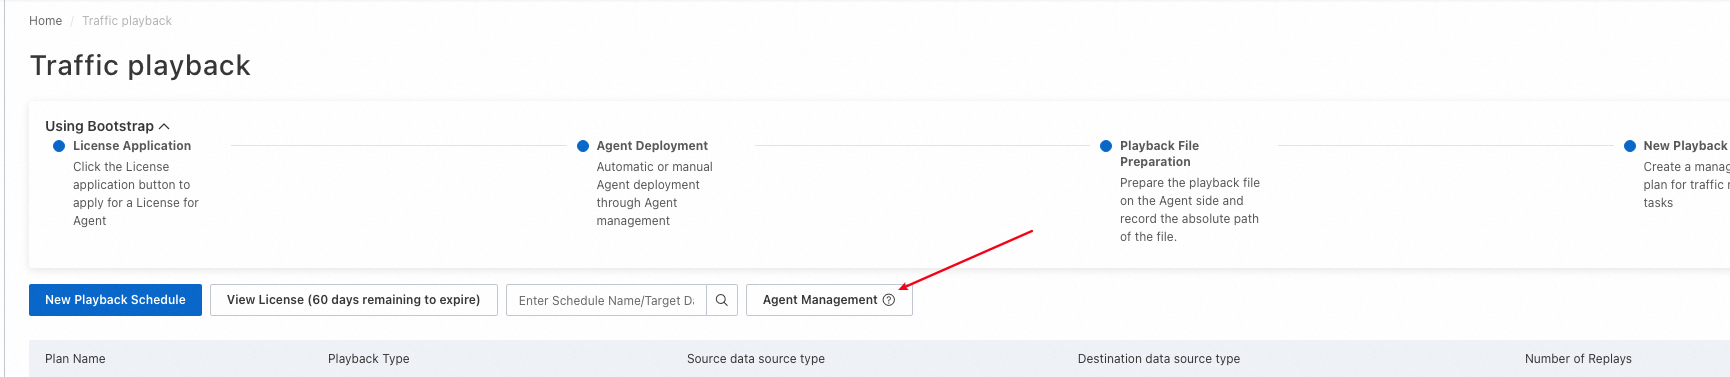
Click Install Agent to start the Agent installation process.

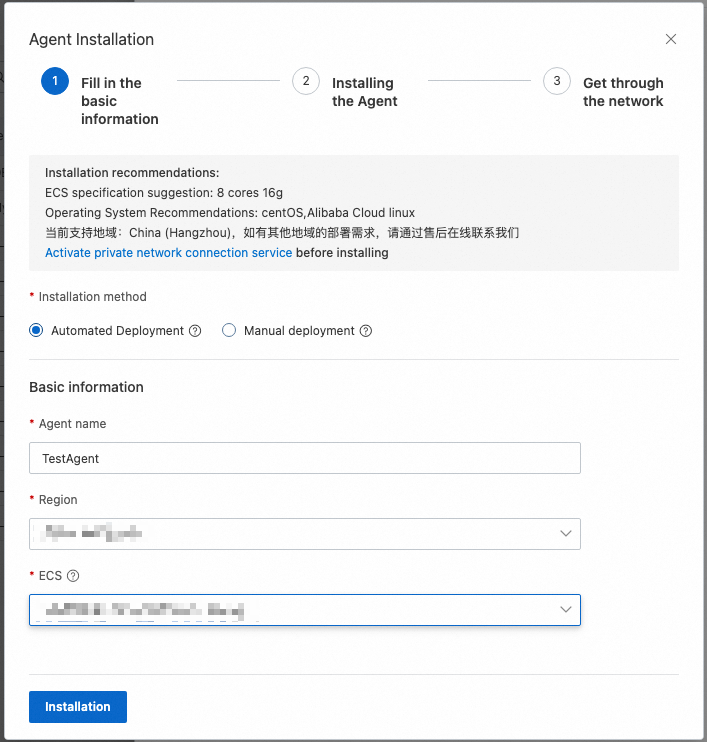
Set Installation Method to Automatic Deployment, enter the Agent name, select the region, and select the ECS instance. After you complete these steps, click Submit. CMH automatically completes the deployment process of the traffic playback Agent.
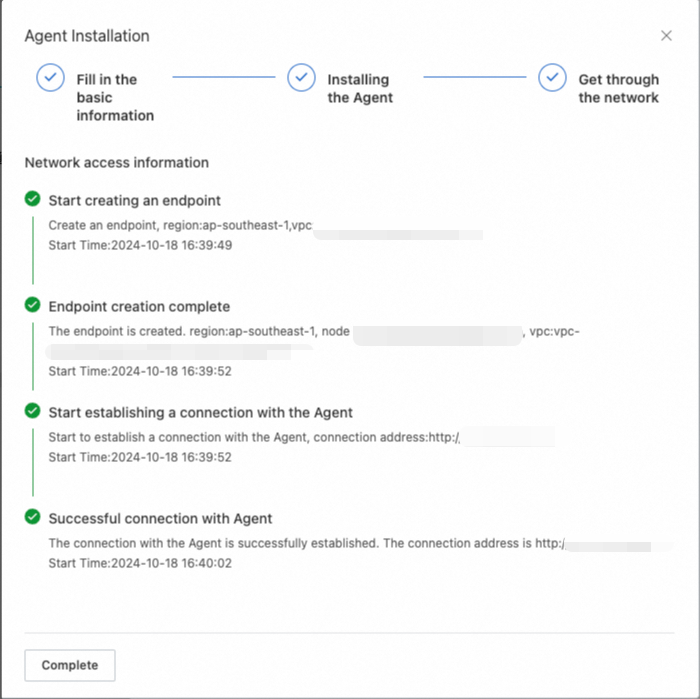
During deployment, you can view the Agent deployment process.
After the deployment is complete, you can view the deployed Agent in the Agent list.

5.2.2 Manual deployment
5.2.2.1 Manual deployment over the public network
For manual deployment over the public network, the ECS instance must have public network access enabled so that CMH can connect to it.
Note:
The ECS instance can be on any platform or in an IDC, as long as CMH can access it over the public network.
After you prepare the ECS instance, click Agent Management to go to the Agent installation page.
Click Install Agent to start the Agent installation process.
Set Installation Method to Manual Deployment, enter the Agent name, select Public Network, enter the IP and Port, and then click Next.
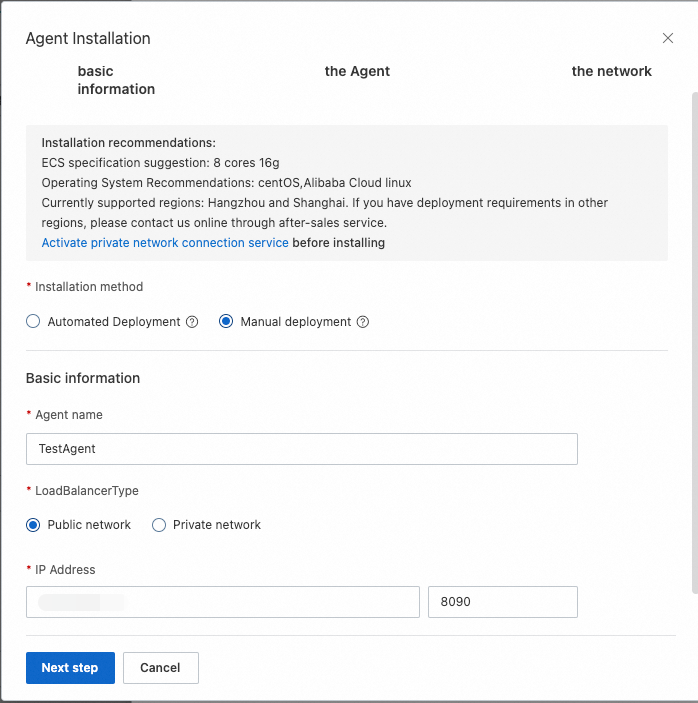
In the next step, the installation command for the ECS instance is provided. Click Copy to copy the command. Then, paste and run the command on the ECS instance to complete the Agent deployment.
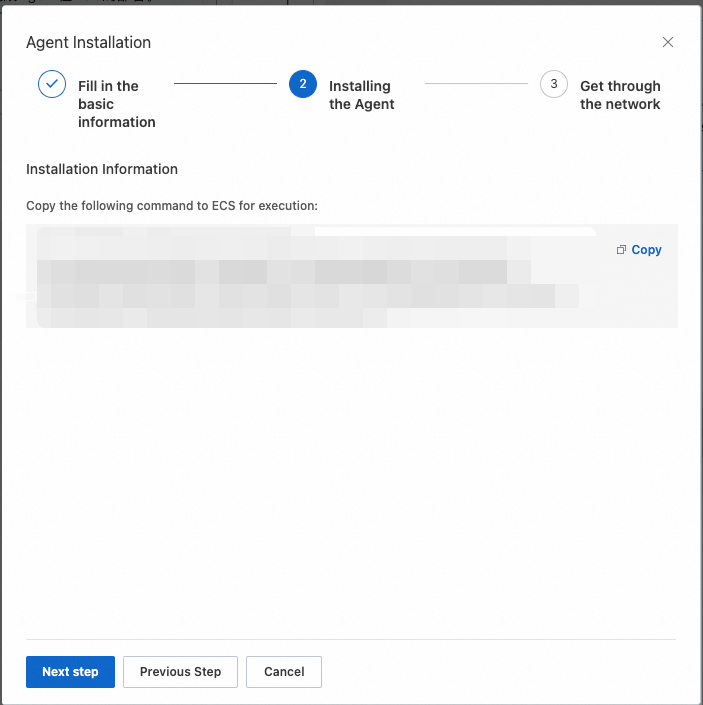
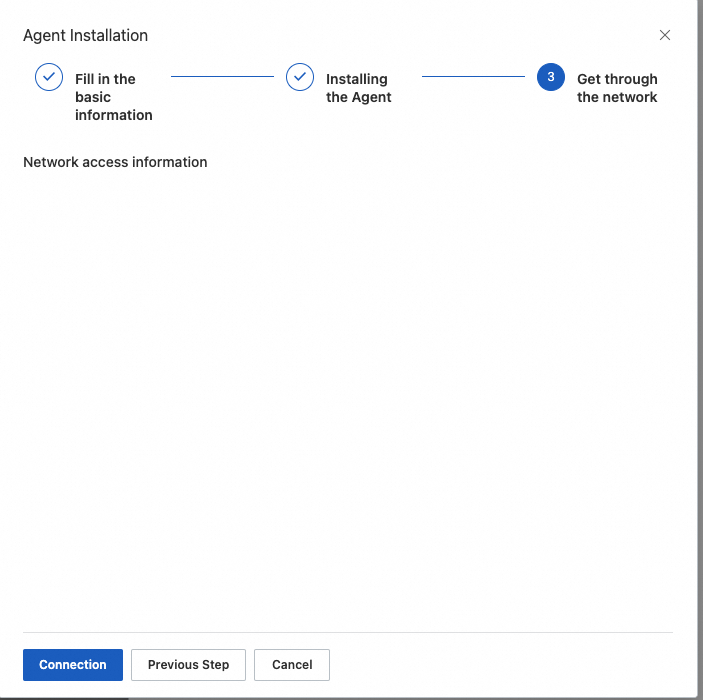
After the deployment is complete, click Next, and then click the Connect button to establish a connection with the Agent.
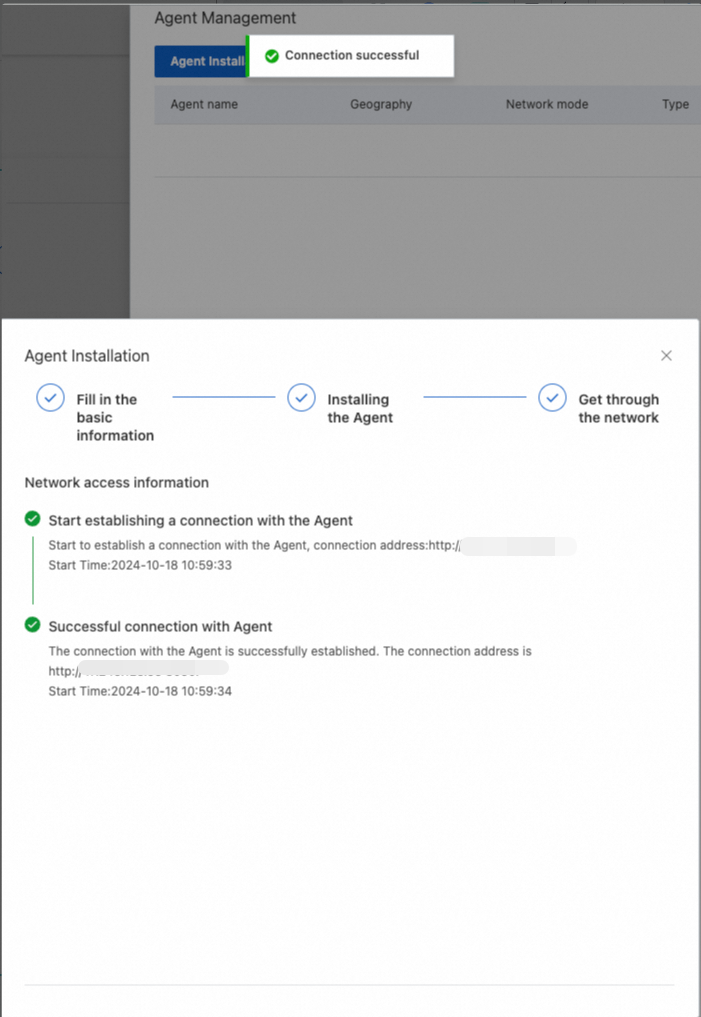
You can view the connection process online.
After the deployment is complete, you can view the deployed Agent in the Agent list.
5.2.2.2 Manual deployment over a private network
Manual deployment over a private network is supported in the Hangzhou and Shanghai regions. To deploy in other regions, you can contact us through online after-sales support.
Note:
The ECS instance can be an Alibaba Cloud or non-Alibaba Cloud machine, as long as the VPCs are connected.
Before installation, you must activate the PrivateLink service.
After you prepare the ECS instance, click Agent Management to go to the Agent installation page.
Click Install Agent to start the Agent installation process.
Set Installation Method to Manual Deployment, enter the Agent name, select Private Network, select the Region, select the VPC, enter the IP and Port, and then click Next.
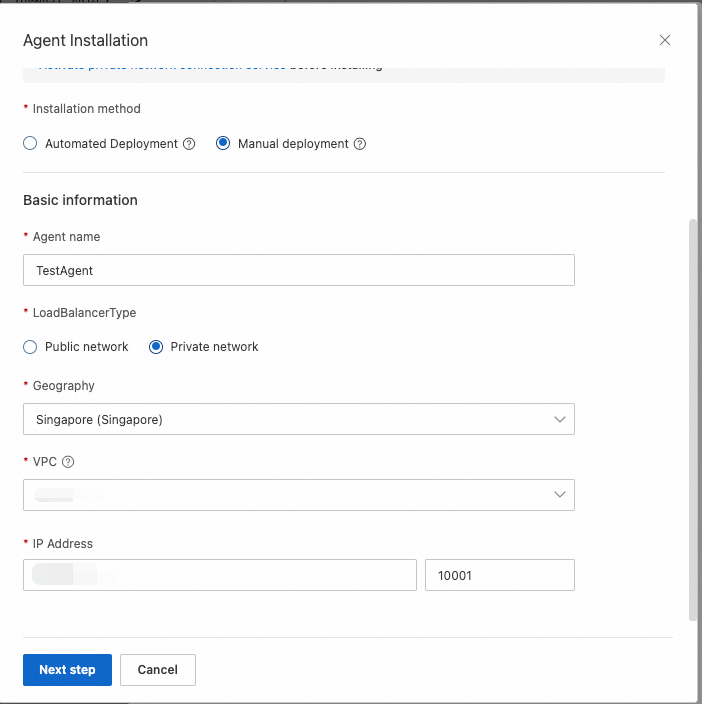
In the next step, the installation command for the ECS instance is provided. Click Copy to copy the command. Then, paste and run the command on the ECS instance to complete the Agent deployment.
After the installation is complete, click Next, and then click the Connect button to establish a connection with the Agent.
You can view the connection process online.
After the deployment is complete, you can view the deployed Agent in the Agent list.
5.2.3 Agent operations
5.2.3.1 Stop
For an automatically deployed Agent that has an online status, you can click the Stop button to shut it down.
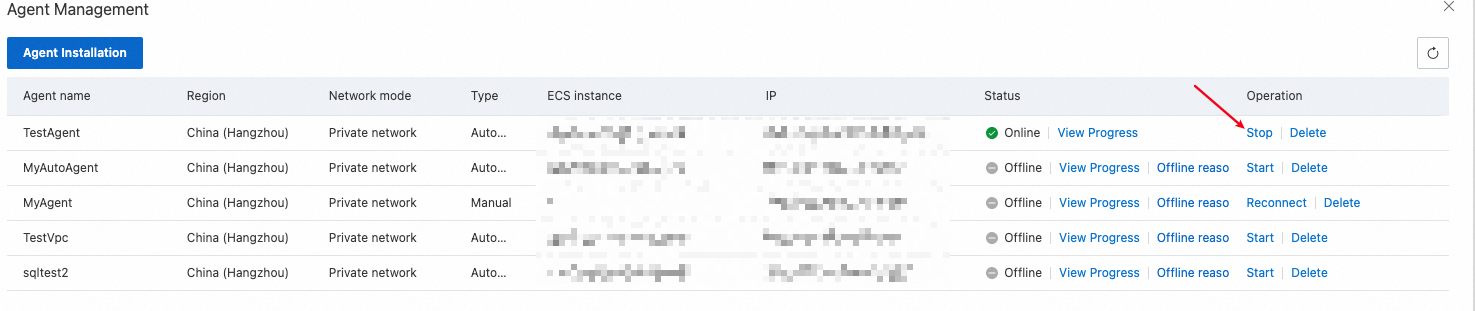
After you stop the Agent, the Agent on the ECS instance is stopped, and its status in the list changes to Stopped. A stopped Agent cannot run playback tasks.

5.2.3.2 Start
For a stopped Agent, you can click the Start button to start it.

After you start the Agent, its status changes to Online.
5.2.3.3 Delete
If an Agent is no longer in use, you can delete it from the Agent list. Before you delete the Agent, you must detach it from any playback plans.
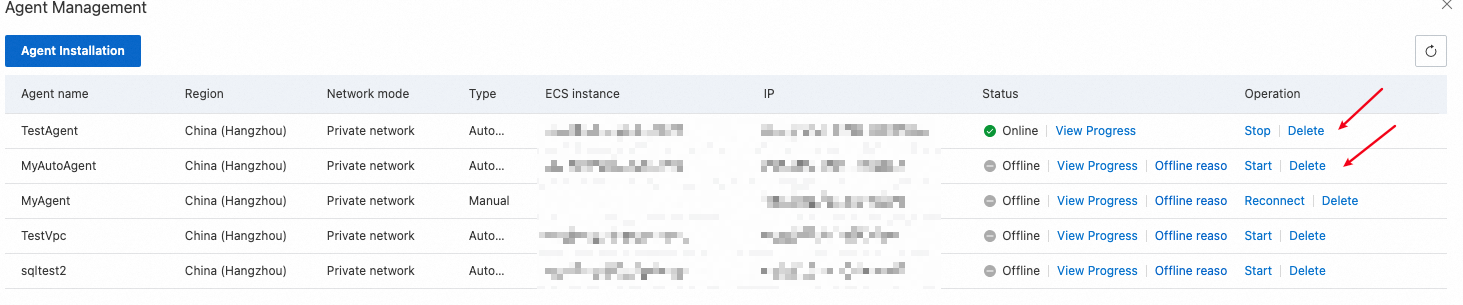
5.2.3.4 Reconnect
For a manually deployed Agent, if the connection is lost, the Agent status is set to Offline. After you confirm that the Agent is running, you can click Reconnect to re-establish the connection between CMH and the Agent.
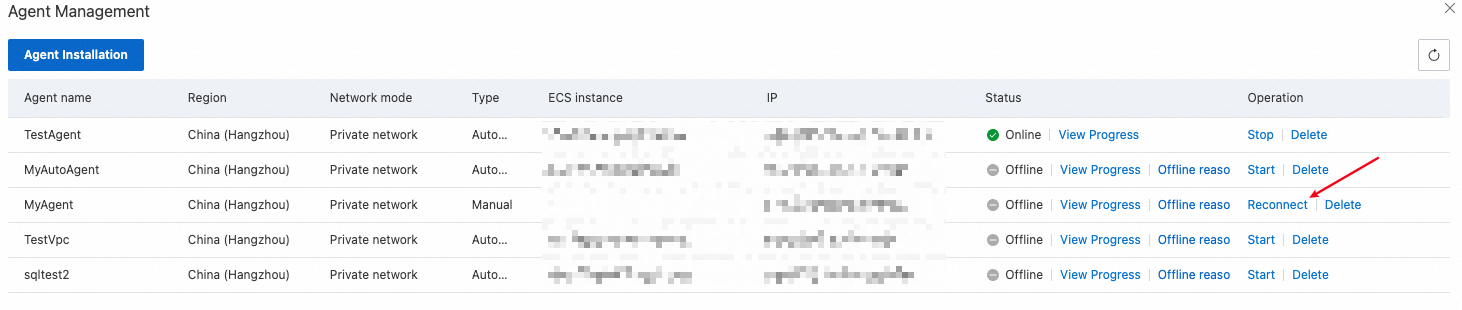
After a successful reconnection, the Agent status is set back to Online.
6. FAQ
6.1 What are the locations and meanings of the playback task logs?
/<Agent_Directory>/log/application-<Agent_Name>.log
This is the Agent operational log.
/<Agent_Directory>/run/replay-task-<Count>/result/result.xlsx
This file contains the details of the nth playback task result, including the Summary Report and SQL Details.
/<Agent_Directory>/run/replay-task-<Count>/access.log
This file contains the execution status of the nth playback task, including metrics such as progress and the number of requests.
/<Agent_Directory>/run/replay-task-<Count>/detail.csv
This file contains the SQL execution details of the nth playback task.
To enable this log, select Yes for Enable detailed SQL playback log in the advanced configuration when you create the playback task.
/<Agent_Directory>/run/replay-task-<Count>/error.log
This is the error log of the nth traffic playback.
/<Agent_Directory>/sharding/merge.json/
This directory contains the sharded data of the SQL file.
6.2 How do I troubleshoot a failed Agent deployment?
Go to the page to check whether the command was run successfully.
Go to /<Agent_Directory>/log/application-<Agent_Name>.log to view the operational log.