Integrate with an Alipay Mini Program
This topic describes how to integrate the Compute Nest AI Assistant into an Alipay mini program by using the web-view component. Two integration methods are available: server-side integration and client-side integration.
Use cases
Add features like an intelligent customer service agent, business consultant, or knowledge base query tool to your Alipay mini program to reduce the workload of human support staff. You can embed the Compute Nest AI Assistant into your mini program to create a conversational interface.
Prerequisites
Create an AI Assistant instance
-
Log on to the AppFlow console. In the left-side navigation pane, choose .
-
Click Create AI Assistant and follow the instructions in the Create an AI Assistant document to configure basic information, model settings, and other parameters.
Bind a custom domain name
Provide a compliant, publicly accessible entry point for the AI assistant. Alipay mini program requires that the business domain name loaded by the web-view component must have an ICP filing. This step involves first verifying the domain by configuring a DNS A record and Nginx, and then changing the DNS record to a CNAME record that points to the AppFlow service.
Create a subdomain and add an A record
-
Create a subdomain and add an A record for it. For more information, see Add a DNS record.
If your domain name was not purchased from Alibaba Cloud, contact your domain administrator to create the subdomain. Alternatively, you can migrate your domain name to Alibaba Cloud DNS and then create the subdomain.
-
Log on to the Alibaba Cloud DNS console. In the Authoritative DNS console, click the domain name you want to manage. On the settings page, click Add Record, configure the following parameters, and then click OK.
-
Record Type: Select A.
-
Hostname: Enter the domain prefix. For example,
poptest. -
Record Value: Enter an IPv4 address, which is typically the public IPv4 address of your Nginx server.
-
Configure the H5 domain whitelist for the Alipay mini program
-
Log on to the Alipay mini program Open Platform Console and go to the development settings page for your mini program. Go to the H5 Domain Name Whitelist tab.
For detailed instructions, usage limits, and error code explanations, see Configure an H5 Domain Name.
On this tab, click Add to start configuring your domain name.
-
Click Add. In the configuration dialog box, click to download the verification file. Fill in the Domain Name Address (HTTPS only), Business Scenario, and Page Address. Upload a Page Screenshot, enter a Reason for Application, and then click Confirm.
-
Place the downloaded verification file in the root directory of your domain. You can find the root directory of your domain in your Nginx configuration file.
server { listen 443 ssl http2 default_server; listen [::]:443 ssl http2 default_server; server_name xxx; root /usr/share/nginx/html; -
Enter the subdomain from step 1 in the Domain Name Address field (format: https://your-domain-name). Follow the on-screen prompts to verify that the verification file is accessible. If the configuration is correct, the verification passes. Complete the remaining configuration and click OK to finish the whitelist setup.
CNAME the subdomain to the AppFlow domain
-
Log on to the Alibaba Cloud DNS console. In the Authoritative DNS console, click the domain name that you added.
-
Find the Hostname you created and click Modify in the Actions column.
-
On the Modify Record page, configure the following parameters and click OK.
-
Record Type: Select CNAME.
-
Hostname: Enter the domain prefix. This example uses
poptest. -
Record Value: Enter the AppFlow domain name that the CNAME record points to. For example,
1563457855438522.appflow.aliyunnest.com.NoteThe AppFlow domain name is the access address specified in Configure deployment information for the integrated web page.
You can find this domain name in the Deployment Address field, located in the Standalone Page Deployment section of the Configure Deployment Information page for your AI assistant.
-
-
Go to the AppFlow-Domain Name Management console to add the domain name and bind a certificate.
-
On the Domain Name Management page, click Add Zone.
-
Set the domain name to the subdomain that you applied for, for example,
poptest.appflow.aliyunnest.com. -
Configure your HTTPS certificate.
In the Configure HTTPS section, set HTTPS to Enable. Enter a Certificate Name, and then paste or upload your certificate content to the PEM Certificate Content and PEM Certificate Key fields.
-
You can use the Alibaba Cloud SSL Certificates Service to purchase and download certificates. For detailed instructions, see Use a free certificate to enable HTTPS access for a website.
On the certificate Download page, select the certificate format based on your server type. For Nginx, select the pem/key format and click Download to get the certificate files.
-
Alternatively, you can obtain the certificate from your domain administrator.
-
-
Click Submit to add the domain name.
-
Integrate the web page
The integration uses the <web-view> component of an Alipay mini program to load the H5 page of the AI assistant. You can use server-side integration or client-side integration.
|
Feature |
Server-side integration |
Client-side integration |
|
Key advantage |
Simple integration and better user experience. |
Frontend-only, no backend support required. |
|
User authorization |
Seamless experience with no repeated authorization. |
May require users to authorize repeatedly. |
|
Information extension |
Can carry rich business attributes. |
Limited functionality, difficult to extend. |
|
Development and maintenance |
|
Your information is stored in encrypted format. Alibaba Cloud will not disclose your key information. |
|
Main drawback |
The server must generate the page URL. |
Application information must be maintained in the cloud, and the user experience is slightly degraded. |
Server-side integration
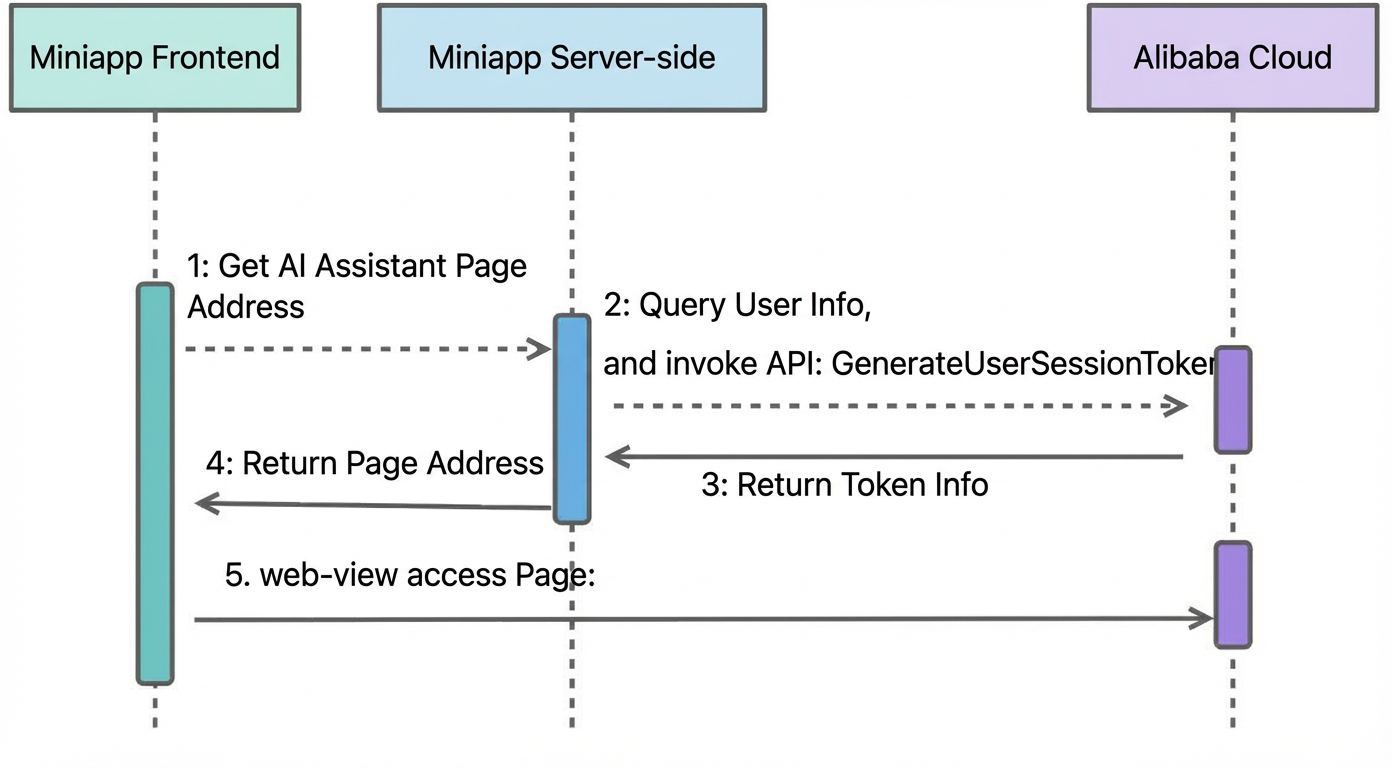
Your business server calls an Alibaba Cloud API to dynamically generate a short-lived session token. The URL containing the token is sent to the mini program frontend for secure access.
Architecture and workflow
-
Configure the AI assistant to use token-based authentication.
-
The mini program calls your server-side API to obtain the URL for the web-view page.
-
Your server retrieves the current Alipay user's information and calls the Alibaba Cloud API to generate a session token. The server then appends the returned token to the AI assistant's page URL, for example,
https://xxxxxx?access_session_token=xxxxxxxxxx, and returns the complete URL to the frontend. -
The mini program uses a server-generated URL in its
web-viewcomponent to access an H5 page.
Frontend implementation
You can refer to the following sample code:
-
index.axml
<view class="page"> <view > <web-view id="web-view-1" src="{{src}}" onMessage="onmessage"></web-view> </view> </view> -
index.js
Page({
  data:{
  },
  async onLoad(){
    this.webviewContext = my.createWebViewContext('web-view-1');
    this.getUrl();
  },

  getUrl() {
    // Call the server-side API to get the URL
    const url = callServerSideAPI
    this.setData({
      src: url
    });
  }
})
Server-side implementation
You can refer to the official Alibaba Cloud sample code.
On the left side of the page, you can configure request parameters such as ChatbotId, IntegratedId, and UserId. The right side displays sample code in your chosen programming language (such as Java, TypeScript, Go, or Python) that you can run directly or download as a complete project.
Client-side integration
Configure integration information
-
Log on to the Alipay mini program Open Platform. Find your mini program and click to view the interface signing method. Obtain the Alipay integration credentials required by the AI assistant: App ID, App Private Key, and Alipay Public Key.
-
On the AppFlow integration page, click Alipay Mini Program. Enter your Alipay mini program credentials, select the page to bind, and click the button to generate a web page. The resulting URL is the
srcvalue for the mini programweb-viewcomponent.
Frontend implementation
The Alipay mini program frontend must implement the following methods:
-
Obtain the user authorization code by calling
my.getAuthCodewithscopes: ['auth_base', 'auth_user']. -
If the AI assistant requires user information:
-
In the previous step, you set
scops=auth_userand calledmy.getAuthUserInfoto request user information authorization. -
Implement the
onmessagelistener method. When a message withevent type=userInfois received to authorize a request for user information, POST the user information to the AI assistant page. For details, see the sample code:
-
index.axml
<view class="page"> <view > <web-view id="web-view-1" src="{{src}}" onMessage="onmessage"></web-view> </view> </view> -
index.js
Page({
  data:{
  },
  async onLoad(){
    this.webviewContext = my.createWebViewContext('web-view-1');
    this.login();
  },
  onmessage(event){
    console.log("Received message from web-view", event.detail);
    if (event && event.detail && event.detail.type == 'userInfo') {
      this.getUserInfo();
    }
  },

  // POST user information to the H5 page
  getUserInfo() {
    console.log("Getting user info",this.data.userInfo)
    this.webviewContext.postMessage(
      {
        type: 'userInfo',
        data: {
          userName : this.data.userInfo.nickName,
          avatar : this.data.userInfo.avatar,
        }
      }
    )
  },
  login() {
    my.getAuthCode({
      // scopes: "auth_user"
      scopes: 'auth_user', // or ['auth_base', 'auth_user']
      success: (res) => {
        console.log('Successfully obtained auth code', res);
        console.log('Auth code:', res.authCode);
        console.log('Failed auth scopes:', res.authErrorScopes);
        console.log('Successful auth scopes:', res.authSuccessScopes);
        // Set user information
        my.getAuthUserInfo({
          fail: (error) => {
            console.error('getAuthUserInfo', error);
          },
          success: (userInfo) => {
            console.log(`userInfo:`, userInfo);
            this.setData({
              userInfo: userInfo,
              src: "https://xxxxx/webhook/home/xxxxxx/index?code=" + res.authCode
            });
          }
        });

      },
      fail: (error) => {
        console.log('Failed to obtain auth code:', error);
      },
      complete: () => {
        console.log('API call completed (regardless of success or failure)');
      }
    },  )
  }
})
-