FAQ: Using PPUs with ACS
This topic answers common questions about using PPUs with Container Compute Service (ACS).
Mounting CPFS for AI Computing on a GPU-HPN pod
For more information, see Use a static storage volume with CPFS.
Mounting CPFS for AI Computing on a CPU pod
Mounting CPFS for AI Computing on an on-demand CPU pod differs from mounting it on a GPU-HPN pod. For more information, see Mount a CPFS to an ACK CPU pod.
Getting GPU Prometheus metrics directly
We recommend that you get metrics from the ACS dashboard.
If you need to collect data, you can use the cadvisor method:
curl 'localhost:8080/api/v1/nodes/<your node name>/proxy/metrics/cadvisor' | grep DCGMOr
kubectl get --raw "/api/v1/nodes/<your node name>/proxy/metrics/cadvisor"
For more information, see Collect Prometheus metrics for container monitoring in an ACS cluster.
Configuring NUMA affinity
By default, ACS supports NUMA affinity. GPUs, CPUs, and memory are bound with NUMA affinity, so no additional configuration is needed. The affinity policy for virtual nodes under GPU-HPN is best-effort, and the affinity policy for GPUs is restrict.
PPU costs and savings in ACS
ACS clusters do not have a management fee. The costs of using PPU resources in ACS include cluster configuration and PPU compute resources. For detailed billing, see Billing.
Cluster configuration costs: These include pay-as-you-go fees for the API Server load balancer, NAT Gateway, the EIP bound to the NAT Gateway, public network traffic, Log Service (SLS), and NAS storage for models. These resources are billed based on usage duration or volume. You can choose to delete these associated resources when deleting the ACS cluster.
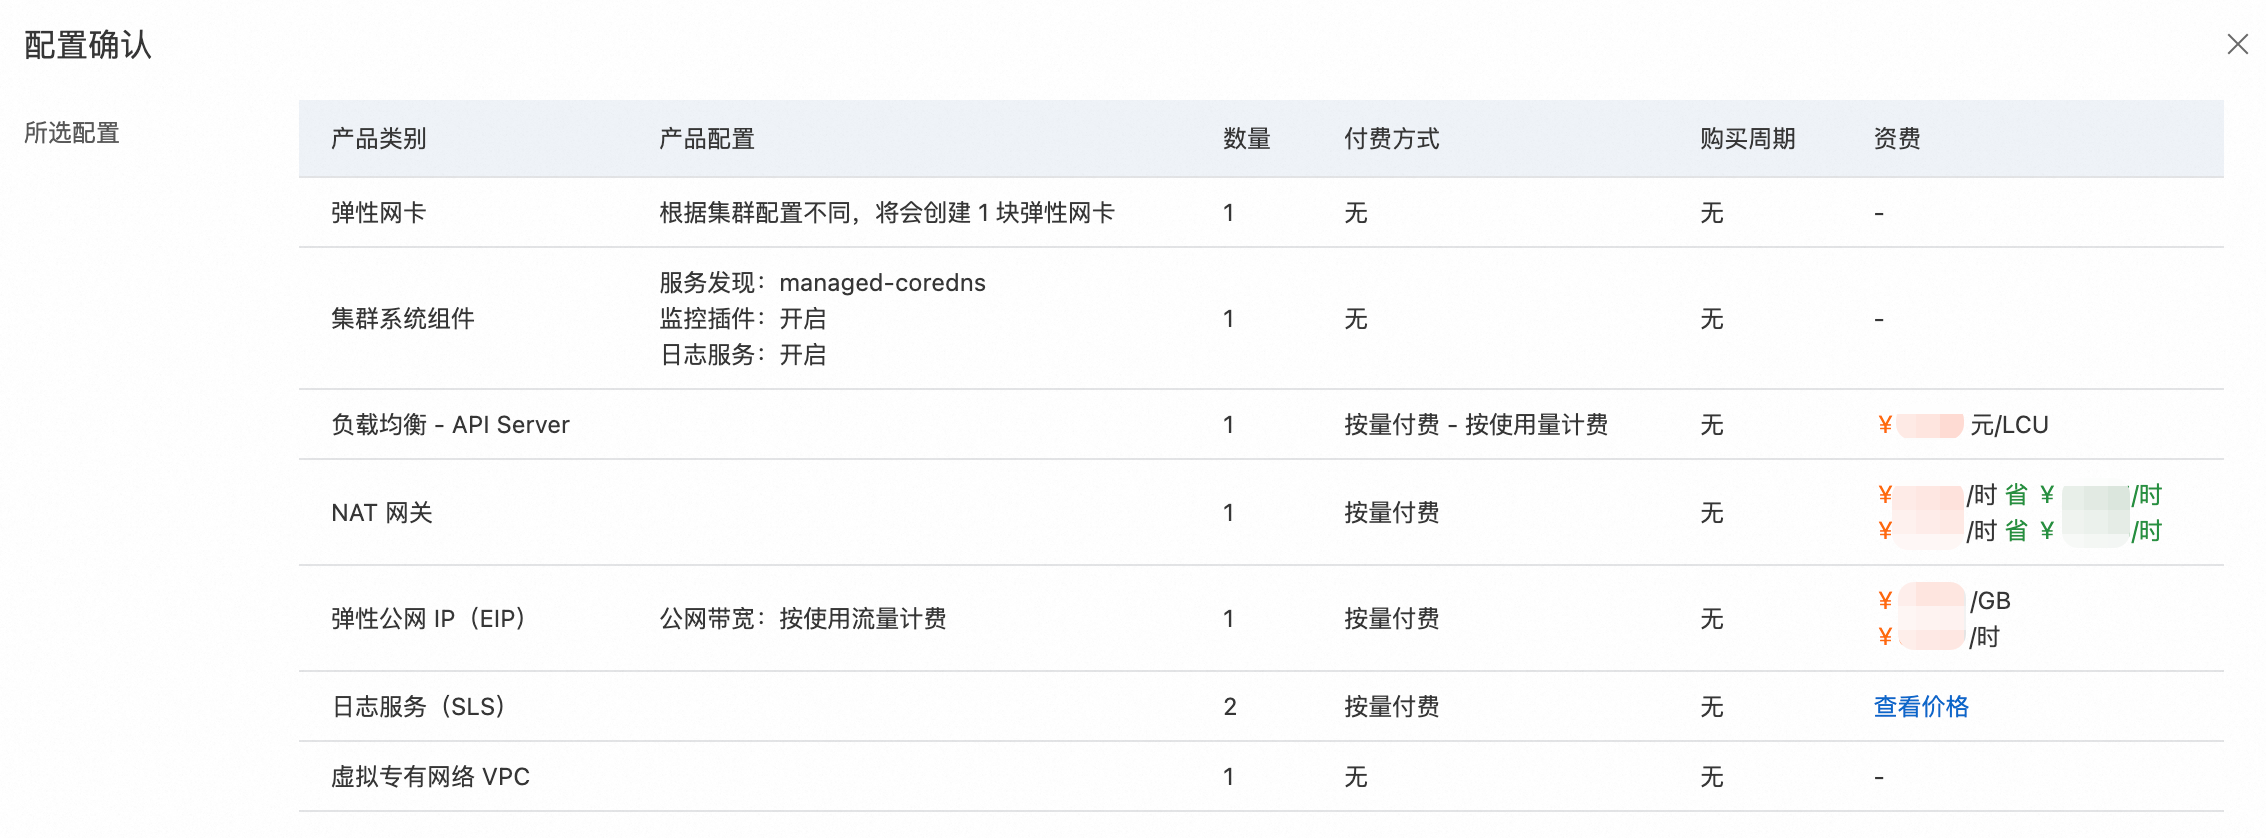
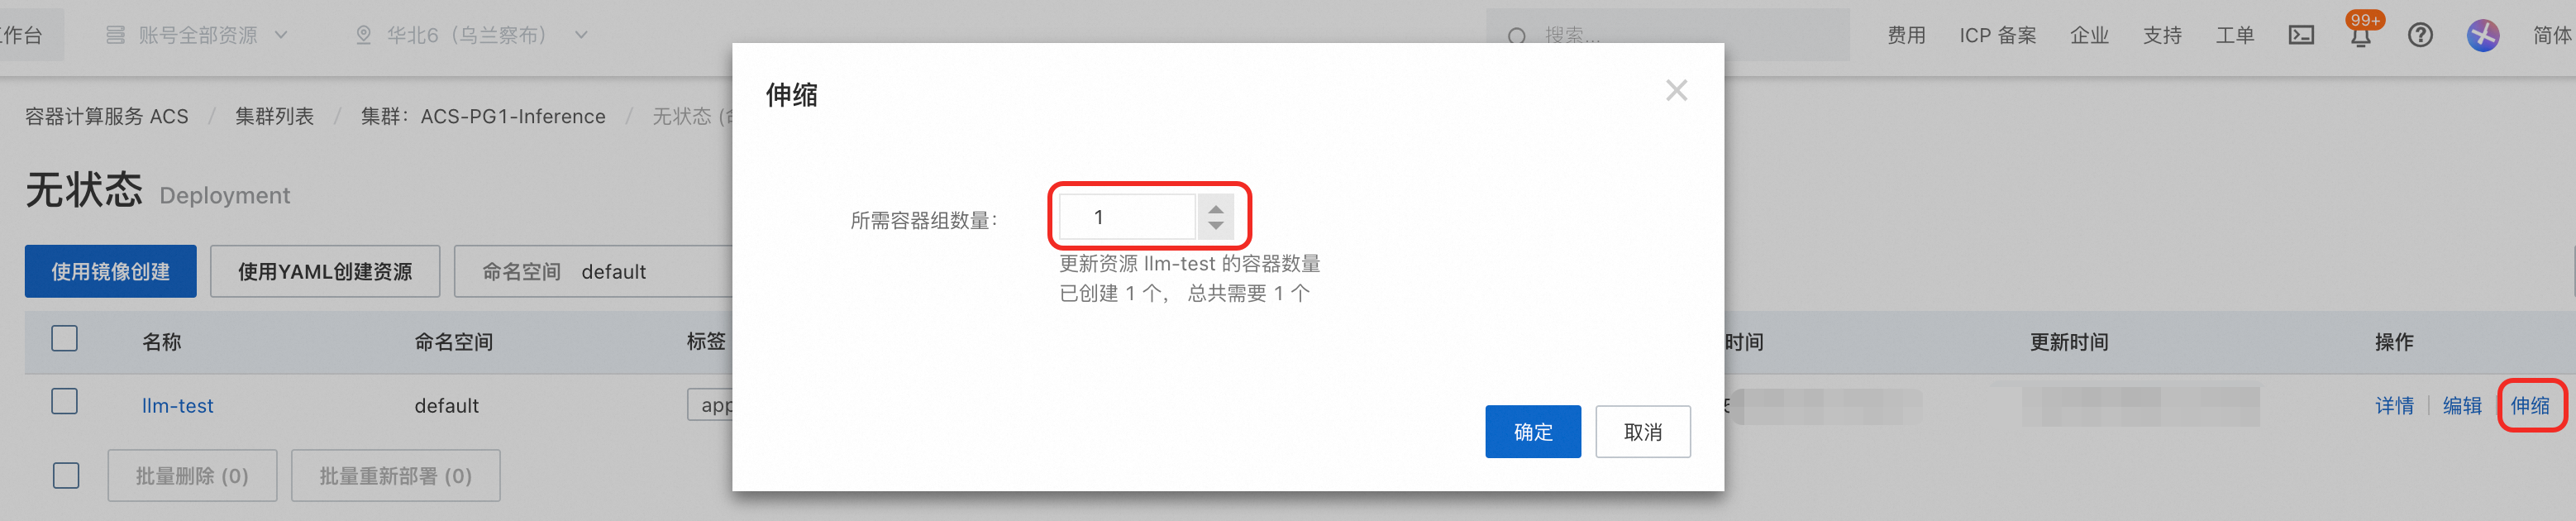
PPU compute resource costs: These include fees for the PPU cards, CPU, and memory used by the containers running the model service. Billing starts when the container image begins to download (Pending state) and ends when the instance stops running (Succeeded or Failed state). To minimize costs, you can scale the stateless workload to zero replicas to quickly delete the containers, and then scale it back to one or more replicas to quickly restart them.
Access control for the public inference service
The inference service in this topic is exposed using a LoadBalancer type Service. This LoadBalancer corresponds to a Server Load Balancer (SLB) instance that is bound to a public IP address.
Refer to Configure an access control policy group for Server Load Balancer to set up an access control policy for the listener of the corresponding SLB instance. Access control supports IP address whitelists and blacklists.
How do I speed up model downloads?
By default, the EIP bound to the cluster's NAT Gateway has a 100 Mbps bandwidth. To speed up model downloads, you can increase the peak bandwidth by following these steps.
Go to the Internet NAT Gateway Console. Select the target instance and click the Associated EIPs tab.
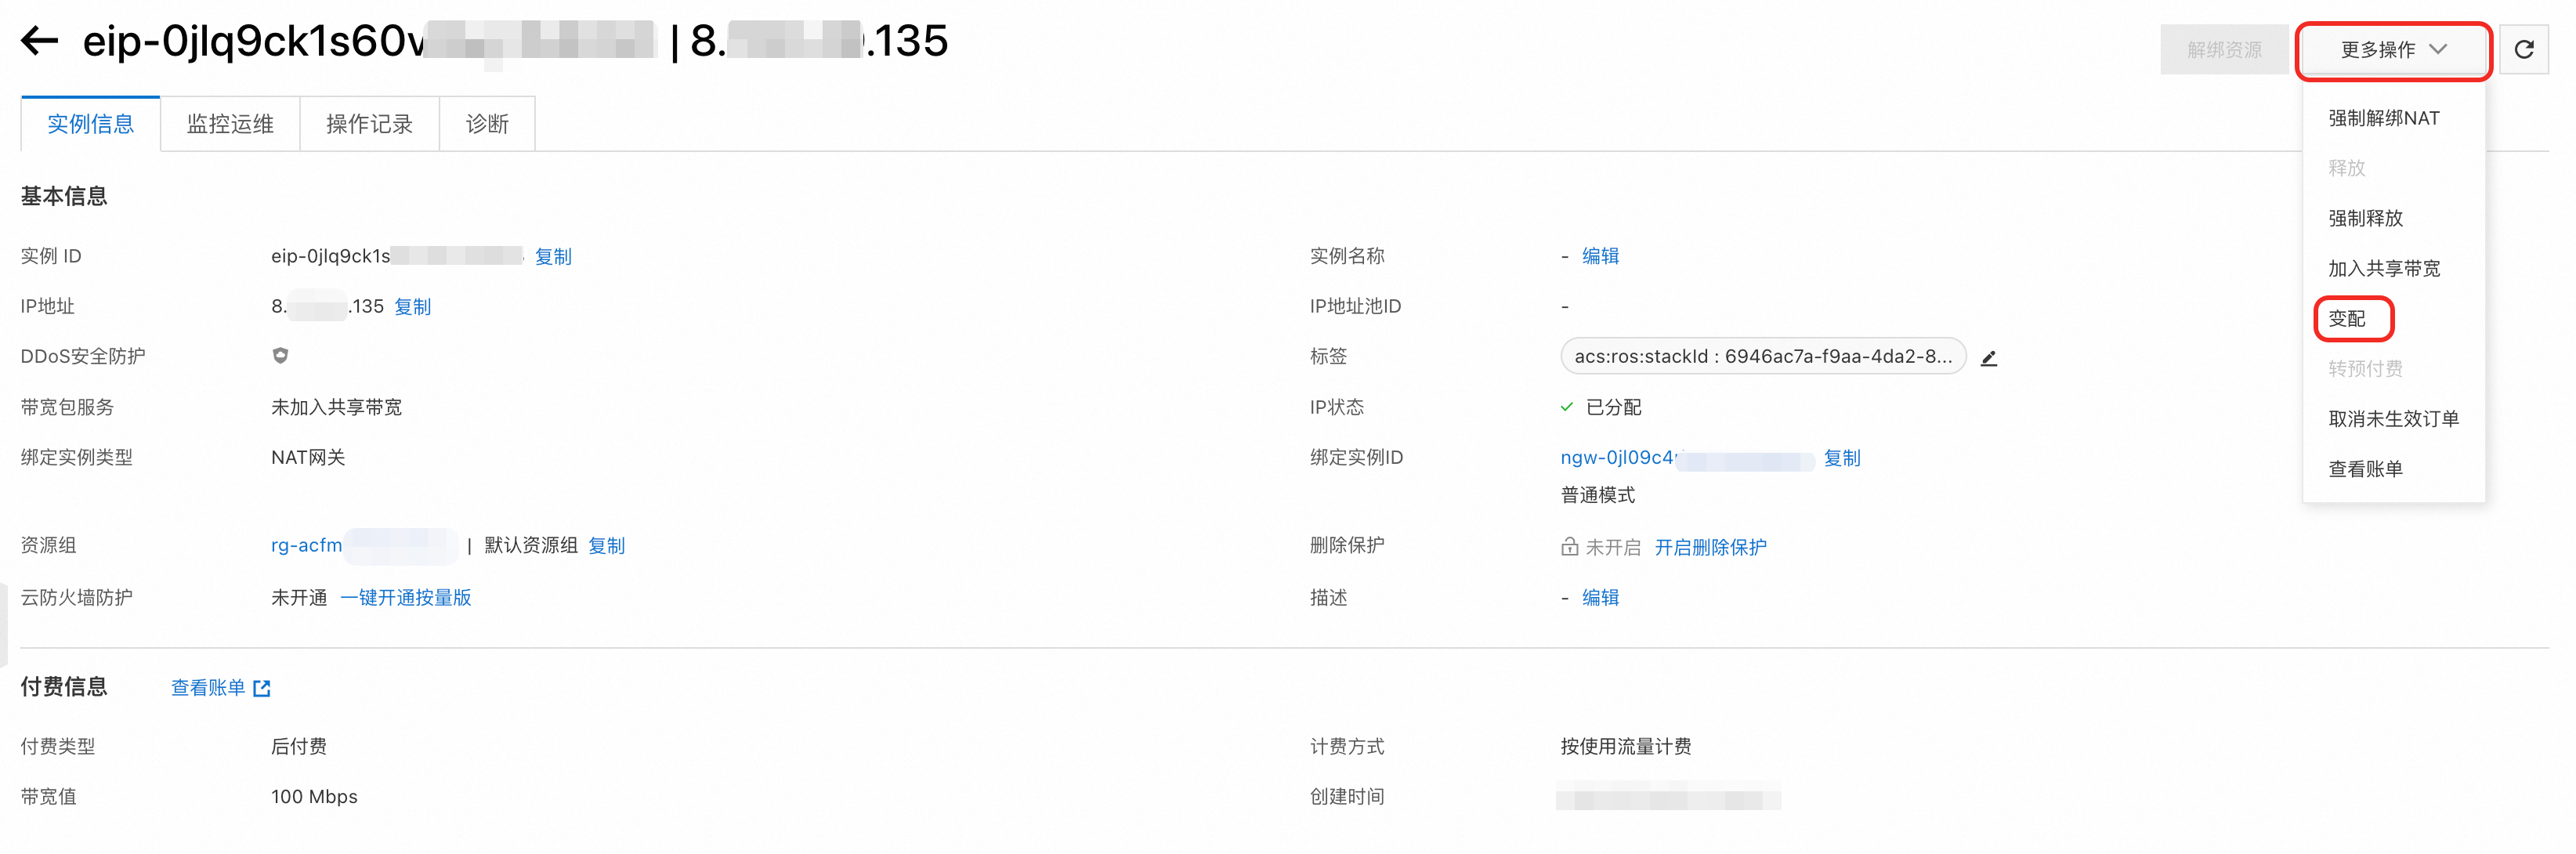
Click the instance ID to go to the instance details page of the EIP.

In the upper-right corner, choose More Actions > Modify Configuration. Increase the peak bandwidth to 200 Mbps and click Buy Now. This change does not affect your bill.
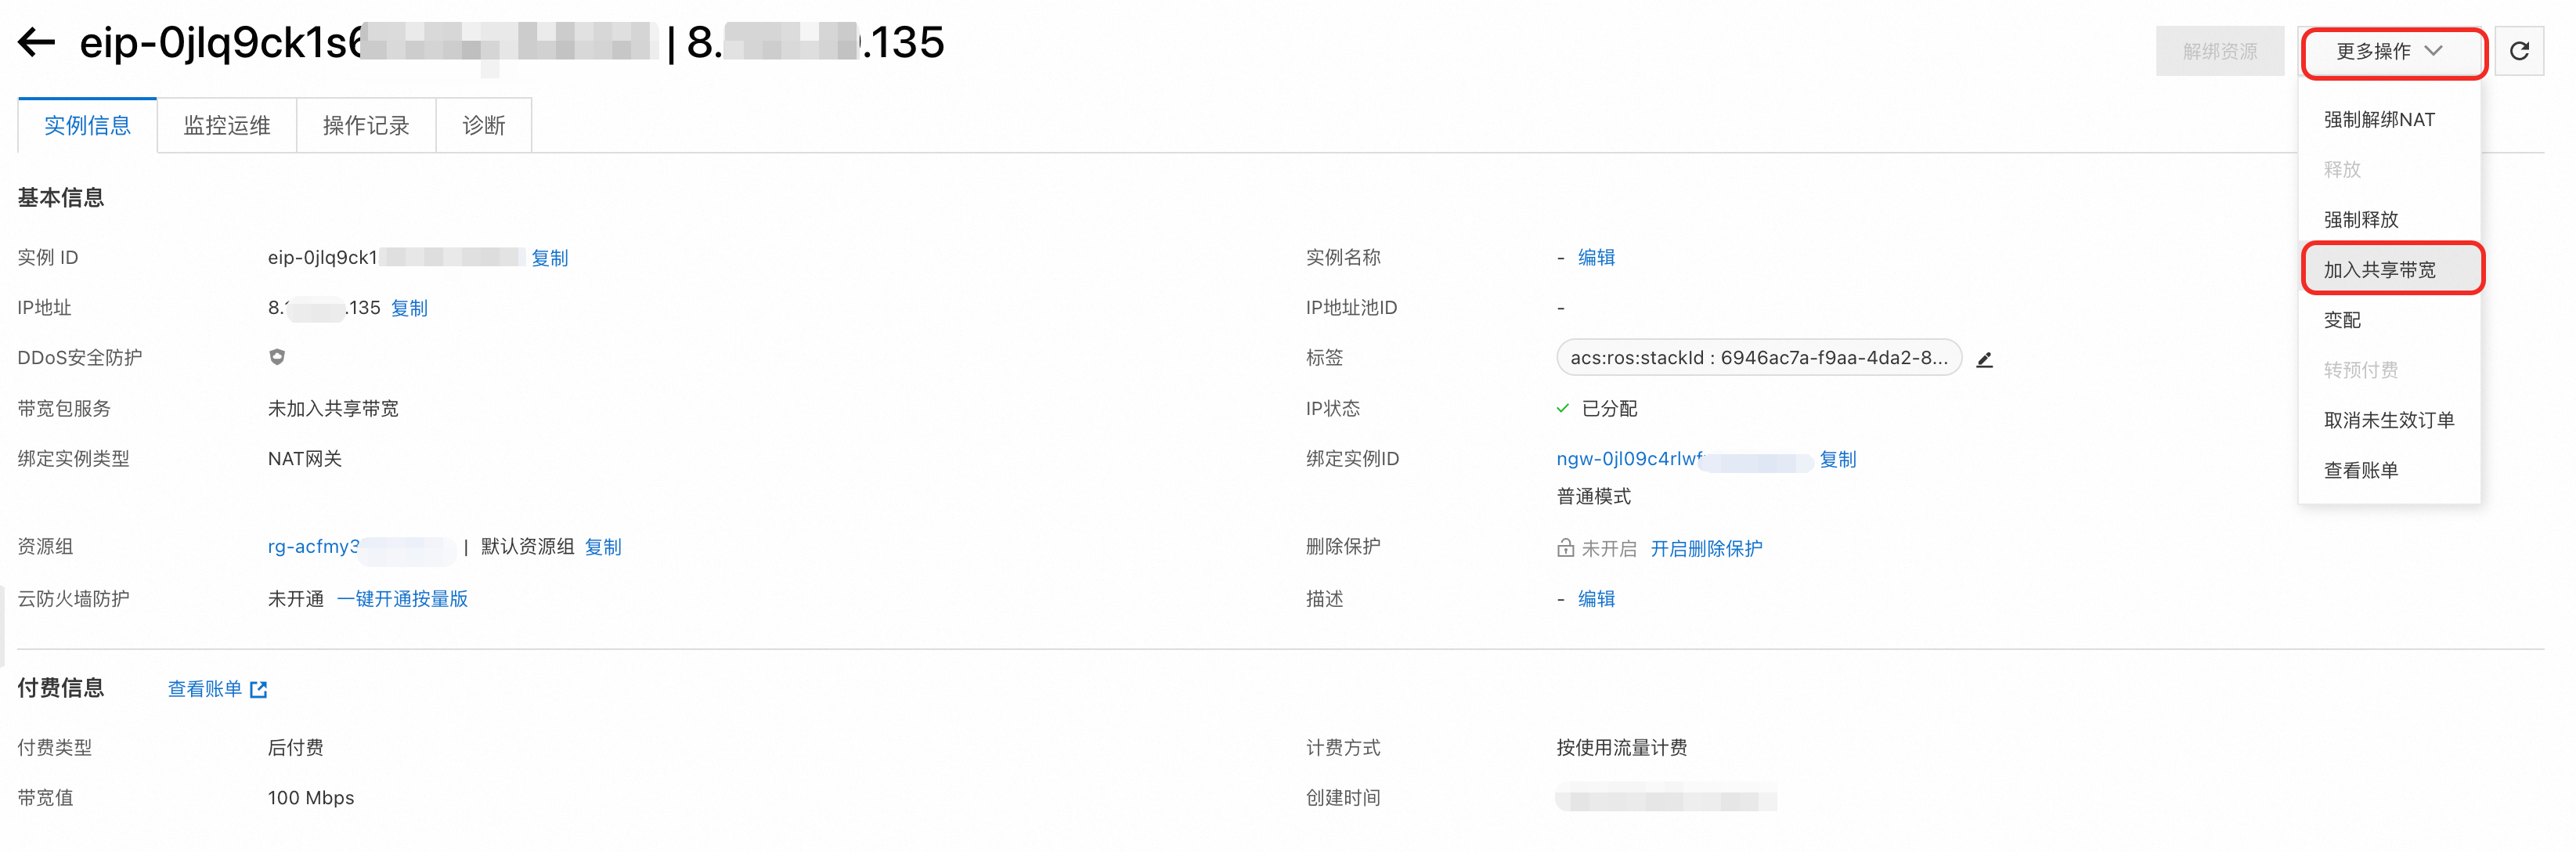
If the model is large, you can Add to Shared Bandwidth for the EIP. A shared bandwidth instance can provide speeds of up to 2,000 Mbps. This action incurs additional charges. Please review the billing information carefully.
Use storage volumes to configure model Checkpoints and Datasets in an ACK cluster
Log on to the NAS file system console and purchase a Network-Attached Storage (NAS) file system. When you purchase the file system, select the same VPC as your Container Service for Kubernetes (ACK) cluster. Otherwise, you cannot connect to the NAS file system.
Create a PersistentVolumeClaim (PVC) in the Container Service console.
On the Clusters page, click the name of the target cluster. In the left navigation pane, choose Volumes > Persistent Volume Claims.
Select the namespace for your task and click Create.
Select NAS and create the PVC using a mount target domain name.
Make sure the PVC name matches the claimName in the task's YAML file. For the mount target domain name, select the domain name of the NAS that you purchased.
To get the NAS domain name, click the purchased NAS, choose Mount and Use, and copy the mount target address. Click Create.
Copy the model Checkpoint and dataset to the NAS. The file path in the NAS must be the same as the subPath in the YAML file.
Purchase an ECS instance in the same VPC.
Mount the NAS to a directory on the ECS instance, for example, the /mnt directory.
To get the NAS mount command, click the purchased NAS, choose Mount and Use, and copy the mount command.
Copy the model Checkpoint and dataset to the NAS, which is the /mnt directory on the ECS instance. The Checkpoint path is /mnt/shared/public/model_configs/ssd and the dataset path is /mnt/shared/public/dataset/coco. Download the model Checkpoint, decompress the file, and copy the contents of the model_configs/ssd directory to /mnt/shared/public/model_configs/ssd. Download the dataset file, decompress the file, and copy the contents of the datasets/coco directory to /mnt/shared/public/dataset/coco.
Example dataset and model for the SSD model.
The image does not contain the Checkpoint file and dataset required for model training. Mount them to the Pod using a volume.
The mountPath values in the sample YAML file are as follows:
/opt/ljperf/benchmark/models/mmdetection/model_configs/ssd/is the SSD model Checkpoint file./opt/ljperf/benchmark/models/mmdetection/data/cocois the dataset required for training the SSD model.The args parameter contains the command to start model training. The core command is
ljperf benchmark --model cv/ssd. This command quickly starts the built-in benchmark model in the image. The 24.09 image supports computer vision (CV) models such as cv/ssd, cv/mask_rcnn, cv/fcn, and cv/mask2former.
Increase the default ACK quota
By default, each user can create a maximum of three ACK clusters and purchase a maximum of 512 GPU-HPN instance cards or 512 GPU instance cards.
To increase this quota, follow these steps.
Log on to the Quota Center console and select Container Service for Kubernetes.
On the General Quotas page, search for Total number of ACK clusters and click Apply to adjust the quota. The application is typically processed within 24 hours.
To the right of the General Quotas title, select Alibaba Cloud Container Compute Service (ACS) to switch to the region where your cluster is located. In the list, select Maximum total number of available GPU cards (HPN) and submit an application.