Route HTTP, HTTPS, and QUIC traffic to Knative Services using an ALB Ingress. ALB provides a fully managed, maintenance-free Layer 7 load balancing service with automatic scaling and traffic splitting for applications that require fine-grained routing.
Prerequisites
-
You have deployed Knative in the ACS cluster.
-
The ALB Ingress controller is installed.
Step 1: Deploy the ALB Ingress
Deploy an ALB Ingress by creating a new ALB instance or using an existing one.
Auto-create an ALB instance
Configure the ALB Ingress during initial Knative deployment or by modifying an existing deployment's configuration file.
During deployment
-
Log on to the ACS console. In the left navigation pane, click Clusters.
-
On the Clusters page, click the name of the target cluster. In the left navigation pane, choose .
-
On the Add-ons tab, click Deploy Knative. On the deployment page, select ALB as the service gateway, select at least two VSwitches, and follow the on-screen instructions to deploy Knative.
To create a vSwitch, follow Create a vSwitch.
Modify the configuration file
To configure the ALB Ingress for an existing deployment, modify the Knative configuration file. To deploy Knative, follow Deploy Knative.
Run the following command to edit the config-network.yaml file:
kubectl -n knative-serving edit configmap config-networkModify and save the config-network.yaml file in the following format.
After you modify
ingress.class: alb.ingress.networking.knative.devand setvswitch-ids, save theconfig-networkfile to configure the ALB gateway. For more information about the regions and zones that ALB supports, see Regions and zones supported by ALB.apiVersion: v1 data: ... ingress.class: alb.ingress.networking.knative.dev # Specifies that ALB is used as the Ingress controller. vswitch-ids: vsw-uf6kbvc7mccqia2pi****,vsw-uf66scyuw2fncpn38**** # Replace the parameter value with the IDs of two vSwitches that you created in different zones. The system automatically attaches the vSwitches when it creates the ALB instance. intranet: "true" # Creates a private ALB instance. internet: "true" # The default value is true, which creates a public ALB instance. If you set this to false, a public ALB instance is not created. ... kind: ConfigMap metadata: name: config-network namespace: knative-serving ...ImportantIf you enable only a private ALB instance, you must enable internal-only access for the Knative service. To do this, set the label
networking.knative.dev/visibility: cluster-local.
Use an existing ALB instance
To use an existing ALB instance, modify the Knative configuration file.
Run the following command to edit the config-network.yaml file:
kubectl -n knative-serving edit configmap config-networkModify and save the config-network.yaml file in the following format.
In the configuration file, include the line
ingress.class: alb.ingress.networking.knative.devand setalbconfigto an existing ALB instance. In this case, you do not need to configurevswitch-ids.apiVersion: v1 data: ... ingress.class: alb.ingress.networking.knative.dev # Specifies that ALB is used as the Ingress controller. albconfig: alb-dev-albconfig # Specifies and reuses the name of an existing public ALB instance. ... kind: ConfigMap metadata: name: config-network namespace: knative-serving ...
Step 2: Access the service via ALB Ingress
-
Log on to the ACS console. In the left navigation pane, click Clusters.
-
On the Clusters page, click the name of the target cluster. In the left navigation pane, choose .
On the Knative page, click the Services tab. Set Namespace to default, and then click Create from Template. Paste the following sample YAML into the template, and then click Create.
The following sample YAML creates a Knative service named
helloworld-go.apiVersion: serving.knative.dev/v1 kind: Service metadata: name: helloworld-go spec: template: spec: containers: - image: registry-vpc.cn-beijing.aliyuncs.com/knative-sample/helloworld-go:73fbdd56 # Replace the region with the actual region. env: - name: TARGET value: "Knative"On the Services page, obtain the domain name and gateway address of the
helloworld-goservice from the Default Domain Name and Access Gateway columns.Run the following command to access the
helloworld-goservice:curl -H "Host: helloworld-go.default.example.com" http://alb-******.cn-beijing.alb.aliyuncs.com # Replace the gateway IP address and domain name with the actual values.Expected output:
Hello Knative!
(Optional) Step 3: View service monitoring data
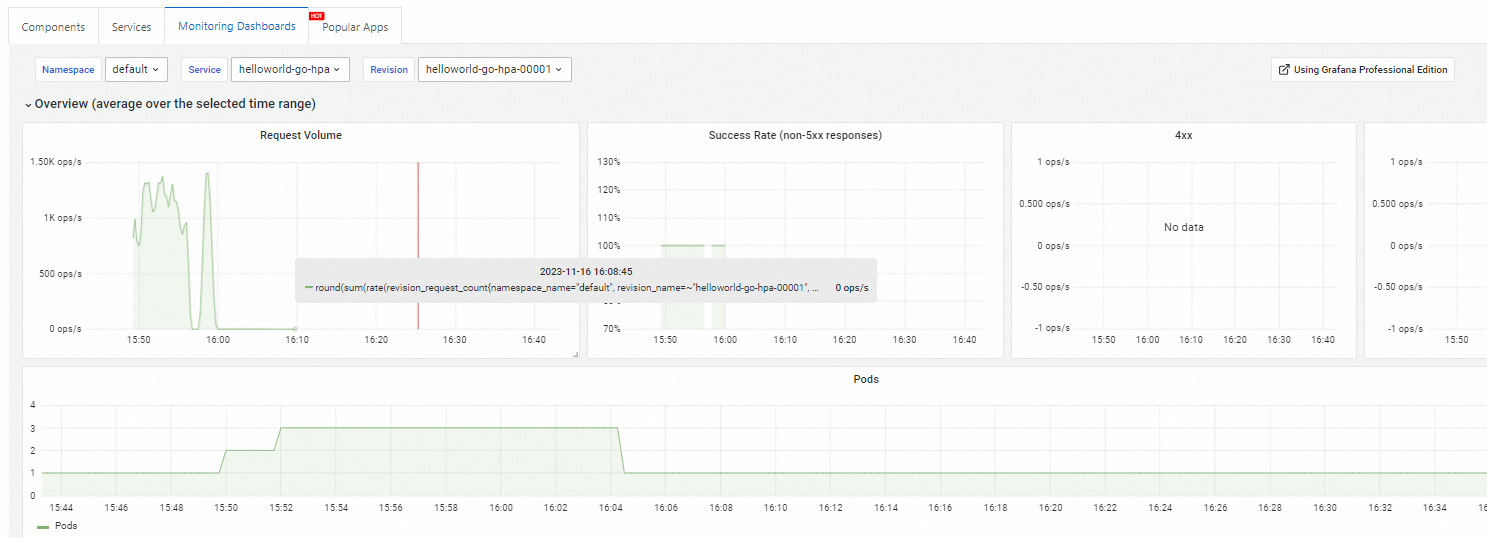
Knative provides built-in observability. On the Knative page, click the Monitoring Dashboards tab to view monitoring data. View the Knative Service monitoring dashboard.
Related documents
-
Enable a custom domain for your Knative Service. Use a custom domain.
-
Configure an HTTPS certificate for your Knative Service. Configure an HTTPS certificate.
-
Deploy a gRPC service in Knative to improve network efficiency. Deploy a gRPC service in Knative.
-
Configure a probe to monitor the health of your Knative Service. Configure a port probe in Knative.