Lock analysis with DAS DevOps service (Economical Edition)
The DAS DevOps service (Economical Edition) enhances the basic edition with advanced features like session management, lock analysis, performance insights, and automatic reclamation of storage fragments. This service helps you efficiently manage your databases around the clock to ensure your online business remains stable and prevent service disruptions. This topic describes how to use the DAS DevOps service (Economical Edition) to perform lock analysis for an RDS MySQL instance.
Prerequisites
You must have an RDS MySQL instance.
The DAS DevOps service (Economical Edition) is currently available only in the China (Shanghai) region. You must create your RDS MySQL instance in this region.
Step 1: Prepare the data
-
Create a test database named das_test in your RDS MySQL instance. For more information, see Create a database.
-
Use Data Management (DMS) to log on to the RDS MySQL database. For more information, see Log on to an ApsaraDB RDS for MySQL instance by using DMS.
-
In the SQL Console of DMS, run the following command to create a test table named students in the das_test database:
CREATE TABLE `students` ( `id` bigint(20) NOT NULL AUTO_INCREMENT COMMENT 'id', `sid` char(64) NOT NULL COMMENT 'student id', `name` varchar(64) NOT NULL COMMENT 'name', `birth_date` date NOT NULL COMMENT 'birth date', `gender` char(16) NOT NULL COMMENT 'sex', `extra_info` varchar(1024) DEFAULT NULL, PRIMARY KEY (`id`), UNIQUE KEY `uk_sid` (`sid`) ) ENGINE=InnoDB AUTO_INCREMENT=1 DEFAULT CHARSET=utf8 -
Run the following commands 10 times to insert test data into the students table:
INSERT INTO students(sid, name, birth_date, gender, extra_info) VALUES(UUID(), SUBSTRING(UUID(), FLOOR(1+(RAND() * 18)), FLOOR(2+(RAND() * 16))), CONCAT(FLOOR(1990 + (RAND() * 20)),'-',LPAD(FLOOR(1 + (RAND() * 12)),2,0),'-',LPAD(FLOOR(1 + (RAND() * 27)),2,0)), 'female', UUID());
INSERT INTO students(sid, name, birth_date, gender, extra_info) VALUES(UUID(), SUBSTRING(UUID(), FLOOR(1+(RAND() * 18)), FLOOR(2+(RAND() * 16))), CONCAT(FLOOR(1990 + (RAND() * 20)),'-',LPAD(FLOOR(1 + (RAND() * 12)),2,0),'-',LPAD(FLOOR(1 + (RAND() * 27)),2,0)), 'male', UUID());
Step 2: Analyze and resolve metadata locks
-
Use a MySQL command-line tool to connect to the RDS MySQL database and create Session 1. For more information, see Connect to an ApsaraDB RDS for MySQL instance.
-
Query data from the students table.
SELECT id FROM students LIMIT 5;Sample returned result:
+----+ | id | +----+ | 1 | | 2 | | 3 | | 4 | | 5 | +----+ -
Start a transaction to update data in the students table without committing the transaction.
BEGIN;
UPDATE students SET name=UUID() WHERE id =3 ;
-
-
Create Session 2 and run the following statement to add an index to the students table:
ALTER TABLE students ADD INDEX idx_name(name); -
Create Session 3 and run the following statement to query data from the students table:
SELECT * FROM students WHERE id < 5; -
Log on to the DAS console and view the current instance sessions. For more information, see Instance sessions.
The Instance Sessions page shows a lock wait.
The page also shows that the number of Active Sessions is 3 and the number of Exceptions is 3 (red alert).
-
Click View Details to view the lock wait relationship graph.
The metadata lock diagnostics page displays the lock wait relationship: Suspicious Session (1) Metadata Lock is blocking students DDL Session (1) and students Other Session (1). These two blocked sessions are in the Waiting for table metadata lock state. The details of the suspicious session are: ID 929774, User hdmadmin, Command Sleep, Execution Time 286s, transaction duration 286s. You can click Kill Selected Sessions, Kill All Suspicious Sessions, or Kill All DDL Statements to resolve the blocking sessions.
-
Click the suspicious session block to display a list of suspicious sessions. In the list, select and kill the suspicious session.
-
Refresh the data on the Instance Sessions page. The query statement has finished and the DDL statement is running.
NoteIf the students table contains a small amount of data, the DDL statement may execute immediately after the suspicious session is killed, and you might not observe this state.
The session list now shows only one record. Its state is altering table, the SQL statement is
alter table students add index..., and its execution time is increasing.
Step 3: Analyze transaction blocking relationships
-
Use a MySQL command-line tool to connect to the RDS MySQL database and create Session 1. For more information, see Connect to an ApsaraDB RDS for MySQL instance.
-
Query data from the students table.
SELECT id FROM students WHERE id < 5;Sample returned result:
+----+ | id | +----+ | 1 | | 2 | | 3 | | 4 | +----+ -
Start a transaction to update data in the students table without committing the transaction.
BEGIN;
UPDATE students SET name=UUID() WHERE id < 5;
-
-
Create Session 2 and run the following statement to update the same data that was updated in Session 1:
UPDATE students SET name=UUID() WHERE id = 1; -
Create Session 3 and run the following statement to update the same data that was updated in Session 1:
UPDATE students SET name=UUID() WHERE id = 2; -
Log on to the DAS console and view the current instance sessions. For more information, see Instance sessions.
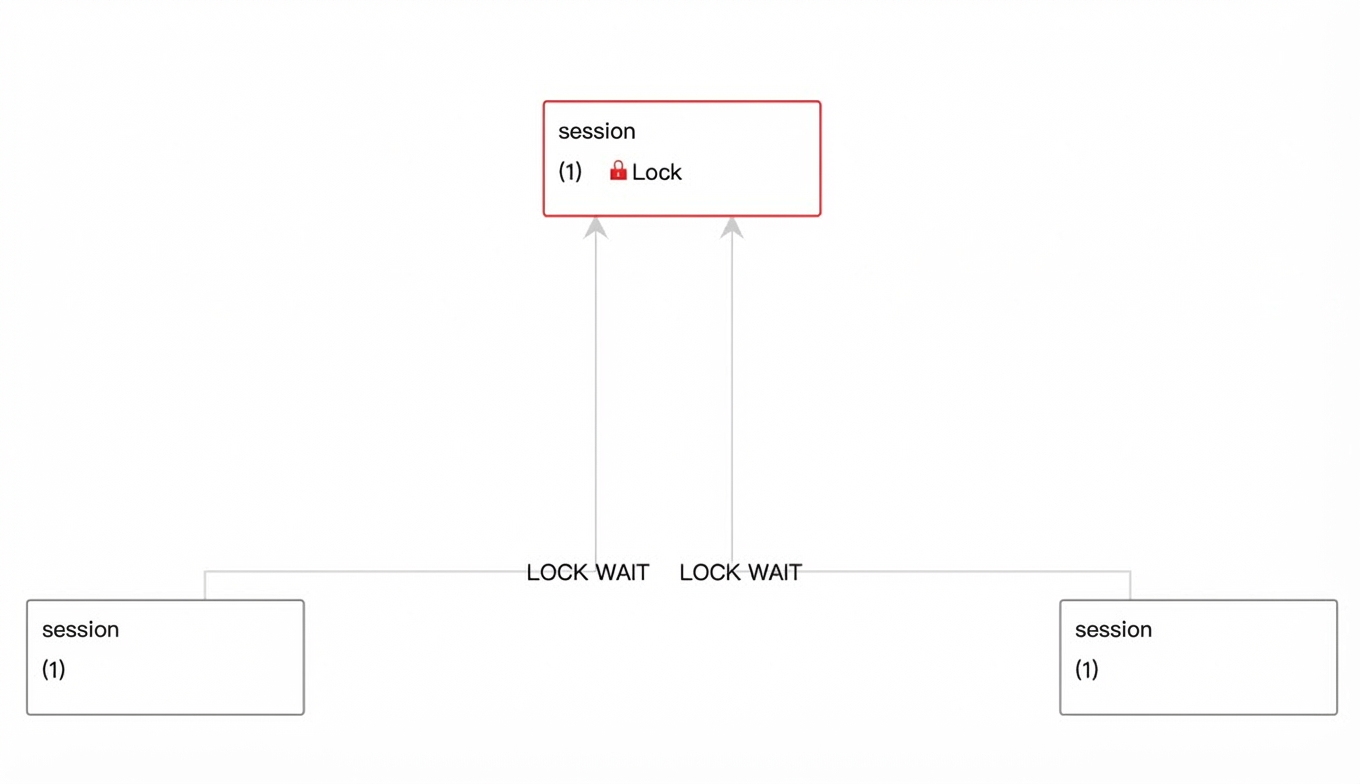
The Instance Sessions page shows two transactions in the LOCK WAIT state.
Session 930307 is in the RUNNING state, blocking sessions 929931 and 929934. Details for the blocking session are: Command: Sleep, Execution time: 138s, Locked rows: 3. Both blocked sessions are running Query commands and are in the LOCK WAIT transaction state.
-
In the Lock Wait Statistics section, click View Details to view the lock wait relationship graph.
-
In Session 1, run the following command to commit the transaction:
COMMIT; -
View the current instance sessions again. The update statements in the other two sessions have completed, and no transactions remain in the LOCK WAIT state.
Related documents
-
For more information about the DAS DevOps service (Economical Edition), see Introduction to DAS DevOps service (Economical Edition).
-
For billing information about the DAS DevOps service (Economical Edition), see billing details.