DataX is a tool for offline synchronization of disparate data sources, supporting efficient data synchronization between various disparate data sources. The Dataphin system embeds the DataX widget, supporting the invocation of DataX through building Shell tasks to achieve data synchronization. This tutorial uses the RDS MySQL database as an example to introduce how to invoke DataX for data synchronization based on Dataphin.
Prerequisites
An RDS MySQL instance has been activated, and the network type of the RDS MySQL instance is a virtual private cloud (VPC). For more information on how to activate an RDS MySQL instance, see Step 1: Create an ApsaraDB RDS for MySQL instance and configure databases.
A database and account for the RDS MySQL instance have been created. During the creation process, you need to record the database name, username, and password. For more information on how to create a database and account, see Step 1: Create an ApsaraDB RDS for MySQL instance and configure databases.
Background information
The Dataphin system embeds the DataX widget. By creating and running DataX tasks (Shell tasks) in Dataphin, DataX can be invoked to achieve data synchronization.
DataX supports data sources for synchronization including MySQL, Oracle, SQL Server, PostgreSQL, HDFS, Hive, HBase, etc. For more information about DataX, see DataX.
Limits
Shell tasks do not support accessing RDS MySQL instances through internal network addresses.
Procedure
Feature | Description |
Step 1: Connect the network between the RDS MySQL instance and Dataphin | Before you start synchronizing data, you need to connect the network between the RDS MySQL instance and Dataphin. |
Step 2: Create the source table and target table for data synchronization | Log on to the RDS MySQL instance and create the source table and target table for data synchronization used in this tutorial. |
Step 3: Download and configure the code template for the DataX task | After downloading and configuring the code template for the DataX task, save it as datax.json. |
After uploading the DataX task code file to the Dataphin platform, the DataX task can be invoked. | |
Create and run the DataX task for data synchronization in the development environment. | |
Run the DataX task in the production environment to ensure the normal output of business data in the production environment. |
Step 1: Connect the network between the RDS MySQL instance and Dataphin
Request the public endpoint of the RDS MySQL instance. For more information on how to request a public endpoint, see Apply for or release a public endpoint.
On the Database Connection page, get the public endpoint and port of the RDS MySQL instance.
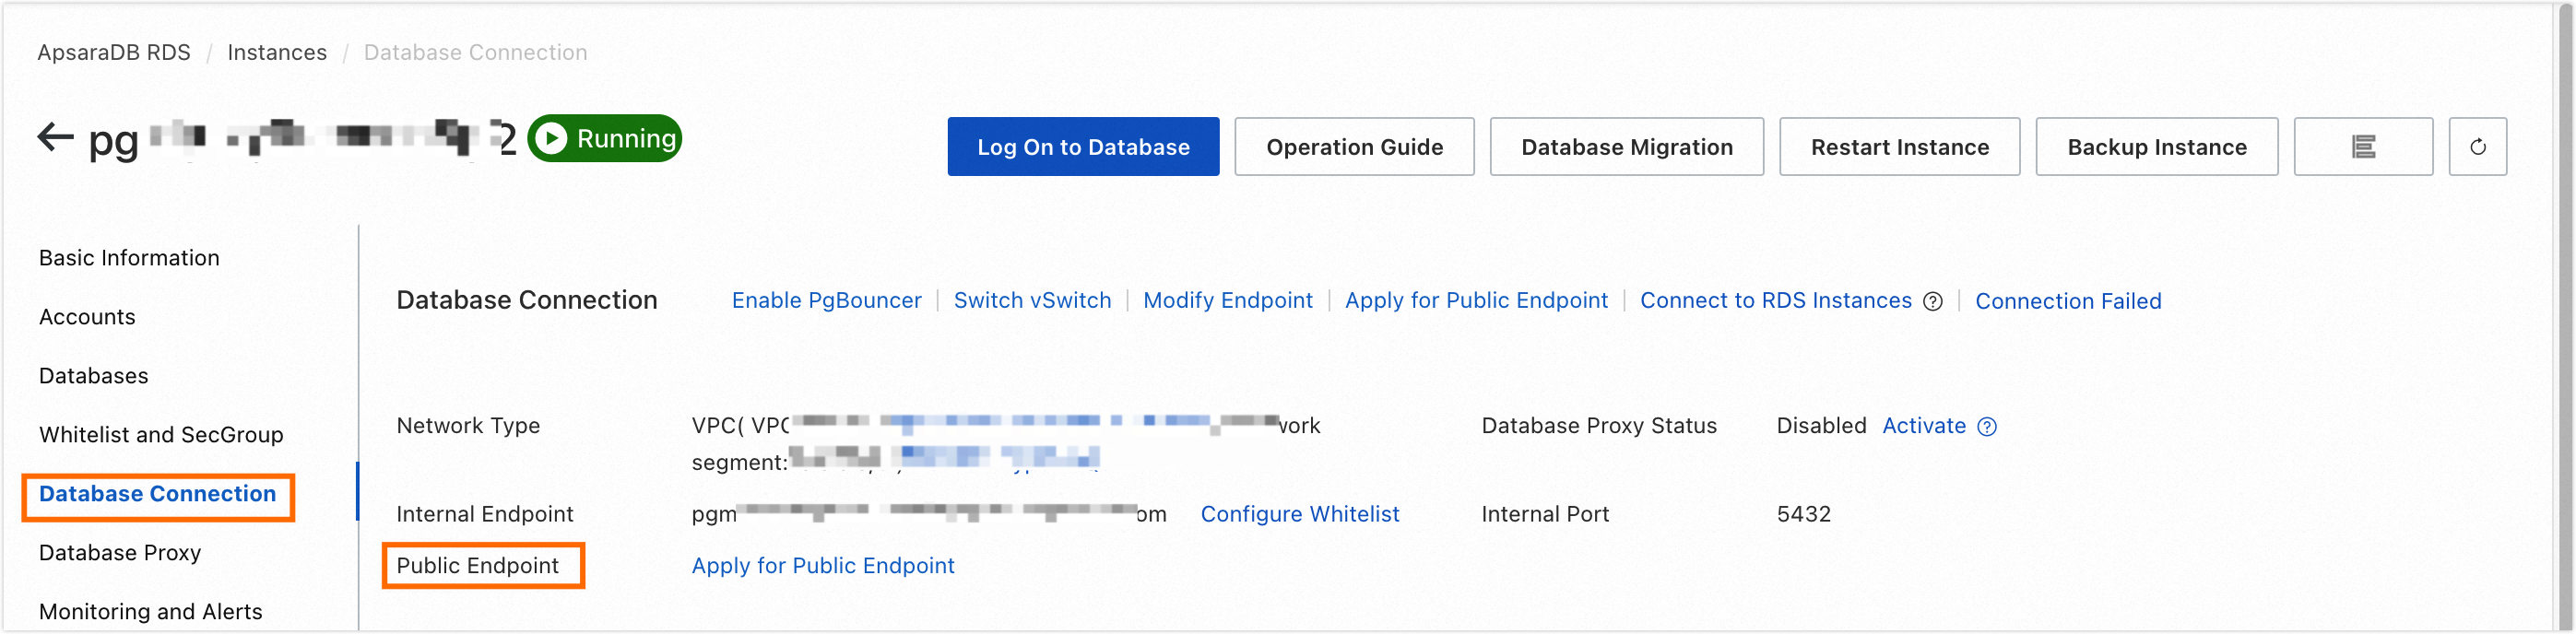
Add the public endpoint and port of the RDS MySQL instance to the sandbox whitelist of the Dataphin project space. For more information on how to add a sandbox whitelist, see Add project members.
Add
0.0.0.0/0to the whitelist of the RDS MySQL instance. For more information on how to add a whitelist, see Step 2: Connect to an ApsaraDB RDS for MySQL instance.ImportantAfter completing data synchronization, immediately delete
0.0.0.0/0.
Step 2: Create the source table and target table for data synchronization
Use the command line to connect to the RDS MySQL instance. For more information, see Use a client or the CLI to connect to an ApsaraDB RDS for MySQL instance. Create the source data table and target data table for synchronization:
The following is a sample code for creating the source data table.
create table datax_test1( area varchar(255),province varchar(255) );
insert into datax_test1 values('North China','Shandong Province'),('South China','Henan Province');
The following is a sample code for creating the target data table.
create table datax_test2( area varchar(255),province varchar(255) );
Step 3: Download and configure the code template for the DataX task
Download the code template for the DataX task.
After configuring the following parameters in the code template, save it as datax.json locally.
Parameter
Description
{username}
Configure as the username of the created RDS MySQL instance, which is the username for logging on to the database.
{password}
The password for logging on to the database. In this tutorial, configure it as the password of the created RDS MySQL instance in the prerequisites, which is the password for logging on to the database.
{{Public Endpoint}:}
The endpoint. In this tutorial, configure it as the public endpoint of the acquired RDS MySQL instance.
{DatabaseName}
The database name. In this tutorial, configure it as the database name of the created RDS MySQL instance in the prerequisites.
{table_name1}
The name of the source data table. In this tutorial, configure it as datax_test1.
{table_name2}
The name of the target data table. In this tutorial, configure it as datax_test2.
{columnname1}
The field for data synchronization. In this tutorial, configure it as area.
{columnname2}
The field for data synchronization. In this tutorial, configure it as province.
The code of the code template is as follows.
{
    "job": {
        "content": [
            {
                "reader": {
                    "name": "mysqlreader",
                    "parameter": {
                        "column": [
                            "{columnname1}",
                            "{columnname2}"
                        ],
                        "connection": [
                            {
                                "jdbcUrl":
["jdbc:mysql://{Public Endpoint}:3306/{DatabaseName}"],
                                "table": ["{table_name1}"]
                            }
                        ],
                        "password": "{password}",
                        "username": "{username}"
                    }
                },
                "writer": {
                    "name": "mysqlwriter",
                    "parameter": {
                        "column": [
                        "{columnname1}",
                        "{columnname2}"
                        ],
                        "connection": [
                            {
                                "jdbcUrl":
"jdbc:mysql://{Public Endpoint}:3306/{DatabaseName}",
                                "table": ["{table_name2}"]
                            }
                        ],
                        "password": "{password}",
                        "username": "{username}"
                    }
                }
            }
        ],
        "setting": {
            "speed": {
                "channel": "1"
            }
        }
    }
}
Step 4: Upload the datax.json file to Dataphin
Log on to the Dataphin console.
On the Dataphin console page, select the workspace region, and then click Enter Dataphin>>.
On the Dataphin home page, click Development.
On the Data Development page, click Data Processing.
On the Data Processing page, click the
 Resource Management icon in the left-side navigation pane.
On the Resource Management page, click the Resource Management
 icon next to .
In the New Resource dialog box, configure the parameters, and then click Submit.
Parameter
Description
Type
The file format to be uploaded in this tutorial is JSON, so select others as the type.
The system supports the following types: file, jar, python, and others. The applicable scenarios are as follows:
If the file format is XLS, DOC, TXT, or CSV, select file as the type.
If the file format is JAR, select jar as the type.
If the file format is PY, select python as the type.
If the file format is not XLS, DOC, TXT, CSV, JAR, or PY, select others as the type.
Name
The name in this tutorial is datax.json.
The naming convention for the name in this tutorial is as follows:
The name must end with .json.
It consists of a combination of letters, numbers, underscores (_), or half-width periods (.).
It cannot start with a digit.
Description
Enter a description of the resource, such as DataX test.
Upload File
Select the datax.json file saved locally in Step 3: Download and configure the code template for the DataX task.
Compute Type
The resource (datax.json) uploaded in this tutorial is used for reference in the DataX code task, so select No Affiliated Engine.
The compute type is used to define whether the resource file needs to be uploaded to the storage layer of the compute engine. The Dataphin system supports the following compute types: MaxCompute, Flink, and No Affiliated Engine. The applicable scenarios are as follows:
When customizing a MaxCompute type function, select MaxCompute as the Compute Type.
When customizing a Flink type function, select Flink as the Compute Type.
For resource files referenced by code tasks, select No Affiliated Engine as the Compute Type.
Select Directory
The default is Resource Management.
In the Submit Remarks dialog box, enter remarks information, and then click Confirm And Submit.
Publish the resource file to the production environment.
On the Data Development page, click Publish in the top menu bar.
On the Pending Publication Object List page, click the Data Processing tab.
On the Data Processing tab, single click the datax.json resource under the Actions column's
 icon.
icon.In the Publish dialog box, enter the publication name or remarks information, and then click Confirm to publish the resource file to the production environment.
Click the Publication Record List in the left-side navigation pane. On the Publication Record List page, check that the publication status of the resource file is Published Successfully.
Step 5: Create a DataX task
For more information, see Step 4: Upload the datax.json file to Dataphin to enter the Data Development page.
On the Data Development page, click Data Processing in the left area.
On the Data Processing page, click the
 Script Task icon in the left-side navigation pane.
On the Script Task page, click the Script Task
 icon next to , and select .
In the New File dialog box, configure the parameters, and then click Confirm.
Parameter
Description
Name
The name in this tutorial is DataX.
Schedule Type
The schedule type selected for the task in this tutorial is One-time Instance.
The schedule type is used to define the scheduling method for tasks published to the production environment. The Dataphin system supports the following schedule types: Recurring Task Node and One-time Instance. The applicable scenarios are as follows:
If the task needs to participate in the system's recurring schedule and depends on an ancestor node, select Recurring Task Node as the Schedule Type.
If the task does not need to participate in the system's recurring schedule and depends on an ancestor node, select One-time Instance as the Schedule Type. This type of task requires manual triggering in the production environment.
Description
Enter a brief description of the task, such as testing DataX.
Select Directory
The default is Script Task.
On the code writing page, write and run the code for the DataX task.
The code is as follows.
@resource_reference{"datax.json"}
python $DATAX_HOME/bin/datax.py datax.json #The Dataphin system has built-in the installation directory of DataX as DATAX_HOME/bin/datax.py.
Where resource_reference{} is used to invoke the uploaded datax.json resource file.
Click Execute in the upper right corner of the page to run the DataX task.
A total number of read and write failures equal to 0 in the running results signifies a successful data synchronization by the DataX task.
Publish the DataX task to the production environment.
On the Script Task page, click Publish in the top menu bar.
On the Pending Publication Object List page, click the Data Processing tab.
Navigate to the Data Processing tab and click the DataX task's Actions column
icon once.In the Publish dialog box, enter the publication name or remarks information, and then click Confirm to publish the DataX task to the production environment.
Click the Publication Record List in the left-side navigation pane. On the Publication Record List page, check that the publication status of the DataX task is Published Successfully.
Step 6: Run the DataX task in the production environment
For more information, see Step 4: Upload the datax.json file to Dataphin to enter the Data Development page.
On the Data Development page, click O&M in the top menu bar.
In the O&M Center, single click the
icon next to the project name to switch to the production environment ().In the O&M center, run the DataX task.
Click the
icon located in the left-side navigation pane.On the One-time Task Maintenance List page, click the DataX task.
On the DataX task details page, click Run in the upper right corner of the page.
In the Run dialog box, retain the default parameters and select Confirm.
View the instance run logs generated by the DataX task.
Click the
icon in the left-side navigation pane.On the One-time Instance Maintenance List page, click the DataX task.
On the DataX task details page, click View Run Logs at the top of the page.
On the Runtime Log page, check the Total Number Of Read And Write Failures.
A total count of zero for read and write failures in the run log signifies a successful DataX task synchronization, maintaining the standard output of business data in the production environment.