Dataphin lets you create custom components for relational database management system (RDBMS) types to meet your data integration requirements. You can then use these components to synchronize data. To create a custom component, you only need the database driver. This topic uses MySQL as an example to demonstrate how to customize an RDBMS database and synchronize data.
Prerequisites
You have created an ApsaraDB RDS for MySQL instance. The network type of the instance must be virtual private cloud (VPC). For more information, see Quickly create an ApsaraDB RDS for MySQL instance.
You have created a database and an account for the RDS for MySQL instance. Take note of the database name, username, and password. For more information, see Create a database and an account.
The driver for the MySQL database has been downloaded.
Background information
An RDBMS is a relational database management system. Examples include MySQL, Oracle, SQL Server, PostgreSQL, Vertica, DRDS, DB2, OceanBase, PolarDB, SAP HANA, and TeraData. This topic uses MySQL as an example to demonstrate how to customize an RDBMS database and synchronize data.
Procedure
The procedure to customize and use a MySQL database component is as follows:
Step | Description |
Before you customize and use the RDBMS component, you must configure the network between the RDS for MySQL instance and Dataphin. Then, create the source and destination tables for data synchronization. | |
Create a custom data source of the test_rdbms_mysql type. After it is created, the custom data source component appears in the development module of the component library. | |
Create a data source instance of the custom component type (test_rdbms_mysql) to import business data from the RDS for MySQL instance into Dataphin. | |
Create an offline pipeline task based on the test_rdbms_mysql component type and the test_rdbms_mysql data source instance. After the task is created, run it to integrate (synchronize) the data. |
Step 1: Configure the network and create data tables
Connect the RDS for MySQL instance and the Dataphin instance.
Add the public endpoint and port of the RDS for MySQL instance to the sandbox whitelist of the Dataphin project:
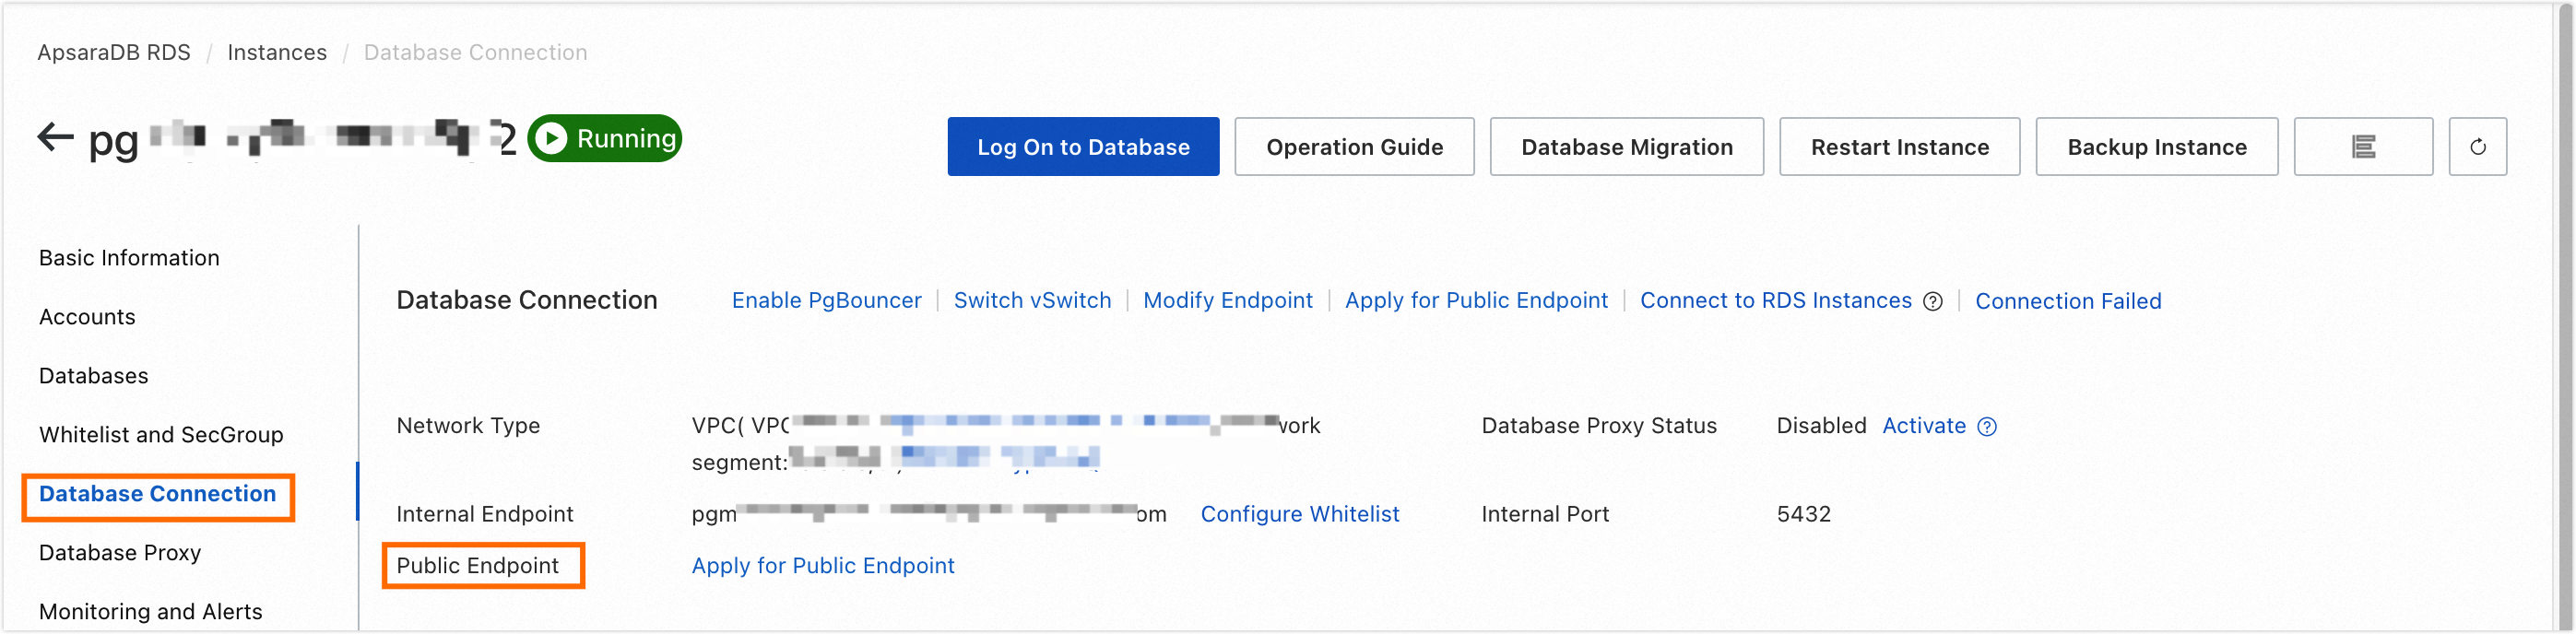
Obtain the public endpoint and port of the RDS for MySQL instance.
Go to the Database Connection page to obtain the public endpoint and port of the RDS for MySQL instance.
Add the public endpoint and port of the RDS for MySQL instance to the sandbox whitelist of the Dataphin project. For more information, see Sandbox whitelist.
Add the IP address of Dataphin to the whitelist of the RDS for MySQL instance. For more information, see Connect to an ApsaraDB RDS for MySQL instance using a client or the CLI.
Region
IP address whitelist
China (Shanghai)
100.104.228.128/26, 100.104.115.192/26
China (Shenzhen)
100.104.48.128/26
China (Beijing)
100.104.238.64/26
China (Shanghai), China (Shenzhen), China (Beijing)
100.104.0.0/16
Create source and destination data tables for data synchronization.
Connect to the MySQL instance from the command line. Then, create the source and destination data tables. For more information, see Connect to an ApsaraDB RDS instance using a client or the CLI.
The following code is an example of how to create a source data table.
create table xin_test_scr2
(
id string,
name string
);

insert into xin_test_scr2 values('1001','huayu1'),('1002','huayuyu2'),
The following code is an example of how to create a destination data table.
create table xin_test_dst_1
(
id string,
name string
);
Step 2: Create a custom data source
Log on to the Dataphin console.
On the Dataphin console page, select a region for your workspace and click Enter Dataphin>>.
Go to the custom component page.
On the Dataphin homepage, click Management Center.
On the Management Center page, click Datasource Management in the top menu bar.
On the Custom Source Type page, click +New Offline Custom Source Type.
On the New Offline Custom Source Type page, configure the parameters.
Parameter
Description
Basic Configuration
Type
Set Type to RDBMS database.
Name
Set Name to test_rdbms_mysql.
ImportantThe name defines the type of the custom component. The system does not allow you to create custom components with the same name.
Type Code
A unique code that identifies the data source type for backend use. Enter rdbms_mysql.
Resource Configuration
Driver Name
Set Driver Name to com.mysql.jdbc.Driver.
Driver Upload
Upload the downloaded driver file (mysql-connector-java-5.1.47). For more information, see Prerequisites.
Description Information
Description
Enter mysql-5.1.47 database.
Click Create.
Step 3: Create a data source instance
On the Data Source Management page, click +New Data Source in the upper-right corner.
In the New Data Source dialog box, select the test_rdbms_mysql data source under Custom Datasource.
In the New test_rdbms_mysql Data Source dialog box, configure the parameters.
Parameter
Description
Datasource Name
Set Datasource Name to test_rdbms_mysql.
Datasource Description
Enter a brief description of the data source.
Datasource Config
Configure the data source:
If the developer mode is Basic, select Production Datasource.
If the developer mode is Dev-Prod, you can configure the data source in one of the following ways:
Click Production + Development Datasource to configure data sources for the production and development environments.
Click Production Datasource to configure the production data source. After you create the production data source, click Development Datasource to configure the development data source.
NoteYou can use the same data source for both the Production Datasource and Development Datasource, or you can use different data sources.
Tag
Optional. Configure a tag for data source categorization.
Production Datasource or Production + Development Datasource
Link
Enter the connection string for the data source.
The format is:
jdbc:mysql://{Public Endpoint}:3306/{DatabaseName}.{Public Endpoint}: The public endpoint.
{DatabaseName}: The database name.
Username
The username to log on to the database.
Password
The password to log on to the database.
Click Test Connection to test the connectivity of the data source.
ImportantConnection tests are not supported for non-RDBMS data sources. Make sure that the data source connection information is accurate.
Click OK.
Step 4: Create and develop an offline pipeline task
On the data source page, move the mouse over the
 icon in the upper-left corner and click Integration.
On the Data Integration page, open the Create Pipeline Development Script dialog box.
In the navigation pane on the left, click Offline Management to go to the offline pipeline development page.
On the offline pipeline development page, click the
 icon, select Offline Single Pipeline, and open the Create Pipeline Development Script dialog box.
In the Create Pipeline Development Script dialog box, configure the parameters.
Parameter
Description
Pipeline Name
Enter test.
Schedule Type
Select Manual Node.
Description
Enter a brief description. For example, Test custom component.
Select Directory
The default value is Offline Pipeline.
Click OK.
On the test offline pipeline page, click the
 icon in the upper-right corner and then click Custom.
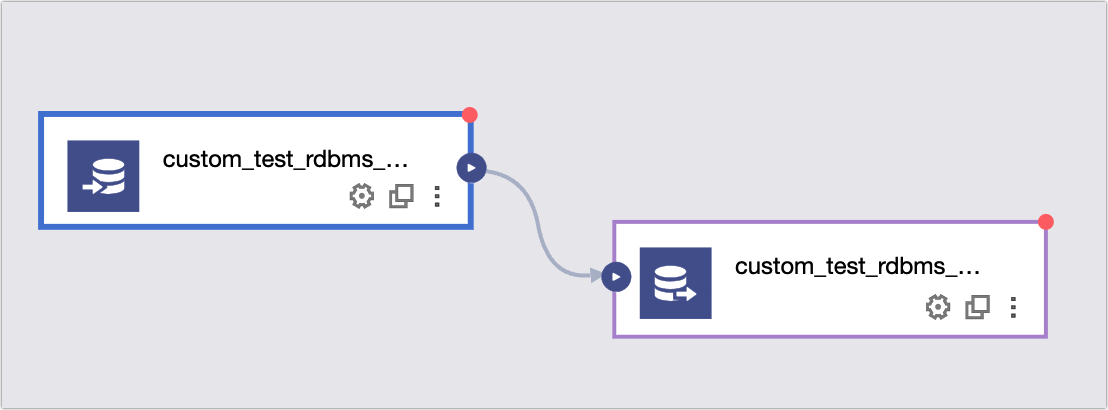
Drag the custom_test_rdbms_mysql_Input Configuration and custom_test_rdbms_mysql_Output Configuration components to the pipeline canvas.
Connect the input and output components and click the
 icon to configure the components. The following figure shows an example:
custom_test_rdbms_mysql_Input component configuration.
Parameter
Description
Step Name
Keep the default value for this tutorial.
You can also change the name. The naming convention is as follows: The name can contain only letters, digits, and hyphens (-). The name can be up to 64 characters long.
Data Source
Select test_rdbms_mysql.
Table
Set the source table to xin_test_src2.
Input Filter
No configuration is required for this tutorial.
The input filter specifies the filter conditions for the input fields. For example,
ds=${bizdate}.The input filter is applicable to the following scenarios:
A fixed part of the data.
Parameter-based filtering.
Output Fields
The output fields are the fields whose data you want to synchronize. In this tutorial, add the id and name fields from the source table xin_test_scr2 as the output fields of the input component:
In the Output Fields section, click New Output Field.
Set Output Field to id, and set Type to String.
Click New Output Field.
Set Output Field to name, and set Type to String.
custom_test_rdbms_mysql_Output component configuration.
Parameter
Description
Step Name
Keep the default value for this tutorial.
You can also change the name. The naming convention is as follows: The name can contain only letters, digits, and hyphens (-). The name can be up to 64 characters long.
Data Source
Select test_rdbms_mysql.
Table
Enter xin_test_dst_1 as the destination table.
Parsing Scheme
You do not need to make a selection for this tutorial.
The parsing scheme is optional. It specifies special processing methods before and after data output. The parsing scheme includes a preparation statement and a completion statement: Preparation statement: The SQL script to execute before import. Completion statement: The SQL script to execute after import.
Input Fields
The output fields configured in the input component are displayed by default.
Output Fields
Output fields are the fields whose data you want to sync. In this tutorial, add the id and name fields from the source table xin_test_scr2 as the output fields for the output component:
In the Output Fields section, click New Output Field.
Set Output Field to id, and set Type to String.
Click New Output Field.
Set Output Field to name, and set Type to String.
Mapping
Click Quick Mapping and select Map by Name.
The mapping specifies the relationship between the output fields of the input component and the output fields of the output component. Mappings include Map by Name and Map by Row:
Map by Name: Maps fields that have the same name.
Map by Row: Maps fields in the same row. After you map by row, the input fields become the final output fields.
Click OK.
In the canvas toolbar, click Run to run the offline pipeline task and check whether the task runs as expected.