You can use Excel to batch import or export valid and invalid mapping relationships. This process reduces manual costs and improves configuration efficiency. This topic describes how to perform these batch configurations.
Permissions
Super administrators, data standard administrators, and data standard owners can batch import valid or invalid mapping relationships for the data standards they manage and view the details of the import records.
All users can export mapping relationships and download the exported files.
Import mapping relationships
Effective mapping relationships
On the Dataphin home page, select Administration > Data Standard from the top menu bar.
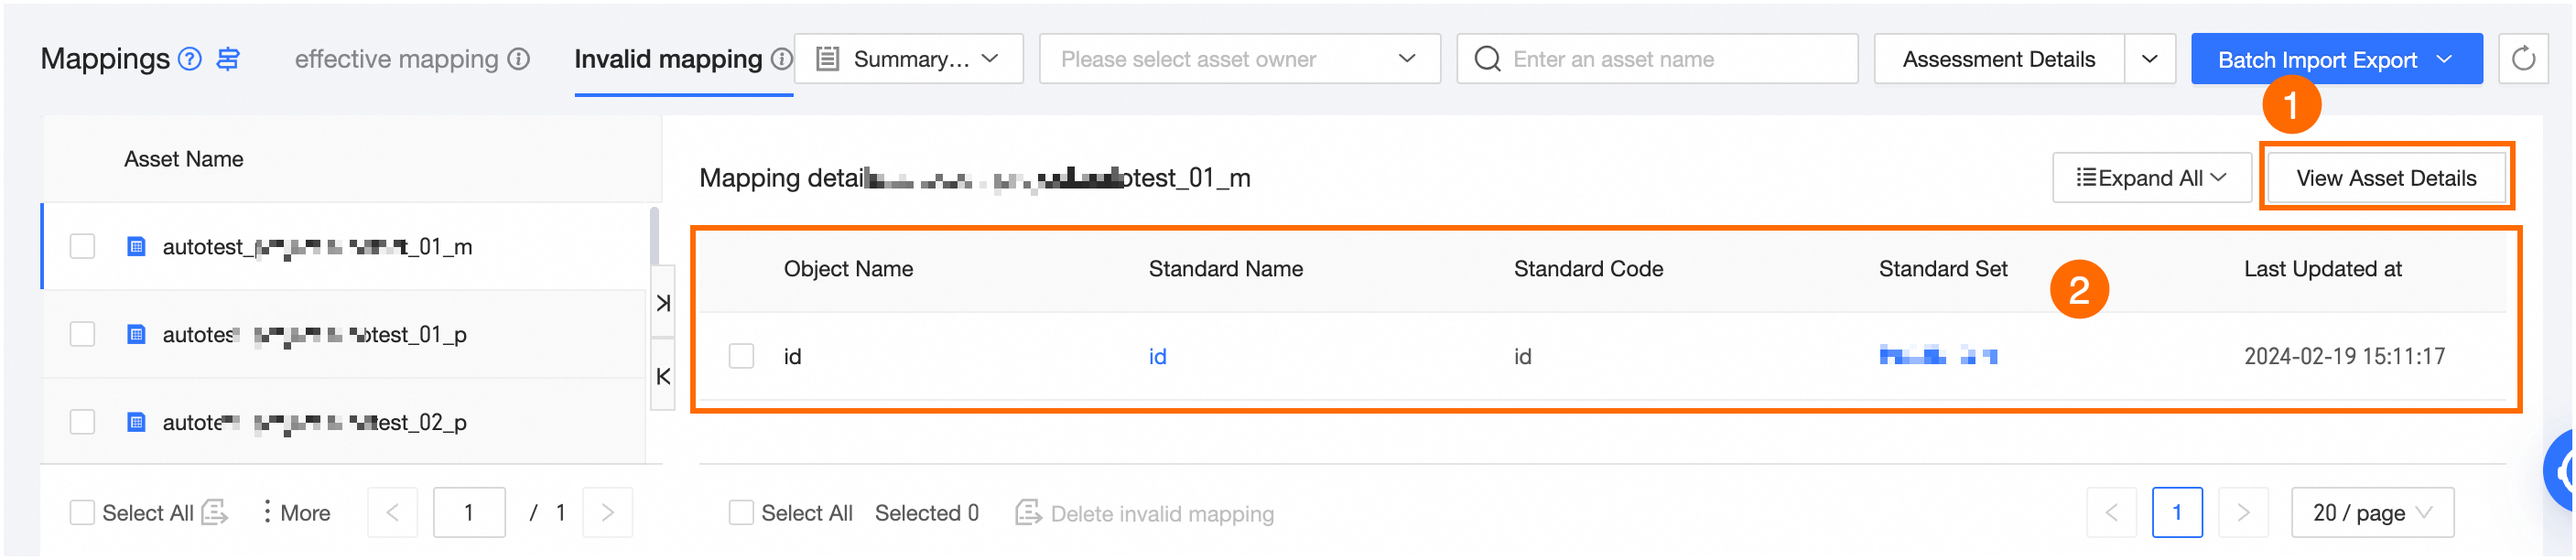
In the navigation pane on the left, choose Implementation Assessment > Mapping. On the Mapping page, click the Valid Mapping tab.
On the valid mapping list, click Batch Import/Export in the upper-right corner and choose Batch Import Mappings.
In the Batch Import Valid Mappings dialog box, configure the parameters.
Parameter
Description
STEP 1 Download configuration template
If you do not have a template, click the file name or the download
 icon to download the .xlsx file. If you already have a template, you can directly upload and import the configuration file.
STEP 2 Upload configuration file
When you fill in the template, follow the specifications for each column. The system checks for name uniqueness and input format during import.
Only single-worksheet .xlsx files can be imported. If the file type is incorrect or there are multiple worksheets, the import fails. Modifying column names, reordering columns, or deleting columns causes a parsing failure and prevents the import.
Header row: Displays column names and instructions. A red asterisk (*) indicates a required field.
Asset Type: If it is a domain asset, select a supported object type from the drop-down list: physical table, logical dimension table, logical fact table, logical aggregate table, physical view, logical view, or logical tag table. If it is an externally registered asset, enter a custom asset type.
Storage Class: If it is a domain asset, select the compute engine type for the current tenant. If it is a global table, select the source data source type. If it is an externally registered asset, select Other.
Asset Name: Enter a custom name. For physical tables, physical views, real-time metadata tables, and image tables, add the project name as a prefix. For logical tables and logical views, add the business segment name as a prefix. For externally registered tables, enter the GUID.
Object Type: Select from the drop-down list. If it is an externally registered asset, select Other.
Object Name: Enter a custom name, such as a field name or metric name. For externally registered tables, enter the GUID.
Data Standard Code: Enter a custom code. The system uses this code to identify the data standard.
Data Standard Name: Optional. This is not used to identify the data standard.
Name entry is case-insensitive. The system automatically matches the name based on whether the asset's source system is case-sensitive.
STEP 3 Update policy
If a mapping relationship in the current import conflicts with an existing one in the Effective Mapping or Invalid Mapping list, the system handles it according to the configured update policy.
If an object with a mapped standard already exists in the effective mapping list, you can Keep effective mapping and append this manually added mapping relationship.
If a mapping relationship from the upload already exists in the invalid mapping list, you can choose to Set invalid mapping to effective or Keep invalid mapping and skip update.
You can wait for the import to complete on the current page and view the results, or you can close the dialog box and view the results later in Batch Operation Records.
If any records fail to import, you can view the error messages in the import details, download the failed records, correct the errors based on the messages, and then re-import the file. If records are skipped because of the conflict resolution policy, the system also provides the reason.
Parameter
Description
Import Result
View the import progress and running time.
Error Records
Displays mapping relationship records that failed validation and could not be imported. This includes the Row Number in the original file, Storage Type, Object, Standard Name, Standard Code, and Error Message.
Click Download Error Records to download the original records as a file. Modify the file based on the error messages and then re-import it.
Execution Log
View and copy the execution log for the import process.
After the import is complete, you can close the dialog box to quickly check the results. Closing the dialog box does not stop the import task. Later, you can click Batch Operation Records on the valid mapping list to view the details of historical import records.
Invalid mapping relationships
From the top menu bar on the Dataphin homepage, select Administration > Data Standard.
In the navigation pane on the left, choose Implementation Assessment > Mapping. On the Mapping page, click the Invalid Mapping tab.
On the Invalid Mapping list, click Batch Import/Export in the upper-right corner and choose Batch Import Invalid Mappings.
In the Batch Import Invalid Mappings dialog box, configure the parameters.
Parameter
Description
STEP 1 Download configuration template
If you do not have a template, click the file name or the download
icon to download the .xlsx file. If you already have a template, you can directly upload and import the configuration file.STEP 2 Upload configuration file
When you fill in the template, follow the specifications for each column. The system checks for name uniqueness and input format during import.
Only single-worksheet .xlsx files can be imported. If the file type is incorrect or there are multiple worksheets, the import fails. Modifying column names, reordering columns, or deleting columns causes a parsing failure and prevents the import.
Header row: Displays column names and instructions. A red asterisk (*) indicates a required field.
Asset Type: If it is a domain asset, select a supported object type from the drop-down list: physical table, logical dimension table, logical fact table, logical aggregate table, physical view, logical view, or logical tag table. If it is an externally registered asset, enter a custom asset type.
Storage Class: If it is a domain asset, select the compute engine type for the current tenant. If it is a global table, select the source data source type. If it is an externally registered asset, select Other.
Asset Name: Enter a custom name. For physical tables, physical views, real-time metadata tables, and image tables, add the project name as a prefix. For logical tables and logical views, add the business segment name as a prefix. For externally registered tables, enter the GUID.
Object Type: Select from the drop-down list. If it is an externally registered asset, select Other.
Object Name: Enter a custom name, such as a field name or metric name. For externally registered tables, enter the GUID.
Data Standard Code: Enter a custom code. The system uses this code to identify the data standard.
Data Standard Name: Optional. This is not used to identify the data standard.
Name entry is case-insensitive. The system automatically matches the name based on whether the asset's source system is case-sensitive.
You can wait for the import to complete on the current page and view the results, or you can close the dialog box and view the results later in Batch Operation Records.
If any records fail to import, you can view the error messages in the import details, download the failed records, correct the errors based on the messages, and then re-import the file. If records are skipped because of the conflict resolution policy, the system also provides the reason.
Parameter
Description
Import Result
View the import progress and running time.
Error Records
Displays mapping relationship records that failed validation and could not be imported. This includes the Row Number in the original file, Object, Standard Name, Standard Code, and Error Message.
Click Download Error Records to download the original records as a file. Modify the file based on the error messages and then re-import it.
Execution Log
View and copy the execution log for the import process.
After the import is complete, you can close the dialog box to quickly check the results. Closing the dialog box does not stop the import task. You can click Batch Operation Records on the invalid mapping list to view the details of a historical import record.
Export mapping relationships
On the valid or invalid mapping list, click Batch Import/Export in the upper-right corner and choose Batch Export Mappings.
In the Batch Export Mappings dialog box, export the valid or invalid mapping relationships based on the selected export scope.
Export Scope: Select the scope of valid or invalid mapping relationships to export. You can export all relationships or export only the relationships for asset objects that are filtered by data segment and project.
NoteYou must select at least one scope.
You can export a maximum of 1,000,000 mapping relationships at a time.
Click OK to export the valid or invalid mapping relationships. You can view the details of this export operation and download the exported file in Batch Operation Records.
Batch operation records for mapping relationships
A maximum of 1,000 batch import records from the last 30 days are retained.
On the valid or invalid mapping list, click Batch Import/Export in the upper-right corner and choose Batch Operation Records.
In the Batch Operation Records for Mapping Relationships dialog box, view the import and export operation records.
Batch Import: Displays the details of mapping import records, including the ordinal number, creator, status, creation time, and end time. You can also click the View icon in the Actions column to view the import details.
Batch Export: Displays the details of mapping export records, including the ordinal number, creator, status, export scope, creation time, and end time. You can also click the Download icon in the Actions column to download the exported file to your local machine.
NoteExported files for valid or invalid mapping relationships are stored in the file system for seven days. After this period, they cannot be downloaded.
You can download only the files for records with a Successful export status.