Data standards support business, technology, and management initiatives. Data standard management involves defining and applying standards to data and its properties. This topic describes how to create and manage data standards.
Permissions
Super administrators and data standard administrators can create or clone data standards in any data standard set.
Data standard set maintenance personnel and members can create or clone data standards in the data standard sets they have joined.
Super administrators, data standard administrators, and data standard owners can manage the data standards for which they are responsible. Management tasks include editing, submitting for publishing, deleting, unpublishing, and editing associated standards.
Limits
You can create a maximum of 100 standards in a single data standard set.
Standard list
On the Data Standard page, you can focus on a specific data standard set that you follow or that is related to you to quickly review the standards in the set. The data standard list provides two display patterns: Edit and View. On the Standard List page, click the ![]() icon in the upper-right corner to switch between views.
icon in the upper-right corner to switch between views.
In view mode, you can view configured data standard set folders and data standard information. You cannot perform operations in this mode. This mode is suitable for browsing.
In edit mode, you can view configured data standard set folders and data standards, and perform operations such as edit, delete, create, clone, publish, release, and revoke on standards. You can also edit or delete data standard set folders. Only accounts with data standard management permissions for the current data standard set can enter edit mode. The following figure shows an example of edit mode.
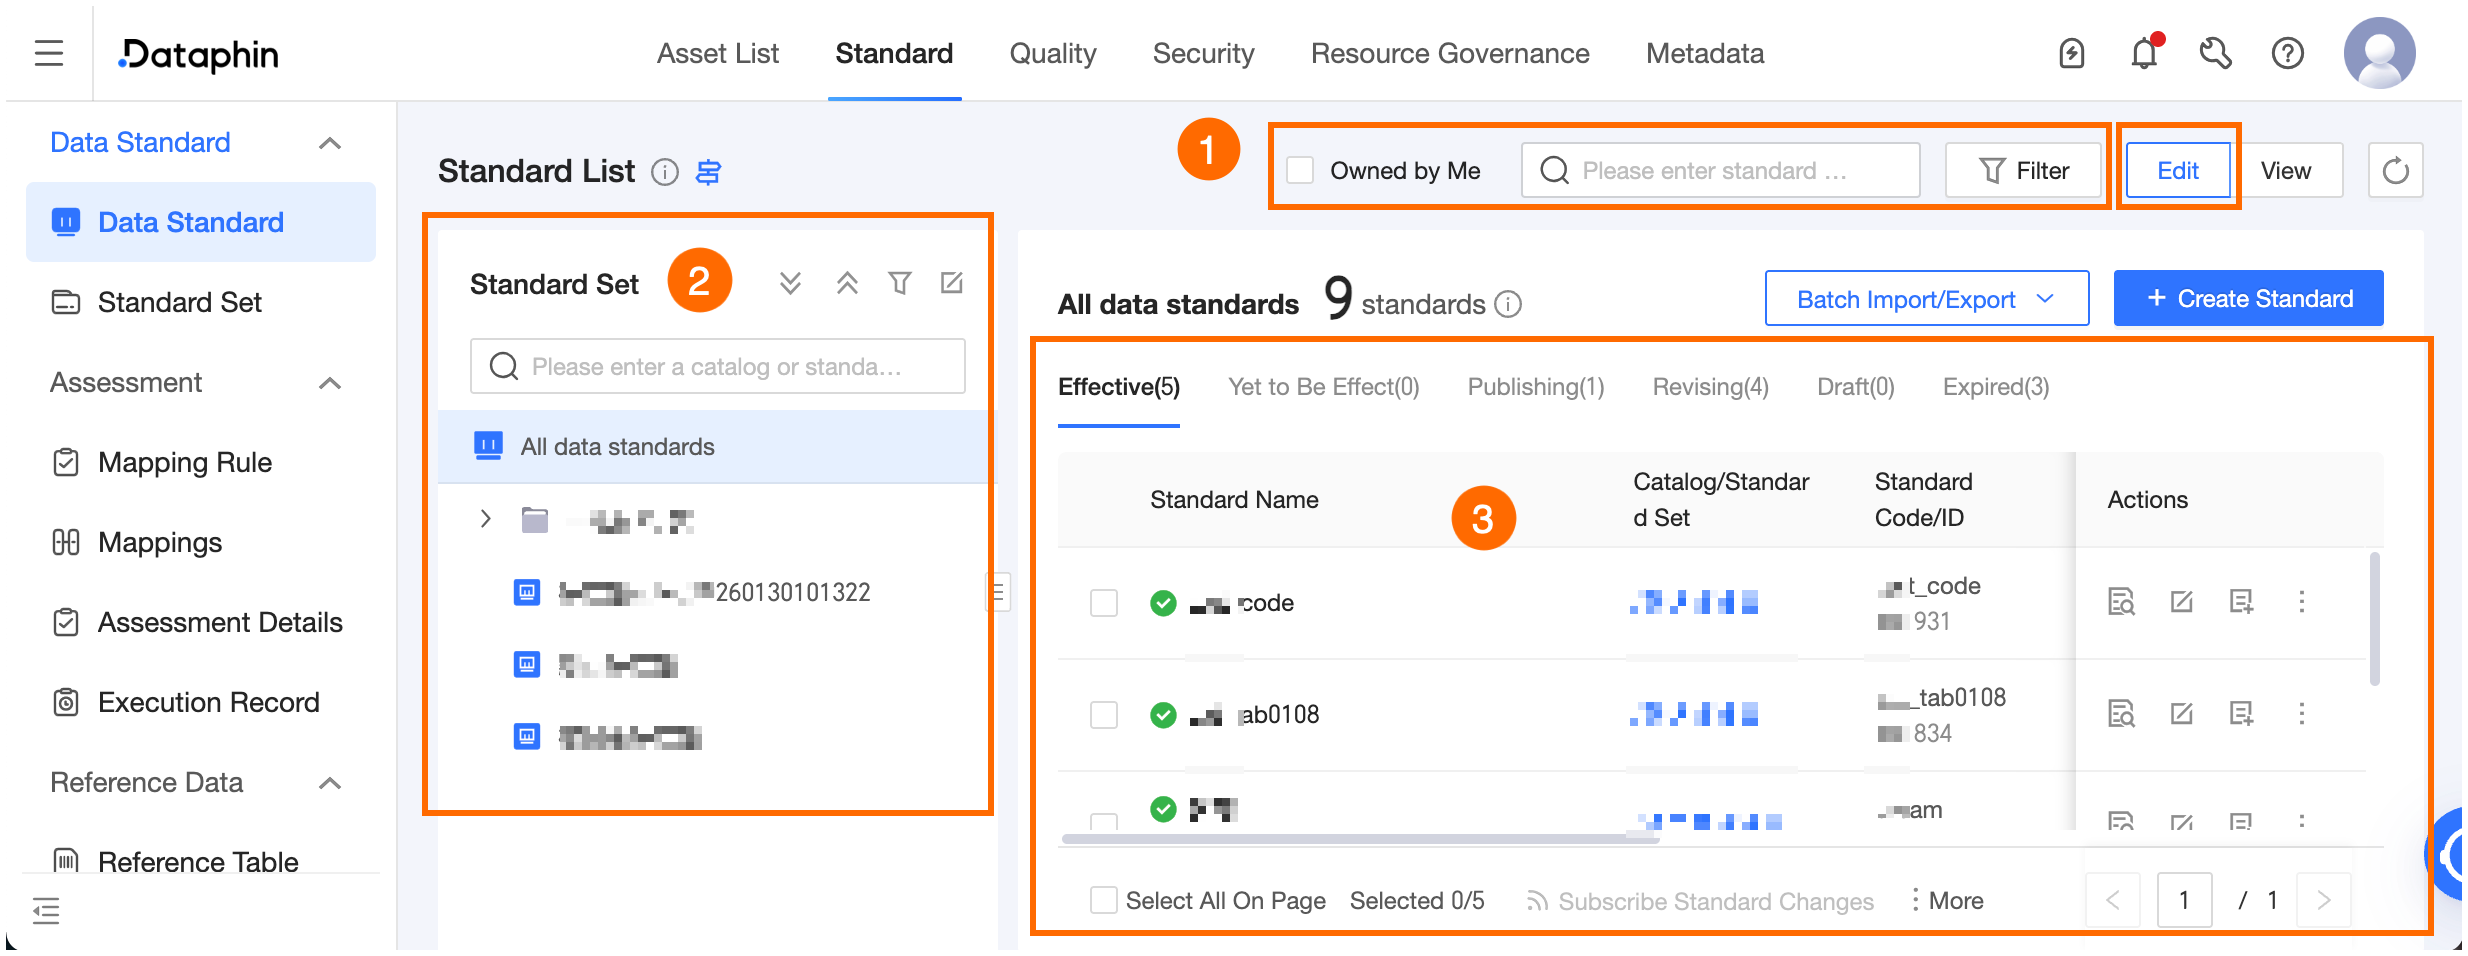
Area | Description |
① Filter and search area | Search for standards by name, code, or ID. You can also filter standards by My Owned, owner, data standard set, standard type, or standard template. |
② Data standard set | The data standard set folder classifies and manages data standard sets and standards from a business or organizational perspective.
|
③ Standard list | The information displayed and the operations supported for a standard vary based on its status. For more information about the operations, see Supported operations for standards.
|

Supported operations for standards
Status | Operation |
In Effect, Yet To Be Effect, Out Of Effect | You can view, edit, add mappings, view mappings, clone, edit associated standards, edit associated documents, subscribe to standard changes, and unpublish. You can also click the Subscribe To Standard Changes and Unpublish buttons at the bottom to unpublish or subscribe to standard changes for published, pending, or expired standards in bulk. |
In Publish | You can View, Go to Approval Task, Republish, Revoke Release, Clone, Edit Associated Standard, Edit Associated Document, and Subscribe to Standard Changes. |
Under Revision, Draft | You can View, Edit, Submit for Publishing, Clone, Edit Associated Standards, Edit Associated Documents, Subscribe to Standard Changes, and Delete. You can also click the Subscribe To Standard Changes, Publish, or Delete buttons at the bottom to publish, delete, or subscribe to standard changes for standards in the Revising or Draft state in a batch. |
Operation | Description |
View |
Click the name of a standard or the View icon in the Operations column to view the standard's Basic Information, Monitoring Rules, and History. On the Basic Information and Monitoring Details pages, you can switch to view historical version records.
|
Edit |
|
Add Mapping | Manually add mappings between data standards and asset objects in batches. Click the Add Mapping icon in the Operations column, select the asset objects, and click OK to add the mappings. For more information, see Add a mapping. |
View Mapping | Click to go to the Data Standard > Mapping > Effective Mappings tab. The system displays all effective mappings for the current data standard in an expanded view. |
Submit for Publishing | If publishing approval is enabled for the data standard set, the submission must be approved. After approval, the standard's status changes to In Effect or Yet To Be Effect. If approval is not enabled, the standard is published to the production environment directly after submission and validation. Note
|
Clone | Quickly clone a standard. |
Delete | Standards in Draft and Under Revision status can be deleted. This operation cannot be undone. Proceed with caution. Note When you delete multiple standards, the operation applies only to standards for which you have permissions. Other standards are skipped. You can view information in the batch operation records. For more information, see Import and export data standards in batches. |
Go to Approval Task | Go to the approval task that corresponds to the standard. |
Republish |
Note If merge approval is enabled for the data standard set of the selected standard, and a previous approval flow for the standard was rejected or revoked, re-publishing the standard triggers a new approval flow that includes all standards from the previous flow. We recommend that you first View Historical Approval Nodes to confirm that the scope of the submitted standards meets your expectations. If you do not want the associated standards to be re-published, you should first revoke the publication and then resubmit the publication request. |
Revoke Release |
Note If merge approval tasks are enabled for the data standard set that contains the current standard, the entire approval task is revoked. You can click View Approval Task to confirm whether this is the expected outcome before you revoke the publication. |
Edit Associated Standard | Configure associated data standards to easily view related standard relationships. For example, a standard for a business metric can be associated with the standards for its statistical dimensions. Associated standards are not versioned. You can view the association relationship only when the latest version is selected. Edit: Click the Edit button to add or remove associated standards, and click the Save button to complete the addition or removal. |
Edit Associated Document | Configure associated standard documents to easily view related document relationships. Associated documents are not versioned. You can view the association relationship only when the latest version is selected. Edit: Click the Edit button. You can add, download, or delete associated documents. Click the Save button to save your changes. |
Subscribe to Standard Changes | Subscribing to standard status changes lets you promptly sync status updates and make business adjustments accordingly. You can view standard subscription information in My Subscribed Assets. For more information, see View my subscribed assets.
Note
|
Unpublish | If unpublishing approval is enabled for the data standard set, the standard must be approved to be unpublished. After approval, the standard's status changes to Draft. If approval is not enabled, the standard's status changes to Draft directly after submission and validation. Note
|


Create a data standard
You must create a data standard in a specific data standard set and base it on a specific standard template.
The data standard set determines the standard’s classification, permission controls, and release approval flow. The standard template determines the properties and monitoring rules that you must configure for the data standard.
You can start creating a data standard in one of three ways, depending on whether a standard template is configured:
Method 1: On the global standard list, click the New Standard button in the upper-right corner. Select the data standard set and the standard template to go to the standard configuration page.
Method 2: On the data standard list page for a single data standard set, if a default standard template is configured for the set, you are taken directly to the standard configuration page based on that template’s properties. If no default template is configured, you must first select a standard template.
Method 3: On the standard template list, click the New icon for a single standard template. The current template is selected by default. After you select a data standard set, you are taken to the new standard page.
Procedure
On the Dataphin homepage, click Administration > Standard in the top menu bar.
The following figure uses creating a new standard on the global standards list page as an example. Click Standard in the navigation pane on the left, and then click the + New Standard button.
In the New Data Standard dialog box, select the data standard set and standard template.
Standard Set: Select the standard set for the data standard.
Standard Template: If the selected data standard set is configured with a default standard template, the template is automatically filled in. If no default template is set, you must select a standard template. To create a standard template, see Create and manage standard templates.
Click Next to enter the Create Standard page and configure the standard’s parameter information.
To switch standard templates, click Switch in the upper-right corner.
ImportantIf you have already configured information for the data standard, switching the template clears all configured information. This action cannot be undone. Ensure that your configuration is complete and complies with the property value specifications.
Parameter
Description
Property configuration
Property information
The values you can enter for properties depend on the property configuration of the standard template. For example, if the value type for the Skip Execution Date property is Enumeration (single-select) and the enumeration range references the China Legal Holidays lookup table, then when you create the data standard, this property will be a drop-down list. The options will be the code values from the China Legal Holidays lookup table.

Standard code value: If the standard code for the current template is automatically generated based on an encoding rule, the system displays the generated code. You can click Regenerate to create a new code, or click Switch to Custom Edit to enter a code that complies with the template's encoding rule constraints.
System property configuration:
Range: If the property's value type is Range, configure it as follows:
Enter enumeration values: Use this for enumerable value ranges. Separate multiple values with commas (,). The maximum length is 5,000 characters.
Range value: Used for value ranges that consist of continuous numbers or dates. You can select from five symbols: >, >=, <, <=, and Unlimited. If both the maximum and minimum values are set to Unlimited, no configuration is required.
Reference lookup table: Use this when the property's value range is dynamic or must follow a specific constraint. You can only select lookup tables that are in the Published state.
For more information about property configuration, see Custom properties.
Built-in property: If you reference a Dataphin built-in system property, the constraints are as follows:
If the property references System Property - Data Type, select the data type for storing the field in the database.
If you select CHAR(n) or VARCHAR(n), you must configure the length. The default for CHAR is 255, and you can select an integer from 1 to 255. The default for VARCHAR is 1000, and you can select an integer from 1 to 65535.
If you select DECIMAL(p,s), you must configure the precision. The default for DECIMAL is [38,18].
You can select an integer from 1 to 38 for precision and an integer from 0 to 18 for scale. The scale must be less than the precision. Otherwise, the input is invalid.
If the property references System Property - Range, configure the value constraint range based on the configured value type and range type.
When the attribute configuration references the system properties Is Null Allowed/Is Empty String Allowed/Is Unique Value, you can select the value constraint as Yes or No.
If the property references System Property - Data Classification/Data Security Level, select the required data category and security level to better manage data governance. For information about how to create data classifications and security levels, see Create and manage data classifications and Create and manage data security levels.
NoteIf a data standard references a built-in system property, the associated mapping monitoring is also referenced. If you have not activated the corresponding module, you cannot reference the built-in mapping monitoring configuration of the system property. You can only reference the property configuration. The properties correspond to different functional modules as follows:
Range, Is Nullable, Is Empty String, Is Unique have built-in content quality monitoring. You must activate the Asset Quality module for the monitoring to take effect.
Data Classification and Data Security Level require the Asset Security module to be activated for monitoring to take effect.
For properties that reference public system properties, you can choose whether to automatically add the corresponding mapping monitoring configuration. The system generates validation details based on the entered property values and their meanings. You can manually modify the configuration as needed. If you do not need mapping audits, you can manually deselect the monitoring configuration.
Note: The selected state of the monitoring configuration next to the property corresponds to the rules in the mapping monitoring configuration list below.
Business information
Data standard set and folder
The default data standard set name.
Effective Time
Set the effective time.
Permanent: Takes effect permanently.
Custom: Is effective during the specified time period. After this period ends, the standard becomes invalid. To continue using this standard, you can modify the effective period and republish it.
Owner
Select an owner for the standard. The owner must be a maintenance person or member of the parent data standard set. The owner can edit and delete the standard.
Description
Enter a custom description of up to 256 characters.
Bid Failure Monitoring Configuration
Monitoring rules include metadata monitoring and content quality monitoring inherited from referenced system properties, along with custom quality monitoring rules. For more information about metadata and content quality monitoring, see Metadata monitoring and Content quality monitoring. To create a quality monitoring rule, see Quality monitoring rule configuration. Click the
button to view a description of the monitoring configuration.Monitoring rule configuration
If you have purchased the Asset Quality module, you can add custom quality monitoring rules, such as Field Uniqueness Validation. After configuration, all asset objects mapped to the current standard can quickly reference the monitoring rules configured here from the quality rule configuration page. This helps enforce the constraints of the data standard and enables batch creation of quality monitoring rules. You can configure up to 100 monitoring rules for each data standard. You can view, edit, and delete monitoring rules.
When creating a quality rule for a Dataphin data table, you can reference the quality monitoring rules configured here to quickly generate quality rules in batches.
On the standard mapping page, for each effective mapping, you can quickly reference the monitoring rules configured here for the standard in the mapping and generate corresponding quality monitoring rules.
NoteIf a quality monitoring rule is deleted from the standard, the quality rule configuration generated from the reference will be incomplete. Proceed with caution based on your business needs.
If a quality monitoring rule for the standard is modified, the quality rule generated from the reference is updated synchronously, but the custom quality configuration content is not modified.
Referencing a public property with monitoring automatically adds the corresponding monitoring rule, such as metadata monitoring.
The information that can be edited for quality rules generated in different features varies. For more information, see Quality rule editing instructions.
Intelligent mapping configuration
Feature Detection
After you configure identification features associated with the standard, the system uses the defined feature expressions, data content, and metadata such as object descriptions to intelligently recommend mappings between standards and asset objects when mapping rules are executed. This reduces manual configuration effort. You can select up to 20 identification features. A logical OR relationship exists between multiple features.
Click the View icon next to a detection feature to view the feature information in the View Feature Details dialog box.
Associated information
Associated standard
View information about associated data standards, including standard name, standard code, parent folder and data standard set, owner, and association relationship.
Add associated standard: Click the Add button. In the Add Associated Standard dialog box, associate data standards. You can configure a maximum of 50 associated standards. Click OK to add the associated standards to the list. The associated standards are successfully added only after you click the Save or Save And Publish button at the bottom.
View standard: You can click the standard's name to view the standard's basic information, monitoring rules, and historical version details in the View Standard panel.
Delete Associated Standard: Click the Delete icon in the Operations column to remove the associated standard.
Associated lookup table
View information about associated lookup tables, including lookup table name, lookup table code, owner, and association relationship.
View Lookup Table: You can click the lookup table name or the View icon in the Actions column to view the lookup table details and reference information.
Edit Associated Lookup Table: Associated lookup tables are automatically generated based on configured standard property values. You can modify the associated lookup tables by changing the property values.
Associated document
View information about associated standard documents, including document name, description, parent folder, and creator.
Add associated document: Click the Add button. In the Add Associated Document dialog box, select documents to associate. You can configure up to 50 associated documents. Click OK to add the associated documents to the list. The associated documents are added successfully only after you click the Save or Save And Publish button at the bottom.
Preview Document: When the document format is PDF, you can preview the document content online.
Download Document: You can download the standard document to your local machine and view it.
Delete Associated Document: Click the Delete icon in the Actions column to remove the associated document.
Click Save. You can view the configuration information in the standard list.
Click Save And Publish, enter Approval Remarks in the Submit Standard For Online Release dialog box as reference information for the release, and click OK to publish the standard to the production environment.

Quality monitoring rule configuration
Parameter | Description | |
Basic Information | Rule Name | Enter a custom rule name based on your business needs. The name can be up to 128 characters long. |
Description | Enter a custom description for the quality rule. The description can be up to 128 characters long. | |
Template Source | System Template: The template contains configurable built-in parameters and is suitable for creating general-purpose rules. Custom Template: The template has preset parameters and requires no configuration. It is generally used to create rules that contain business logic. | |
Rule Template | Rule templates include Completeness, Uniqueness, Validity, and Stability.
For more information about templates, see Template type descriptions. | |
Rule Configuration | Configure the details of the monitoring rule. To configure a template for a validation field, it is automatically selected based on the field or metric mapped by the standard and does not need to be configured here. For other configurations, see Data table parameter configuration. Note: Rule configurations can only be modified in the data standard. After the rule is referenced on the quality page, the rule configuration cannot be modified. However, you can modify the rule name, rule strength, scheduling configuration, and effective status, and you can run and test the rule. | |
Validation Configuration | The validation configuration varies depending on the selected template. For more information, see Validation configuration description. Note: Validation configurations can only be modified in the data standard. After the rule is referenced on the quality page, the validation configuration cannot be modified. | |