Data lineage traces data end-to-end, from ETL sources to BI destinations, tracking the entire data lifecycle from creation to deletion by recording the source, movement, transformation, and dependencies of data. This tutorial walks you through three methods for establishing lineage: automatic parsing, manual configuration, so you can apply lineage to your data development workflow and maximize data value.
Value of data lineage
-
Issue identification: When a data anomaly occurs, trace lineage back to the source to pinpoint the root cause.
-
Impact analysis: If an ancestor table schema or data changes, quickly assess the impact on downstream nodes.
-
Data governance: Use the asset inventory to verify the transparency and compliance of data transformation pipelines, improve metadata quality, and clarify table ownership.
-
Cost optimization: Identify long-unused tables and unpublish them to save storage and computing costs.
Prerequisites
Standard modeling requires the Intelligent R&D Edition.
Data preparation
-
Create a project named `zmx_devprod` for developing offline integration nodes, compute nodes, and logical table tasks.
-
Create a data block named `LD_dev_prod_yy`. For more information, see Create a data block.
-
Create a subject area. For more information, see Create a subject area.
-
Create a business entity named `yy_shiti01`. For more information, see Create and manage business entities.
-
Create a data source named `mysql567`.
-
In the MySQL data source, create a database named `dataphin05` and two tables, `wp_mysql_tab01` and `wp_mysql_tab02`. The two tables must have the same schema.
create table `wp_masql_tab01` (
	`user_id` varchar(256) comment 'User ID',
	`name` varchar(256) comment 'Name',
	`gender` bigint comment 'Gender',
	`age` bigint comment 'Age',
	`phone_num` varchar(256) comment 'Phone number'
) comment 'wp_masql_tab01'
Lineage details
-
When you submit a node, the system automatically parses table and field lineage in the developer environment. When you publish a node, the system automatically parses lineage in the production environment. For Basic projects, submitting is equivalent to publishing. A single submission or publication parses up to 100,000 lineage relationships. If this limit is exceeded, the lineage is not recorded and does not appear in the asset inventory.
-
Deleting a node also deletes the lineage associated with its physical table. If you delete only the physical table without deleting the node, the lineage relationship remains. In the lineage graph, the corresponding table node appears as Not Collected or Deleted.
Automatically parse data lineage
Scenarios: Applies to integration sync nodes, standard SQL nodes (such as MaxCompute SQL nodes), and logical table tasks.
Advantages: Automated, near real-time, and no additional cost. Lineage is generated automatically when developers follow the development standards.
Data integration data lineage
When you use a batch pipeline to create a batch integration node that syncs data, the system automatically establishes table-level and field-level lineage between the source and the output table.
-
On the Dataphin home page, choose Development > Data Integration from the top menu bar.
-
From the top menu bar, select the zmx_devprod project.
-
In the navigation pane on the left, choose Integration > Batch Pipeline. In the batch pipeline list on the right, click the
 icon and select Batch Pipeline.
 -
In the Create Batch Pipeline dialog box, configure the parameters.
Parameter
Description
Pipeline Name
Enter Data lineage.
Schedule Type
Select Manual Node.
Description (optional)
Enter a brief description of the batch pipeline. The description can be up to 1,000 characters long.
Select Directory (optional)
The default folder is Offline Pipeline.
-
Click OK to create the batch pipeline.
-
On the Offline Single Pipeline Development page, click the Component Library.
-
From the Input components, select the MySQL Input component and drag it to the pipeline canvas.
-
From the Output components, select the MaxCompute Output component and drag it to the pipeline canvas.
-
Connect the MySQL Input component to the MaxCompute Output component.
-
Click the
 icon on the input and output components to configure the MySQL Input component and the MaxCompute Output component. For more information about the parameter settings, see Configure the MySQL Input component and Configure the MaxCompute Output component.
-
MySQL Input component
Parameter
Description
Step Name
Use the default name.
Number of Source Tables
Select Single Table.
Data Source
Select mysql567.
Table
Select the source table wp_mysql_tab01.
Output Fields
Use the default output fields.
-
MaxCompute Output component
Parameter
Description
Step Name
Use the default name.
Data Source
Select Project/zmx_devprod.
Table
Create a target table:
-
Click One-click Table Creation.
-
In the code input box, use the default table creation statement and delete the partition.
-
Click Create.
Loading Policy
Select Overwrite Data.
Mapping
In the mapping relationship, select Same-line Mapping.
-
-
-
Click OK to finish configuring the input and output components.
-
In the batch pipeline toolbar, click the Save and Run icons. Then, click the Submit and Publish icons.
-
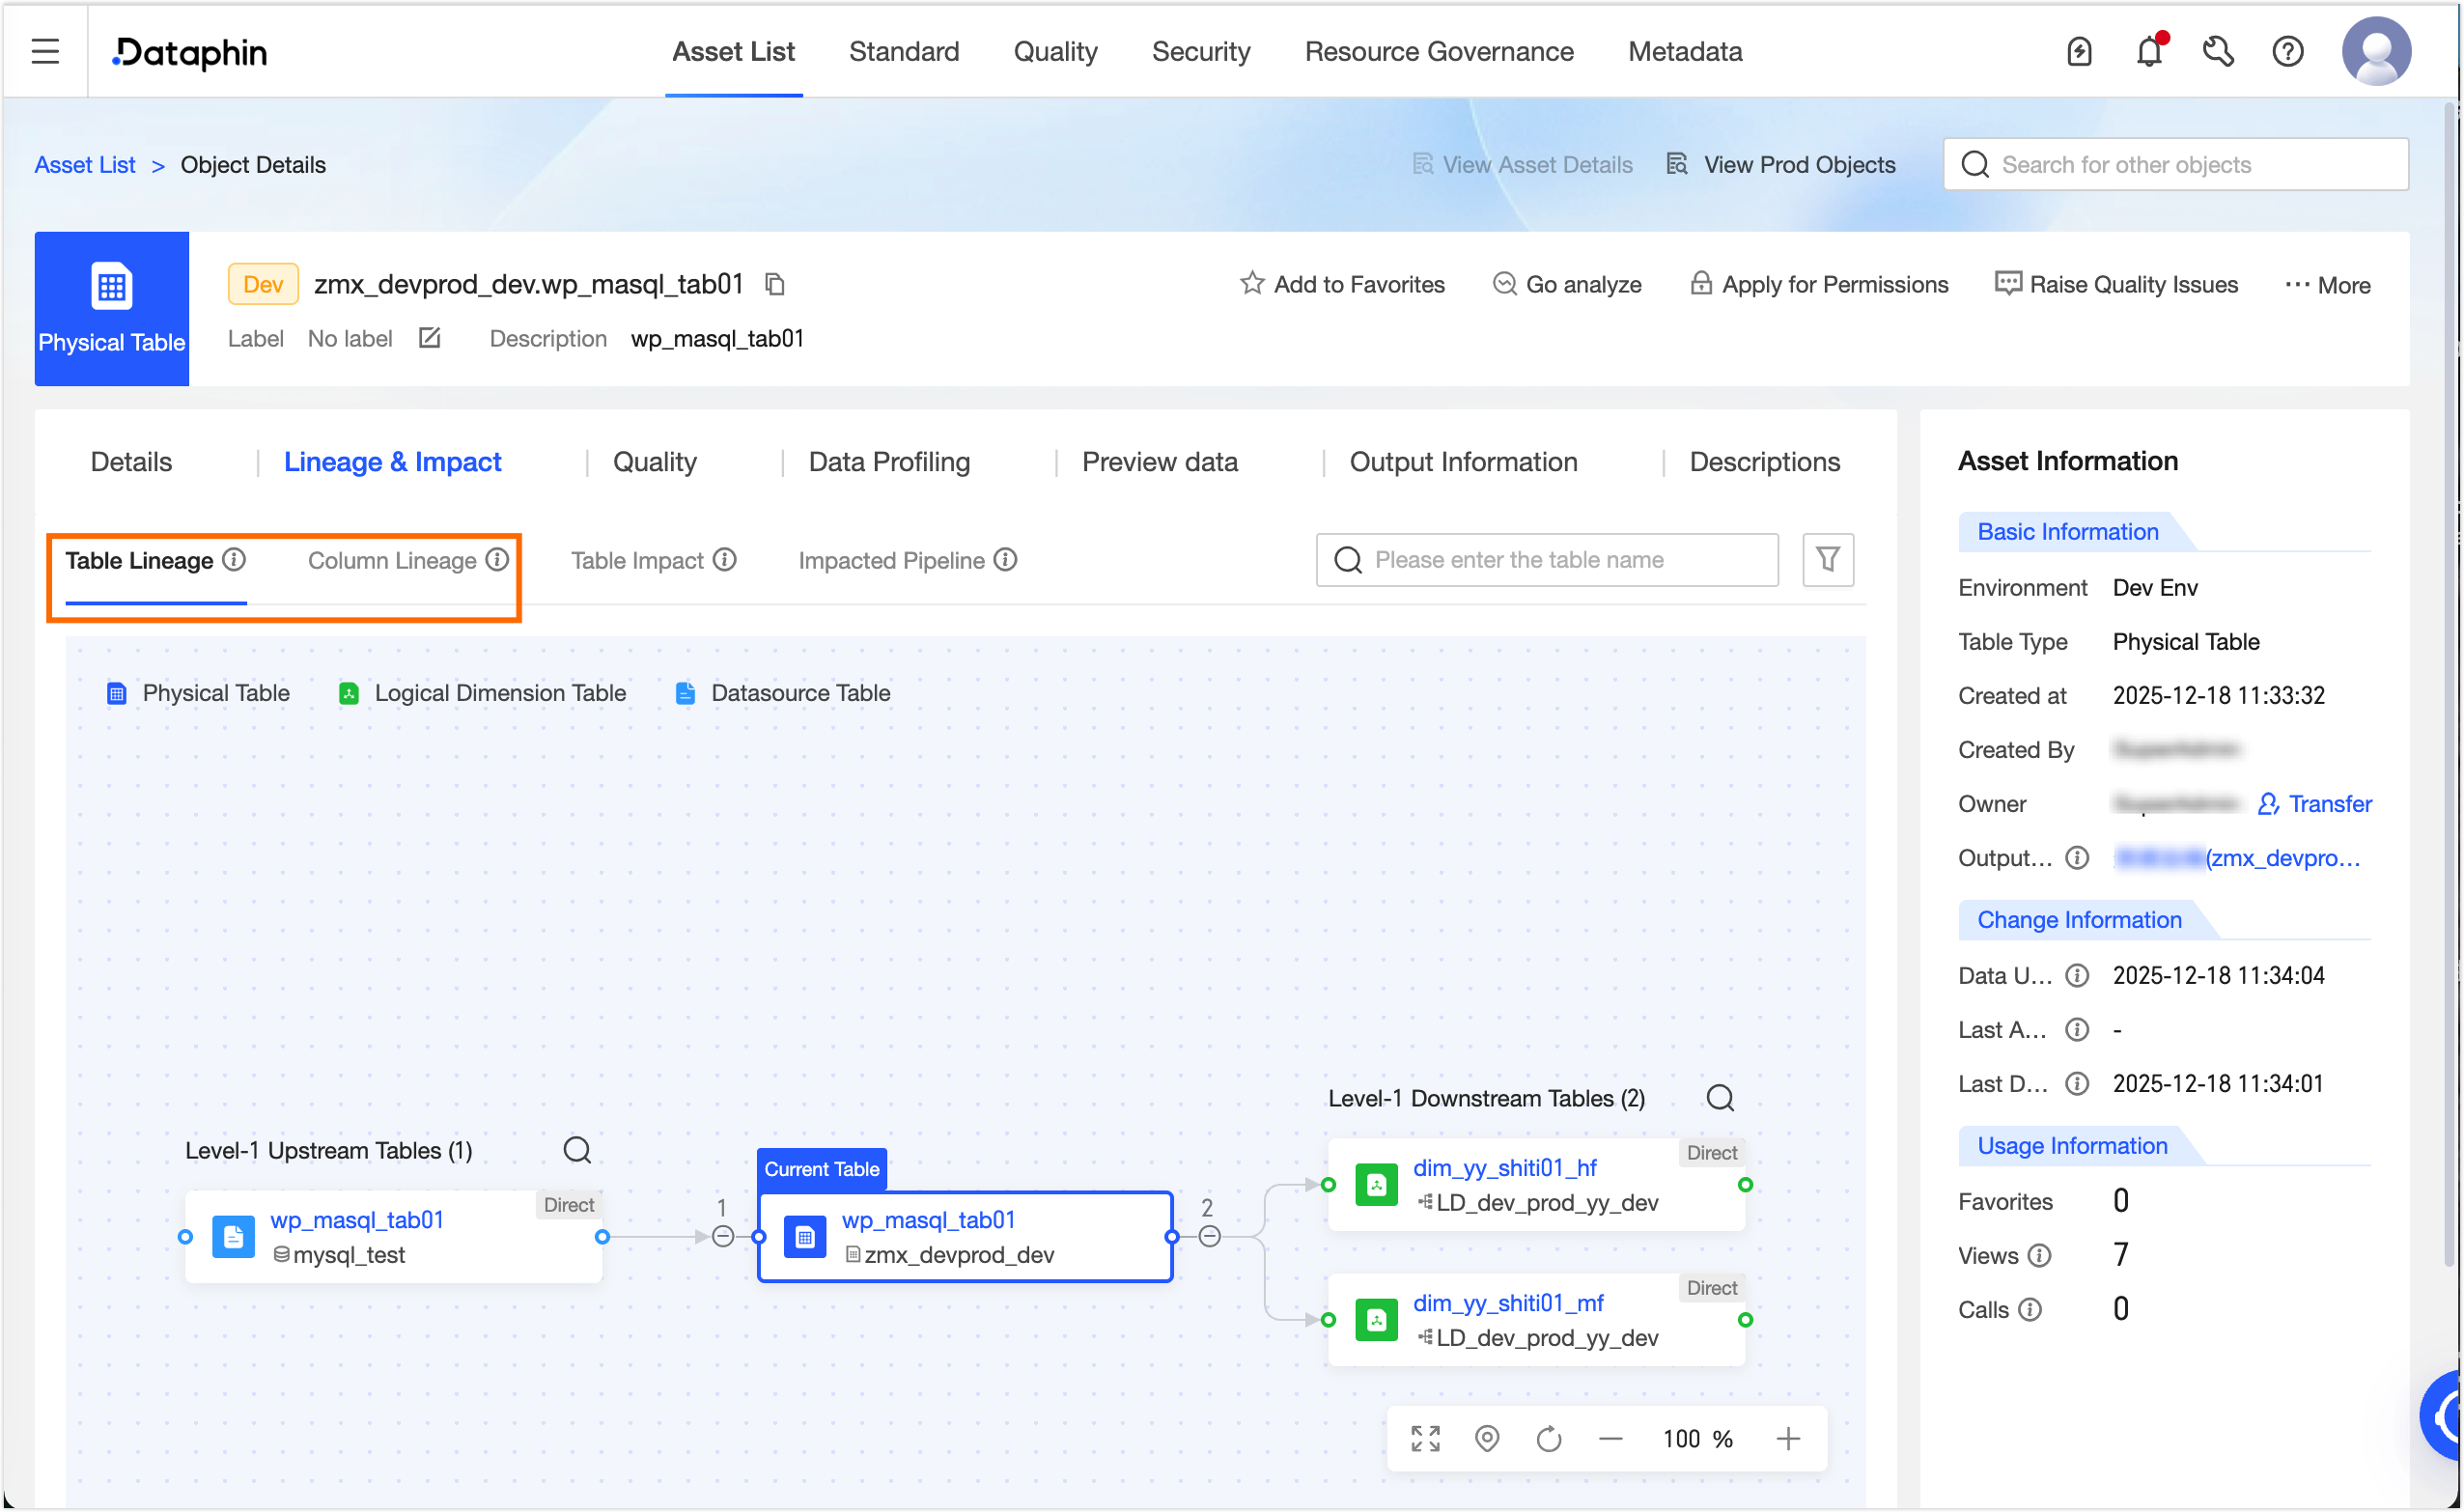
After the pipeline is published, go to Administration > Asset Inventory. In the search box, select Dataphin Asset. Search for and click the target table `wp_mysql_tab01`. On the Object Details page, you can view the table-level and field-level lineage for the table.
Compute node data lineage
When you write Data Query Language (DQL) or Data Manipulation Language (DML) statements in ad hoc queries or SQL nodes, the system automatically parses the logic, such as `SELECT...FROM...` and `INSERT...INTO…`, and generates table-level, field-level, and table-to-field lineage.
-
On the Dataphin home page, choose Development > Data Development from the top menu bar.
-
From the top menu bar, select the zmx_devprod project.
-
In the navigation pane on the left, choose Data Processing > Script Task. In the compute node list on the right, click the
icon and select Database SQL. -
In the Create Database SQL Task dialog box, configure the parameters.
Parameter
Description
Task Name
Enter Data lineage.
Schedule Type
Select One-Time Task.
Select Directory
The default is Code Management.
Use Template
Turn off Use Template.
Description
Enter a brief description of the Database SQL node. The description can be up to 1,000 characters long.
Data Source Type
Select MySQL.
Data Source
Select mysql567.
Database/Schema
Select dataphin05.
-
Click OK. In the code editor, enter the following code.
INSERT INTO wp_masql_tab02 SELECT * from wp_masql_tab01 -
In the code editor toolbar, click the Save and Run icons. Then, click Submit and Go to Publish.
-
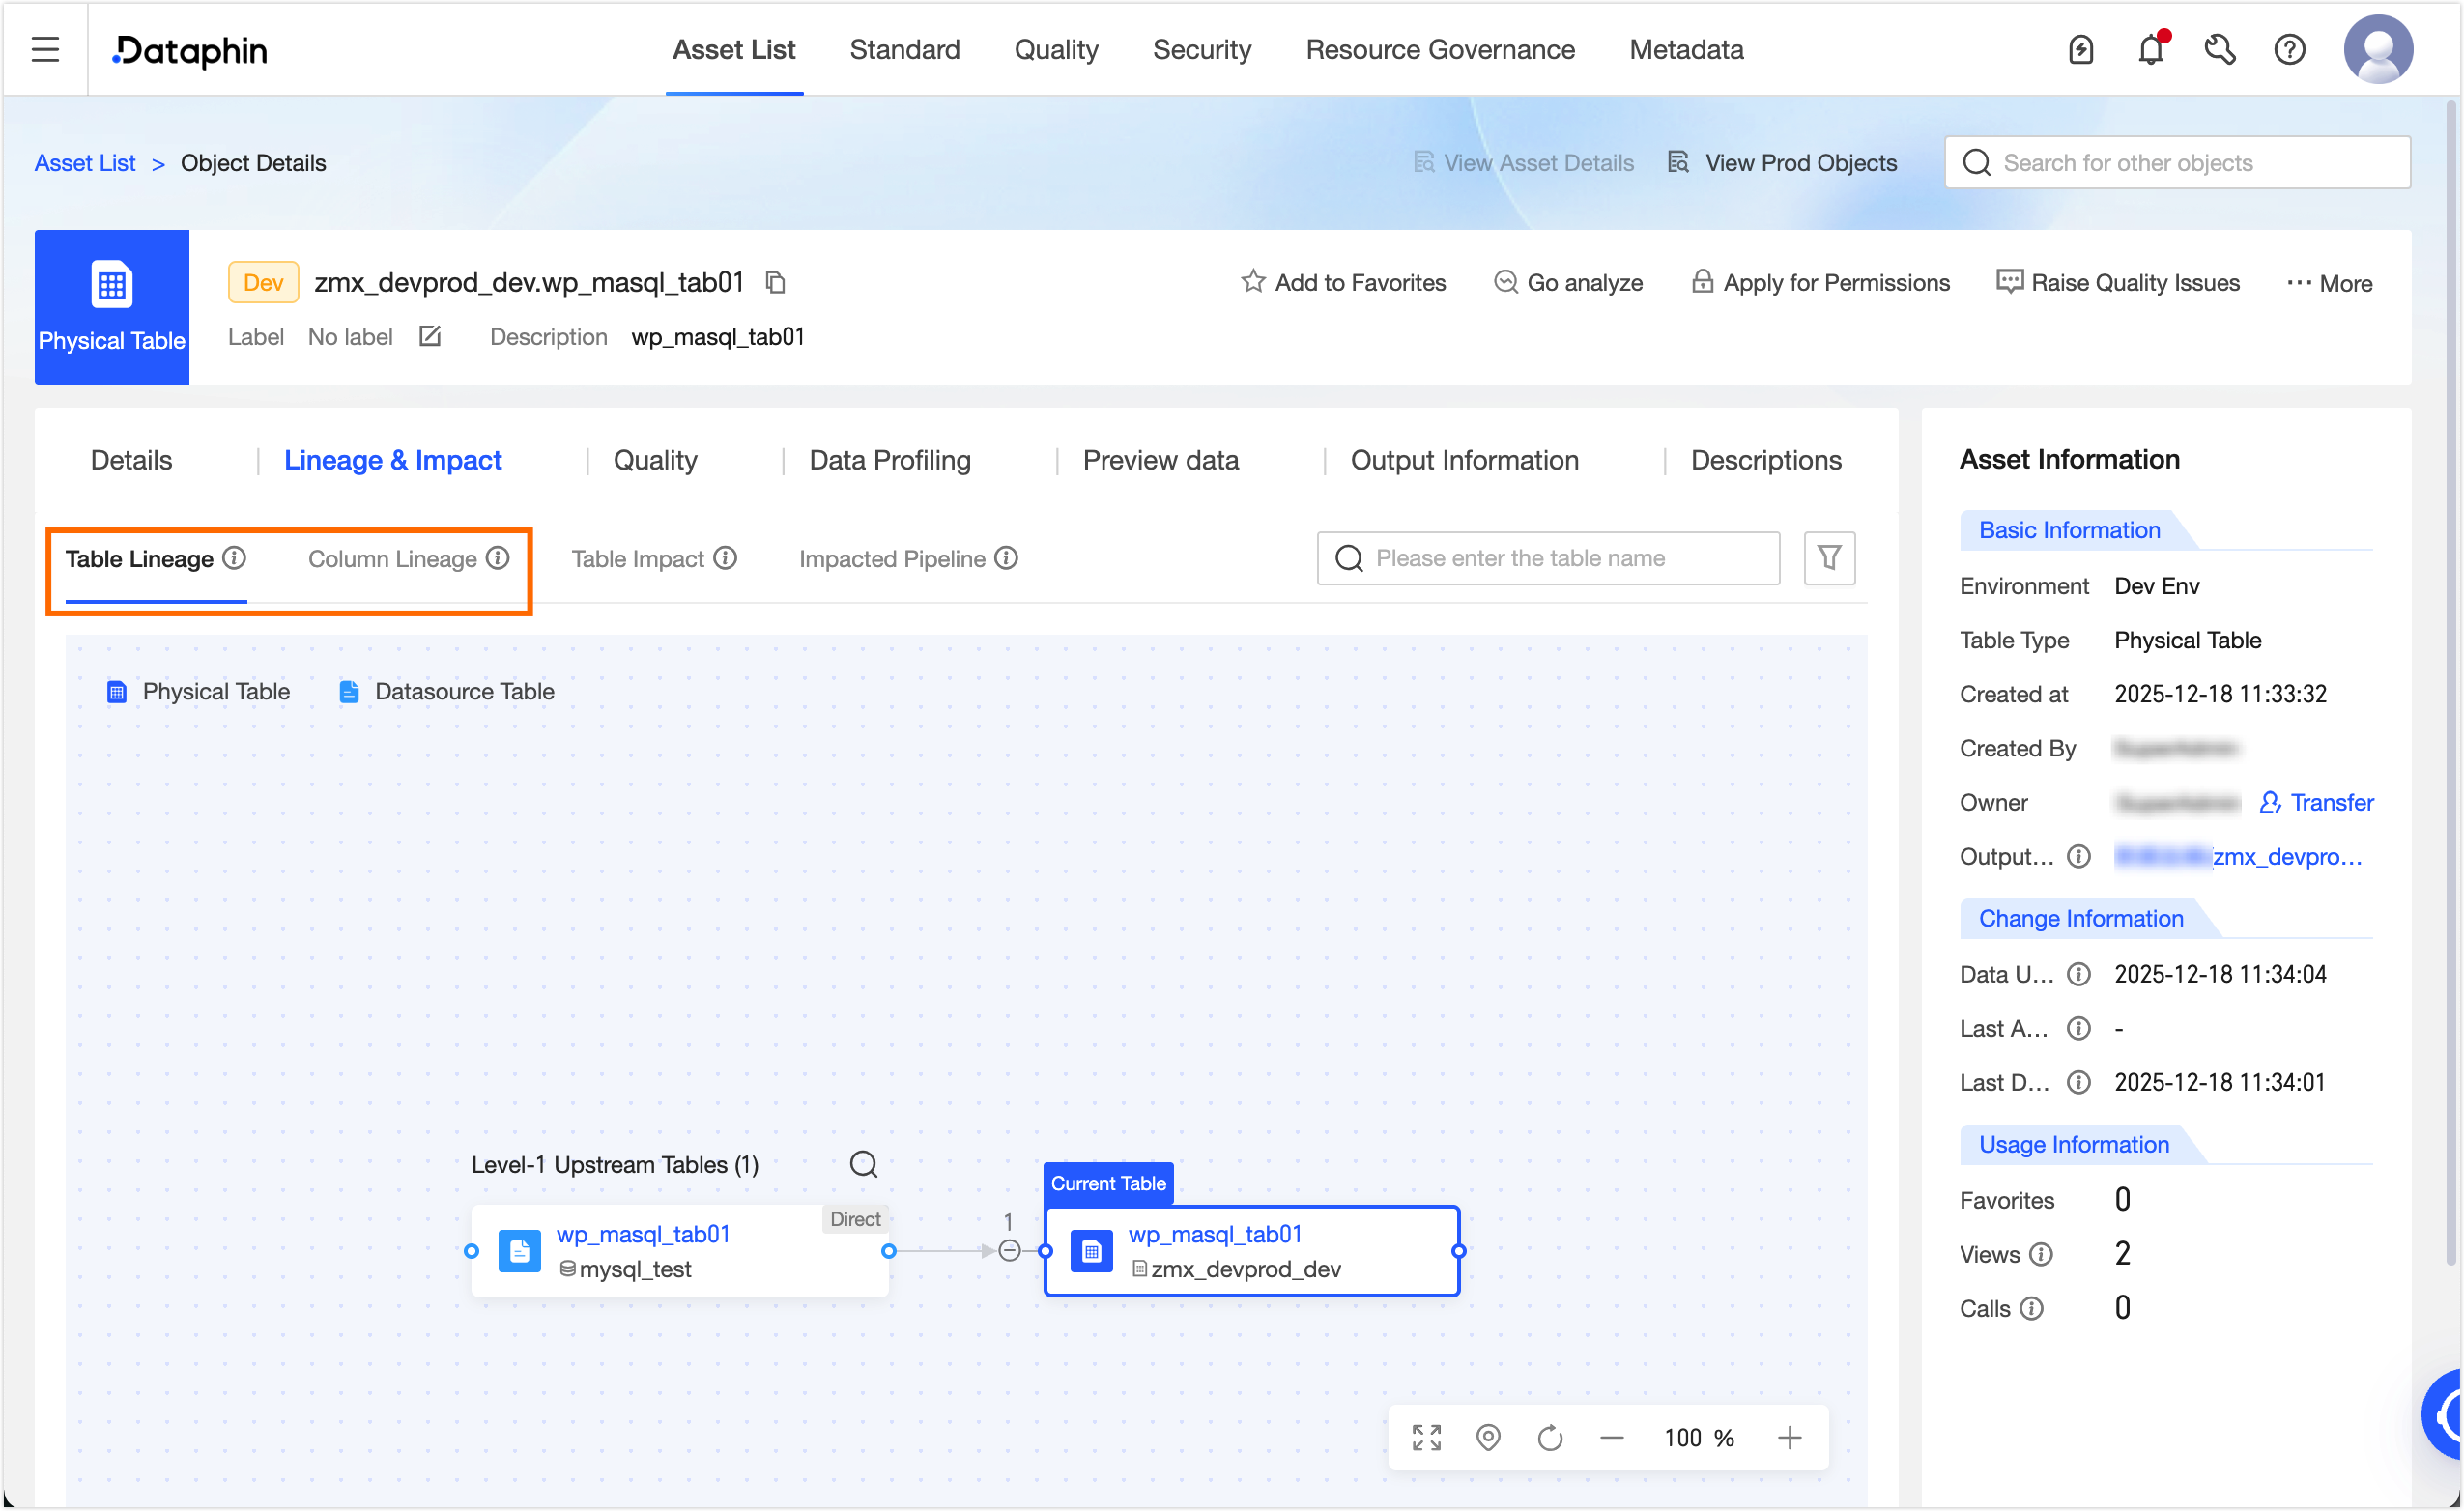
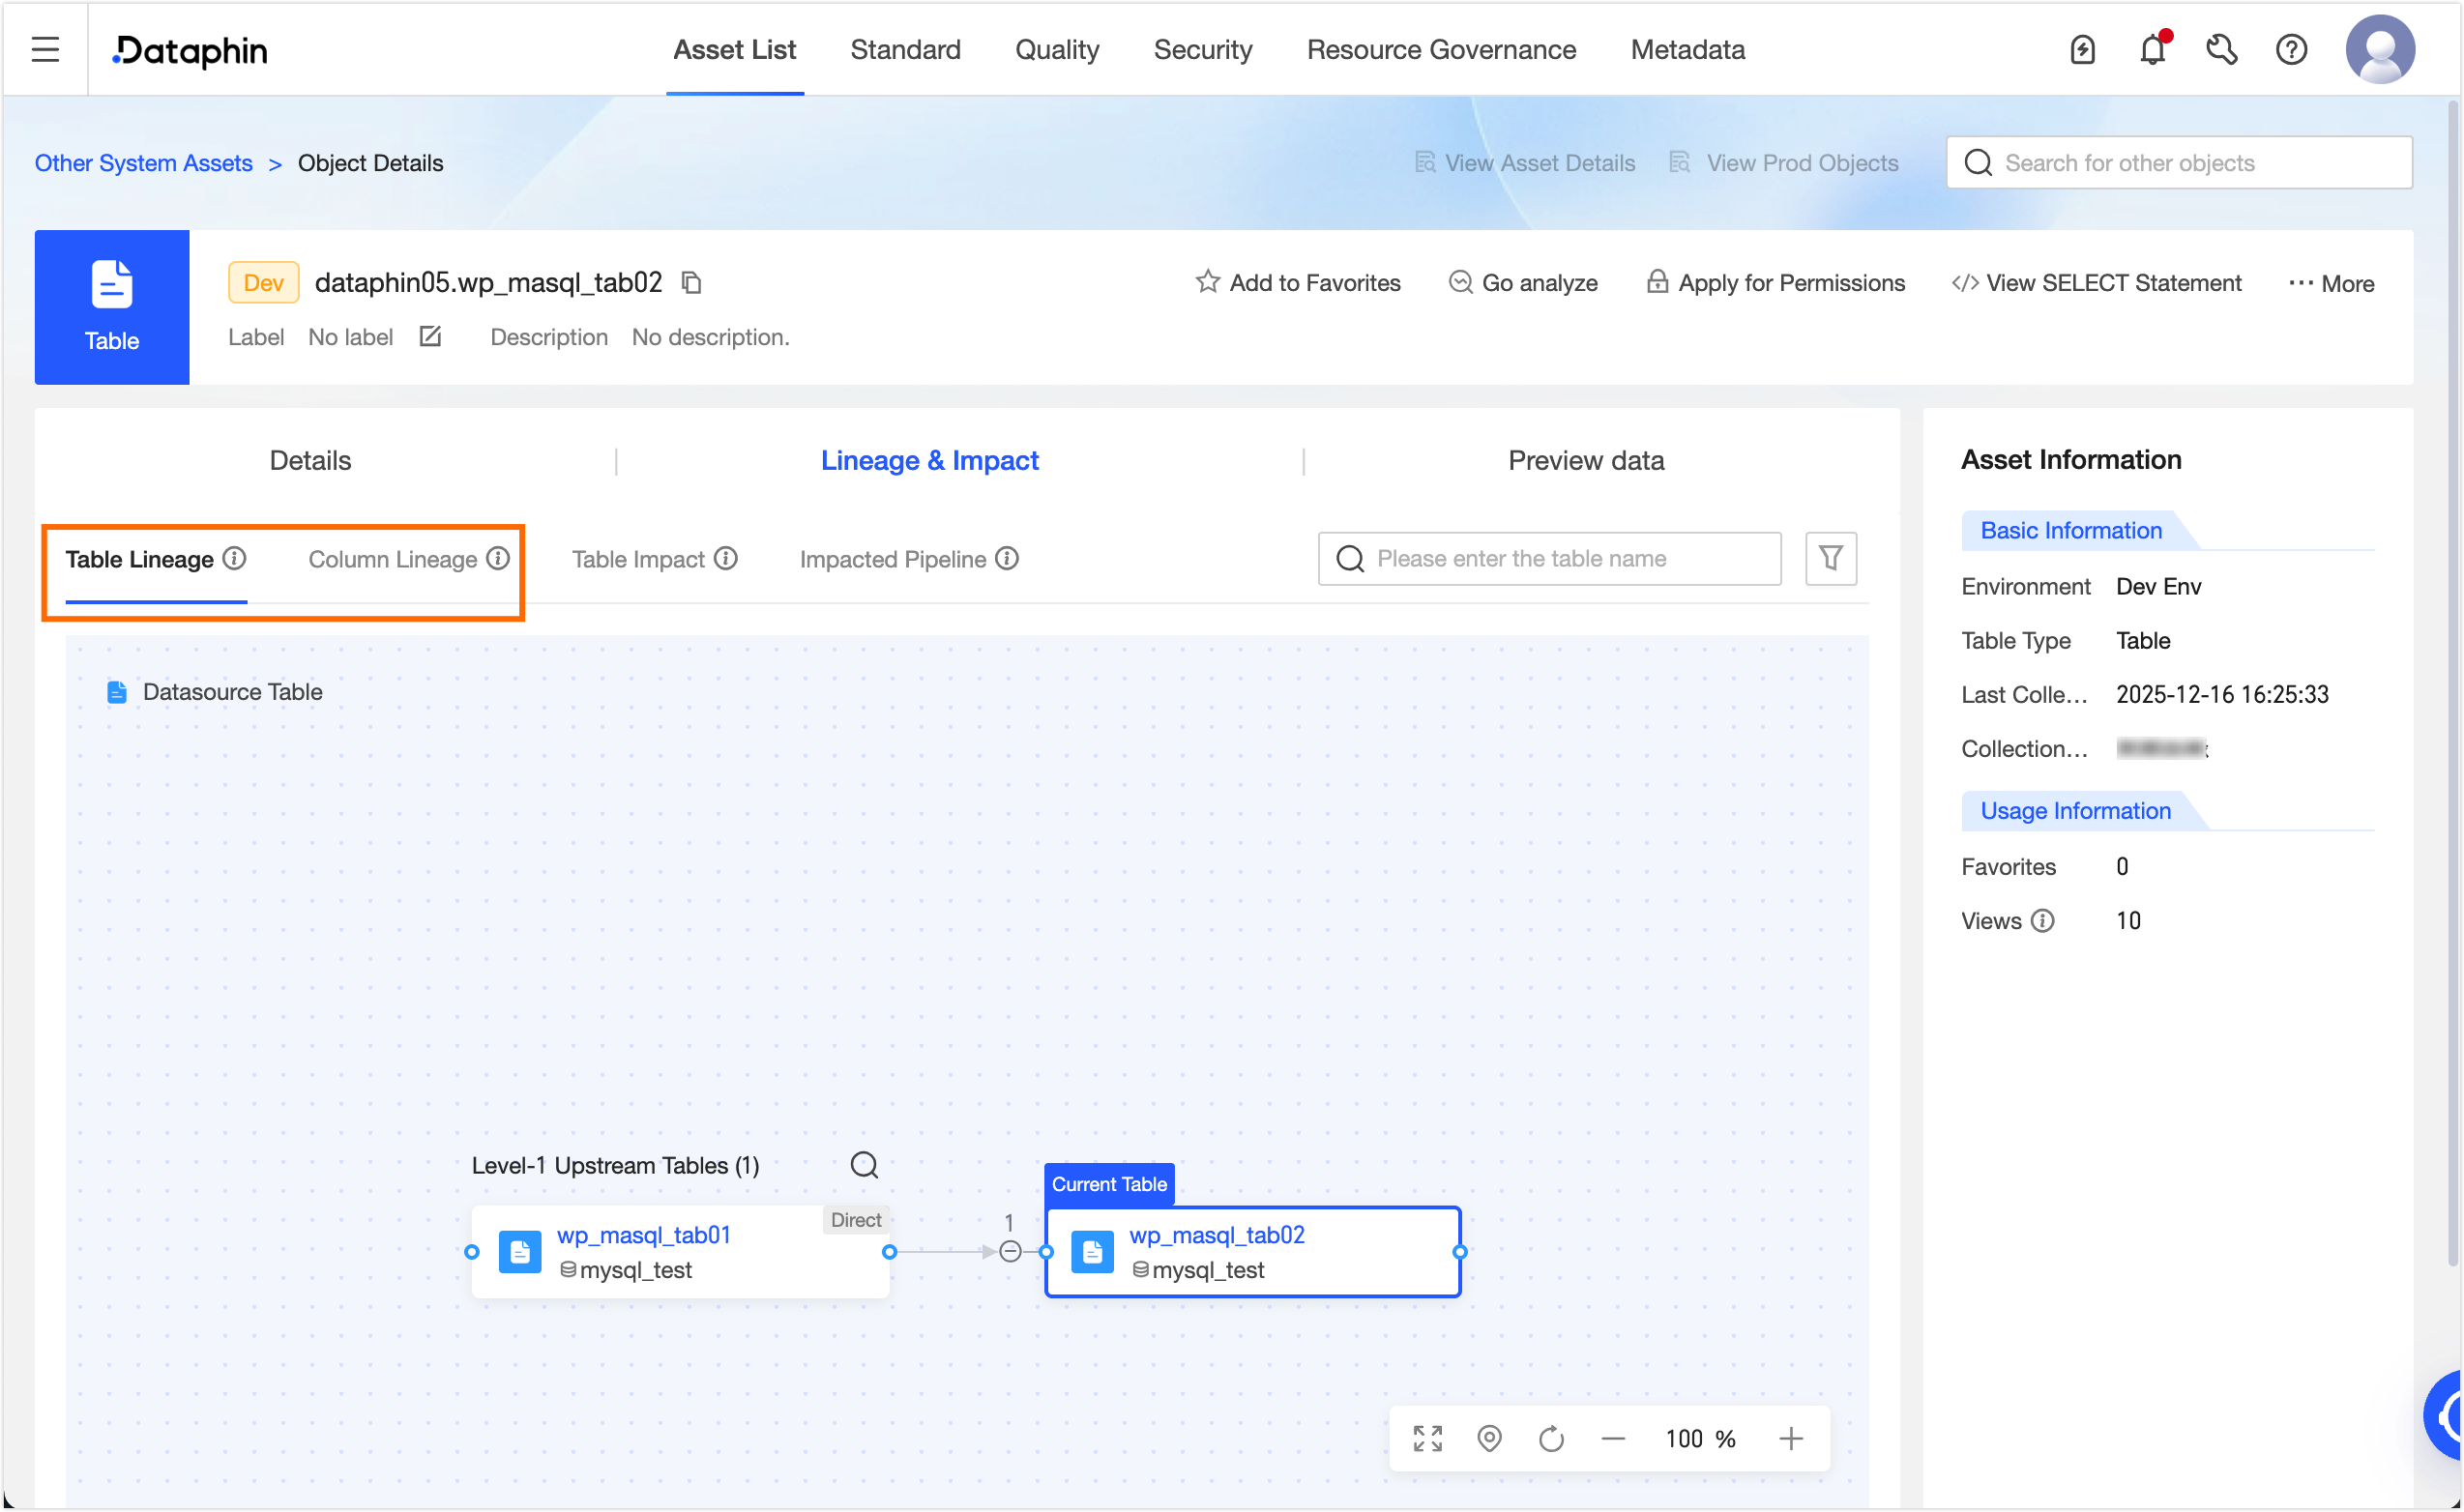
After the node is published, go to Administration > Asset Inventory. In the search box, select Other System Assets. Search for and click the target table `wp_mysql_tab02`. On the Object Details page, you can view the table-level and field-level lineage for the table.
Logical table task data lineage
When you create a logical table task in Data Development, the system automatically establishes lineage between upstream and downstream nodes.
-
On the Dataphin home page, choose Development > Data Development from the top menu bar.
-
From the top menu bar, select the zmx_devprod project.
-
In the navigation pane on the left, choose Standard Modeling > Logical Dimension Table. In the logical dimension table list on the right, click the
 icon to open the Create Logical Dimension Table dialog box.
 -
In the Create Logical Dimension Table dialog box, configure the parameters. For more information, see Create a regular logical dimension table.
Parameter
Description
Business Object
Select Regular Object/yy_shiti01.
Data Timeliness
Select Offline T+h.
Logical Table Name
Use the default table name.
Chinese Name
Enter Data lineage.
Description
Enter a brief description of the logical dimension table. The description can be up to 1,000 characters long.
-
Click OK to open the Logical Table Editor wizard. In the Table Schema step, set the data type of the `yy_shiti01_id` primary key to string, and then click the Save and Next button.
-
In the Computation Logic step, click the Source Configuration button on the right side of the page. In the Source Configuration dialog box, configure the parameters.
Parameter
Description
Source Type
The default is Physical Table.
Source Table Name
Select
${zmx_devprod}.wp_masql_tab01.Associated Primary Key Field
Select user_id.
-
Click OK, and then click the Save and Next button.
-
In the Schedule & Parameter Settings step, go to the Upstream Dependencies section and click the Auto Parse button. Then, in the Node (Task) Name column, click Click to Add. In the Click to Add dialog box, select the
virtual_root_nodenode. Click Save and Submit, and then click Go to Publish. -
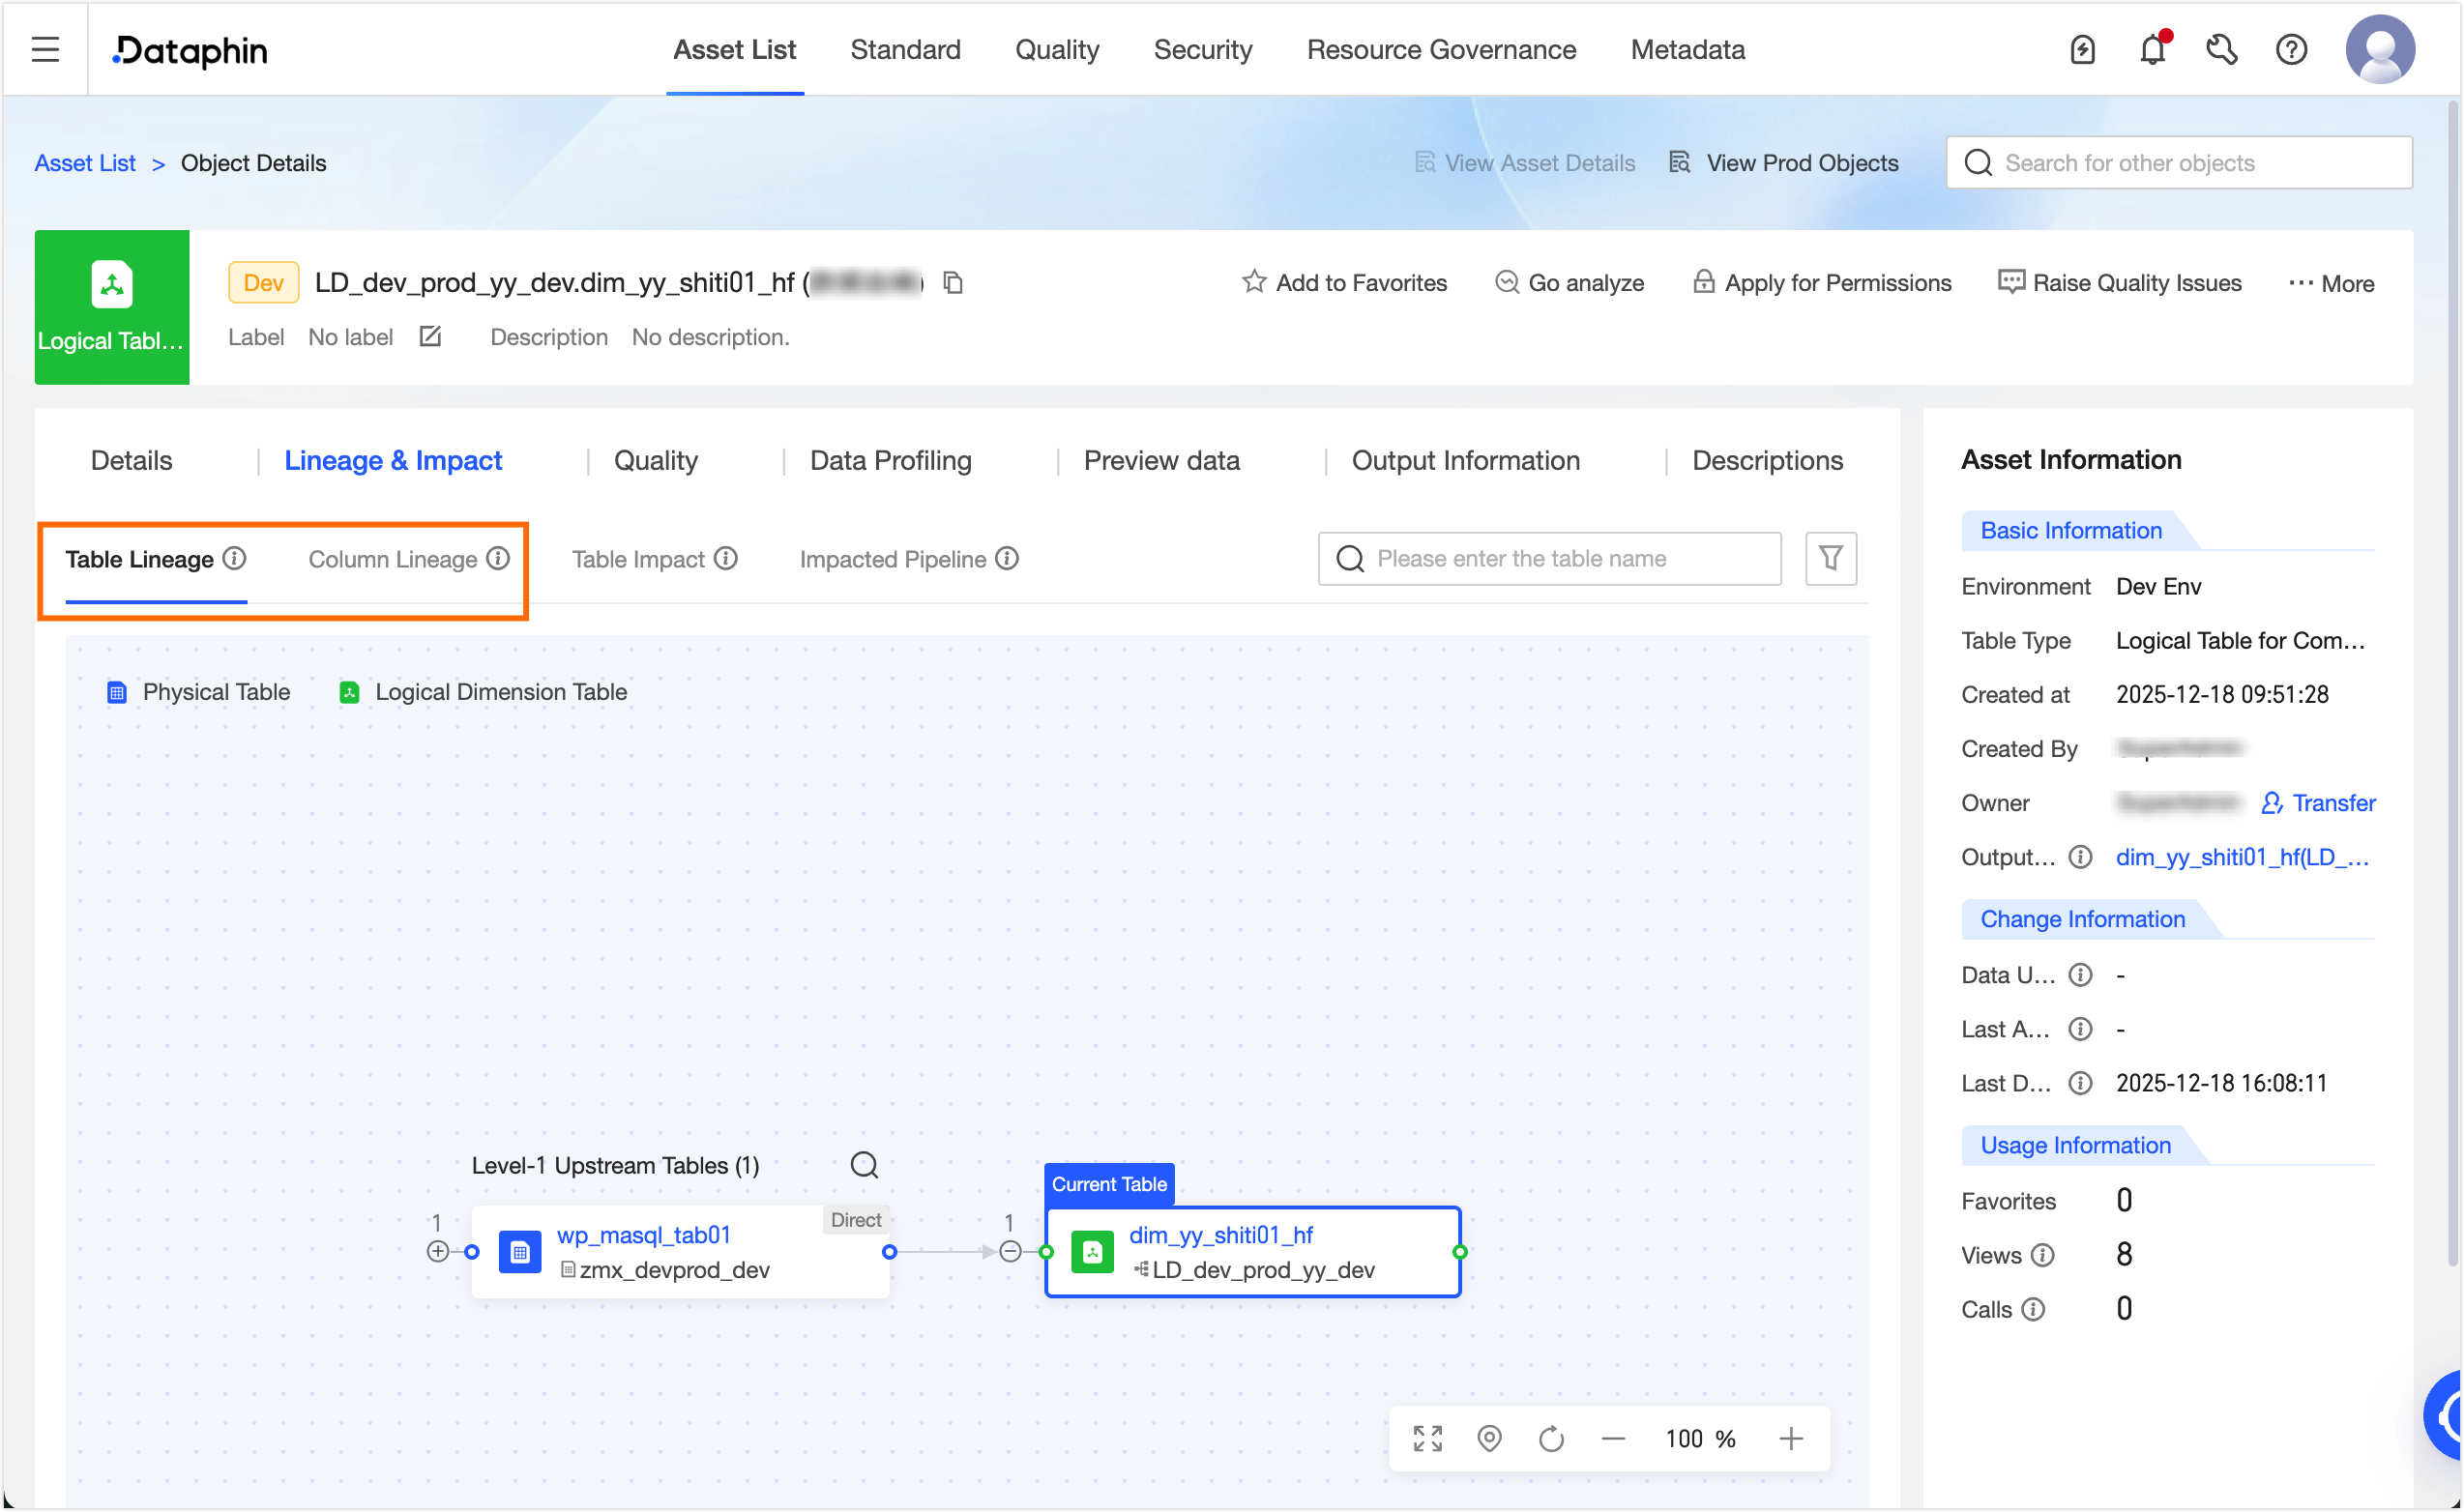
After the task is published, go to Administration > Asset Inventory. In the search box, select Dataphin Asset. Search for and click the target table `dim_yy_shiti01_hf`. On the Object Details page, you can view the table-level and field-level lineage for the table.
Manually configure data lineage
Scenarios: Applies to non-SQL nodes (such as Python or Shell), complex business logic that SQL cannot parse, lineage relationships based on offline conventions, and cases where automatic parsing fails or is incomplete.
Advantage: Covers blind spots of automatic lineage parsing.
-
On the Dataphin home page, choose Development > Data Development from the top menu bar.
-
From the top menu bar, select the zmx_devprod project.
-
In the navigation pane on the left, choose Data Processing > Script Task. In the compute node list on the right, click the
icon and select Python. -
In the Create Python Task dialog box, configure the parameters.
Parameter
Description
Task Name
Enter Data lineage_python.
Schedule Type
Select One-Time Task.
Select Directory
The default is Code Management.
Use Template
Turn off Use Template.
Description
Enter a brief description. The description cannot exceed 1,000 characters.
-
Click OK and enter the script in the code editor.
-
In the menu bar on the right, click Lineage. In the Lineage Configuration panel, click Configure Input Table/Configure Output Table. In the Configure Input Table or Configure Output Table dialog box, you can configure the parameters. For more information, see Custom lineage configuration.
Parameter
Description
Environment
Select Auto.
Input Table/Output Table
-
Set Input Table to zmx_devprod_dev.wp_masql_tab01.
-
Set Output Table to LD_dev_prod_yy_dev.dim_yy_shiti01_hf.
Selected Range
Select Entire Table.
-
-
Click OK to complete the lineage configuration.
-
In the code editor toolbar, click the Save and Run icons. Then, click Submit and Go to Publish.
-
After the node is published, go to Administration > Asset Inventory. In the search box, select Dataphin Asset. Search for and click the target table `wp_mysql_tab01`. On the Object Details page, you can view the table-level and field-level lineage for the table.