The MongoDB output widget writes data from external databases or big data platform storage systems into MongoDB for integration and reprocessing.
Prerequisites
-
A MongoDB data source is created. Create a MongoDB data source.
-
Your account has read-through permission for the data source. To request access, go to data source permissions.
Procedure
-
On the Dataphin home page, choose Development > Data Integration.
-
In the top menu bar, select a Project (or Environment in Dev-Prod mode).
-
In the left navigation pane, click Batch Pipeline. Select the target offline pipeline from the Batch Pipeline list to open its configuration page.
-
Click Component Library in the upper-right corner to open the Component Library panel.
-
In the Component Library panel, select Output, then drag the MongoDB widget onto the canvas.
-
Drag the
 icon to connect an upstream widget to the MongoDB output widget.
 -
On the MongoDB output widget, click the
 icon to open the MongoDB Output Configuration dialog box.
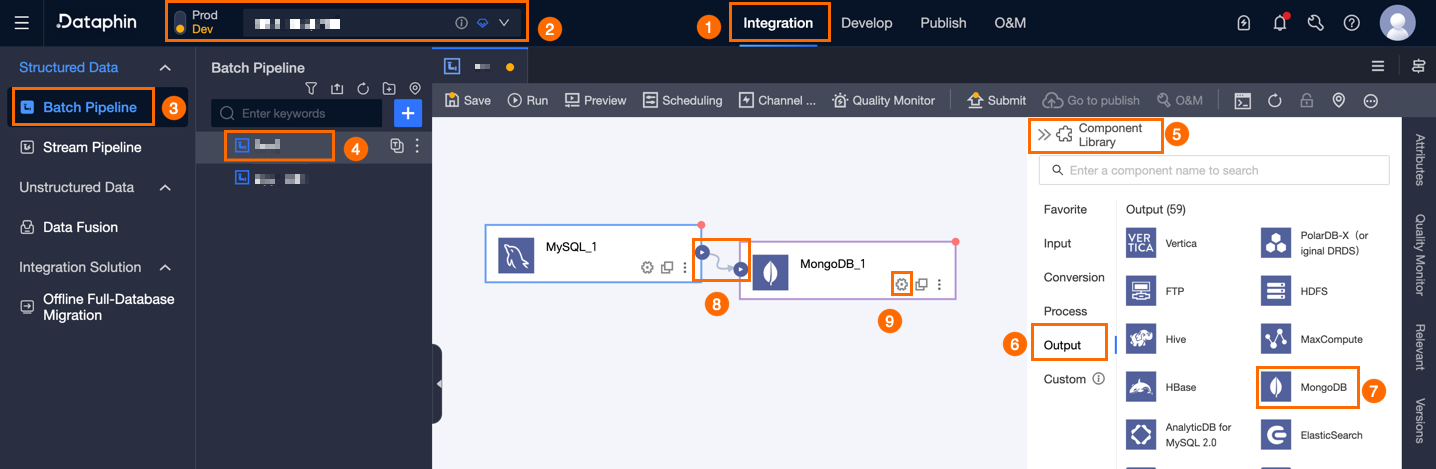
-
In the Mongodb Output Configuration dialog box, configure the following parameters.
Parameter
Description
Basic Settings
Step Name
Name of the MongoDB output widget. Naming rules:
-
Supports Chinese characters, letters, numbers, and underscores (_).
-
Maximum length: 64 characters.
Datasource
Lists all MongoDB data sources, with or without write-through permission. Click the
 icon to copy the data source name.
-
Click Request next to a data source to apply for write-through permission. Request, renew, and return data source permissions.
-
To add a data source, click Create Data Source. Create a MongoDB data source.
Table
Select the target table for output data. Search by keyword or enter the exact name and click Accurate Search. The system checks table status after selection. Click the
 icon to copy the table name.
Update Information (optional)
Specifies the update configuration. Example:
{"isUpsert":"true","upsertkey"""unique_id"}.Field Separator (optional)
Separator between fields. Default: comma (,).
Field Mapping
Input Field
Displays the output fields of the upstream widget.
Output Field
Output fields of this widget. Add fields using Batch Add or Create New Output Field:
-
Batch Add: Click Batch Add. JSON and TEXT formats are supported for batch configuration.
-
JSON format example:
// Example: [{"name": "user_id","type": "String"}, {"name": "user_name","type": "String"}]Notename: the field to import. type: the data type after import. For example,
"name":"user_id","type":"String"imports the field named user_id and sets its data type to String. -
TEXT format example:
// Example: user_id,String user_name,String-
Row delimiter separating field entries. Default: line feed (\n). Supported: line feed (\n), semicolon (;), period (.).
-
Column delimiter separating field name and type. Default: comma (,).
-
-
-
Create New Output Field.
Click + Create New Output Field, enter a Column name, select a Type, and click the
 icon to save.
 -
Copy Ancestor Table Field.
Click Copy Ancestor Table Field to auto-generate output fields from the ancestor table.
-
Manage Output Fields.
Additional operations on added fields:
-
Click the
icon in the Actions column to edit a field. -
Click the
icon in the Actions column to delete a field.
-
Mapping
Maps source input fields to target output fields for data synchronization. Two modes are available: Same Name Mapping and Same Row Mapping:
-
Same Name Mapping: Maps fields with the same field name.
-
Same Row Mapping: Maps fields by row position when source and target field names differ.
-
-
Click Confirm to save the MongoDB output widget configuration.
 icon to save.