Offline integration in Data Management (DMS) is a low-code data development tool. You can combine various task nodes to create a data flow and run it on a recurring schedule for data transformation and data synchronization.
Supported database types
MySQL: ApsaraDB RDS for MySQL, PolarDB for MySQL, MyBase for MySQL, PolarDB-X, AnalyticDB for MySQL V3.0, and MySQL databases from other sources.
SQL Server: ApsaraDB RDS for SQL Server, MyBase for SQL Server, and SQL Server databases from other sources.
PostgreSQL: ApsaraDB RDS for PostgreSQL, PolarDB for PostgreSQL, MyBase for PostgreSQL, AnalyticDB for PostgreSQL, and PostgreSQL databases from other sources.
Oracle
DB2
MaxCompute
Hologres
OSS
Hologres supports only Data Import nodes, and OSS supports only Data Output nodes.
Scenarios
The offline integration feature in DMS provides batch data processing for the following scenarios:
Quickly build an offline data warehouse with the low-code visual editor. This supports data warehouse scenarios such as ad hoc queries, multidimensional analysis, data mining, and offline computing.
Address complex batch processing challenges for big data. This supports business scenarios such as fine-grained operations, data marketing, and intelligent recommendation.
The offline integration feature is built on Spark and supports applications that require improved performance on Hadoop platforms.
If you have questions or issues while using this feature, search for the DingTalk group ID 31826394 and join the group to provide feedback.
Data flow creation process
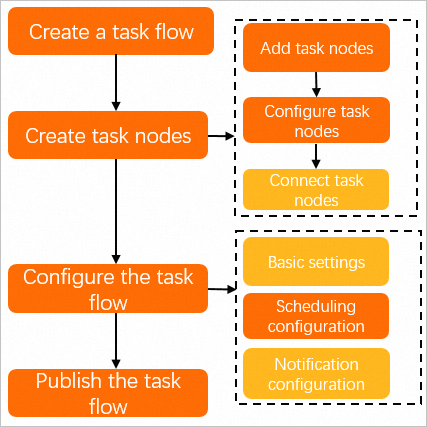
Procedure
- Log on to the DMS console V5.0.
-
In the top navigation bar, choose .
NoteIf you use the DMS console in simple mode, move the pointer over the
 icon in the upper-left corner and choose .
 Click Create Data Flow, enter a Data Flow Name, and then click Confirm.
On the data flow details page, create nodes for the data flow. For more information, see Create a data flow.
At the bottom of the page, configure the data flow information.
Click the Data Flow Information tab. In the Properties section, modify the Data Flow Name, Description, Owner, and Stakeholders.
To schedule the data flow, go to the Scheduling Settings section, turn on the Enable Scheduling switch, and configure the schedule.
Parameter
Description
Scheduling Type
Select a scheduling type:
Recurring schedule: The task is periodically scheduled. For example, the task is run once a week.
Schedule once: The task is run once at a specific time. You only need to configure the specific time of execution.
Effective from
The period during which the schedule is active. The default is from 1970-01-01 to 9999-01-01, which means it is always active.
Scheduling Cycle
The scheduling cycle for the task.
Hour: The task is run at the specified hours.
Day: The task is run once per day. You must configure the specific time for the daily schedule.
Week: The task is run once on specified days of the week. You must configure the specified days and the specific time.
Month: The task is run once on specified days of the month. You must configure the specified days and the specific time.
Timed Scheduling
This parameter is required if you set Scheduling Cycle to Hour. Two options are available:
Run at a fixed interval: Set the time range and the interval in hours.
For example, if you set the start time to 00:00, the interval to 6 hours, and the end time to 20:59, the system runs the task at 00:00, 06:00, 12:00, and 18:00.
Run at a specified time: Set the specific hours to run the task.
For example, if you set 0Hour and 5Hour, the system runs the task at 00:00 and 05:00.
Specified Time
This parameter is required if you set Scheduling Cycle to Week or Month.
If the scheduling cycle is Week, select the days of the week to run the task. You can select multiple days.
If the scheduling cycle is Month, select the days of the month to run the task. You can select multiple days.
Specific Point in Time
This parameter is required if you set Scheduling Cycle to Day, Week, or Month, or if you set Scheduling Type to Schedule once.
The specific time to run the task flow.
For example, if you set this to 02:55, the system runs the task at 02:55 on the specified days. If you set this to 2023-09-28 00:00, the system runs the task at the specified date and time.
Cron Expression
You do not need to manually configure the cron expression. The system automatically generates and displays it based on your cycle and time configurations.
Click the Advanced Configuration tab to set variables. For more information, see Configure time variables.
Publish the data flow. For more information, see Publish a data flow.
Optional: Click Go to O&M in the upper-right corner of the canvas to perform O&M on the data flow. For more information, see Data flow O&M.