The task orchestration feature of Data Management (DMS) orchestrates and schedules various tasks. You can create a task flow composed of one or more task nodes to handle complex scheduling and improve data development efficiency.
Background
During major sales events, e-commerce platforms often run promotional campaigns, such as issuing coupons to users whose total spending reaches a certain threshold. This topic describes how to use an SQL Assignment for Single Instance node, a Conditional Branch node, and a Single Instance SQL node in task orchestration to automate this promotion at the database level.
Prerequisites
You have a database and the permissions to modify it. To request permissions, see Overview of access control.
Prepare the environment
Log in to DMS 5.0.
Move the pointer over the
 icon in the upper-left corner of the DMS console and choose . Note
If you use the DMS console in normal mode, choose in the top navigation bar.
In the Please select the database first dialog box, enter a keyword to search for a database, select the database instance from the search results, and then click Confirm.
-
Create a configuration table, a business table, and a coupon issuance table.
-
Create a configuration table named
activity_setting. Paste the following SQL statement into the SQL editor and click Execute.SQL statement:
CREATE TABLE `activity_setting` ( `has_promotion` tinyint(1) NOT NULL COMMENT 'Indicates whether a promotion is active', `consumption_limit` int(11) NOT NULL COMMENT 'Consumption threshold', `quota` int(11) NOT NULL COMMENT 'Coupon amount', PRIMARY KEY (`has_promotion`) ) ENGINE=InnoDB DEFAULT CHARACTER SET=utf8 COLLATE=utf8_general_ci ROW_FORMAT=COMPACT AVG_ROW_LENGTH=16384; -
Create a business table named
consumption_records. Paste the following SQL statement into the SQL editor and click Execute.SQL statement:
CREATE TABLE `consumption_records` ( `id` bigint(20) UNSIGNED NOT NULL AUTO_INCREMENT COMMENT 'Record ID', `time` datetime NOT NULL COMMENT 'Consumption time', `count` int(11) NOT NULL COMMENT 'Consumption amount', `user_id` bigint(20) NOT NULL COMMENT 'User ID', PRIMARY KEY (`id`) ) ENGINE=InnoDB DEFAULT CHARACTER SET=utf8mb4 COLLATE=utf8mb4_general_ci COMMENT='Consumption records table' AUTO_INCREMENT=8001 ROW_FORMAT=COMPACT AVG_ROW_LENGTH=54; -
Create a coupon issuance table named
voucher_send_list. Paste the following SQL statement into the SQL editor and click Execute.SQL statement:
CREATE TABLE `voucher_send_list` (
    `Id` int(11) NOT NULL AUTO_INCREMENT COMMENT 'Record ID',
    `user_id` int(11) NULL COMMENT 'User ID',
    `consumption_sum` int(11) NULL COMMENT 'Total consumption',
    `quota` int(11) NULL COMMENT 'Coupon amount',
    PRIMARY KEY (`Id`)
) ENGINE=InnoDB
DEFAULT CHARACTER SET=utf8 COLLATE=utf8_general_ci
AUTO_INCREMENT=1
ROW_FORMAT=COMPACT
AVG_ROW_LENGTH=0;
-
-
Insert data into the configuration table. Paste the following SQL statement into the SQL editor and click Execute.
SQL statement:
INSERT INTO activity_setting( has_promotion, consumption_limit, quota) VALUES('1','100','30'); -
Insert data into the business table. Use the test data generation feature to generate data. For more information, see Test data generation.
To generate data for the
consumption_recordstable, configure the parameters as follows. For the id field (bigint(20) unsigned, primary key, auto-increment, not null), select the Random Auto-increment algorithm and set Step to 1. For the time field (datetime, not null), select the Random algorithm and set the range to[2000-01-01 00:00:00, 2021-01-01 00:00:00]. For the count field (int(11), not null), select the Random algorithm and set the range to[1, 1000]. For the user_id field (bigint(20), not null), select the Random algorithm and set the range to[1, 2000]. Set Rows to Generate to 10000 and Conflict Handling to Skip on data conflict. Then, click Submit.
Procedure
-
Create and populate the configuration, business, and coupon issuance tables. For more information, see Prepare the environment.
-
Create a task flow.
-
Log on to Data Management (DMS) 5.0.
-
Move the pointer over the
icon in the upper-left corner and choose . NoteIf you use the DMS console in normal mode, choose in the top navigation bar.
-
Click Create Task Flow.
-
In the New Task Flow dialog box, enter a Task Flow Name and a Description, and then click OK.
-
-
Orchestrate the task nodes.
-
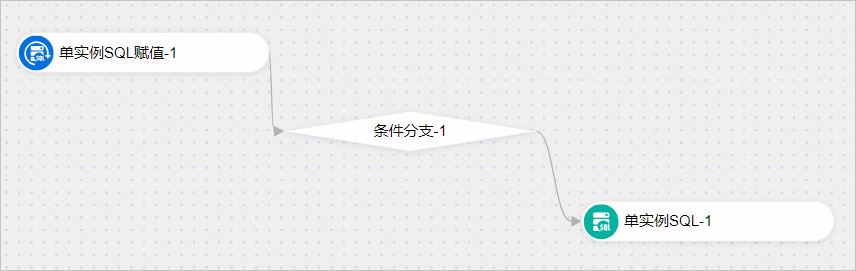
From the Task Type list on the left, drag an SQL Assignment for Single Instance node, a Conditional Branch node, and a Single Instance SQL node to the canvas.
-
Connect the nodes to form a task flow.
Hover over the Single Instance SQL Assignment node, and click the hollow circle that appears on the right side of the Single Instance SQL Assignment node and drag a connection line to the Conditional Branch node.
Hover the pointer over the Conditional Branch node, click the hollow circle that appears on the right side of the Conditional Branch node and drag a connection line to the Single Instance SQL node.
-
-
Configure the task nodes.
-
Select the SQL Assignment for Single Instance node to configure it. For more information, see Configure an SQL Assignment for Single Instance node.
-
Select the target database.
-
In the SQL editor, enter the following SQL statement:
select * from activity_setting limit 1 -
In the Variable Setting section on the right, add three output variables: Quota (Coupon amount), HasPromotion (Indicates whether a promotion is active), and ConsumptionLimit (Consumption threshold).
In the SQL editor on the left, enter
select * from activity_setting limit 1. In the output variable mapping section on the right, map the variables to the query results as follows: Quota to Row 0 and Column 2, HasPromotion to Row 0 and Column 0, and ConsumptionLimit to Row 0 and Column 1.
-
-
Select and configure the Conditional Branch node. For more information, see Configure a Conditional Branch node.
Configure the conditional expression as follows: set Condition Field to HasPromotion, Operator to ==, and Value to 1.
-
Select the Single Instance SQL node to configure it.
Enter the following SQL statement:
INSERT INTO `voucher_send_list`(`user_id`,`consumption_sum`,`quota`)
SELECT * FROM
(SELECT `user_id`, sum(count) AS consumption_sum,${Quota} FROM `consumption_records`
 WHERE `time` > '${bizdate}'  GROUP BY `user_id`) `consumption_records`
where `consumption_sum`>${ConsumptionLimit}
-
-
In the upper-left corner of the canvas, click Try Run to test the task flow.
After the trial run is complete, view the SQL execution results for each node on the execution log tab below the canvas to verify that the task flow ran correctly.
You can also query the
voucher_send_listtable in the SQL Console to verify the results. After the trial run is complete, executeSELECT * FROMin the DMS SQL Console. The results show multiple rows of data with fields such asvoucher_send_listLIMIT 20;Id,user_id,consumption_sum, andquota. The value in thequotacolumn is 30 for all returned records, confirming that the coupon issuance records were written correctly. -
Optional: Configure periodic scheduling.
-
On the task flow editing page, click the Task Flow Information tab at the bottom of the page.
-
In the Scheduling Settings section, turn on the Enable Scheduling switch and configure the schedule. For information about the parameters, see Scheduling cycle configuration.
-
-
Publish the task flow. It will then run automatically according to the configured schedule.
-
In the upper-left corner of the canvas, click Publish.
-
In the Publish dialog box, enter a comment in the Remarks field and click Publish.
-