Best practices for widget development (iOS)
An application widget is a miniature application view that you can embed in other applications, such as the home screen, to receive periodic updates. This document describes how to develop iOS widgets.
Create certificates
In iOS, a widget is a standalone application that functions as an extension of the host app. Therefore, you must create a separate certificate for the widget.
Create a certificate for the host app.
Detailed information about this process is widely available and is not covered in this document.
Create a certificate for the widget.
The process for creating a widget certificate is similar to creating one for the host app. However, note the following points.
The widget's Bundle ID is an extension of the host app's bundle ID. For example, if the host app's bundle ID is
com.companyName.AppName, the widget's bundle ID must be in the formatcom.companyName.AppName.WidgetName.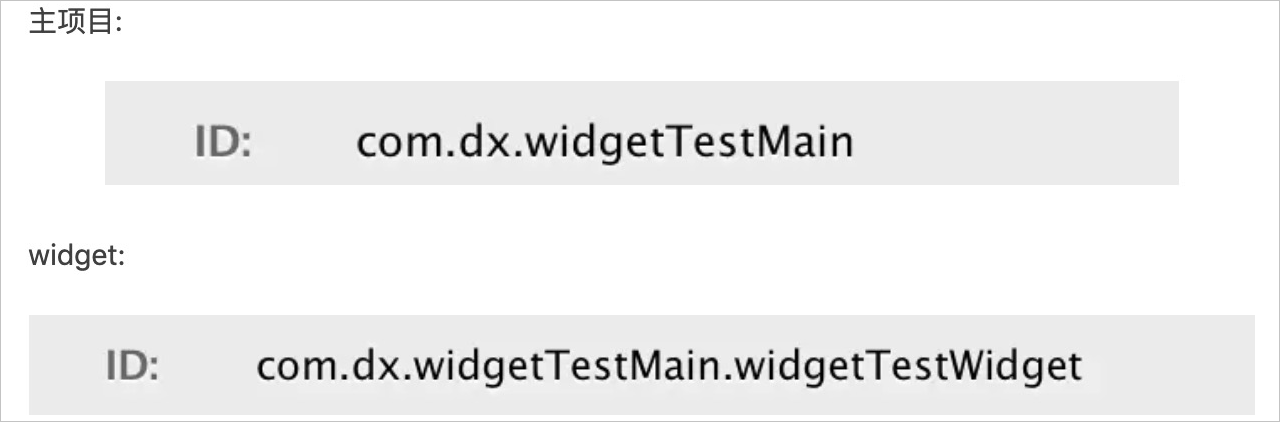
When you create the certificate, select the App Group configuration item.
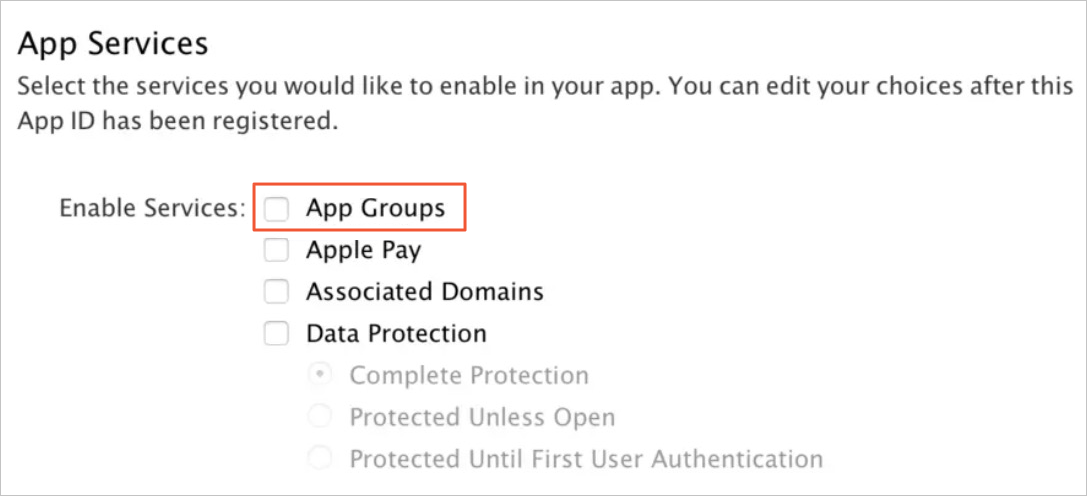
Create a widget
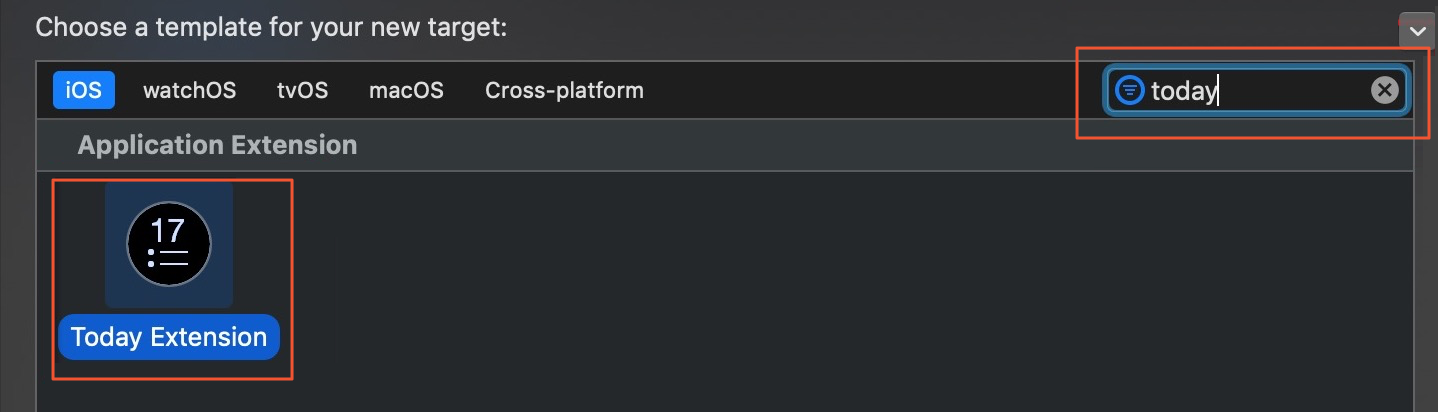
In Xcode, choose to create a Today Extension.
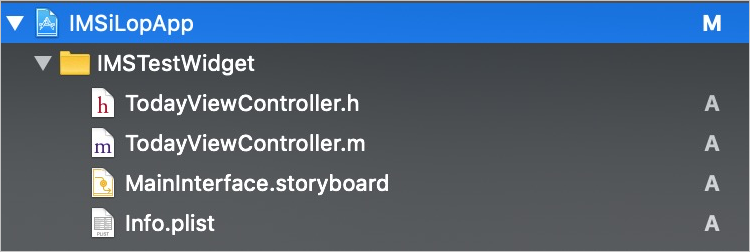
View the directory structure after the widget is created.
Set the development method for the widget project.
By default, the project uses the storyboard development method. To use a code-only approach, perform the following steps.
In , delete the NSExtensionMainStoryboard option and add the NSExtensionPrincipalClass option. Set the value of the option to the class name IMSWidgetTestViewController, as shown in the following figure.
Set the expand and collapse effects for the widget. The following example shows the code.
- (void)viewWillAppear:(BOOL)animated { [super viewWillAppear:animated]; if (/* Check whether to expand or collapse */) { self.extensionContext.widgetLargestAvailableDisplayMode = NCWidgetDisplayModeExpanded; } else { self.extensionContext.widgetLargestAvailableDisplayMode = NCWidgetDisplayModeCompact; } } - (void)widgetActiveDisplayModeDidChange:(NCWidgetDisplayMode)activeDisplayMode withMaximumSize:(CGSize)maxSize { switch (activeDisplayMode) { case NCWidgetDisplayModeCompact: { self.preferredContentSize = maxSize; break; } case NCWidgetDisplayModeExpanded: { self.preferredContentSize = CGSizeMake(self.view.bounds.size.width, 210); break; } default: break; } }NoteSet the expanded height as required. The height must not exceed the system maximum.
The system does not allow you to modify the collapsed height.
Refresh the data using the method that is provided by the system. The following example shows the code.
- (void)widgetPerformUpdateWithCompletionHandler:(void (^)(NCUpdateResult))completionHandler { completionHandler(NCUpdateResultNewData); }NoteThe refresh operation may fail. This is a known issue with Apple. You can resolve this issue by adding a delay. For more information, see reasons for the delay and a temporary solution.
Configure the navigation feature between the widget and the host app.
The extension and the host app are two separate processes that cannot communicate directly. This means that clicking a button in the widget cannot navigate to a specific page in the host app. To enable the widget to launch the host app, you can use the `openURL` method.
In the host app, choose and add a URL Scheme.
The following figure shows an example. Set URL Schemes to TodayWidget.
Configure the navigation URL (openURL). The full URL is a combination of the URL scheme, `://`, and the host app bundle ID, as shown in the following figure.

Set up communication between the widget and the host app
Because widgets are independent applications, the host app and the widget must use an App Group to communicate with each other.
Create an App Group.
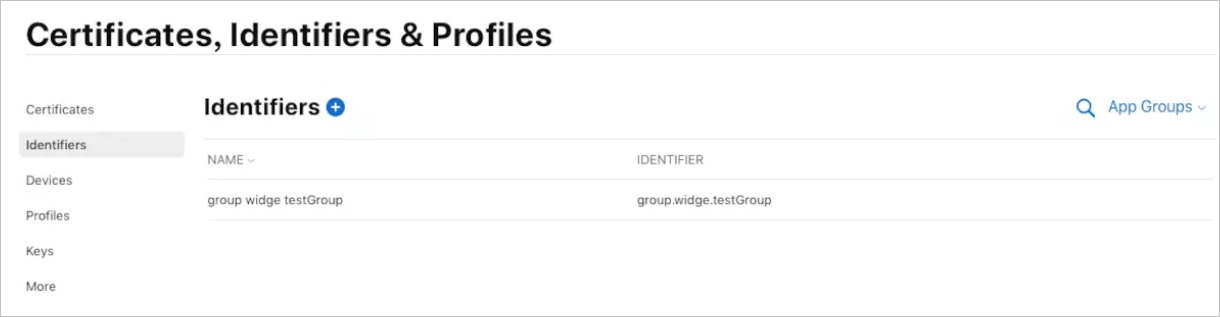
Go to the developer website to register an App Group. Enter a name and an ID, and then follow the on-screen instructions. You will obtain an App Group similar to the one shown in the following figure.

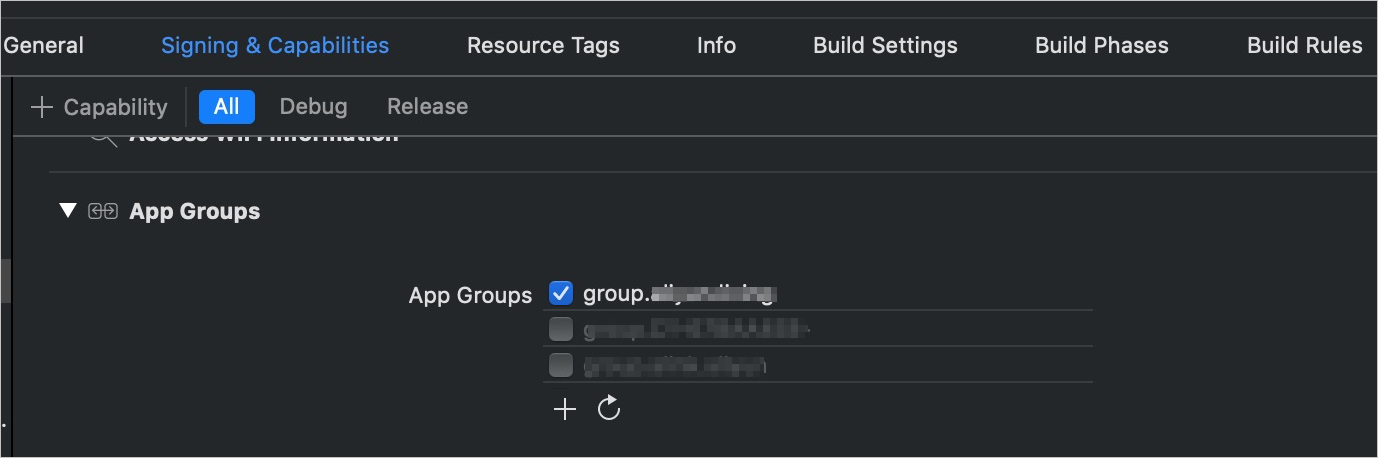
In , configure the App Group.
In the App Group settings for both the host app and the extension (widget), set the group name. Make sure that the group name is the same for the host app and the widget, and that it matches the App Group that you registered on the developer website.
Configure communication between the widget and the host app.
You can use either `NSUserDefaults` or `NSFileManager` to enable communication between the widget and the host app. This section describes how to use `NSUserDefaults`.
Store data
Retrieve data


IoT Platform SDK usage guide
This section describes the development process for a Today Extension. For information about other types of widget development, see the official Apple documentation.
Import the SDK.
Set up the profile.
For iOS, we recommend that you use CocoaPods to import the SDK. You must import the SDK for both the host app target and the widget target. Because a widget is a standalone application, each target requires its own SDK for compilation. If you have multiple widgets, you must configure a profile for each widget. The following example shows how to configure the profiles.
target “WidgetTargetName1” do
    pod 'IMSApiClient', '1.6.0'
    pod 'IMSAuthentication', '1.4.1'
end

target “WidgetTargetName2” do
    pod 'IMSApiClient', '1.6.0'
    pod 'IMSAuthentication', '1.4.1'
end
View the list of required SDKs for widget development.
List of required SDKs for widget development
[1] General request SDKs
    pod 'IMSApiClient', '1.6.0'
    pod 'IMSAuthentication', '1.4.1'
[2] SDKs related to device widgets
    # Thing
    pod 'IMSThingCapability', '1.7.5'
    # Persistent connection
    pod 'IMSMobileChannel', '1.6.7'
Run `pod update` and compile the project.
After the project is compiled, select the widget's target and run the widget project.
NoteBecause the widget is an independent application, you must also import a copy of the security image to the widget's target. Otherwise, an error occurs.
Initialize the host app configuration.
Initialize IMSAuthentication for the host app. The following example shows the code.
// Set the credential to be updated in the App Group
[[IMSCredentialManager sharedManager] addCredentialStoreWithAppGroupName:AppGroupName];
Write the ApiClient information to the corresponding App Group shared area.
// After the host app initializes IMSApiClient, write the ApiClient information to the corresponding App Group shared area
[[IMSConfiguration sharedInstance] storeConfigToAppGroup:AppGroupName];
Configure the Today Extension. The following example shows the configuration code.
+ (void)initialize {
    // Initialize APIClient
        [IMSConfiguration initWithAppGroupName:AppGroupName];
        // Initialize identity authentication
        [IMSCredentialManager initWithAppGroupName:AppGroupName];
    // Register the delegate for RequestClient
    IMSIoTAuthentication *iotAuthDelegate = [[IMSIoTAuthentication alloc] initWithCredentialManager:IMSCredentialManager.sharedManager];
    [IMSRequestClient registerDelegate:iotAuthDelegate forAuthenticationType:IMSAuthenticationTypeIoT];
}

- (void)viewWillAppear:(BOOL)animated {
    [super viewWillAppear:animated];

    // Based on the information stored in the App Group shared area
    // Prevent the extension's APIClient from being initialized if the host app is not open
    [[IMSConfiguration sharedInstance] synchronizeConfigFromAppGroup];
    // Update the credential from UserDefaults
    [[IMSCredentialManager sharedManager] synchronizeCredentialFromAppGroup];
}
Call the API. The following example shows the code.
 IMSIoTRequestBuilder *builder = [[IMSIoTRequestBuilder alloc] initWithPath:@"/uc/path/xxxx"
                                                                    apiVersion:@"1.0.0"
                                                                        params:@{}];
    [builder setScheme:@"https"];
    IMSRequest *request = [[builder setAuthenticationType:IMSAuthenticationTypeIoT] build];
    __weak typeof(self) weakSelf = self;
    [IMSRequestClient asyncSendRequest:request responseHandler:^(NSError * _Nullable error, IMSResponse * _Nullable response) {
          if (response.code == 401) {
                [self loginOut];
            }

            if (error) {
                NSLog(@"request error = %@",error);
            } else {
                NSLog(@"request success");
            }

        }];
    }];
Check the logon status of the host app in real time. The following example shows the code.
- (void)viewWillAppear:(BOOL)animated {
    [super viewWillAppear:animated];

    // Configure the host, environment, language, and security image based on the information stored in the App Group shared area
    // Prevent the extension's APIClient from being initialized if the host app is not open
        [[IMSConfiguration sharedInstance] synchronizeConfigFromAppGroup];

        // Update the credential from UserDefaults
        [[IMSCredentialManager sharedManager] synchronizeCredentialFromAppGroup];

    // Check if the credential exists to determine the logon status
    if ([IMSCredentialManager sharedManager].credential) {
        // Logged on
    } else {
        // Not logged on
    }
}
Configure multilingual display names for the widget.
Use the host app's
[IMSConfiguration sharedInstance].languageto update the language information. The information must be saved to the group again.// Write the ApiClient information to the corresponding App Group shared area [[IMSConfiguration sharedInstance] storeConfigToAppGroup:AppGroupName];Set up multiple languages.
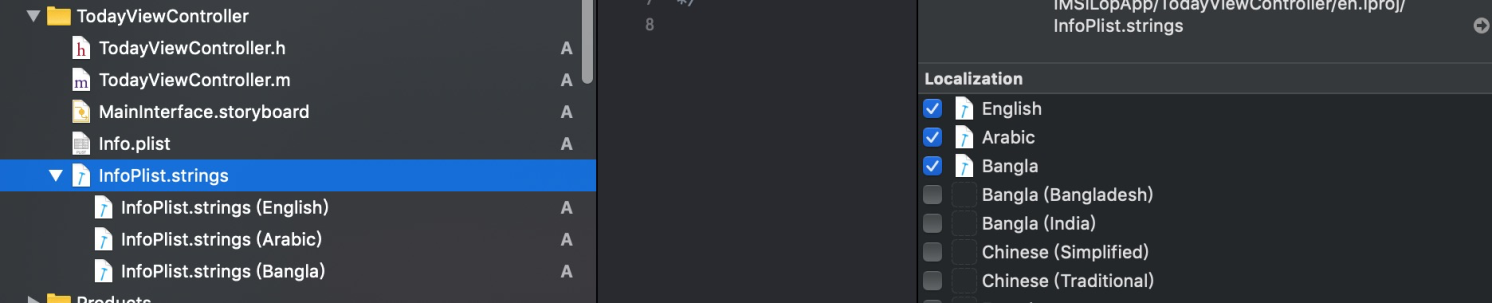
Select the Today Extension's target, choose , and create a new strings file. Name the file `InfoPlist`.
After the file is created, select the `InfoPlist.strings` file, click Localize, and add the required languages.
The UI after you set up multiple languages is shown in the following figure.
Change the widget's display name.
Select a language and modify the widget's display name for that language. The widget's name is controlled by the system language and does not change based on the app's language.

Device widget and scenario widget API documentation and call procedure
The following section provides the API documentation and call examples for developing device and scenario widgets. For more information, see Scenario Service.
APIs related to the host app
Scenario widget
[1] Get the list of scenarios that have been added to the widget
    path: /living/appwidget/list
    version: 1.0.0
    params: @{}
[2] Query all scenarios
    path: /living/scene/query
    version: 1.0.1
    params = @{@"catalogId": @"0",
                             @"pageNo": @(pageNo),
                             @"pageSize": @(pageSize)
                             }
[3] Update the scenario widget
  path: /living/appwidget/create
  version: 1.0.0
  params = @{@"sceneIds": @[]}
Device widget
[1] Get the list of devices that have been added to the widget
    path: /iotx/ilop/queryComponentProduct
    version: 1.0.0
    params: @{}

[2] Get the property list of a device (Currently, multilingual properties must be passed as input parameters)
    path: /iotx/ilop/queryComponentProperty
    version: 1.0.0
    params = @{@"productKey":productKey,
                             @"iotId":iotId,
                             @"query":@{@"dataType":@"BOOL”, @"I18Language":@"zh-CN"}
                             }
[3] Update the widget list
    path: /iotx/ilop/updateComponentProduct
    version: 1.0.0
    params: The updated device list
APIs related to the Today Extension
Scenario widget
[1] Get the list of scenarios that have been added to the widget
    path: /living/appwidget/list
    version: 1.0.0
    params: @{}
[2] Execute a scenario
    path: /scene/fire
    version:1.0.1
    params: @{@"sceneId":sceneId}
Device widget
[1] Get the list of devices that have been added to the widget
    path: /iotx/ilop/queryComponentProduct
    version: 1.0.0
    params: @{}
[2] The device widget has logic for local and cloud communication. It requires integrating the persistent connection attachment and subscription from the host app and listening for a normal persistent connection.
[3] For device status changes, locate the /thing/properties and /thing/status topics, listen for status changes, and refresh the UI.
[4] Select a device, specify ThingShell to set device properties, and change properties through the thing model.
[5] If you have subscribed to the topic, you will also receive a cloud status change notification after step [4] is successful.
Core reference code for the device widget
[1] Persistent connection attachment & subscription (For related SDKs, see the persistent connection channel SDK)
  IMSConfiguration * imsconfig = [IMSConfiguration sharedInstance];
  LKAEConnectConfig * config = [LKAEConnectConfig new];
  config.appKey = imsconfig.appKey;
  config.authCode = imsconfig.authCode;
  // Specify the persistent connection server address. (If left empty, the SDK uses the default address and port. The default is the China (Hangzhou) region. Do not include "protocol://". If set to empty, the underlying channel uses the default address.)
  config.server = @""
// Enable the dynamic host selection feature. (Default is NO. Set to YES for environments outside China. This feature requires that config.server is not specified.)
  config.autoSelectChannelHost = NO;
  [[LKAppExpress sharedInstance]startConnect:config connectListener:self];// self needs to implement the LKAppExpConnectListener interface
}
[2] Register the downstream listener

#pragma mark - Register Downstream Listener
static NSString *const IMSiLopExtensionDidReceiveUpdateAttributeSuccess = @"LAMPPANEL_DIDRECEIVE_UPDATE_ATTRIBUTE_SUCCESS";
static NSString *const IMSiLopExtensionDidReceiveUpdateDeviceStateSuccess = @"LAMPPANEL_DIDRECEIVE_UPDATE_DEVICE_STATE_SUCCESS";
@class TodayViewController;
@interface IMSWidgetDeviceListener : NSObject <LKAppExpDownListener>
@end
@implementation IMSWidgetDeviceListener

- (void)onDownstream:(NSString * _Nonnull)topic data:(id  _Nullable)data {
    IMSAppExtensionLogVerbose(@"Widget onDownstream topic : %@", topic);
    IMSAppExtensionLogVerbose(@"Widget onDownstream data : %@", data);
    NSDictionary * replyDict = nil;
    if ([data isKindOfClass:[NSString class]]) {
        NSData * replyData = [data dataUsingEncoding:NSUTF8StringEncoding];
        replyDict = [NSJSONSerialization JSONObjectWithData:replyData options:NSJSONReadingMutableLeaves error:nil];
    } else if ([data isKindOfClass:[NSDictionary class]]) {
        replyDict = data;
        // Add cloud processing here!
        if (data) {
            if ([topic isEqualToString:@"/thing/properties"]) {
                [[NSNotificationCenter defaultCenter] postNotificationName:IMSiLopExtensionDidReceiveUpdateAttributeSuccess object:self userInfo:data];
            }

            if ([topic isEqualToString:@"/thing/status"]) {
                [[NSNotificationCenter defaultCenter] postNotificationName:IMSiLopExtensionDidReceiveUpdateDeviceStateSuccess object:self userInfo:data];
            }

        }
    }
    if (replyDict == nil) {
        return;
    }
}

- (BOOL)shouldHandle:(NSString * _Nonnull)topic {
    // Return the topics that need to be handled
    if ([topic isEqualToString:@"/thing/properties"] || [topic isEqualToString:@"/thing/status"]) {
        return YES;
    }
    return NO;
}
@end

[3] Add a delegate listener and add properties
@interface IMSWidgetDeviceController () < LKAppExpConnectListener>

// Local control
@property (nonatomic, strong) IMSWidgetDeviceListener *imsWidgetDeviceListener;


[4] Add a listener in viewDidLoad
- (void)viewDidLoad {
    [super viewDidLoad];
    // Do any additional setup after loading the view from its nib.

    // Listen for cloud device property changes
    [[NSNotificationCenter defaultCenter] addObserver:self selector:@selector(dididReceiveUpdateAttributeNoti:) name:IMSiLopExtensionDidReceiveUpdateAttributeSuccess object:nil];
    // Listen for cloud device status changes
    [[NSNotificationCenter defaultCenter] addObserver:self selector:@selector(dididReceiveUpdateDeviceStateNoti:) name:IMSiLopExtensionDidReceiveUpdateDeviceStateSuccess object:nil];
}

[5] Handle downstream notifications
// Downstream cloud property data
- (void)dididReceiveUpdateAttributeNoti:(NSNotification *)info {
}

// Downstream cloud status data
- (void)dididReceiveUpdateDeviceStateNoti:(NSNotification *)info {
}


[6] Method to change properties
IMSThing *thingShell = [kIMSThingManager buildThing:iotId];
[[thingShell getThingActions] setProperties:@{propertyIdentifierName:value}
                                 responseHandler:^(IMSThingActionsResponse * _Nullable response) {
                                   if (response.success) {
                                         // Success
                                     } else {
                                        // Failed
                                     }
}];

[7] Release resources
- (void)viewWillDisappear:(BOOL)animated {
    [super viewWillDisappear:animated];
    // Remove persistent connection-related components
    [[LKAppExpress sharedInstance] removeConnectListener:self];
    [[LKAppExpress sharedInstance] removeDownStreamListener:self.imsWidgetDeviceListener];
}

- (void)dealloc {
    [kIMSThingManager destroyThing:self.thingShell];
    [[NSNotificationCenter defaultCenter] removeObserver:self];
}