Access on-premises resources from the cloud using PrivateZone and VPN Gateway
Background
A self-managed data center and an Alibaba Cloud virtual private cloud (VPC) are two separate network environments. However, services deployed in both the on-premises data center and the Alibaba Cloud VPC need to use Domain Name System (DNS) resolution to access each other. Managing two separate sets of DNS records not only creates repetitive work for O&M engineers but also creates a risk of data inconsistency. This can introduce significant uncertainty into business operations. Therefore, you need to share DNS records between the on-premises data center and the Alibaba Cloud VPC to enable real-time communication between services. This topic explains how to use PrivateZone to access on-premises DNS records.
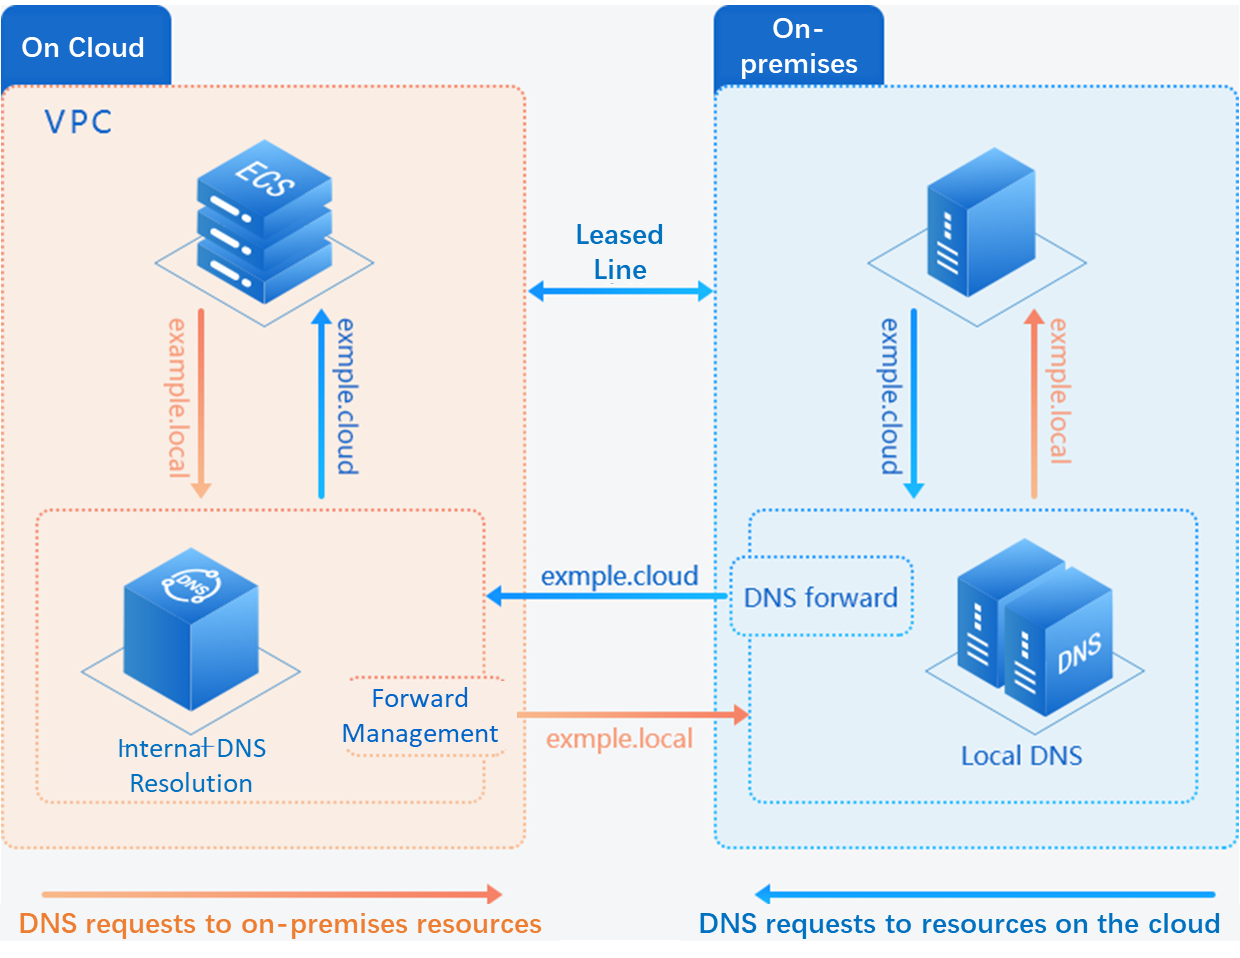
Solutions
You can use three solutions to access on-premises resources from the cloud. This topic describes the procedure and validation method for Solution 1, which uses a Resolver to access on-premises resources from the cloud.
(1) Use a Resolver to access on-premises resources from the cloud
1. Connect the VPC to the on-premises data center using methods such as Smart Access Gateway (SAG), a leased line, or a VPN. This example uses an IPsec-VPN tunnel.
(2) Modify the LocalDns of cloud servers to access on-premises resources from the cloud
1. Connect the VPC to the on-premises data center using methods such as SAG, a leased line, or a VPN. This example uses an IPsec-VPN tunnel.
2. Modify the LocalDns of the cloud servers so that clients can send DNS queries directly to the on-premises self-managed DNS server.
[centos]# vim /etc/resolv.conf
# Modify the nameserver below with the actual IP address of your on-premises DNS.
nameserver 2.2.XX.XX
nameserver 3.3.XX.XX
(3) Use a Secondary DNS to access on-premises resources from the cloud
1. Connect the VPC to the on-premises data center using methods such as SAG, a leased line, or a VPN. This example uses an IPsec-VPN tunnel.
2. Use a Secondary DNS to synchronize DNS records from the on-premises DNS to the cloud for resolution.
You must use BIND for your self-managed DNS. Secondary DNS does not fully support Windows DNS Server.
Use a Resolver to access on-premises resources from the cloud
What is a Resolver?
A Resolver forwards DNS queries from an Alibaba Cloud VPC to an external DNS system. This is achieved by creating domain forwarding rules and DNS outbound endpoints. This enables services to communicate in hybrid cloud environments.
Prerequisites
1. You have used an Alibaba Cloud server to simulate an on-premises data center and used BIND to set up an on-premises DNS server.
2. You have enabled the VPN Gateway service for the Alibaba Cloud VPC.
3. You have enabled the Cloud DNS PrivateZone service.
References:
Procedure

Step 1: Create a VPN Gateway
You can create a VPN Gateway as follows.
Log on to the VPC console.
In the navigation pane on the left, choose VPN > VPN Gateway.
On the VPN Gateway page, click Create VPN Gateway.
On the purchase page, configure the VPN Gateway based on the following information, and then click Buy Now to complete the payment.
Return to the VPN Gateway page to view the VPN gateway that you created. The public IP address of the VPN gateway in this example is x.x.x.217.
The status of a newly created VPN Gateway is Preparing. The status changes to Normal in about two minutes. The Normal status indicates that the VPN Gateway is initialized and ready to use.
Step 2: Create a customer gateway
To create a customer gateway, perform the following steps.
In the navigation pane on the left, choose VPN > Customer Gateway.
Select the region of the customer gateway.
On the Customer Gateway page, click Create Customer Gateway.
On the Create Customer Gateway page, configure the customer gateway based on the following information, and then click OK.
Name: Enter a name for the customer gateway.
IP Address: Enter the public IP address of the on-premises gateway device in the data center that you want to connect to the VPC. In this example, the IP address of the simulated on-premises data center is x.x.x.44.
Description: Enter a description for the customer gateway.
Step 3: Create an IPsec-VPN connection
You can create an IPsec-VPN connection as follows.
In the navigation pane on the left, choose VPN > IPsec-VPN Connection.
Select the region where you want to create the IPsec-VPN connection.
On the IPsec-VPN Connection page, click Create IPsec-VPN Connection.
On the Create IPsec-VPN Connection page, configure the IPsec-VPN connection based on the following information, and then click OK.
Name: Enter a name for the IPsec-VPN connection.
VPN Gateway: Select the VPN Gateway that you created.
Customer Gateway: Select the customer gateway to connect.
Local CIDR Block: Enter the CIDR block of the VPC where the selected VPN Gateway resides. In this example, the CIDR block is 172.25.0.0/16.
Remote CIDR Block: Enter the CIDR block of the on-premises data center. In this example, the CIDR block is 172.28.0.0/16.
Effective Immediately: Select whether the connection takes effect immediately.
Yes: Negotiation starts immediately after the configuration is complete.
No: Negotiation starts when traffic is detected.
Pre-Shared Key: Enter the shared key. This key must be the same as the pre-shared key of the on-premises gateway device. Use the default configurations for other options.
Advanced Configuration:
IKE Configurations:
Encryption Algorithm: Select an algorithm as needed. This example uses 3des.
Authentication Algorithm: Select an algorithm as needed. This example uses md5.
IPsec Configurations:
Encryption Algorithm: Select an algorithm as needed. This example uses 3des.
Authentication Algorithm: Select an algorithm as needed. This example uses md5.
DH Group: Select a group as needed. This example uses disabled.
Step 4: Load the VPN configuration on the on-premises gateway device
To load the VPN configuration on the on-premises gateway device, perform the following operations.
In the navigation pane on the left, choose VPN > IPsec-VPN Connection.
Select the region of the IPsec-VPN connection.
On the IPsec-VPN Connection page, find the target IPsec-VPN connection and click Download Peer Configuration in the Actions column.
Add the downloaded configuration to your on-premises gateway device. For more information, see
This example uses strongSwan to build an IPsec-VPN service. The deployment procedure is as follows:
Install strongSwan: `yum install strongswan -y`.
Configure strongSwan. The following configuration is for reference only.
1. [centos ~]# vim /etc/strongswan/ipsec.conf
# ipsec.conf - strongSwan IPsec configuration file
# basic configuration

config setup
    # strictcrlpolicy=yes
    uniqueids = never

conn %default
        ikelifetime=1440m
        keylife=60m
        rekeymargin=3m
        keyingtries=0
        keyexchange=ikev1   #IKE version
        authby=psk

conn toMyIdc
      left=%defaultroute
      leftid=x.x.x.44    #Public IP address of the on-premises data center gateway
      leftsubnet=172.28.0.0/16    #Private network address of the on-premises data center. To ensure connectivity for the entire VPC CIDR block, add the full VPC address.
      right=x.x.x.152      #Public IP address of the Alibaba Cloud VPN Gateway
      rightid=x.x.x.152    #Public IP address of the Alibaba Cloud VPN Gateway
      rightsubnet=172.17.0.0/16     #Private network address of the VPC associated with the Alibaba Cloud VPN Gateway
      auto=start   #Immediately establish an IPsec security connection when the process starts
      type=tunnel
      ike=3des-md5-modp1024
      esp=3des-md5
b. Run the following command to open the ipsec.secrets configuration file. The following configuration is for reference only.
[centos ~]# vi /etc/strongswan/ipsec.secrets
# ipsec.secrets - strongSwan IPsec secrets file
x.x.x.44 x.x.x.152 : PSK 1234567
c. /etc/sysctl.conf system configuration. The following configuration is for reference only.
[centos ~]# vim /etc/sysctl.conf

#Configure forwarding, which is 0 by default
net.ipv4.ip_forward = 1
#Disable redirection to prevent malicious users from using IP redirection to modify route tables on remote hosts
net.ipv4.conf.all.accept_redirects = 0
net.ipv4.conf.all.send_redirects = 0

#Apply the configuration
[centos ~]# sysctl -p
c. Start the Strongswan service.
[centos ~]# systemctl start strongswan.service
e. Add a route. In this example, the route is added in the UI.
On the IDC core gateway, add a route to the peer network 172.17.0.0/16 and set the next hop to the strongSwan server at 172.28.0.7.
Step 5: Configure VPN Gateway routes
You can configure VPN Gateway routes as follows.
In the navigation pane on the left, choose VPN > VPN Gateway.
Select the region of the VPN Gateway.
On the VPN Gateway page, find the target VPN Gateway and click its instance ID in the Instance ID/Name column.
On the Destination-based Route tab, click Create Route.
On the Create Route page, configure the destination-based route based on the following information, and then click OK.
Destination CIDR Block: Enter the private CIDR block of the on-premises data center. In this example, the CIDR block is 172.28.0.0/16.
Next Hop: Select the IPsec-VPN connection instance.
Publish to VPC: Select whether to publish the new route to the VPC route table. In this example, select Yes.
Weight: Select a weight. In this example, select 100.
Step 6: Test network connectivity
Log on to an ECS instance that does not have a public IP address in the Alibaba Cloud VPC. Run the ping command to ping the private IP address of a server in the on-premises data center to verify connectivity.
Step 7: Build an on-premises DNS
1. Install BIND: `[centos ~]# yum install -y *bind`.
2. Configure named.conf: `[centos ~]# vim /etc/named.conf`. The following configuration is for reference only.
zone "alidns-example.com" IN {
        type master;
        file "alidns-example.com.zone";
        allow-update {127.0.0.1; };
};
3. Configure alidns-example.com.zone: `[centos ~]# vim /var/named/alidns-example.com.zone`. The following configuration is for reference only.
$TTL 3600
@       IN SOA  172.28.0.7. admin.alidns-example.com. (
                                        8       ; serial
                                        1D      ; refresh
                                        1H      ; retry
                                        1W      ; expire
                                        3H )    ; minimum
@       IN      NS      172.28.0.7.
@       IN      A       15.15.15.15
4. Start BIND: `[centos ~]# systemctl start named.service`.
Step 8: Configure the Resolver
For more information about the configuration, see:
1. Create an outbound endpoint
You can configure an outbound endpoint as follows.
1. Log on to the Cloud DNS console and choose PrivateZone > Resolver > Outbound Endpoint. Then, click Create Outbound Endpoint.
2. On the Create Outbound Endpoint page, configure the parameters based on the following information and click OK.
Endpoint Name: Enter a name for the endpoint. This example uses Test.
Outbound VPC: All outbound DNS queries from the Resolver are forwarded through this VPC. This example uses a VPC in the Beijing region.
Select Security Group: The rules in the security group are applied to the outbound endpoint. In this example, the security group rules allow inbound and outbound traffic on TCP and UDP port 53.
NoteOnly non-managed security groups are supported. For more information about managed security groups, see Managed security groups.
Source IP Address for Outbound Traffic: Select and enter an IP address from a vSwitch in the selected zone. The IP address must not be in use by another resource, such as an ECS instance.
2. Create a forwarding rule
1. Switch to the Forwarding Rule page, configure the forwarding rule based on the following information, and then click OK.
Rule Name: Enter a name for the rule. This example uses Test.
Rule Type: Currently, you can only select Forward to External DNS System.
Forwarding Zone: Enter the name of the zone for which you want to forward queries. This example uses alidns-example.com.
Outbound Endpoint: Select the outbound endpoint that you created. This example uses the outbound endpoint Test created in the previous step.
IP Address and Port of External DNS System: The IP address and port number of the self-managed DNS server in the on-premises data center. This example uses 172.28.0.7:53.
ImportantIf the self-managed DNS server that you specify uses a public IP address and the ECS instances in the outbound endpoint VPC do not have public IP addresses, you must activate
NAT Gateway and configure the SNAT feature.
3. Associate a VPC
1. Select the forwarding rule that you want to associate with a VPC and click Associate VPC. The associated VPC and the outbound endpoint must be in the same region. You can also associate a VPC that belongs to another account .
Step 9: Parsing test
1. Log on to any ECS instance in the associated VPC and run the following command to perform a test:
[centos ~]# dig alidns-example.com