Customer Management
This feature is available only to existing paid customers and is no longer sold to new customers.
The Customer Management page lets you view key customer information. You can search for customers and apply advanced filters. You can also perform operations, such as adding, editing, exporting, importing, tagging, and merging customers.
Customer list
Click Customer in the top navigation bar. In the navigation pane on the left, select Customer Management to view the list of all customers. The following figure shows an example.
Search and filter customers
You can search and filter customers in two ways: Search and Advanced filter.
Search: The default view on the customer list page is Search. You can enter a customer ID, name, mobile phone number, ID, or email in the search box. Click the Search button to find matching customers. The following figure shows an example.
NoteThe search for customer ID, name, mobile phone number, ID, and email requires an exact match. Only customers that exactly match the search term are returned. For example, if a customer ID is "abc123", searching for "abc" or "123" does not return any results. You must enter the full ID "abc123" to find the customer.
Advanced filter: You can use complex conditions to filter customers. The advanced filter lets you use multiple conditions and groups of conditions, such as Creation time, Source channel, Platform identity, Tag, Customer status, Gender, Location, and Birthday. The following figure shows an example.
Creation time: The default time range is Last 7 days. You can click the time control to select a different date range. For example, to search for customers created in the last 30 days, click the time control, select 'Last 30 days' in the time range selector, and then click the Filter button. The list displays customers created within the last 30 days.
Source channel: This is the channel from which the customer was acquired. You can select multiple source channels. To do this, click the desired channel names and then click the Filter button. The filter conditions collapse, and the list displays customers who match the selected channels.
Platform identity: This is the customer's identity on a specific platform. You can select multiple platform identities. To do this, click the desired platform identities and then click the Filter button. The filter conditions collapse, and the list displays customers who match the selected platform identities.
Tag: You can filter customers based on their tags, which are displayed in groups. Click Expand filter conditions, select the tags you want, such as A1 and A2, and then click the Filter button. The filter conditions collapse, and the list displays customers who have the "A1" tag, the "A2" tag, or both.
Customer status: Statuses include Normal user, Suspicious user, and Blacklisted user. You can select all three statuses at the same time to display all customers.
Gender: You can filter customers based on their gender property. Options include Male, Female, and Unknown.
Location: You can filter customers based on their location, which includes Country, Province, and City.
Birthday: You can filter customers based on their birthday property.
ImportantYou can select multiple conditions to create a combined filter. The conditions are joined by an "AND" relationship. You can click the Clear filters button to clear all selected conditions and display all customers in the list.
Customer portrait
Basic customer information: On the Customer Management page, click a customer ID to open the customer details page. You can view the customer's basic information. The following figure shows an example.
Customer tag and group information: You can directly change the Static group and Tag information on the customer details page. Click the small × icon on a tag to remove the customer from a group or remove a tag. The following figure shows an example.
Customer attribute display: The Customer attribute fields are based on the customer attribute settings. The information for the attributes that you configured in the customer settings is displayed here. By default, the system displays the Customer ID, Source channel, Creation time, and Source fields at the bottom of all customer attribute fields. The following figure shows an example.
Customer platform identity information: This section displays the customer's identity on various third-party platforms. These platforms include WeChat (Official Accounts, Mini Programs), Taobao (from Tmall orders), Alipay (from Tmall orders), Youzan, and Wangdian Tong. A connection to JD.com is not yet available. The following figure shows an example.
Customer value score: The system calculates the customer value score based on different scoring rules for each customer attribute field. The following figure shows an example.

Contact duration: The time interval from when the customer was created to the present.
Customer stage: The customer stage is triggered by customer behavior events. When a customer triggers a specific behavior event, they are moved to the corresponding stage.
Customer value score: The sum of the profile score and the total popularity score.
Profile score: The system uses different scoring rules for each customer attribute field. The profile score is determined by the information integrity of each attribute in the customer details and the corresponding scoring rules.
Total popularity: You can set appropriate scores for different behavior events based on your business needs. After you set the scores, when a customer triggers a corresponding event, their popularity score increases by that amount.
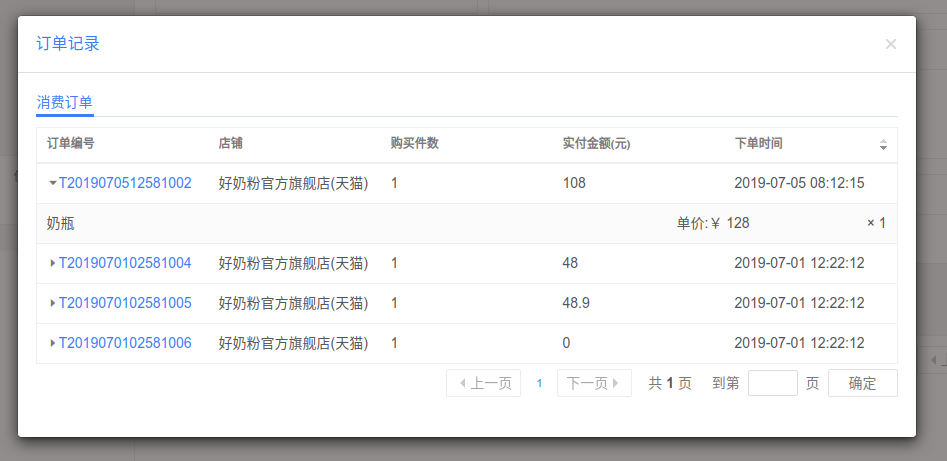
Customer transaction information: This section displays the customer's order data from third-party E-commerce platforms. The following figure shows an example.

Click the View Order Records button to view transaction order records. The following figure shows an example.
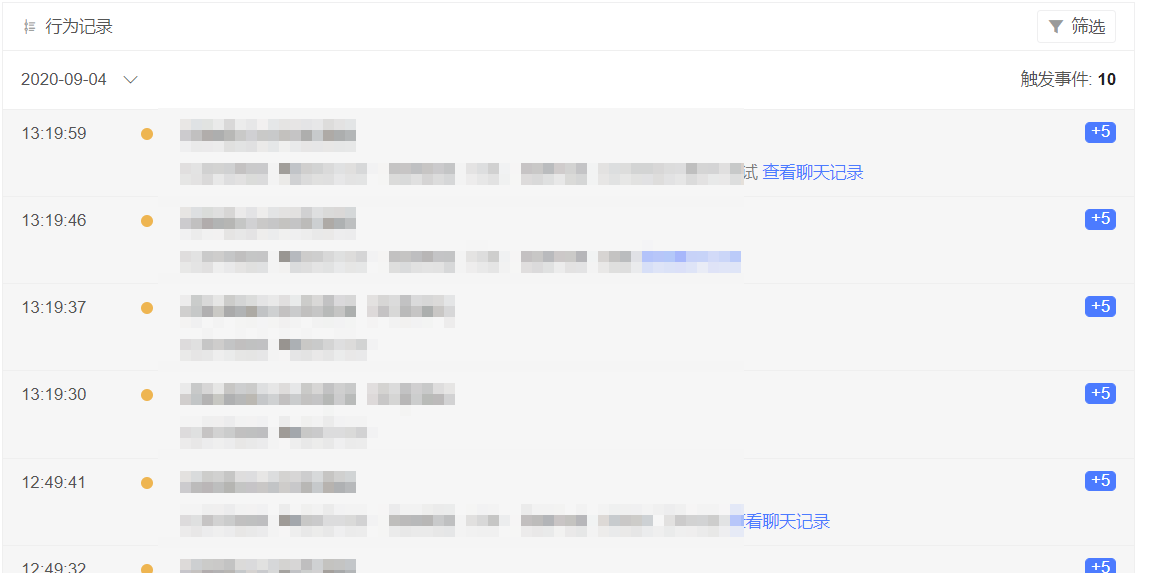
Customer behavior records: This section records the customer's behavior events in reverse chronological order. The following figure shows an example.
Click the Filter button in the behavior records section. The filter window opens. The following figure shows an example.
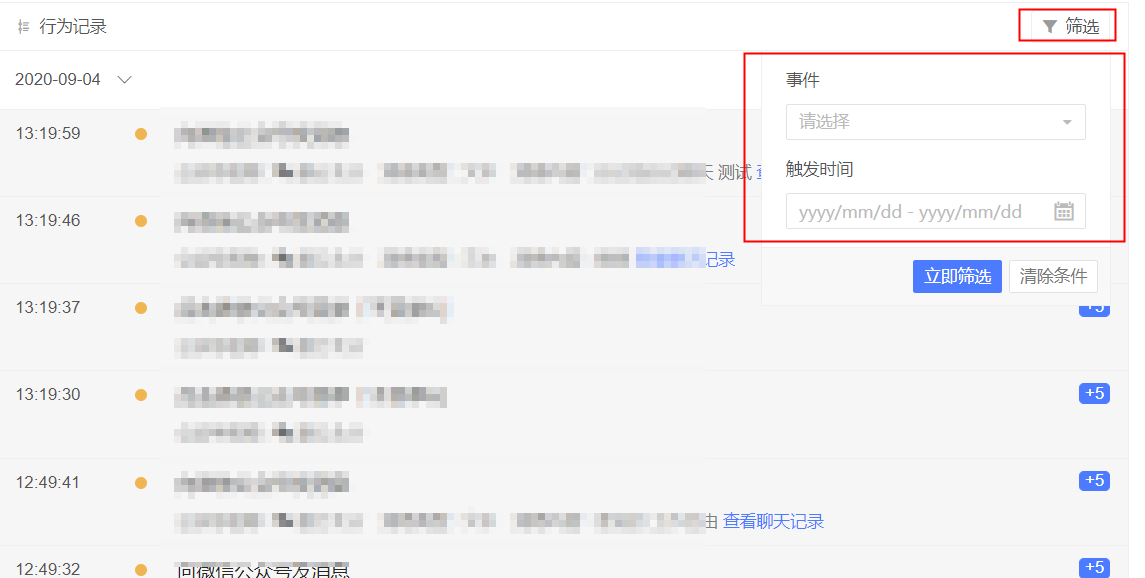
Select a triggering event, specify a trigger time, and click the Filter button to view records for that event within the specified time period. For example, if you select 'Send message to WeChat Official Account' as the event and choose a time range, clicking the Filter button displays all records of messages sent to the Official Account within that time. The following figure shows an example.
Operations
After you understand the customer's basic information and how to query and filter customers, you can perform a series of operations on them.
Edit customer information:
On the Customer Management page, click the Edit icon for a customer in the Operations column to open the edit customer page. The following figure shows an example.
You can upload a new profile picture and modify the customer's name, mobile phone number, gender, birthday, email, and address. Click the OK button to save your changes.
NoteYou can also go to the customer details page and click the Edit button in the upper-right corner to edit the customer's information. The following figure shows an example.
Manually create a new customer: On the Customer Management page, you can Import customers and Add customers.
Add a customer
On the Customer Management page, click the Add Customer button to open the add customer page. You must upload a profile picture and enter the customer's name, mobile phone number, gender, birthday, email, and address. The following figure shows an example.
Click Show more attributes to display all additional attributes. Click Collapse to hide them again.
After you enter all the information, click the Save button to add the customer.
Import external customers:
Import customers:
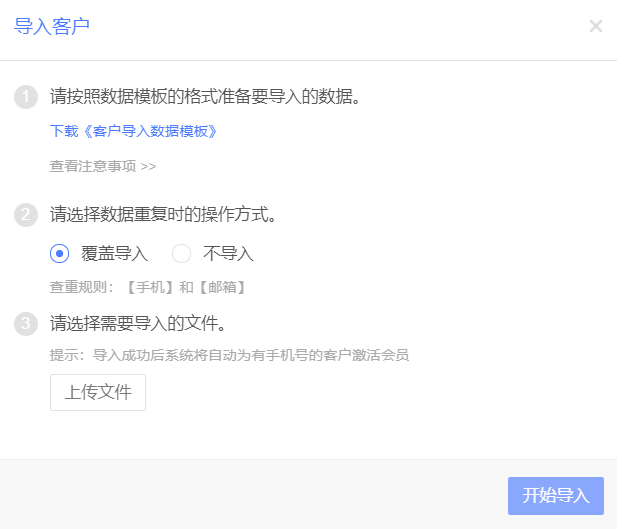
The customer import feature lets you import a file of customer data directly into the Social Interaction module. This is useful for importing customers in batches.
You can import customers to add new ones or update information for existing ones, which makes customer management faster. The system uses the mobile phone number as the unique identifier for each customer.
Add new customers: If a mobile phone number in the import file does not exist in the system, a new customer record is created.
Update customer information: If a mobile phone number in the import file already exists in the system, the existing customer's information is replaced with the newly imported data.
Import file rules: Three file formats are supported for import: CSV, XLS, and XLSX. The file encoding for CSV files must be UTF-8. The file encoding for XLS and XLSX files must be ANSI.
Import file fields: You can import default customer attributes, custom customer attributes, and customer tags. The default customer attributes include name, mobile phone number, gender, birthday, and email. Custom customer attributes include five types: single-line text, multi-line text, date, single-choice, and multiple-choice.
When the import file contains default attributes, use the attribute name as the import field. For example: Name, Gender, Birthday, Mobile, Email.
When the import file contains custom attributes, use the attribute ID as the import field.
When the import file contains a mobile phone attribute, the data format must be "T:XXXX" or "T: XXXX".
When the import file contains a date attribute, the data format must be "MM/DD/YYYY".
When the import file contains a multiple-choice attribute, use commas to separate the options in the data.
When the import file contains a single-choice attribute and the data is empty, the attribute value is set to the default value from the attribute settings after import.
ImportantThe default value for gender in the system is Male.
When the import file contains tags, the new tags are added to the customer after import. The customer's original tags are not affected. You can import only one tag for a customer at a time.
Import customers: On the Customer Management page, click Import Customers. The import customers window opens. The page displays notes about the import process and how to handle duplicate data. Select the import file and click Start Import to begin. The following figure shows an example.

Tag customers: Tagging customers helps you classify them for better management. You can tag one customer or multiple customers at the same time.
On the Customer Management page, select one or more customers by checking the boxes next to their IDs.
Click the Customer Classification button and select Tag. The following figure shows an example.
In the Edit Tags dialog box, select the checkboxes for the tags you want to apply and click OK. The tags are then applied to the selected customers. The following figure shows an example.
Merge customers:
On the Customer Management page, select at least two customers. Click More > Merge Customers. The merge customers window opens. The following figure shows an example.
By default, the first record is the main record. You can click the Set as main record button in the Operations column to change the main record.
Click OK. The merge customers window closes.
In the system prompt, click View customer details to open the customer details page. The customer attributes are merged.
NoteThe points are the sum of the points from each customer record. The tags are a combination of the tags from each customer record.
Export customer data:
On the Customer Management page, you can click the Export button in the upper-right corner of the customer list to export customer data. The following figure shows an example.
Select the checkboxes for the customers you want to export. If you do not select any checkboxes, all customers are exported by default. Click the Export button. The system begins to prepare the data. The following figure shows an example.
After the data is ready, click the Download button to download the data to your local computer as a CSV file.
ImportantIf you navigate to another page or refresh the page, the download status box remains in the lower-right corner until the download is complete. After the file is prepared, it is saved for one hour. If you do not download the file within one hour, the system automatically purges the file and closes the notification in the lower-right corner.